FHB Logo Facebook LinkedIn Email Pinterest Twitter X Instagram Tiktok YouTube Plus Icon Close Icon Navigation Search Icon Navigation Search Icon Arrow Down Icon Video Guide Icon Article Guide Icon Modal Close Icon Guide Search Icon Skip to content
Subscribe
Log In
  • How-To
  • Design
  • Tools & Materials
  • Restoration
  • Videos
  • Blogs
  • Forum
  • Magazine
  • Members
  • FHB House
  • Podcast
Log In

Discussion Forum

Discussion Forum

Custom Tile Shower REDO!!!

km2dodge | Posted in General Discussion on October 9, 2013 10:01am

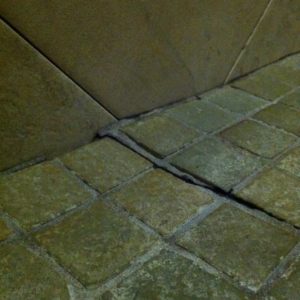
In 2008 I remodeled my master bath with a custom tile shower.  The floor of the shower is starting to show problems.  Of which I feel are water retention related. 

The Master in on the main level which is over a basement.  Therefore the base flooring is of the master bath is of course a wood subfloor.

During the installation of the shower by the contractor I noticed they were putting the rubber underlayment of the shower pan directly on the wood sub-floor.  When I inquired to the slope of the floor they stated this and that and many reasons not to have to have a pre-slope so I let them continue.  I believe my issue now are a result of not having a preslope.  Whether its related or not to the methods used during the construction I can’t say for sure but the entire base of the shower needs to be replaced.

My plan is to attempt to remove the bottom 18″ or so of tile on the walls and to remove the entrie floor, pan, drain and such.  Then replace with a poured preslope, new liner, new drain, top level and new tile.

Among many issue to consider one I am trying to figure out before I tear into the shower is the wall.  I anticipate I will have to remove and replace the 12-18″ of hardi-board on the walls so I will be able to replace the shower floor membrane pan and such.  When I replace the hardi-board on the walls I will have a seam.  This seam is what is puzzling me.  Should I attempt to remove tile above where I will actually cut the hardibacker?  This will allow me to reapply a membrane product in an attempt to seal the seam of the new and old hardibackers.  Or is there a better method..(hopefully asside from re-doing the entire walls!)


Advice??  Thoughts??


MB
Reply
  • X
  • facebook
  • linkedin
  • pinterest
  • email
  • add to favorites Log in or Sign up to save your favorite articles

Replies

  1. user-1116010 | Oct 09, 2013 07:01pm | #1

    pre pitch

    We have made a nice living redoing poorly installed custom shower bases. We use a strip of plywood ( 1/2 or 3/8'' ) around the perimeter of the sump area, and then fan shingles around the  drain as needed before screwing 1/2" plywood inplace to create a pre - pitch under the shower pan liner.

          Preparing the walls correctly can take some time, and, as you have indicated, it is always better to have the wall tile cover the durarock seam by at least an inch or two. We use thin set and mesh tape to seal the durarock joints...........

  2. User avater
    Mongo | Oct 09, 2013 07:18pm | #2

    This will be somewhat long...

    First, as you mentioned, the membrane itself should have been sloped. That is required by code. So there should have been a sloped mud bed over the subfloor, then your membrane is placed over the sloped mud bed, then you lay another layer of mud, then you tile on that second layer of mud.

    Harry Dunbar has an excellent photo tutorial on his website here:

    http://www.ontariotile.com/how-to-build-a-showerpan.html

    As far as replacing your membrane? You can indeed demo the floor, strip off the bottom 12-18" of wall tile, pull the cement board covering the wall, then reinstall as needed. For a shower like yours with a CPE or CPVC membrane, there is usually a drainage plane along the lines of 6-mil poly or tar paper behind the cement board. Try not to trash that when you remove the tile and backer board on the bottom part of the wall.

    What you don't want is for the "new seam" in the cement board to fall right under a grout seam in the tiled wall. So going backwards a bit:

    Your membrane probably runs about 8" up the walls, behind the cement backer board. When you install the new cement board, you can't drive any fasteners through the membrane. So to properly fasten the cement board, you'll need to strip the existing cement board up higher, about 16" to 18".  You want that cement board cut line to fall behind a tile, not right on a grout line. So when you retile, the tile that covers the cement board seam will be half on the old cement board and half on the new cement board. Doesn't have to be exactly half, but it helps to have a course of tile bridge that seam.

    When you install the new cement board? The upper part of the new cement board will be held by fasteners; screws or nails. The lower part (roughly 8") that's covering the membrane can't have any fasteners, so the bottom edge of it will be locked in place by the preslope deck mud.

    Hope that makes sense. It's not mandatory you do it that way. Just a few ideas.

    Don't try to reuse the existing membrane. It'll get wrecked when you demo it out. Doing this repair is a lor of work. The last thing you want it a pinhole leak after going through all that effort.

    And a word of caution: You mentioned a new "poured preslope". Preslopes are made from barely moist deck mud and "packed" into place. They are not made from wet concrete and "poured" into place. Again see the Harry Dunbar tutorial.

    Good luck!

Log in or create an account to post a comment.

Sign up Log in

Become a member and get full access to FineHomebuilding.com

Video Shorts

Categories

  • Business
  • Code Questions
  • Construction Techniques
  • Energy, Heating & Insulation
  • General Discussion
  • Help/Work Wanted
  • Photo Gallery
  • Reader Classified
  • Tools for Home Building

Discussion Forum

Recent Posts and Replies

  • |
  • |
  • |
  • |
  • |
  • |
View More Create Post

Up Next

Video Shorts

Featured Story

Versatile Vise

The IQ Vise has angled jaws, a simple locking mechanism, and solid holding power.

Featured Video

SawStop's Portable Tablesaw is Bigger and Better Than Before

The 10-in. Jobsite Saw PRO has a wider table, a new dust-control port, and a more versatile fence, along with the same reliable safety mechanism included in all SawStop tablesaws.

Related Stories

  • Podcast Episode 692: Introduction to Trade Work, Embodied Carbon, and Envelope Improvements
  • FHB Podcast Segment: Embodied Greenhouse Gas Emissions and the Building Codes
  • Old Boots Learn New Tricks
  • Install Denim Insulation Like a Pro

Highlights

Fine Homebuilding All Access
Fine Homebuilding Podcast
Tool Tech
Plus, get an extra 20% off with code GIFT20

"I have learned so much thanks to the searchable articles on the FHB website. I can confidently say that I expect to be a life-long subscriber." - M.K.

Get home building tips, offers, and expert advice in your inbox

Signing you up...

This site is protected by reCAPTCHA and the Google Privacy Policy and Terms of Service apply.
See all newsletters
See all newsletters

Fine Homebuilding Magazine

  • Issue 332 - July 2025
    • Custom Built-ins With Job-Site Tools
    • Fight House Fires Through Design
    • Making the Move to Multifamily
  • Issue 331 - June 2025
    • A More Resilient Roof
    • Tool Test: You Need a Drywall Sander
    • Ducted vs. Ductless Heat Pumps
  • Issue 330 - April/May 2025
    • Deck Details for Durability
    • FAQs on HPWHs
    • 10 Tips for a Long-Lasting Paint Job
  • Issue 329 - Feb/Mar 2025
    • Smart Foundation for a Small Addition
    • A Kominka Comes West
    • Making Small Kitchens Work
  • Issue 328 - Dec/Jan 2025
    • How a Pro Replaces Columns
    • Passive House 3.0
    • Tool Test: Compact Line Lasers

Fine Home Building

Newsletter Sign-up

  • Fine Homebuilding

    Home building tips, offers, and expert advice in your inbox.

  • Green Building Advisor

    Building science and energy efficiency advice, plus special offers, in your inbox.

  • Old House Journal

    Repair, renovation, and restoration tips, plus special offers, in your inbox.

Signing you up...

This site is protected by reCAPTCHA and the Google Privacy Policy and Terms of Service apply.
See all newsletters

Follow

  • Fine Homebuilding

    Dig into cutting-edge approaches and decades of proven solutions with total access to our experts and tradespeople.

    Start Free Trial Now
    • Facebook
    • Instagram
    • X
    • LinkedIn
  • GBA Prime

    Get instant access to the latest developments in green building, research, and reports from the field.

    Start Free Trial Now
    • Facebook
    • YouTube
  • Old House Journal

    Learn how to restore, repair, update, and decorate your home.

    Subscribe Now
    • Facebook
    • Instagram
    • X

Membership & Magazine

  • Online Archive
  • Start Free Trial
  • Magazine Subscription
  • Magazine Renewal
  • Gift a Subscription
  • Customer Support
  • Privacy Preferences
  • About
  • Contact
  • Advertise
  • Careers
  • Terms of Use
  • Site Map
  • Do not sell or share my information
  • Privacy Policy
  • Accessibility
  • California Privacy Rights

© 2025 Active Interest Media. All rights reserved.

Fine Homebuilding receives a commission for items purchased through links on this site, including Amazon Associates and other affiliate advertising programs.

  • Home Group
  • Antique Trader
  • Arts & Crafts Homes
  • Bank Note Reporter
  • Cabin Life
  • Cuisine at Home
  • Fine Gardening
  • Fine Woodworking
  • Green Building Advisor
  • Garden Gate
  • Horticulture
  • Keep Craft Alive
  • Log Home Living
  • Military Trader/Vehicles
  • Numismatic News
  • Numismaster
  • Old Cars Weekly
  • Old House Journal
  • Period Homes
  • Popular Woodworking
  • Script
  • ShopNotes
  • Sports Collectors Digest
  • Threads
  • Timber Home Living
  • Traditional Building
  • Woodsmith
  • World Coin News
  • Writer's Digest
Active Interest Media logo
X
X
This is a dialog window which overlays the main content of the page. The modal window is a 'site map' of the most critical areas of the site. Pressing the Escape (ESC) button will close the modal and bring you back to where you were on the page.

Main Menu

  • How-To
  • Design
  • Tools & Materials
  • Video
  • Blogs
  • Forum
  • Project Guides
  • Reader Projects
  • Magazine
  • Members
  • FHB House

Podcasts

  • FHB Podcast
  • ProTalk

Webinars

  • Upcoming and On-Demand

Podcasts

  • FHB Podcast
  • ProTalk

Webinars

  • Upcoming and On-Demand

Popular Topics

  • Kitchens
  • Business
  • Bedrooms
  • Roofs
  • Architecture and Design
  • Green Building
  • Decks
  • Framing
  • Safety
  • Remodeling
  • Bathrooms
  • Windows
  • Tilework
  • Ceilings
  • HVAC

Magazine

  • Current Issue
  • Past Issues
  • Magazine Index
  • Subscribe
  • Online Archive
  • Author Guidelines

All Access

  • Member Home
  • Start Free Trial
  • Gift Membership

Online Learning

  • Courses
  • Project Guides
  • Reader Projects
  • Podcast

More

  • FHB Ambassadors
  • FHB House
  • Customer Support

Account

  • Log In
  • Join

Newsletter

Get home building tips, offers, and expert advice in your inbox

Signing you up...

This site is protected by reCAPTCHA and the Google Privacy Policy and Terms of Service apply.
See all newsletters
See all newsletters

Follow

  • X
  • YouTube
  • instagram
  • facebook
  • pinterest
  • Tiktok

Join All Access

Become a member and get instant access to thousands of videos, how-tos, tool reviews, and design features.

Start Your Free Trial

Subscribe

FHB Magazine

Start your subscription today and save up to 70%

Subscribe

Enjoy unlimited access to Fine Homebuilding. Join Now

Already a member? Log in

We hope you’ve enjoyed your free articles. To keep reading, become a member today.

Get complete site access to expert advice, how-to videos, Code Check, and more, plus the print magazine.

Start your FREE trial

Already a member? Log in

Privacy Policy Update

We use cookies, pixels, script and other tracking technologies to analyze and improve our service, to improve and personalize content, and for advertising to you. We also share information about your use of our site with third-party social media, advertising and analytics partners. You can view our Privacy Policy here and our Terms of Use here.

Cookies

Analytics

These cookies help us track site metrics to improve our sites and provide a better user experience.

Advertising/Social Media

These cookies are used to serve advertisements aligned with your interests.

Essential

These cookies are required to provide basic functions like page navigation and access to secure areas of the website.

Delete My Data

Delete all cookies and associated data