FHB Logo Facebook LinkedIn Email Pinterest Twitter X Instagram Tiktok YouTube Plus Icon Close Icon Navigation Search Icon Navigation Search Icon Arrow Down Icon Video Guide Icon Article Guide Icon Modal Close Icon Guide Search Icon Skip to content
Subscribe
Log In
  • How-To
  • Design
  • Tools & Materials
  • Restoration
  • Videos
  • Blogs
  • Forum
  • Magazine
  • Members
  • FHB House
  • Podcast
Log In

Discussion Forum

Discussion Forum

Cut a V bottom of 2x2s

joewood | Posted in Construction Techniques on August 16, 2005 10:39am

What’s an easy clean way to cut Vs in the bottoms of thes 2×2 balusters ? I guess I’d use my radial arm saw and make two passes, but unless you’re exact, you leave an overcut on one or both sides. This is probably the best way but I thought I’d ask. Got quite a few to do.


Reply
  • X
  • facebook
  • linkedin
  • pinterest
  • email
  • add to favorites Log in or Sign up to save your favorite articles

Replies

  1. User avater
    NickNukeEm | Aug 16, 2005 10:49pm | #1

    Tablesaw.  Tilt and raise blade to exactcenter of baluster.  Attach sacrificial fence and bury the blade to where the tips of the blade teeth, fence, and table all meet (will require bringing the blade up thru the fence.)  You should be able to put the baluster against the fence, run it through,  rotate it 180 degrees, and finish the vee.  Repeat however often until you are finished, or just bored.

    Or maybe someone else has a better way.


    "I am the master of my fate, I am the captain of my soul."  Invictus, by Henley.

  2. User avater
    SamT | Aug 16, 2005 11:01pm | #2

    Joe,

    Are they all exactly the same dims? The ends are exactly square"

    If so, set the table saw to the angle you want, set the depth so that the top  of the kerf is the same height as the centerline of the baluster. Better to be high than low. High won't interfere with the fit, just give ya a little venting for drying.  (|;>)

    Set the fence so that your kerf is just in from the end.

    Cut, flip, repeat.

    Fine tune the angle and depth. Cut 'em all and let the carpenter sort 'em out.

    Oh. Wait. Yer the carpenter.

    Cut the other ends to length.

    SamT

  3. dustinf | Aug 16, 2005 11:17pm | #3

    Just thinking out loud, but maybe tape/clamp 10 or so together so all the bottoms are flush and facing up.  Then make a jig so you could run a chamfering bit across the bottoms all at once.  May have to make  a few passes depending on what kind of router, and how much material you are removing.

    Or cut them one at a time on the band saw.  Clamp a speed square to the table as a 45 degree fence, and a stop block to control the depth. 

    I think the table saw is going to make a projectile out of the cut off piece.

    1. joewood | Aug 16, 2005 11:33pm | #4

      If I run the balusters veticall  thru the T saw, the blade won't tilt over that far. Doing it horizontally, I could rig up a sliding table, but, I don't like leaning over and cutting on the T saw, and launching projectiles ..


      I like the bandsaw idea ..

      1. dustinf | Aug 16, 2005 11:39pm | #5

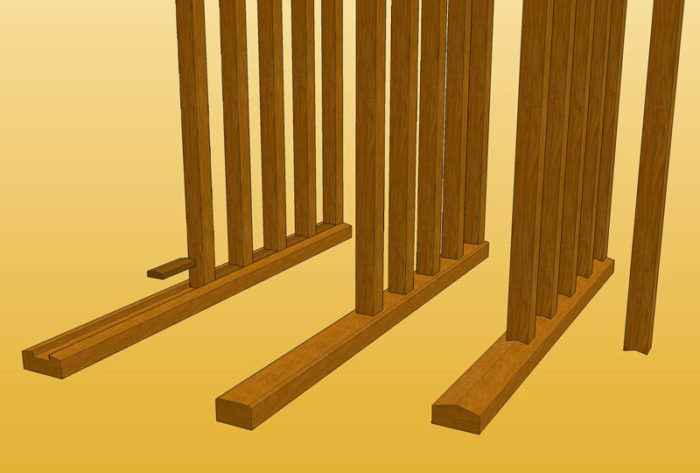
        What if you cut a square mortise into the bottom piece, and just slid the square ballister into it?

      2. mikerooney | Aug 16, 2005 11:40pm | #6

        Router table and a dovetail bit.http://www.lesvisible.com/


      3. User avater
        NickNukeEm | Aug 16, 2005 11:57pm | #8

        Doing it horizontally, I could rig up a sliding table...

        I was thinking miter gage, myself, end against the fence.  Zip-zip, on to the next.

         "I am the master of my fate, I am the captain of my soul."  Invictus, by Henley.

        1. joewood | Aug 17, 2005 12:20am | #10

          I think Bill has it, because you can also then rip the bevels on your bottom rails, exact match .. just set the blade to 5 deg and away we go !


          you get a dawg bisket BillW, good boy !


          1. BillW | Aug 17, 2005 01:31am | #11

            woof!

          2. dinothecarpenter | Aug 17, 2005 03:32am | #14


            woof!

            woof!woofwoof!!

  4. ~~billw | Aug 16, 2005 11:55pm | #7

    I just did about 70 of these - used a variation on the tablesaw method already described, but rather than a sacificial fence, I used a spacer - a small block against the fence before the blade, stacked 5 balusters at a time on my miter gauge (pushed up against the spacer block ), slide past the block into the blade, set to come up 1/2 way through, then flip & repeat.

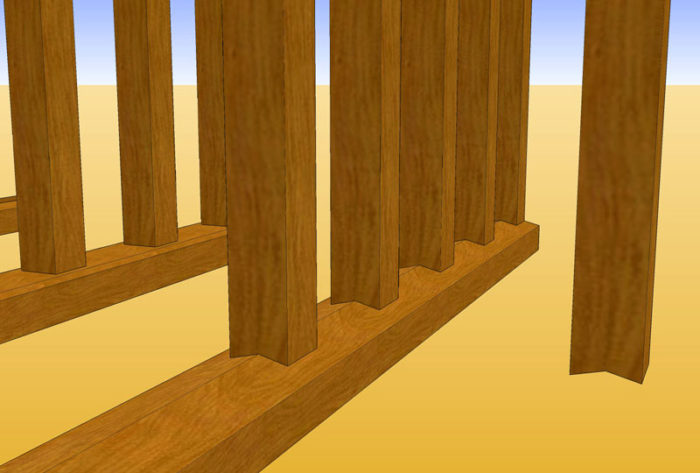
    BTW, I left the blade set at this angle, raised it to go 1/2 way through a 2x4, then ripped the bottom of the railing assembly to get a perfect match where the bottom of the spindles hit the 2x4.

  5. Pete | Aug 17, 2005 12:17am | #9

    BillW is right on.  that little spacer at the front of the fence makes  for a safe operation.  I don't stack 'em though, I find it less stressful and just as fast to do them one at a time -- cut, flip, see ya later.  cut them to length after you've made the trickier bottom cut.  it's also easy to mark and drill perfectly spaced  90 degree holes in the bottom rail -- install your first balluster (I usually start in the center) with a spot of polyurethane glue and a stainless screw from underneath.   your eyeball will center the screw just fine sideways while the groove will center it on the rail.  then a small spacer block will tell you where to set your next ballusters in both directions.

  6. rez | Aug 17, 2005 02:35am | #12

    Got to wondering how Dino would do this?


    1. dinothecarpenter | Aug 17, 2005 03:13am | #13

      R-EZ.

      Two cuts. Set all the balusters under the EZ and cut.

      You need to build a lay out table top like this one.

      .http://www.eurekazone.com/images/gallery/multiplecutlayouttable.html

      We need to place the balusters square to the table top and the guide rail square to the balusters/tabletop.


      Rez. You knew that.

      YCF Dino

  7. sawzall | Aug 20, 2005 04:20am | #15

    I would use your RAS.

    1. User avater
      RichColumbus | Aug 20, 2005 04:36am | #16

      I would use your RAS.


      That'd be my choice.

  8. piko | Aug 20, 2005 06:19am | #17

    I'm inclined to think that a jig  - 2 parallel 'tracks' with the bottom rail between (with the spacings well marked), upon which runs a carriage supporting a router. Set the router bit to remove only sufficient lumber from the rail to take the 'foot' of the baluster...3 passes with a 1/2" bit. Bonus being that the balusters won't wiggle when you place them.

    Once the jig is made, you've got it for as long as you want.

    ciao for niao

    To those who know - this may be obvious. To those who don't - I hope I've helped.


  9. User avater
    Dinosaur | Aug 20, 2005 07:35am | #18

    Shaper or moulding head; use a tenoning jig to hold the balusters upright.

    Dinosaur

    A day may come when the courage of men fails,when we forsake our friends and break all bonds of fellowship...

    But it is not this day.

  10. PhillGiles | Aug 20, 2005 07:46am | #19

    Well, my first choice would be to use the RAS to cut shallow dados across the base; but, if you have your heart set on notching the ballusters instead, use the RAS. Make a jig (just two sides of a box with a stop-block for length) to register the 2x2's in the same place everytime.

    .
    Phill Giles
    The Unionville Woodwright
    Unionville, Ontario
    1. joewood | Aug 20, 2005 07:52am | #20

      I'm still inclined to use the t saw, and then bevel my bottom rails to match ..

      1. dinothecarpenter | Aug 20, 2005 03:51pm | #21

        Joe.

        You have the guide rails. This is the best application for the system.

        The wood stays under the guide and you just slide the circular saw on the track.

        Use the outer groove on the smart base.

        Take a look at this picture. If you bevel your saw and you use the outside track on the smart base, you can cut 50 pieces at the time with your system.

        The job is done in few minutes. 

        View Image

        Edited 8/20/2005 8:52 am ET by dinothecarpenter

Log in or create an account to post a comment.

Sign up Log in

Become a member and get full access to FineHomebuilding.com

Video Shorts

Categories

  • Business
  • Code Questions
  • Construction Techniques
  • Energy, Heating & Insulation
  • General Discussion
  • Help/Work Wanted
  • Photo Gallery
  • Reader Classified
  • Tools for Home Building

Discussion Forum

Recent Posts and Replies

  • |
  • |
  • |
  • |
  • |
  • |
View More Create Post

Up Next

Video Shorts

Featured Story

Podcast Episode 688: Obstructed Ridge Vent, Buying Fixer-Uppers, and Flashing Ledgers

Listeners write in about removing masonry chimneys and ask about blocked ridge vents, deal-breakers with fixer-uppers, and flashing ledgers that are spaced from the wall.

Featured Video

How to Install Exterior Window Trim

Learn how to measure, cut, and build window casing made of cellular PVC, solid wood, poly-ash boards, or any common molding material. Plus, get tips for a clean and solid installation.

Related Stories

  • Guest Suite With a Garden House
  • Podcast Episode 688: Obstructed Ridge Vent, Buying Fixer-Uppers, and Flashing Ledgers
  • FHB Podcast Segment: Finding the Right Fixer-Upper
  • Keeping It Cottage-Sized

Highlights

Fine Homebuilding All Access
Fine Homebuilding Podcast
Tool Tech
Plus, get an extra 20% off with code GIFT20

"I have learned so much thanks to the searchable articles on the FHB website. I can confidently say that I expect to be a life-long subscriber." - M.K.

Get home building tips, offers, and expert advice in your inbox

Signing you up...

This site is protected by reCAPTCHA and the Google Privacy Policy and Terms of Service apply.
See all newsletters
See all newsletters

Fine Homebuilding Magazine

  • Issue 332 - July 2025
    • Custom Built-ins With Job-Site Tools
    • Fight House Fires Through Design
    • Making the Move to Multifamily
  • Issue 331 - June 2025
    • A More Resilient Roof
    • Tool Test: You Need a Drywall Sander
    • Ducted vs. Ductless Heat Pumps
  • Issue 330 - April/May 2025
    • Deck Details for Durability
    • FAQs on HPWHs
    • 10 Tips for a Long-Lasting Paint Job
  • Issue 329 - Feb/Mar 2025
    • Smart Foundation for a Small Addition
    • A Kominka Comes West
    • Making Small Kitchens Work
  • Issue 328 - Dec/Jan 2024
    • How a Pro Replaces Columns
    • Passive House 3.0
    • Tool Test: Compact Line Lasers

Fine Home Building

Newsletter Sign-up

  • Fine Homebuilding

    Home building tips, offers, and expert advice in your inbox.

  • Green Building Advisor

    Building science and energy efficiency advice, plus special offers, in your inbox.

  • Old House Journal

    Repair, renovation, and restoration tips, plus special offers, in your inbox.

Signing you up...

This site is protected by reCAPTCHA and the Google Privacy Policy and Terms of Service apply.
See all newsletters

Follow

  • Fine Homebuilding

    Dig into cutting-edge approaches and decades of proven solutions with total access to our experts and tradespeople.

    Start Free Trial Now
    • Facebook
    • Instagram
    • X
    • LinkedIn
  • GBA Prime

    Get instant access to the latest developments in green building, research, and reports from the field.

    Start Free Trial Now
    • Facebook
    • YouTube
  • Old House Journal

    Learn how to restore, repair, update, and decorate your home.

    Subscribe Now
    • Facebook
    • Instagram
    • X

Membership & Magazine

  • Online Archive
  • Start Free Trial
  • Magazine Subscription
  • Magazine Renewal
  • Gift a Subscription
  • Customer Support
  • Privacy Preferences
  • About
  • Contact
  • Advertise
  • Careers
  • Terms of Use
  • Site Map
  • Do not sell or share my information
  • Privacy Policy
  • Accessibility
  • California Privacy Rights

© 2025 Active Interest Media. All rights reserved.

Fine Homebuilding receives a commission for items purchased through links on this site, including Amazon Associates and other affiliate advertising programs.

  • Home Group
  • Antique Trader
  • Arts & Crafts Homes
  • Bank Note Reporter
  • Cabin Life
  • Cuisine at Home
  • Fine Gardening
  • Fine Woodworking
  • Green Building Advisor
  • Garden Gate
  • Horticulture
  • Keep Craft Alive
  • Log Home Living
  • Military Trader/Vehicles
  • Numismatic News
  • Numismaster
  • Old Cars Weekly
  • Old House Journal
  • Period Homes
  • Popular Woodworking
  • Script
  • ShopNotes
  • Sports Collectors Digest
  • Threads
  • Timber Home Living
  • Traditional Building
  • Woodsmith
  • World Coin News
  • Writer's Digest
Active Interest Media logo
X
X
This is a dialog window which overlays the main content of the page. The modal window is a 'site map' of the most critical areas of the site. Pressing the Escape (ESC) button will close the modal and bring you back to where you were on the page.

Main Menu

  • How-To
  • Design
  • Tools & Materials
  • Video
  • Blogs
  • Forum
  • Project Guides
  • Reader Projects
  • Magazine
  • Members
  • FHB House

Podcasts

  • FHB Podcast
  • ProTalk

Webinars

  • Upcoming and On-Demand

Podcasts

  • FHB Podcast
  • ProTalk

Webinars

  • Upcoming and On-Demand

Popular Topics

  • Kitchens
  • Business
  • Bedrooms
  • Roofs
  • Architecture and Design
  • Green Building
  • Decks
  • Framing
  • Safety
  • Remodeling
  • Bathrooms
  • Windows
  • Tilework
  • Ceilings
  • HVAC

Magazine

  • Current Issue
  • Past Issues
  • Magazine Index
  • Subscribe
  • Online Archive
  • Author Guidelines

All Access

  • Member Home
  • Start Free Trial
  • Gift Membership

Online Learning

  • Courses
  • Project Guides
  • Reader Projects
  • Podcast

More

  • FHB Ambassadors
  • FHB House
  • Customer Support

Account

  • Log In
  • Join

Newsletter

Get home building tips, offers, and expert advice in your inbox

Signing you up...

This site is protected by reCAPTCHA and the Google Privacy Policy and Terms of Service apply.
See all newsletters
See all newsletters

Follow

  • X
  • YouTube
  • instagram
  • facebook
  • pinterest
  • Tiktok

Join All Access

Become a member and get instant access to thousands of videos, how-tos, tool reviews, and design features.

Start Your Free Trial

Subscribe

FHB Magazine

Start your subscription today and save up to 70%

Subscribe

Enjoy unlimited access to Fine Homebuilding. Join Now

Already a member? Log in

We hope you’ve enjoyed your free articles. To keep reading, become a member today.

Get complete site access to expert advice, how-to videos, Code Check, and more, plus the print magazine.

Start your FREE trial

Already a member? Log in

Privacy Policy Update

We use cookies, pixels, script and other tracking technologies to analyze and improve our service, to improve and personalize content, and for advertising to you. We also share information about your use of our site with third-party social media, advertising and analytics partners. You can view our Privacy Policy here and our Terms of Use here.

Cookies

Analytics

These cookies help us track site metrics to improve our sites and provide a better user experience.

Advertising/Social Media

These cookies are used to serve advertisements aligned with your interests.

Essential

These cookies are required to provide basic functions like page navigation and access to secure areas of the website.

Delete My Data

Delete all cookies and associated data