I just wanted to give all you guys a big thanks for all the help/ideas you gave me during my latest project. Piffin was a big help and a bunch of the other guys in the construction techniques forum. (Sorry I don’t remember all your names.) Sorry it took so long to complete and post pics. With both me and my wife working and trying to raise 2 kids, 2 dogs, a cat and various minor pets; it doesn’t leave much time for work on my own house. The weather in the North East, this summer didn’t help either, but enough of my complaining.
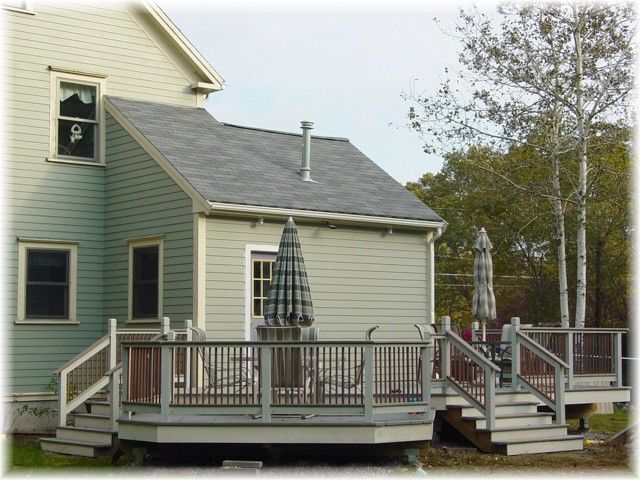
I went with the Trex decking, and I’m glad I did. I have tried to talk a few of my clients, (ie: friends and family) to use it, but I couldn’t get anyone to pay the extra cash, so I was my own guinea pig. It looks great, I just hope it holds up like they say it does.
My post on joist sizing was a big hit here a few months ago! Everyone had a different opinion. I had a 12′ span with a 2′ cantilever over the beam. Well I went with 2×8’s 12″ o.c. I blocked midspan and added diagonal bracing…it is plenty stiff. It’s funny because my 240lb buddy can walk across and you don’t feel a thing, but my 100lb Doby’s trot across and you can feel a slight shake! In either case it is barely perceptible and feels plenty solid.
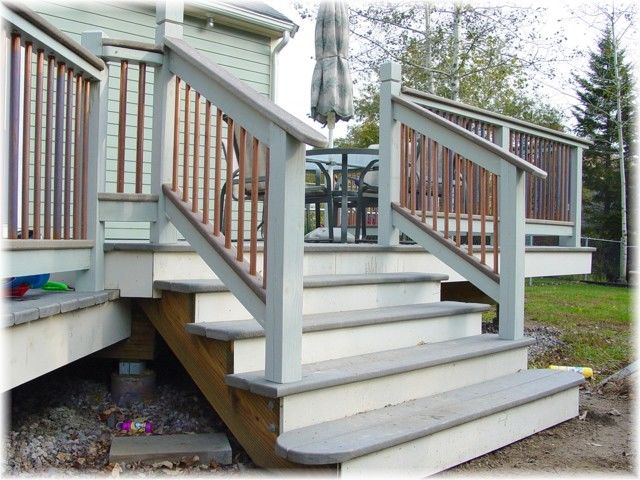
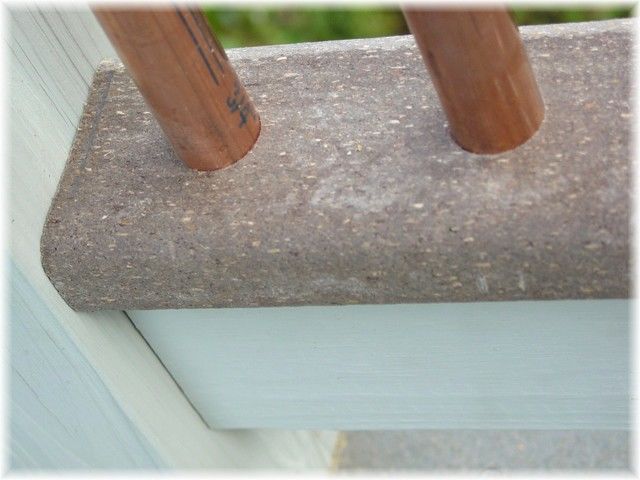
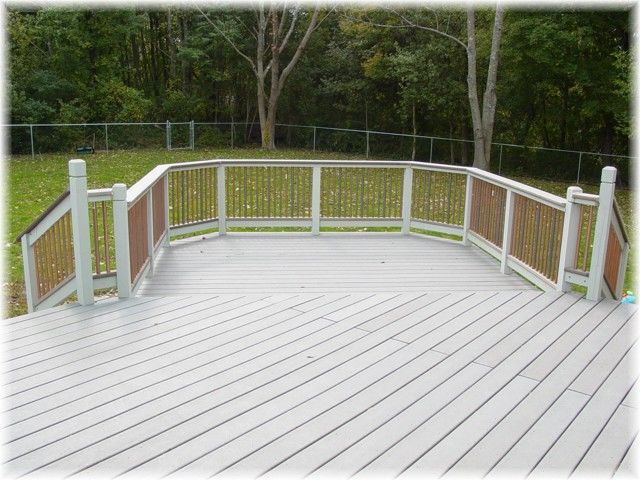
As for the railing, I didn’t want to use P.T. with the trex decking, but the composite systems are way overpriced. Someone here gave me the suggestion to use copper. (Sorry, don’t remember name) So I went with Trex rails and copper spindles. I alternated 3 3/4″ copper and 1 1″ copper pipe. I milled subrails out of Trex to eliminate the maintenance of scraping/treating in between all the spindles. The hole for the spindles doesn’t go all the way through so the P.T. part of the subrail should never rot. And the Trex piece is dado’d to fit over the P.T. to prevent water from wicking underneath.
The posts and sub rails are P.T. with a solid color stain, which should be the only parts that ever require maintenance.
All I have left to do is a little touch up here and there (fill nail holes, landscaping, and getting a dumpster to get rid of the trash pile.) Again I want to thank all of you that help out with suggestions and construction ideas. It’s nothing compared to some of the other pics I have seen posted here, but a few guys wanted to see pics of the railing system I came up with. Hope you like. Thanks again 🙂
I don’t understand! I cut it twice and it’s still too short!


Replies
NICE!!!
Who ever invented work didn't know how to fish....
Great job! Nice house too.
Steve J.
Soli Deo Gloria
Yes, it's a lovely house. The copper balusters are a new idea to me. What will they look like in the future? Will that be the desired look?
I had 2 options with the copper:
1) Clean all the copper piping. The blue writing on the piping will come off with lacquer thinner and some elbow grease. Then spray a lacquer on the pipes to keep the fresh copper look. But that would require a lot of maintenance to keep it looking fresh...which sort of defeats the whole purpose. Or I could...
2) Do nothing. The copper will tarnish to a Verdi green in about 6 months to a year. I intend to make some copper post caps for the few posts I left the caps on. They should all tarnish to match. I think there is nothing better looking than an old copper roof that has that nice moss green look. The pipes will do the same. And the best part, (and the main reason I thought of copper in the first place, is) ...no maintenance. No scrapping, no pressure washing, no reapplying stain, or water repellent every spring.
I don't understand! I cut it twice and it's still too short!
Edited 10/21/2003 6:40:42 PM ET by Manroot
We have a radio show here in BigD on the public station KERA
Its called anything you want to know. Some one called in asking how to put the verdi finish on copper. You will never guess the answer, horse urine, thats right,that answer was substantiated four or five times by other callins. Somebody even had an address where the substance could be ordered,who collects it was my question.But if you want another solution one guy said plumbers flux would do the same, nature will work also if you want to wait.But then what is horse urine if not natural?
Wow! Your deck looks great! Good job!!
What did you use to fasten the decking? How did you drill the baluster holes on the sloping rails on the stairs?
Al Mollitor, Sharon MA
Al,
Thanks! I used Trapeaze screws specially made for composite decking, and they work as advertised. I was very happy with them. The literature on Trex says that it hold nails and screws better than wood, and that you could even use stainless finish nails, so the exposed head is very small, and barely noticeable.
For the rails for the stairs, I tacked my bottom sub rail into place and then marked it with an adjustable angle. I then took the adjustable angle over to my drill press and transferred the angle to my press table. To get the baluster spacing I used a large framing square and marked off my spacing (3 inches) on a spare sheet of plywood, making long lines 3 inches apart down one edge. Then I scribed my bottom subrail to the posts and cut it out. I take the cut subrail over to the plywood and lay it over my 3" lay out marks at the angle it will be installed. (using the mitered edges as a guide) I center the subrail over these marks using simple math, so that both end balusters are equal distance to their respective posts. Now I just transfer the marks on the plywood to my subrail. Bring the subrail to my drill press (Which is set at the proper angle) and drill them out.
The top sub rail is drilled out in the same fashion except I leave both ends a bit long. After the bottom rail is installed I clamp the top rail to the sides of the posts and drop a plumb bob down along one of the end holes. This allows me to make sure the top holes line up perfect with the holes in the lower subrail. I leave the clamps a little loose so I can tap this way or that with a hammer, until I get it perfect. When it's right I scribe it with a retractable razorknife, (I never use a pencil, a hold over from my furniture making) and make the cuts.
Unlike the top subrailings for the deck, the top subrailings for the stairs are not drilled all the way through. So it takes a little elbow grease and patience to ease the pipe in. I found it easier to put the pipe in the bottom rail and ease the top rail onto it.
I posted a few pics in case my explanation is not clear. (The pics however are for my regular railings, I forgot to take pics of the stair railing process!)
The process for the regular railing though is similar.
1)Install 2x4 bottom subrail.
2) Next I take the top 2x4 subrail and put it in place upside down. I tap the pipe through the 2x4 so that a few inches comes through the other end. (When you're done it looks like you are trying to make a crude pipe organ with all the pipe sticking way up in the air.)Then I flip it back over and screw it in place (Step 2 pic)
3) Now I take a torpedo level and place it along one of the end pipes. I make sure it is plump and mark the distance from the pipe edge to the post. I transfer this measurement to my trex subrail and make the cuts.
4) Next I tap the trex subrail onto the 2x4 subrail and use 1-5/8" stainless screws, drilling down the center of every other spindle hole. (The forstner bit automatically marks the center of each mortise.)
5) Next I tap each piece of tubing down into it's corresponding mortise. I cut the tubes a 1/4 inches shorter than the top subrail. When the pipe is flush with the top of the subrail I give it one good rap with the hammer to seat it in the bottom rail.
6) Next I install the topcap using 2-3/4" screws drilled from underneath, and Gorilla glue on all miters and ends where the cap meets a post.
(Also to finish it off, I sand the top cap with 120 grit paper on my random orbit sander. The rough finish is nesacary for traction on the decking, but for the handrail a smooth finish encourages people to actually hold on with there hands, something pressure treated definitely doesn't invite. The Trex finishes velvety smooth)
When doing stairs, if the pitch is to steep, you will have to cut your mortise on the lower rails through the trex and into the p.t. to get sufficient depth of mortise for strength. In this case you may want to drill a 1/4" drain hole all the way through each mortise. With the flat deck railings this is not nesacary because the Trex will not rot, and neither will the copper tubing, if a little water gets inside the spindles it's not going to be a big deal.
Also I placed a mock up section of railing sideways between 2 benches and placed my entire 250lbs weight set on top of it to test the strength of the Trex subrail. It passed without a scratch. I also gave it the official ASTM-128473-skf-4 test. (You know, the "smack it really hard with a 24oz framing hammer test") The copper tubing dented and bent but again the Trex held up without a scratch.
Al sorry this is so long, I just wanted to make sure I covered all bases!I don't understand! I cut it twice and it's still too short!
Great Job! Manroot, and a deck to be proud of. Looks like you aquired a few good tools out of the deal too..............
"Honey, I know it's not in the budget but I really need this tool to do the job right."
"Rather be a hammer than a nail"
Bob
Pro-Dek,
Thanks! I know you are one of the guys in my earlier forums that gave me some good suggestions, thank you.
Actually the only good tool I got out of this deal was a deck/drywall gun. I wanted to make sure I seated all the screws evenly, and doing it with my drill was out of the question! I was shooting for the ol' 12" sliding compound miter saw, but my wife wouldn't have anything to do with it! :0I don't understand! I cut it twice and it's still too short!
Nice Job the Manroot.
I like the idea of copper pipe although you might have also used some Lucite Rod. It is clear and you could have ran lighting underneath the railing thereby illuminating all the spindles. Really would have wowed the neighbors!
Great looking deck, all those shortcuts you didn't make-look great!! Lucite rods would look cool at night but would deteriorate rapidly over time due to the exposure to UV.
Nice railing. Do you have any finish shots?
Chris
Looks great. I really like the 2 tone effect. Or is it 3 tone... The color choice really goes with the house - rather than looking like an after thought like some. What is the finish you put on the PT lumber? Do I see 3 sets of steps? - man that will eat up some building time.
I like the copper pipe baluster idea because it's it gives good visibility through the rails but I'm guessing it doesn't come up to $4 per baluster like some of that powder coated stuff. And, it looks like you did a good job at planning the spacing on your balusters. Shows good planing. A lot of guys slam one picket up against the post or do other wacky things with spacing - the type of things that most people don't notice, but it just gets under my skin...
In addition to Trex being a great product, All things considered, I think it is one of the better composite choices.
It just amazes me that more people don't want to do it with the best materials available.... Say, customer wants a $6000 deck, but can't pony up an extra $1,000 for a 50 year deck...
Thanks for the compliment!
The p.t. lumber is painted with a solid color grey stain, the Trex is Winchester grey (when it finishes fading) and the copper is copper! (obviously!) With my design I get 4 balusters out of one 10' length. For 3/4 inch it works out to just under $1.50 a piece. Which isn't bad considering in my area the home centers sell the p.t. balusters for 95 cents to a buck a piece. I wanted to use all 1 inch but it was a lot more expensive. So I alternated 3 3/4 inch then 1 1 inch, it doesn't really show up in the pics to well but it looks nice with the larger diameter thrown in every fourth one. I used 300' 3/4" and 160' of 1".
My ideal spacing was 3" o.c. but to get the pattern I wanted with the 1 inch pipe I had to do a little math to make it work. because I needed an odd number of balusters in every section. Every section was a little different (2 7/8" 2 13/16") My pattern went 3/4 - 3/4 - 3/4 - 1 - 3/4- 3/4- 3/4- 1 - 3/4- 3/4 3/4.
All the drilling of the rails did take some time, and the milling of the trex subrails takes a little time, but once all the components are made, it goes together quite fast.I don't understand! I cut it twice and it's still too short!
Good display of craftsmanship..Your work is very pleasing to the eyes.
I find myself debating (with myself) the pros and cons of lining up your butt joints vs randomizing them. Do most consider your method the obvious thing to do? Would some try to place the joints randomly?
I usually line butt joints up as long as they're separated by one or -preferably- two full pieces. I noticed this on Manroot's deck too, and think it looks fine. On a really big deck, randomization might look good, but something systematic looks good to me on a smaller deck.
Another advantage of composite decking is that it is available in 20' lengths, so fewer butt joints are needed.
Al Mollitor, Sharon MA
I pretty much agree with what Al said. About 5 years ago there was an article in FHB: The 10 Rules of Finished Carpentry. (or some similar name) One of my favorite articles. One of the rules: "Nothing is random". My stager pattern may have been a bit different, but a pattern looks like it is meant to be there. One possible exception would be hardwood flooring, but you still have to make sure all the small pieced don't get bunched up, etc. The challenge of deck building is that you are working with framing type materials, ie - twisted 2x4s, checked 4x4s etc, but it's gotta look perfect... as in finish carpentry. That is what Manroot achieved.Random might be appealing with a very contemporary designed property, but this one is traditional all the way.Matt
Thanks for your feedback Matt & Al. I agree with the technique and am interested to see that I would have had to take it into consideration. My brain . . .
Tim,
I did it this way because I think the joints look better when they are lined up. Maybe on a wood deck random joints look ok, but with the composite decking, I think it looks a lot better to plan out ahead of time where your joints will fall and put a doubled joist under that spot.
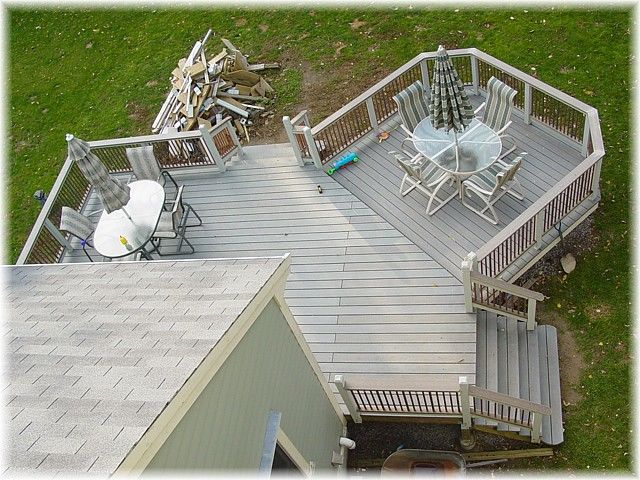
The upper deck on my project was 22' long. So each run consists of a 16' piece of Trex and a 12' piece cut in half to 6'. (I did this on purpose because the Trex decking is expensive and I wanted to use ALL of it!) I alternate the 16 footers to give me an alternating line of joints on either side of the deck, to balance out the look.
The joints fall over a doubled 2x8. spaced with scrap 2x8 stock I cut into the shape of a homeplate used in baseball. With the point sticking up, this will allow any water that falls between the joint to drain. The 2x8 is held together with 3/8' carriage bolts, so it is essentially a beam in itself.
Also I hit all end cuts with a 3/8" roundover bit, to give it a more finished look. It looks a lot better.I don't understand! I cut it twice and it's still too short!
THanks for the response. I like the beam-building technique. I've been thinking about that technique for a miter I have to make in a deck at the corner of a house.
I'm pleased that the day has come when we have some experience behind us to guide in better building techniques, such as deck-building techniques to increase the product's longevity and beauty.
Manroot
Great looking deck, goes well with the house.
Mr "E" - It looks great - it brings back fond memories of the "DOOR" a.k.a 'Mother of all projects"
Best of Luck
YD
Re: Copper Ballusters
It has been three years since you posted your great pictures. I am thinking of doing a similiar type railing using cedar and 1/2 copper.
How did it work after the 3 years
George