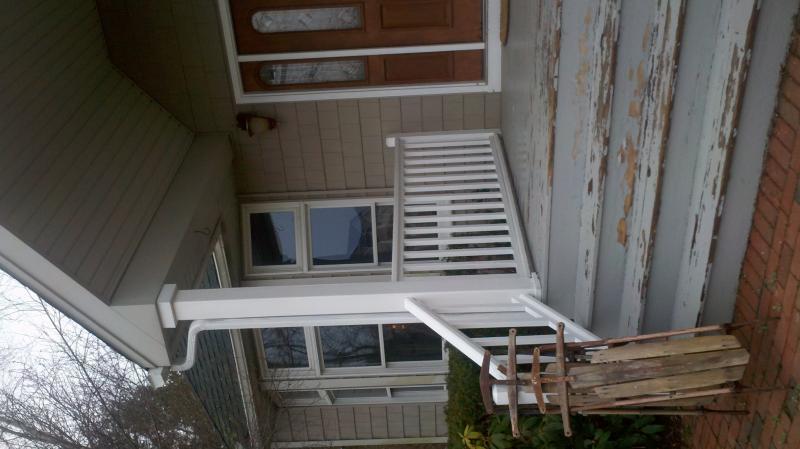
I am stripping off the old decking and removing the entire stair structure in the enclosed picture. The existing framing structure of the deck itself will remain as it is sound.
I am building boxes for the steps, consisting of three seperate boxes stacked strapped together and bolted at the top box/front rim.
I have aprox 31-32″ overall height from base to top of rim so i will be constructing the boxes using 2×8 PT which will give me the 7 1/4″ rise for each level. The decking is timbertech grooved planks, and i will be constructing the step boxes to accomodate “three” planks per step instead of the commonly seen two per step.
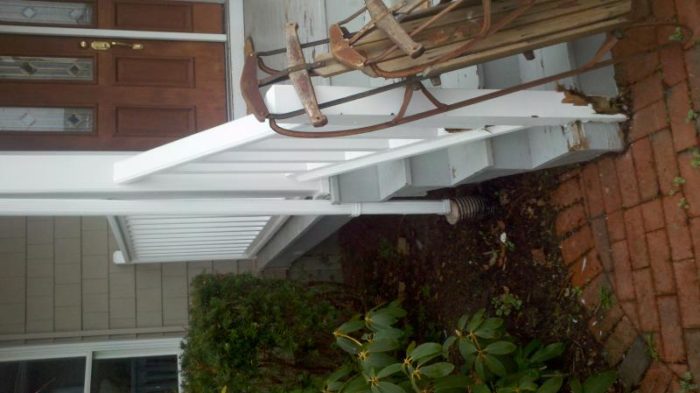
I have a few items to discuss regarding this project and i would like to start the thread by seeking some sound advice on how best to support the box framing. I will through bolt at top as mentioned above, but am seeking advice on how to provide a sturdy base for the boxes to be set on? If you note in the pictures, the existing structure is pavered “up to”. The boxes will now obviously be extended another three planks out (with the one extra plank now being added to each step).
The width of the existing deck frame is 8′ 5″, so was thinking of possibly setting a couple of footings at the front to give it some support there and using the bolts at the top? I dunno the best way to support the stacked box framing, all i know is i don’t want to pour a slab! Just a thought and don’t flame me up on this, but can the front rest on the existing pavers? Not as the sole support, but just as not to take that section up and have to cut and piece back together.
BTW, will be using 5 1/4 timbertech planks, grooved hidden fasteners (decking/stairs) 3/4″ Azek for risers, sides of boxes 9thinking of using Azek sheets for sides of boxes so no seams, but that is the next discussion 😉 need to figure out the support issue first.
Sorry attached pix appear to need rotation (sorry for all the sore necks) but not sure how to correct that, maybe someone can help me out with that??
Your thoughts all?


Replies
Any one here have any experience building step boxes? Or possibly be able to recommmend some info links or such???
Guess I'll stick with my original plan of setting two footings and attaching two 4x4 posts to inside of box. Will need to leave the inside corner area blocking out until it is set in place, so that I can align where the rail posts will be located. Once they are marked for placement i can set the footings below, attach the 4x4 to the footing on a standoff anchor, then bolt the 4x4 to the lower box. This way it serves as support and the rail post to be covered by post sleeve later.
I think I will place the lower base box right over the existing pavers. I will remove the pavers that lie inside the box, but only as many as are needed to install footings. I will rest the front of the box on the pavers and use the footings with the attached 4x4 to level it off. When I install the azek riser trim on the bottom front I think it will look fine, and save me the trouble of reworking the pavers.
Wow, i just realized I am posting and replying to myself? No wonder i like the answers i'm getting ;)
Guess everyone is on vacation for the long weekend. Still would love to hear from guys who have also done box step frames/trim for their stair projects.
This one took a little thought (yes, i think i hurt myself).
Just cut your stringers to the appropriate rise and run and mount the boxes to the stringers. Id say the rise and run for the new stair case would be close to that of the old one, you will have to plumb cut the bottom step of the new stringers (in other words just plumb cut the bottom step off, your box would become the bottom step and it would be built wider than the rest of them).
Basically, just build the box out the length of the extra run (sounds like an extra tread depth) and just screw it right in to the rise side of the stringers, stacking the boxes.
The alternative would be to use 3/4 plywood laminated together(two sheets glued together per stringer) to build the stringers because that extra run would cause the need to cut too much meat out of the 2x12.
Or, you could just build the boxes the same dimension as the rise and run and mount two 4x4 posts to the back outside corners of the bottom boxes and the front inside corner of the box above it. The right way would be a footer for each post, and that would be alot of footers, but I suppose you could float them as long as your wood connections were extra tough. Lag or carriage bolts should be fine. I can see this one being more work and less sturdy than the stringers.
Also, I would put little mini joists in the boxes at least 24 " on center, seeing as how the stringers would no longer be carrying the deck boards, but the boxes would be.
The hard part is going to be getting the stairs to stand on their end like that.
Pocket-hole jig or a countersink bit would work wonders, but aren't necessary. Appropriatly sized drill bit and nails are all you need. You wont split the rim of the boxes fastening them to the mini-joists. Matter of fact, 16d nails and a countersink would work too, but more splitting.
Personally, I'd just laminate the plywood. Cut the laminations into about 16" strips (better draw the stringers out first, just to be sure you have enough meat). Those stringers are short but as wide as the stairs are, you would need at least four of them. That would be two sheets of plywood, if that.
Arch, no wonder you hurt yourself....I hurt myself trying to follow you on this one (lol).
But seriously, I don't know if you get what I was saying. the entire existing stairs and stringers are being taken out. Building the three stacked boxes is not a problem at all. With 2x8's and the 1" deck boards I will get a 7 1/4" rise per step. Basically the bottom box will be equal to 9 deck boards including the 1/4" gap between boards and of course the riser that sits behind the deck plank, and then repeated for the next two steps, obviously subtracting each "3 step set up" demension for each smaller box.
The box technique is far more sturdier than stringers will ever be. My main question was if anyone had any "particular" technique to share regarding a support base. I figured regular tube footings from the "get go", but was curious if others had a "better" or faster" or more "ingenious" technique???
At this point i will just dig for the tubes and drop two in the front and two in the back of base box. Will bolt 4x4's to inside of base box and set them on standoffs on the footings. Will set the front 4x4's to act as support rails for composite post sleeves. Strap boxes togeteher and bolt into existing framing at top box. Like I said this was the original plan, so might as well stick with it, as i didn't get any other techniques that would save me any time.
At this point I.m thinking more about the azek trim on the sides of the boxes. Will use 7 1/4" Azek for the risers, and am thinking I will use the azek sheets for the sides of the boxes to give it a seamless look on the sides. Will have to just butt the riser trim to the side sheet trim as no way a miter on riser ends can be cut doing it this way. This was my second question i was going to post about. The Azek sheets are pricey, but i think it would look better than stacking the boards on each level, ya know?
Honestly, I don't think footers will be all that necessary for the steps themselves. I doubt the original had footers and I dont see any massive failures, or minor ones other than the rot. You could pour footers for the handrail posts, however, and attach the boxes to those. Or even pour a couple of pads flush with grade on the inside bottom step and strap the bottom step to them. If you treated the bottom outside rim like a header, there are endless amounts of connectors you could use to make the connections.
I finally see what you are getting at. Yes, it will be very sturdy that way, but I think it is overkill. Building the laminated stringers would be just fine--less material and cost, faster installation, and they would be plenty sturdy. The wider you cut your laminations the better.
Keep in mind that the footings do not need to be all the way out under the front edge of the steps -- you can set the footings back and cantilever out a bit.
Also keep in mind that the pavers will frost heave a bit, so you probably don't want them under the steps unless you leave a half inch or more gap.
For the photos, here you go.
As for whether you can support the bottom box on concrete footing anchors, in a word, yes, at least in theory. Our front stairs were built that way and lasted for 15 years; that they didn't last longer wasn't the fault of the anchors, either. I don't think I'd want to rest the stairs on the brick pavers in your photographs. PT wood will rot, by the way, if allowed to set permanently in soil or water, so I think I would raise the structural parts of the first box off the ground by a couple of inches
One could use "foundation
One could use "foundation grade" treated for the bottom box. Still won't last forever, but would likely last long enough to make it someone else's problem.
Appreciate the photo help.
The steps have been built and done. Footings were poured and bottom box was kept clear of the ground. The Versatex fascia will cover the gap at the bottom.