decorative clapboard fan for gable end
Hi,
Want to decorate the gable end of an entry porch roof with a clapboard fan (see attached drawing, “entry fan.jpg”) and need some advice.
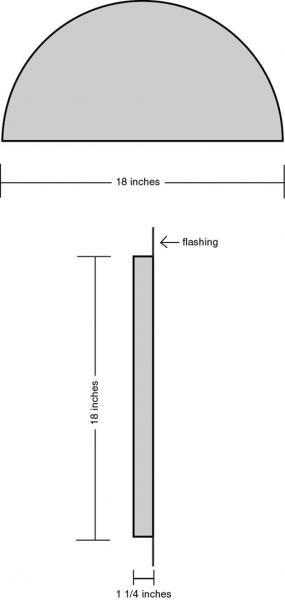
At the center of the fan will be a copper half-disc (see other attachment, “entry fan detail.jpg”), but I’m not sure how to go about fabricating one. Basically it’s half of an 18-inch diameter circle and needs to be 1 1/4-inches thick. I also think it would be a good ideal to have flashing that can tuck under the clapboards to keep moisture off the underlying sheathing (which is primed MDF).
Should I use something like 18 ga. copper and wrap a piece of plywood? How do I avoid wrinkling the copper? Is there an easier way? I’m sure this has been done many times before, but I can’t find anything on the web that details methods.
Also, any tips/tricks to the fan layout and fitting the clapboards nicely? As you can see from the drawing, they butt into the frieze board trim on the gable, which is 5/4 cedar. Figured I would need to do some very careful scribing to avoid any gaps.
Thanks,
Ed


Replies
Well, my post sank like a lead balloon there, so I thought maybe I'd bump it up again to see if anybody cared to comment.
It's not THAT dumb of a question, is it? I'm getting set to tackle this project and would love to have some experienced advice.
Thanks!
I put a couple on my house when I started replacing the siding. They are in two different scales, and I layed them out two different ways. The larger fan has an 18" hemisphere, and I layed out the pieces so that the wide end would be no more than 5" to the weather.
The smaller one, I layed it out so there was a minmum 1" exposure on the small end, and divided the outer edge EQ.
I don't recomend an MDF underlayment, even if it is Medex. I used 1/2" CDX cut to the exact shape& size, then overlayed the beveled VG Cedar. Air nailing only, I used 1/4" staples.
Where the fin meets the hemisphere, I cut to fit, then caulk the end, squished on good, and wiped. This would be primed, and caulked again before paint. All the wide end cuts were marked in place and then cut on a band saw.
Many of the pieces will need to be tapered in thickness with a hand plane, and the only saw for the job was the band saw, because every cut is tapered or angled. You could stumble by with a jigsaw, but it's much easier sliding the board over a table.
Smooth the edges with a belt sander, bevel the bottom edge a few degrees, and install a drip cap under it to cover the trim or siding below.
As far as the copper disk, Think about copper paint. I don't know if it's visible in one pic, but the vent stack is PVC sprayed with copper paint. It's been several years now, and I believe it's actually getting a patina(maybe it's just me).
Sorry about the pic labled "Back wall" I tried to get rid of it, but no go. Anyway, that's the building I was working to.
Thanks for sharing your photos and tips, Dave. That fan on the porch overhang looks really sharp.
As far as the MDF underlayment, there's not much I can do about it because another guy already installed it and the porch gable end is trimmed already (rest of the house is sheathed in 1/2" Advantech). I think it'll be OK primed as it is and with the flashing and caulk.
Must be a lot of fitting, fussing, planing, trying the fit again, repeat, etc. How long did it take you?
Copper paint--that's an interesting idea I hadn't thought of. I wonder how it would hold up? This faces directly west and gets wicked afternoon sun.
Is there any way to flash the top of the half-circle, or "hemisphere" as you say, or do you just rely on a good fit and caulk to keep water from seeping behind there?
Thanks again, nice work. Did you seal your clapboards front, back, and ends before installing?
Yes a lot of fussy cuts. I did it in the shop and installed it as one unit. All cuts are tight enough so that a caulk joint is sufficient. The large fan took 8 hrs from start to prime.
Doing it on the ground sounds like a terrific idea, but unfortunately I don't have that luxury as the sheating's already installed. The face of the gable end is trimmed in 5/4" cedar--I suppose I could build the whole assembly on a piece of triangular 1/4" CDX, then fasten it onto the face of the MDF, but I do want the trim to remain proud of the clapboards a tad. Hmmm...
Regarding the "relief cuts" in the copper--if I do that, won't water seep down into the backside of the copper (between the copper and the plywood half-circle it wraps) where it might cause trouble? Seems like any moisture that gets back there won't be able to dry very well.
Another idea I had was to use alternating light and dark clapboards to emphasize the sunray effect--maybe heartwood and sapwood. Can you get light-colored cedar clapboards? Seems to me I poked around for Northern White Cedar clapboards at one point and came up blank (white cedar shingles are a dime a dozen, though).
I'll definitely post photos when it's done--and yeah, it's going to be a fun project. These kinds of details really make a house.
Alright, you got me now. I happen to be re-siding my house right now with Hardi-plank fiber cement siding. I'd love to do a sunburst over the small gable over my front door. But I'm not sure how to get going on it. If you have a few minutes and care to explain how to lay it out I would be truly greatful. Is there a trick or formula to it? Is the half moon mathematically proportional to the gable or is it just proportional to make it look right? Should I just lay it out full scale on plywood and play around with it until it looks right? Any pointers would be appreciated.
I cruised the my JLCD-ROM for some guidance, but all I came up with was, get this, doing it in vinyl with J-channel!
It's just simple division. Divide the rake lines up evenly at whatever looks good, and strike lines to a center point on the base. The half circle is then scribed, and determines what the skinny end of each vane will measure. For the large gable end fan, the large end of the clappers equals standard 5" exposure(measured sqaure off the edge) for a 6" beveled clap board, and started at a comon center point at the base.
Make any sense?
Crystal clear....I just couldn't picture where to start, know what I mean. That clears things up nicely. I'll post a picture for y'all when I'm done. Many thanks.
Brian
Now I have a question.
Making the sunburst design using clapboard or hardiplank....
Will you actually overlap the siding as you would if it were installed horizontally?
Thanks guys.View Image
Yes, I used standard sized 6" beveled CVG Cedar clap boards. On the larger, full sized gable fan, I kept the wider end of the board the full 1/2" thickness, and tapered towards the top(thinner) edge at the narrow end.
I have no idea how it would be done with cementitious Hardiplank(it is cementitious, right?), because of the tapered rip cuts. I think if you tried to rip the stuff, you would fog out the neighborhood.
Thanks Dave,
Just wasn't sure how the siding laid together. I have messed with some designs like this, but only for interior projects, where the face was flush.
Hey, I liked the before and after pics of the back of the house.
Nice job.........BIG change.View Image
Say, Dave, now that I'm up to my ears in this project I was just wondering how you fastened those claps. Where did you locate the staples--an inch or so above the bottom (thick edge) of the clap?
I was trying to thick of a way to blind-nail these (mine will be finished clear, not painted) but couldn't. Seems like the claps need to be well-fastened toward the bottom of their exposed face.
Just wondering what your method was--thanks.
BTW, I'm inclined to use stainless steel ring-shanked nails here, but of course they're going to be pretty obvious with the clear finish.
Edited 8/29/2003 7:29:47 AM ET by MONSIEUR_ED
Ed,
I used 1/4" air driven staples ~1" up from the weather edge. I had tried driving nails, but found that the clapboards were a bit too delicate for this once they were tapered down. Also, when I cut the taper, I cut it off the thick(1/2") edge. What this did for me was that as the clapper got more narrow, it also got thinner. This helped alot where they all landed against the half round center. I still had to do a little planing here and there.
edit: Oh, BTW, I also started from each side and worked to the center, then covered with a tapered piece the same thickness as the half-round disc.
Edited 8/29/2003 11:17:21 AM ET by DAVEHEINLEIN
Your image didn't come through (is it really 3 MB?).
Can you repost it, maybe a smaller version?
here's one that was kind of neat ... it was already there when we started our remodel ...
good use of a half round windowMike Smith Rhode Island : Design / Build / Repair / Restore
what are you using to cut your FC, shears or a saw, I just finished a FC re-siding job, I used the shears mostly, dust free and all, but on cuts I had to make with a saw I used a reg carbide blade.
Hardie recommended using reg carbide blades on the install sheet, but that stuff ate blades like nothing else, thought about getting a FC blade for the next one or a diamond blade?Never be afraid to try something new. Remember, amateurs built the ark, Professionals built the Titanic.
I'm also getting ready to apply a fan design to the gable of my back porch. I think I have it figured out but I don't understand the use of a bandsaw. Is this to lessen the thickness as the clapboard stacks up near the center? Also do you plane the backside or front surface? It's been about 17 years since I did one and the old memory isn't helping yet.
Thanks
Rupert
The bandsaw was used because every 'blade' of the fan is tapered at a different amount, and the angle on either end changes with each blade. It is much easier to get a nice straight cut rather than using a jig saw.
As you suspected, the taper was on the thick edge, and as the fan 'blade' approached the center, it bcame thinner, and stacked up better.
What I did was to lay it out full scale on an exact fitting template of 1/2" CDX plywood, cut and fix the center half-circle then measure, cut, and fit each blade starting from the bottom(natch) and working to the center.
IIRC, most of the planing was done on the back sides.
Thanks Dave............I guess I better dust off my band saw
Rupert
One idea that might be helpful.
If your fan will fit on a 4x8 sheet. You could lay it all out on the ground. That would save a ton of crawling up and down the ladder or scaffold. Then lay your half circle in place and mark it. That will save a lot of scribing. You should be able to mark the roof line also. Then just install.
You could very easily build a simple jig to cut the siding with a circular saw...for the taper.
About the copper. The bottom edge is easy just break a 90 on it. Around the radius would be harder. You would have to put relief cuts in the edge and just pound on it. Well gently. Working it while laying on it's face might give the best results. That should help to keep it flat. But it shouldn't need to be perfect.
BTW...... you will post a picture when you're done, right?
It looks like a fun project....enjoy!
How about bending the copper over the radius of your half circle, using the relief cuts and then soldering them to make it solid again.
Just another thought........
You might start another thread titled "bending copper" and get a metal expert in the conversation.
One more thought.... Could you glue the copper to the backer board with construction adhesive to help keep it flat?
Yeah, I was wondering about soldering--seems like that would work well.
I was planning on using some sort of adhesive to fasten the copper to the plywood backer, as you suggest.
You're right, I should probably start a thread on copper fabrication to get some metal pros in on the conversation.
Thanks, CAG.
I didn't realize how big that shot was. It was in amongst a bunch of others I had lying around in my biz folder, and I just snagged it when I browsed for an attachment
Dave,
no problem, what was the file type? Never be afraid to try something new. Remember, amateurs built the ark, Professionals built the Titanic.
It was a photoshop file. That must have been the prob. I have changed it to a jpeg file now.
Well, finally finished the sunburst this afternoon (will post a picture as soon as it's developed).
Came out nice, but boy what a lot of fussy work. Not sure I'd want to do one of those every day. On the other hand it's pretty satisfying to see it take shape and it really adds a lot to the house.
By the way, Dave, I ended up using stainless rink-shank nails but predrilled all the holes to avoid any splitting problems like you mentioned.
Am curious about something--where did this detail originate? Do you see these in Europe? Seems to me it's a Victorian-era thing, but maybe I have that wrong. And I associate it with New England, but maybe you see these elsewhere? Be interested to know a little more about the history.
Great Ed, can't wait to see it. As fas as I know, the fan is a Victorian detail, along with the gingerbread, the brackets, spandrels,etc. Mostly high-style. A nice detail though.
Oh,BTW, the large one was ~12' across, and took 8hrs. from layout to priming.
Edited 9/2/2003 9:07:58 PM ET by DAVEHEINLEIN
Here's a few shots of the sunburst.
I was curious to try using alternating heartwood and sapwood clapboards to accentuate the sunray effect. I dug through my supplier's bin of CVG western red cedar claps and found an equal amount of each. However, when I got started cutting them, I realized that there were actually three colors--blonde sapwood, nut-brown heartwood, and reddish-brown heartwood. So I ended up alternating the three colors.
I applied clear finish (TimberTek UV) to all surfaces after cutting and planing but before installing. This deepened the colors nicely--more coats on the fronts will probably help even more.
There's a detail shot of the copper half-circle, plus the copper step flashing I used. Am still debating keeping the copper polished or letting it weather to a patina.
I'm embarassed to admit how many hours I spent on this. Probably at least sixteen (cut the curves on the claps by hand with a coping saw, since I don't have a band saw).
Thanks to everybody for all the tips and photos.
That looks great Ed, on the cap flashing at the bottom, is there a pitch of any kind? When I did mine, I milled a standard drip cap with water groove under it. I would have used a piece from the lumber yard, but it needed to be a different dimension.
Afraid I didn't think of that. Do you think water will just sit on there?
Well, you never know. It could soak up into the claps and blister off any surface finish you might have, but part of the thing about the pitch is that there's a bit of air space to let them dry.
Next time I'll do it that way but I'll try not to lose any sleep over it.
Thing is, I find, no matter how hard I try to do it right there's always something more I could've done after the fact. Guess that's the problem with not being an experienced pro--but I suppose you guys are always learning too.
Yeah, it's always something.
Mr Ed,
I've been following your thread and project from the beginning.
Great job!!!!
Did you say you were embarassed about how long it took you to do it?
Don't be. You just went to school and took Copper Sunburst 101 and passed with flying colors.
If I ever attempt a project like this, I'm coming to you, Professor.
brianView Image