I have a very noticeable sag in a load-bearing wall on my first floor, telegraphed to second floor. I believe the reason is to be found down in the basement: there’s nothing underneath the load-bearing wall. There are some 4×4 supports 3′ over, I’m guessing the original builders figured that was sufficient. Anyway the joists have deflected, helped no doubt by the plumbers who butchered the joists for steam lines.
Weight will be going back on those joists as I finish up a second floor bathroom. I’d like to put support under those load-bearing walls. Complication is it’s the laundry room. So I figure a beam across the room, but the problem is there’s a CI waste line going right through where the center of that beam would be. Ok two beams. But the support on one side would obstruct washer & dryer (we’ve considered alternative layouts, they don’t work out).
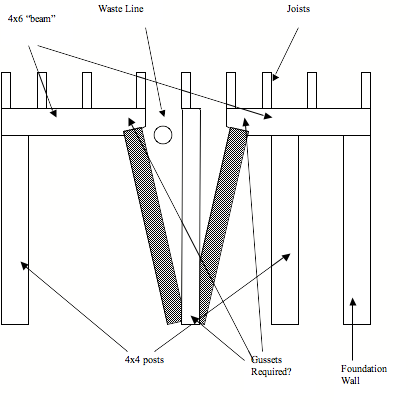
So my current plan is a kind of rafter affair, taking the load diagonally instead of vertically. After all that rambling explanation, I enclose a pic. The “rafter” on the left is the main deal, the one on the right is to counter the horizontal forces. There may be just enough room to run a strap tie over the waste line to tie the tops together.
Questions: (a) Anyone have experience with doing something like this and have any comments to offer? (b) I assume I need heavy gauge gusset plates to hold the thing together. Any suggestions where one can get those kinds of plates?
Thanks for any help.


Replies
yes, I've had experience with things like that, but even with all you said, I see only a tenth of the needed information to be able to dream up a solution. goos place to have an engineeer look at it - or at least post a dozen photos here.
Welcome to the
Taunton University of Knowledge FHB Campus at Breaktime.
where ...
Excellence is its own reward!
I've worked with an engineer in the past, on replacing a beam, that was $$$. I'll see what he has to say, and try to post some pitchers.
and try to post some pitchers.
make mine an import please....
Life is not a journey to the grave with the intention of arriving safely in a pretty and well preserved body, but rather to skid in broadside, thoroughly used up, totally worn out, and loudly proclaiming<!----><!----><!---->
WOW!!! What a Ride!Forget the primal scream, just ROAR!!!
506 = view of CI stack and waste line, beam would run "behind" the stack.507 = view of stack looking towards foundation wall, that horizontal pipe is the waste line. The wood support is an ex-door stud that I've left in for now in case it's holding things up (a beam on the right was almost sawn in two by a plumber, if not for a door support underneath it....)508 = another view of the stack, with waste line looping in from the right509 = now against the foundation wall and looking at where the beam and support on the left of my earlier picture would go510 = waste stack and line from another angle, looking at foundation wall511 = what the ground looks like, I'll be putting a 4x4 support between the waste stack and vent stack, set back a little
is the span between the 4th and 6th joists 32 or 48"??? (L to R)
why not build a load bearing wall between the bottom of the 4x6 and the floor...
start the wall at 3rd joist or between the 3rd and 4th joist and go over as far as the 7th....
got a feeling that yur gonna need a footer in the concrete no matter what ya do....
View Image
Life is not a journey to the grave with the intention of arriving safely in a pretty and well preserved body, but rather to skid in broadside, thoroughly used up, totally worn out, and loudly proclaiming
WOW!!! What a Ride!
Forget the primal scream, just ROAR!!!
Measurements of the 4x6 spans are about 56" and 45" respectively, with 32" between them (two joist bays, the 4th and 6th you asked about). 4x6 beams are overkill but I'll have a suspended ceiling coming down 5-1/2" anyway. If I could put a 4x4 post just to the left of the waste line, I'd be done. But I just can't without blocking off access to either washer or dryer, both of which are front-loading. Hence the idea of a diagonal support.On the right, there was a wall for a small bathroom that I'll be reconstructing, it'll cover up CI waste stack, vent stack, supports. There's a footing there already for the 4x4 to the left of the foundation wall: above is king stud for doorway, and above that header support for 400lb CI tub, hence the 4x4 to take that load. I've already installed 4x8 header above 1st floor doorway (original header was 2 2x4s....these old houses....) and shimmed with metal plates to make sure load transfers down. If I post a picture of the header, you'll see the extent of the deflection.Last weekend I took up tile floor, today I am planning to put in footing for left and middle supports.
how deep into a 4x6 would the waste line be...
imagine a sistered 4x6 to the existing 4x6...
sistered 4x to the 4x that is to the 5th joist...
this assembly forms a "T"....
gusset from the center post to the new beam where the soil line is..
carry the new beam to or past the exisiting out board 4x4 posts...
Life is not a journey to the grave with the intention of arriving safely in a pretty and well preserved body, but rather to skid in broadside, thoroughly used up, totally worn out, and loudly proclaiming<!----><!----><!---->
WOW!!! What a Ride!Forget the primal scream, just ROAR!!!
Waste line starts about 2" below plane of joists, ends about 7" down.If I could get a 2x4 plate between waste line and joists....4x4 or 4x6 beams either side of the waste line, below the plate....4x4 splice underneath the waste line, shimmed down if necessary, with a support post underneath it.....Pro: a lot easier to frame, a little less "imaginative"...Con: I assume the support post has to be midway between the joists 4 and 5 in my picture, instead of to the right of the waste line....I would hope that I would never be the person that had to replace that waste line.....
jimminy cricket....
I would seriously look in to moving that waste line if I had to dig up the floor....
revert that cluster a simpler flow...
then do an engineering on the support issue...
Life is not a journey to the grave with the intention of arriving safely in a pretty and well preserved body, but rather to skid in broadside, thoroughly used up, totally worn out, and loudly proclaiming<!----><!----><!---->
WOW!!! What a Ride!Forget the primal scream, just ROAR!!!
The waste line runs from a retrofit bathroom in the "butler's pantry."It is currently the only functioning bathroom in the house.It ain't going anywhere in my lifetime....
I wouldn't hesitate a minute at doing something like that. I'd tie them together with a couple of lateral ties. I'd also be somewhat concerned about balancing equal pressure against one another.
Bob's next test date: 12/10/07
If I may ask a follow-up question....
This weekend-from-hell, I got started on the footings. I have a question about footings and the CI waste stack. Pitchers below:
Based on the pitcher I gave in my first post, I have cut holes for footings for the two posts to the left and right of the waste line. I'd still like to put in a footing to the right, under the tub.
View Image
This pitcher shows the hole to the right of the waste line (the waste line would go around the support to connect to the waste stack). What you are looking at is something I hooked up to support the waste stack. Homer and Lowes never heard of riser clamps, and anyway not sure what the point is of supporting the stack on the framing when there's no support under the latter.
View Image
These pitchers give a close-up of the base of the stack, something that I noticed that has made me nervous. The concrete is cracked and depressed on one side of the stack. That was true before I did my work, it may have been caused by masons jack-hammering the floor a few weeks ago putting in French drains, or it may have been there for decades. I just noticed it, but I was too fed up to stop. The slab BTW is 2" thick.
View Image
This last pitcher shows the square drawn on the concrete on the other side of the stack where I want to put one more footing, to take the weight of a 400lb CI tub.
I'm getting nervous about having footings on either side of this stack. If I use sill seal to decouple the footings from the rest of the slab, surely the weight of the stack will be concentrated on the area between the footings, where there is already cracking and deflection.
My preferred course of action is to not decouple the footings from the concrete around the stack (so sill seal only on 3 sides for each of those footings). Then pour structural epoxy into those cracks to repair the concrete around the stack (I have some Aboweld).
I guess another course of action is to dig out concrete around the stack and pour a mega-footing for that whole area (two footings and the stack in between. That would be a major pain if anyone decides later to go plastic.
I'd welcome any opinions. My engineer is out of town.
Edited 4/20/2008 8:19 pm ET by Taylor
If the concrete is 2", why are you caring one way or the other about coupling or decoupling?
The footings carry the weght. The 2" concrete covers the dirt. End of story. Bob's next test date: 12/10/07
Thanks for the reassurance. I guess a better way of putting it is, if the all the weight of the stack sits on dirt, if I carve out holes either side of it, the dirt could be displaced sideways. Like the walls of a sand castle going splat when you step on it. Obviously not an issue once the footings are in and set.
I think the idea is that the footing may move down with load and you don't want it cracking the floor around it.
But I want the footings to pick up some of the load of the stack, since before the load was presumably spread out in the soil.
with all these pitchers yur making us thirsty... whatcha serving????
near as I can tell from the pictures...
that stack is going nowhere's.....
pour the footes rifht to the slab...
how big of foot print does that CI tub have??? you may not need the footer for it...
Life is not a journey to the grave with the intention of arriving safely in a pretty and well preserved body, but rather to skid in broadside, thoroughly used up, totally worn out, and loudly proclaiming<!----><!----><!---->
WOW!!! What a Ride!Forget the primal scream, just ROAR!!!
Chip out that piece of slab beside the stack that's been depressed, or leave well enough alone? This floor will need leveler anyway.....My design weight for the tub is 1300 lbs. Water, people, ....
what's the foot print of the tub....
and exaxtly where is this tub going????
Life is not a journey to the grave with the intention of arriving safely in a pretty and well preserved body, but rather to skid in broadside, thoroughly used up, totally worn out, and loudly proclaiming<!----><!----><!---->
WOW!!! What a Ride!Forget the primal scream, just ROAR!!!
Not sure what you mean by "footprint".... It's 5' x 32", will sit in a 2nd floor bathroom above the kitchen above this laundry room. All joists in the bathroom either sistered or replaced (plumbers.....). Spent last summer replacing the beam holding up one side of the bathroom. Now working on the other side, making sure there is a load path all the way down for this monster. The framing of this house is weird. On the outside bearing wall of the bathroom, an undersized beam (which remodelers later notched...), that I can understand. On the inside wall, about 1/2 of the joists sit on a single 2x10. It gets better: this 2x10 is notched 3-1/2" to sit on a 2x4 ledger on a beam at the head of the stairs, so it's effectively a 2x6 beam. They have studs resting on this 2x10/2x6 beam, and they've notched the studs so they rest half on the 2x10/2x6 and half on the kitchen top plate (no bottom plates in this house). The studs are all splitting of course, I've glued and screwed sisters for all of those. Why didn't they just put a 4x10 there?Where I have access, I've sistered a 2x10 to the 2x10/2x6 beam, where the (new) joists for the tub get support, so at least those are nailed into a 4x10. And underneath, I've put a 4x8 header over the doorway and used steel shims to close the gaps in the load path. These supports in the basement are the last part of the reinforcement. Right now the load path ends in air.
got it... I think....
My mind's eye was telling me some thing different...
Life is not a journey to the grave with the intention of arriving safely in a pretty and well preserved body, but rather to skid in broadside, thoroughly used up, totally worn out, and loudly proclaiming<!----><!----><!---->
WOW!!! What a Ride!Forget the primal scream, just ROAR!!!
Ok while in my car today the obvious solution came to me........install a new beam between the joists. Use custom-sized joist hangers to attach the joists to the beam. Still need the intermediate support, and need to cut an extra joist on the left to lift the beam up and slide it over that waste line to the support.Framing it actually looks like a piece of cake, compared to stuff I've done before. The complications are: water, electric, gas and steam.The beam would have to be offset by an inch or two from the wall it would support, because of various things that need to go up inside the wall being supported. Biggest deal there is a steam pipe that's right in the way of where the beam would go. There's a 3-1/8" nipple between two fittings, and that's where the beam would go.Wow, tight.
get a truck you'll get better ideas - faster...
is this similar to yur idea???
http://forums.taunton.com/tp-breaktime/messages?msg=103586.7
Life is not a journey to the grave with the intention of arriving safely in a pretty and well preserved body, but rather to skid in broadside, thoroughly used up, totally worn out, and loudly proclaiming<!----><!----><!---->
WOW!!! What a Ride!Forget the primal scream, just ROAR!!!
I'm only now realizing that you were suggesting a beam parallel to the joists, to the left of the waste line, to replace vertical support. Hmm..... Sorry for the slow uptake, DW has to deal with this a lot....I understood you were still suggesting a new beam underneath the joists, whereas I'm suggesting one at the same level as the joists, still running perpendicular to the joists....The only "T" would be this: To get the new beam over the waistline, I'd have to bring it up through the joist on the left, then slide it over to the right, then sister a splice to restore that joist on the left, but I wouldn't call the latter a "beam" really.... The advantage of your idea is not having to deal with utilities (except the rats nest of copper and galvanized water supply pipes that gets in the way of any solution and will have to be removed)....
Edited 4/23/2008 3:26 am ET by Taylor
the foot print is 1,920SI or 13.3SF or 97.75PSF....
Life is not a journey to the grave with the intention of arriving safely in a pretty and well preserved body, but rather to skid in broadside, thoroughly used up, totally worn out, and loudly proclaiming<!----><!----><!---->
WOW!!! What a Ride!Forget the primal scream, just ROAR!!!
why not pocket a beams made of lvls in the same plane of the joists?
Yes, I was thinking of a 4x10 to provide nailing surface for joist hangers.... Actually LVLs would be too wide, 3" will just fit, 3-1/2" would require moving that steam line completely....Still need the intermediate support, can't get a full-length beam up there because of the waste line....
Edited 4/23/2008 4:10 am ET by Taylor
Your still better off doing two 2x10 glued and nailed with hangers.
depending on the span maybe even eliminate the post.
My engineer visited today.
He used the word "unbelievable" a lot. At one point he said he didn't know how the house was still standing.
All of the load that we are talking about, that he takes very seriously, is sitting on a couple of untreated 4x4 posts sitting on concrete (and therefore rotting). And the 4x10 beam between was notched about 4" by a plumber running a vent stack for the kitchen bathroom. It is sheer bloody luck that there was a post for a doorway there that caught that load. Even so that post is now obviously rotting.
He wants any footings I put in to be at least 4 times bigger than what I was planning. This is in case there is a weak spot in the soil. He thinks 12"x12" is too small and if you get unlucky and the soil happens to be soft at just that spot..... He also wants them deeper. Everyone around here uses 12"x12"x8" footings, he wants 24"x24"x12".
He is a little skeptical of my initial idea of the diagonal trusses I originally proposed, because the load would not be evenly distributed either side of the trusses. It's probably even worse than that, the load either side would vary depending on whether the bath had water in it. And you want even distribution of load so the horizontal forces counteract each other.
He thinks my idea of a "flash beam" (his term) inserted between the joists would work, though he would want the footings made bigger, which moves the location of the support in the middle. This would not be his first choice because, as he put it, we would not have belt and suspenders, we would be replacing a belt with suspenders, because we would be cutting the joists that are still (somehow) functioning in order to insert the new beam between them.
He has another idea: a steel beam that would be offset from the wall it would be supporting, on the other side of that wall from where I was thinking so it avoids the waste line. He wants steel to minimize head obstruction, he thinks we can get by with 8". Then some additional 2x6s in the joist bays because the beam support would be offset from the wall it would be supporting. The advantage of this idea is that now there is no need for intermediate supports, so no obstructions for the washing machine. The disadvantage is that we would need to add 30"x30"x12" support in front of the basement window, and some plumbing in the concrete floor would have to be moved.
I will be discussing the alternatives with DW tonight. I favor the last alternative.