Did salt do all of this damage to my garage floor?
After tearing all of this out I can’t imagine what else would have caused this but salt. The area is 16’x6’x2.5″ inches deep. I calculated that its about 20 sq/ft for volume (roughly). And I think I am going to replace two pieces of rebar that were totally disolved but leave the rest alone.
It’s a suspended garge slab with a large I-beam underneath (I have an awesome cold storage underneath) but I’m only going to park my VW bug on it so it’s not going to have a diesel truck parked on the patch.
Is bag mix from the local orange hardware store good enough? They sell concrete ad mix or bonding adhesive and is that worth the $12/gal?
I guess when you buy a 70’s house with aluminum wiring you have to smile and live with this stuff.
Any advice, thanks in advance.


Replies
Maybe
But could be caused by a top cold joint, where the second truck was late or even too much water added in order to finish the floor.
If not the cause, it could have contributed to salted water entry which would rust out the wire and untreated rod.
i always use a bonder on patches, even ordinary white glue (PVA).
dampen the area being patched so it doesn't suck the moisture out of the patching material, of which "sand mix" might be your answer. No large aggregate, very small stone, long enough working time.
moisten area to be coated and beyond, slather on bonding agent, patch and keep moist at least a week.
Not sure of leaving the metal alone, if rust continues, there's not much reinforcement.
It does look a lot like salt damage, perhaps abetted by frost spalling.
I think you'd want some sort of bonding assist (and have the area damp before starting), but (as others are only too happy to tell you) I'm no expert. And, after the patch has cured several months, you probably should apply some sort of sealer, or perhaps garage floor paint.
Your measures do work out to about 20 cu ft (or about 0.74 yard). Given that there's about 0.6 cu ft in an 80-pound bag of Quikcrete, you're looking at around 33 bags. Might be time to call the truck.
Thanks for the input.
I am going to put some patching/leveling mix on top and around the big patch after I get the big stuff done. My plan was to pressure wash the garage and try to rinse off any extra dirt and/or salt then put some garage sealing paint on the main area.
I will use the glue, since its not too much extra cost or work, thanks.
I guess i could use a gallon of rust inhibitor on the rebar that is still there, but that seems like a lot of extra work and I have used that on the frame of my truck with mixed results. If I had the time/money that sure seems like the best idea.
I think most of the local trucks have a 1 or 2 yard minimum and for what I can pay for 33 bags and and exectric mixer for the weekend I think I am leaning that way, but point well taken.
I will post some more updates/photos and thanks again.
I think you should check with the concrete plant and describe your problem to them. Maybe they can supply a mostly sand mix with fiberglass strands incorporated. It looks like the rebar is too high in the floor, I would use a grinder to cut it loose and remove as much as easily done to eliminate the rusting problem. Also use a bonding agent.
Did you read the part that said it's a suspended slab?
Well... no I didn't read that, I just looked at the pictures. Rebar that high in the slab would mostly be in compression, thus pretty useless. Something is very very strange going on.
Yeah, I agree the rebar is awfully high in the slab. I suspect it was built as a "cage", with a twin array near the bottom of the slab.
As to why the failure seen, most likely saltwater from melting road slush worked its way down through the concrete to the rebar. The rebar began to rust, and when steel rusts it expands. This fractured the concrete, and further fracturing may have occurred due to freeze/thaw (dunno how heated this area might be).
This is a common failure mode for bridge decks around here. Generally the fix is to remove the concrete down to just below the rebar, sandblast the rebar, epoxy coat it, and pour new concrete.
MarkH wrote:
Rebar that high in the slab would mostly be in compression, thus pretty useless.
Not necessarily so. The O.P. indicated some sort of beam below. That indicates the slab may not be a simple span. It could be that thre are, in fact, areas near the top of slab that are acting in tension.
By covering this area with concrete you are making a cosmetic and wear-surface patch (bonding agent or not). You will not be making a structural repair. Thus you will, in fact, be hiding a potentially serious flaw in this floor. Were you to sell this house, the next owner could easily have a much heavier vehicle that may over stress the floor. This could have life threatening results.
I'm sorry, but to properly repair this damage you need to consult with a structural engineer who is versed in reinforced concrete design. This will cost a bit more than some sacks of mud from the big box.
By the way... 20 cubic feet is a lot of mud to mix in a wheelbarrow and to place by hand.
thanks all for the info
I guess the only good part was that the 16x6x2.5" area was pretty much rubble when I started cleaning it out, so any structural issues, bad ones that is, have happened. I just cleaned the hole out.....the skilled labor part.
I am not 100% sure but I think the suspended slab is about 10' thick, or more, and it has a pretty serious I beam supported on both ends and in the middle, but yes, I am not happy about missing concrete and rusted rebar.
So far, I have just chipped out any loose stuff with a breaker bar, all of it by hand.
Point about the engineer well taken.
Yes, since I just consider it mostly a patch for all the obvious reasons, that is why I thought bag mix would be okay. If I win the lottery its coming out.
The Orange hardware store rents an electric mixer and you are right, mixing that by hand would be a total @#$%^& mess.
I have a concrete plant nearby and will stop in and see if I can get a 3rd opinion....thanks again.
Where my parents used to live out in the country there was an outfit that had a site-mixing truck. The truck carried sand, gravel, cement, and water in separate hoppers and automatically mixed them on site, providing exactly the amount of concrete you needed. If you're lucky there's something similar near where you live.
What you and others here are proposing is to do a cosmetic patch. Rubbing in straight portland or using a latex bonding agent that you can by from the big box won't make your new top layer part of the structural slab. I don't care how much you want it to be OK, it won't be. The slab will be less than what it was apparently designed to be. If you disagree with me then I'm sure you will agree to disclose this "repair" to any potential buyer of the property (complete with photos). After all, what's there to hide?
where do you draw the line on disclosure?
Sapwood brings up a very good point about disclosure.
It would seem that asking for advise in a public forum can be a double edge sword. On one hand you're getting free advice from professionals; on the other you're being made aware of construction defeciencies that could have legal bearing regarding disclosure.
It reminds me of the EPA issue of lead based finishes in pre 1978 homes. If you choose to test for lead and find it's positive, then you are legally required to disclose that to a potential buyer. However, If you don't test for lead and you have a contractor do qualifying work under LRRP guidelines, then it can always remain an unknown and disclosure is never an issue. Of course, if you do work on potential lead based finishes in your own pre 1978 home, then you are not legally bound to the EPA's LRRP protocols at all. Do we have an ethical twist on the conundrum: If a tree falls in the forest and nobody is around to hear it, does it make a sound?
Seems to me, the disclosure line is drawn where you involve a professional. Does Finehomebuilding's BT advice automatically trigger a legal obligation toward disclosure; particularly in this case?
This looks like more than a patch job to me
I've looked at your photos a few times now. Something seems amiss here...and it looks like more than a simple patch job to me.
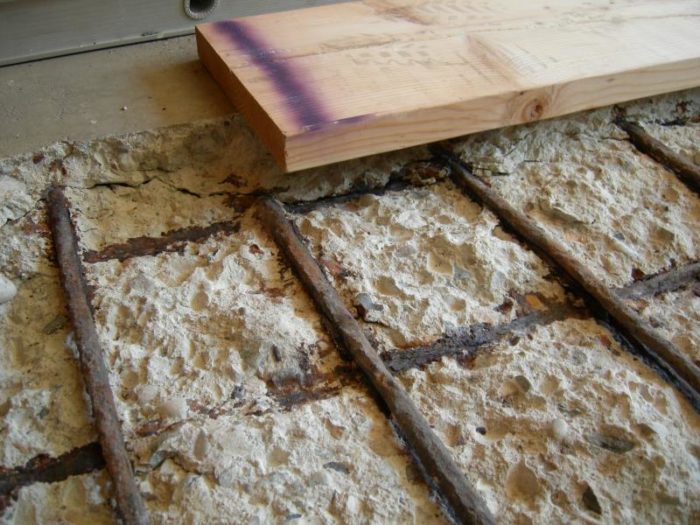
I noticed in photo #1 that you apparently have a continuous horizontal shear line right above the rebar. This indicates delamination at the tension (steel) layer. Could this be due to a large live load applied in the past...or even the long term dead load on poorly structured, placed, or finished concrete? We obviously don't know the structureal parameters of your building, but these photos (and this one in particular) concerns me from a structural and safety point of view.
Also, if this is the inside of your protective building (as it appears), then how much salt could have been used or dripped in there? Doesn't seem like enough to keep the slab saturated with a brine solution to the point of oxidizing the embedded rebar that badly. Maybe the rebar used was of very poor grade* and already largly rusted when it was used on this job. I've seen people do crazier things when their time is free and money is tight. If the rust process had already well begun, it would've gotten worse in wet concrete and expanded as a result of the iron's oxidation--thereby placing an enormous amount of pressure within the concrete. Enough to cause it to delaminate at the tensile layer? Who knows; but it kinda looks like it.
At any rate, do yourself a favor and pay to have a structural engineer look at your slab. IMO it would be money well spent because (as others have pointed out) any concrete or rebar you patch in is going to be largley cosmetic.
* I see the rebar is rusted badly, but I don't see even a ghost imprint of hot pressed rebar. I appears to be unprotected, smooth, cold roll steel doweling. If it is, then I believe that to be cause for additonal structural concern.
a continuous horizontal shear line right above the rebar. Pay attention to dn's comment!
At the very least (until you win the lottery), you need to break the top layer back to where there is not a hoizontal crack as seen in your first photo (right below the 2x8).
Would suspect you will be chiping out a few more feet to each side. A breaker bar dropped by hand may or may not be sufficient. For this type chip-out, and to not amage underlying concrete, a hand held air impact chisel is likely best - you do have an air compressor?
My preferred bonding method is to mix a slurry of straight portland cement and wire brush it into all surfaces, including on the rebar. A big wire cup on a 7" or 9" angle grinder is what I use for bonding. Takes abut as long as sanding a hardwood floor to do it right.
My approach if it were my own place would be to chip everything out down to where there is NO visible existing cracks (you may need to remove the entire surface area worst case.
Then do the portland cement wire brush bond layer, immediately before mixing your concrete. If doing bag stuff, it is pea gravel mix, so that is OK, but for this case I'd add an extra 5# of portland cement to each bag.
You will likely get enough broken off back to no shear line crack that you will end up needing 2 yards or so - thus, get fiber reinforced air entrained 6 sack mix delivered, 4 " slump MAX, do NOT add any water.
Much thanks again...and
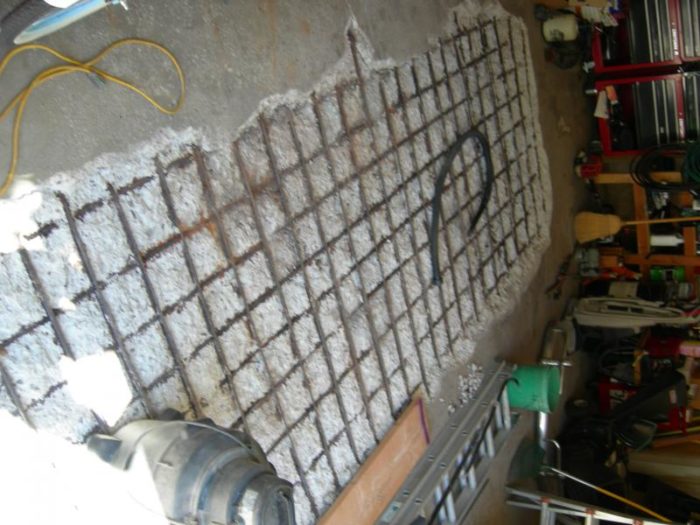
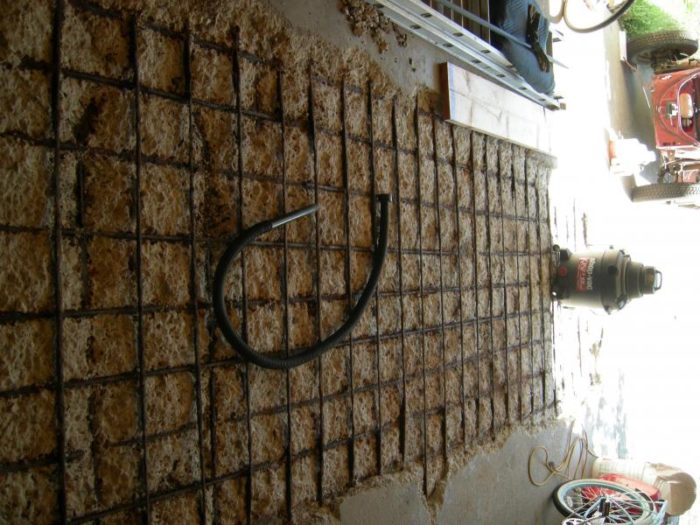
Here are two more crack photos, but I think most of you already recognized the fact that all cracks and loose material should come out.
If it matters, the garage is 24' wide and 23' front to back and the affected area is basically in the middle.
The first photo with the crack that keeps going (the rebar is in line with it) is 10' from the front edge of my garage, and yes there is a matching crack on the other side of the area too that follows that rebar. The second photo is at the front of the garage going to the cold joint (without expansion material) which is my driveway.
I put a 6' level on the crack and there is about a 1/4" bump from side to side and I don't think this is exactly under the I beam that is under the middle of the slab. (Sorry I haven't measured that but someone is in the basement currently).
As far as all the questions about disclosure, not only am I all for that, but I don't think the best concrete guy in the world could hide the fact that a patch was done. When I moved in, there was the large bubble of concrete there and I just cleaned it out. But that does further beg the issue that if I cover it up, will the new owner be satisfied with just knowing I have a few pictures and I filled it in? If I keep digging and sandblast the rebar (which is the right way) its turned into a $5,000+ job. (a small price to pay for not falling through the floor I guess). How far does anyone want to keep going? Maybe most all of the rebar is shot?
Obviously, photos, an engineering review and repair checklist and permit would be the way to comfort any new buyers. But, if there is an example of a floor joist that a plumber cut up, does the current homeowner have to pull all the plumbing, wiring, redo flooring and drywall to make the new owner happy, or can something be sistered (a patch) to help the situation? Do you have cut your nose off in other words?
I thnk the floor is pretty safe, because i'm not really driving on it. If I thought I was going to fall through into my cold storage I would be calling an engineer. But all the suggestions I have been given are really appreciated and intelligent ones too.
You're taking disclosure too far
Disclosure to a potential buyer does not require you to make any repairs at all. It is only incumbant upon you to let them know what you know about the condition. It essentially allows a buyer to make an educated purchasing decision based on know facts; not smoke and mirrors.
BTW, you've indicated that someone is in the basement where you have great cold storage. Do they have a pulse?:)
A bit more info
After vacuuming the affected area for the zillionth time today, I did visit the basement and noticed several things.
One, the beam actually runs from front to back of my garage and is basically right down the middle of the area.
Two, the two main cracks seen from above have matching bubbled/spaulded areas that are seen in the ceiling of the cold storage below with what looks to be a light dusting of salt from 30yrs of snow melting in the garage.
So....I think the salt has been melting and rusting and ruining my concrete over the years right where those two cracks are.
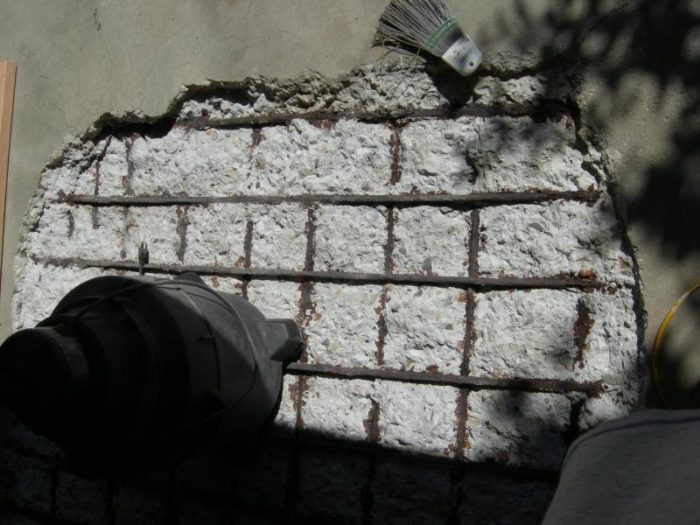
Two areas stand out with additional cracking/separating and its mainly at the shallow rebar where the two cracks begin and end. That is, it almost looks like the top layer was poured over a lower layer since there is a 1/8" crack (roughly) at these two areas, where the two cracks begin.
I thought a 100lb jackhammer would be needed to really get it busted out....but were would it end? For a while I thought a log spliting wedge would work too but it looks like the crack keeps going down and down to?. Who knows? I am to the point where, if I am going to do it right, the whole garage needs to be redone and my ceiling below. Currently, that isn't in the cards this year.
One interesting thing is that the ruined area looks to end where some of the rebar on the top turns down and doesn't run the length of the floor. Who knows why they did that but you would think that would make it stronger. I wonder why the concrete would crack where the rebar turns down?
I will have to post an update in a year or two, and at least some finishing photos.
Thx for all the advice, most apprecieated.