
Has anyone done brick walkways and driveways? Is there a book on doing it? Easy for a do it yourself?
Thanks for your time.
Has anyone done brick walkways and driveways? Is there a book on doing it? Easy for a do it yourself?
Thanks for your time.
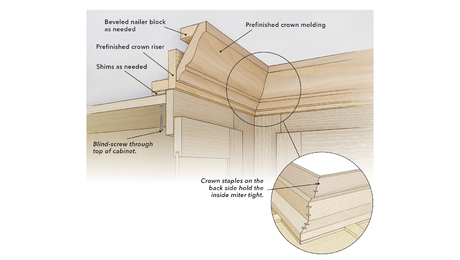
Use these assembly techniques when installing crown risers and molding to minimize visible gaps and nail holes.


"I have learned so much thanks to the searchable articles on the FHB website. I can confidently say that I expect to be a life-long subscriber." - M.K.
Dig into cutting-edge approaches and decades of proven solutions with total access to our experts and tradespeople.
Start Free Trial NowGet instant access to the latest developments in green building, research, and reports from the field.
Start Free Trial Now


Replies
I've done a few (walkways not driveways) the bricks is the easy part it's what's underneath that counts.
Make sure base is sold lay in 5/8" minus crushed rock, rake to the contour you want & compact the crap out of it. Then it's sand time about 3/4" to 1" I like to use 3/4" conduit or copper pipe as a guide to keep the level uniform.
Now it's brick time--- once the bricks are in, then more sand push broom over the whole thing. I like to mix some straight portland cement in with the sand that will help lock it in when some moisture is added.
Once you have broomed sand all over the place then hit it with a walk behind plate compactor to get the sand inbetween all the joints.
Remember you can lay the bricks as pretty as can be , but if the base sucks the bricks will look like crap down the road once it all settles.
“When politicians and journalists declare that the science of global warming is settled, they show a regrettable ignorance about how science works.” Nigel Calder, editor of New Scientist
About how deep did you make the gravel? Did you use a plastic barrier between the gravel and the sand? Did you use a plate compactor or a jumping jack to compact the gravel and sand?
I agree with the above comments about having the base perfect and well compacted, that truly is the most important part of the whole job.
I like to use a paver base for my subgrade, which is a crushed aggregate mixed with really fine limestone dust. Once it gets wet it's really stable and you don't have to worry about it moving under the load of traffic. I like to put down about four to six inches and compact it really well with a plate compactor, or on a large driveway or patios we've had the excavator run over it a few times with his rolling vibratory compactor. After that we usually like to lay down a couple of inches of sand just as a working base and compact it in as well.
I would also agree that by adding a little portland cement it will really lock the pavers together.
Depth of crushed rock depends on what's underneath it & what elevation you want the finsh product to be.
For instance if your removing grass over a soft soil I would want atleast 6" of crushed base, but if your ground is hard like glacial til then your rock base is to even out the imperfections & would be only a couple of inches.
On the gravel tou can use either a jumpin jack or a plate compactor---- jumpin jack compacts more with less passes but harder to control --- plate compactor is easy to control but requires more passes.
No plastic barrier I want water to be able to seep through it, verses finding a horizontal path & taking sand away. I have seen a weed barrier used before.“When politicians and journalists declare that the science of global warming is settled, they show a regrettable ignorance about how science works.” Nigel Calder, editor of New Scientist
Here's a UK site. Watch out for the British vocabulary and spelling.
http://www.pavingexpert.com/
weed barrier or filter between sand and stone is a must or the sand works its way down over time through the stone.
AllTrade said: >> weed barrier or filter between sand and stone is a must or the sand works its way down over time through the stone.<<
It depends on what kind of stone is used.
Bill said, >> Make sure base is sold lay in 5/8" minus crushed rock, << The problem with aggregates is that the nomenclature is highly regional. As a mater of fact, in many states, the names of most stone products are set by the state DOT. So, theoretically we could have 50 different names for the same product. And to further complicate things different types of stone are available in different parts of the country. For example, someone above said something about crushed limestone - which isn't available where I live. None the less, when Bill said 5/8" minus I assume what that means is that it is crushed stone of various sizes anywhere from 5/8 down to stone dust. So, in that case there is no need to place a geo-textile fabric between the sand and the crushed stone.
Here, in NC the crushed stone that Bill refers to is called ABC or crusher-run and is what is commonly used for road beds, although I think it would be more like 1" minus.
Personally I use ABC stone and I put the geo-textile filter fabric, which allows drainage, under the crushed stone, and on top of the firm subsoil dirt. Then I use "screenings" or fines, which is basically stone sand from a quarry, rather than natural sands for the layer right under the brick. The "screenings" compact much better than natural sand during the final step I will describe below. The down side is that you still need a small amount of regular sand to sweep over your paver top surface. I like using mortar sand for this purpose, since it is quite fine.
If I was in a situation where I had to use, say 3/4" washed stone as a subbase, in that case I'd put the geo-textile fabric between the stone and the dirt and a second layer between the crushed stone and whatever was above it, be it ABC or something finer. The whole idea is that the fabric allows drainage (unlike plastic) and keeps the different layers of material stratified, so that they won't migrate together and further settle over the years.
Another note is that the crushed stone needs to be compacted in lifts (or layers). When using a non motorized compactor, like a vibratory plate compactor I'd probably do 3" lifts. One advantage to renting a vibratory plate compactor is that you can cover your finished pavers with sand and then run the plate compactor over them. This will really "tighten them up".
Another thought is that someone above said "The brick are the easy part".... Well, sort of... I'd modify that statement a bit to say the field brick are the easy part. The edges can be a real bear if cutting of the bricks is required. A diamond blade brick saw must be rented for other than the very smallest projects. This could be a chain saw style gas operated saw, or a wet saw with a sliding table that allows the brick to pass under the blade - similar to a wet tile saw. This cutting of the brick can easily be just as labor intensive as placing all the brick in the "field", and hearing and eye protection is a must. If the paver project can somehow be carefully planned out to utilize paver shapes so as to not to require cutting, this will save hours - days on a large project...
Finally, when doing a paver project, it is essential to provide some kind of a hard edge, to contain the sand and edge pavers and hold them in place. This could be as simple as using mortar to lock the edge bricks together, or there are various product or other methods to create the hard edge. Often you will see brick pavers areas installed between finished concrete areas - again to create the "hard edge". If you don't create a hard edge, the paver job will start to fail around the edges after a year or 2, or sometimes sooner.
PS: The art of a paver project is in the patterns that can be created. See attached pic.
I use a mixture of gravel and clay called roadbase,it is VDOT approved here in this area.I use a few differant quarries within a 150 mile radius,and its about the same type of material at each of them , easily compacts with a plate tamper in 2" to 4" "lifts.
I'm probably about 300 miles from you (max) and they don't have that aggregate around here. You are uner VDOT standards, we are under NCDOT. BTW - I'm thinking when I lived in VA the material we call crusher run here was called 21a there...
Edited 4/9/2007 7:49 pm ET by Matt
I've been installing pavers for over 20 years, and have learned a few things.
Base is critical. As mentioned, stone varies regionally. Here we have crushed limestone and screened glacial till gravel. The crushed is much better, but you have to use what is available.
5-6" base for walkways and patios, 12" for driveways, placed in layers, tamped well. Plate tamper is fine if lifts are thin enough (2-3"). We screed the last lift. Not everybody bothers, but I feel it is worth it. It is how we set grade (establishing pitch) and results in a uniformly thick setting bed of sand or screenings.
1/2 inch galvanized water pipes are used as screed guides. Stiffer than copper or conduit mentioned above. We shoot each end of the pipe to set grade.
Fabric over subsoil helps if it is soft or spongy (clay). I cannot imagine how it could be used between stone and setting bed layers, although I have seen this in books and magazines. How would you keep it perfectly flat while screeding an inch of sand? Weeds are not coming up through the tamped base. They result from airborne seeds landing in the joints.
Edge restraints are available now that didn't used to exist. We use a plastic one that gets spiked into the base and covered with topsoil to hide it. The webbing can be snipped to allow the edging to follow curves. We used to just tamp base material along the outside edge to contain the pavers, but sometimes some drift would occur over time. Wood borders do not work in a Northern climate, as they tend to rise with the freeze-thaw cycles. Trust me on this.
Diamond blade saw as mentioned above gives professional look to cuts. I've done exactly one job ever (large rectangle) that required no cuts.
Another fairly new product is polymeric sand for the joints. It helps reduce erosion and weed growth. Directions on the bags say not to use limestone screenings as setting bed material, but do not say why. Reacts with the polymer, I guess. So we use a coarse sand.
Bear
"Another fairly new product is polymeric sand for the joints. It helps reduce erosion and weed growth. Directions on the bags say not to use limestone screenings as setting bed material, but do not say why. Reacts with the polymer, I guess. So we use a coarse sand."
I used this stuff last fall on my brick sidewalk, and it's pretty neat - the sand is swept in as usual, then you wet it down with a light spray of water and it glues itself together. It will get fairly stiff but it stays a little rubbery, so the bricks can move up and down a little without cracking the bond.
bearman
I laid my own driveway with 13,000 used paving bricks.. I need to regularly spray the grass and weeds growing between the bricks but saw a potential solution recently.
The guy took an air hose and blew out as much sand from between the bricks as he could get out.. then he carefully poured morter mix between the bricks and broomed everything into the cracks. He then misted the morter mix with a sprayer.. He stayed off it for a week and now it's been 5 years and he's yet to see any weeds growing.
Is that a practice you'd recommend?
Frenchy, I think it depends on the climate. I don't think it would hold up to freeze-thaw cycles very well, but might work pretty well in warmer areas.Bear
let me ask this ,around here [,kansas] one of the street contractors lays brick in the cross walks at the intersections. they lay concrete,then 1 1/2 sand then lay the bricks.
now i feel like i can put down the concrete as easy as ,gravel and packing it. what do you think of this idea? larryhand me the chainsaw, i need to trim the casing just a hair.
Bluegillman,
Lots of good posts here already... ditto the comments about the base being paramount.
I did a patio for my house myself about 10 years ago.
I paid a contractor to excavate for the base, truck out the soil (5 loads), truck in the crushed stone, lay and compact. He also trucked in the sand for me.
I handled levelling the sand, laying the pavers, brooming in and vibrating the finished sand.
In my case, I got to handle 22,000 lbs of pavers a minimum of three times each even with the pallets delivered right next to the install. (pattern was random using 7 different shapes and colors) Of course, the days I chose to do the job turned out to be 90+ degrees.
Knee pads, strong back, and strong hands are all prerequisites. Next time I write a check for the whole thing and supervise with margarita in hand.
Easy for a do it yourself?
Yes and no.
As with so many things, it's the preperation that is key. No real rocket science in the prep labor, but a lot of manual labor. Some of that labor can be reduced with machinery (and some machines, like a blade compactor are required); but the learning curve with machinery can be expensive renting by the day or w/e.
The actual pavers? That's more to are you agile enough to handle the bending and stooping with pallets and pallets of pavers? 80% of the work is the prep; about 20% in the placement. Now, actually placing the pavers can be half the hours in the project, chronologically--but the hard labor is in the prep.
I'll sub out just about any size project bigger than 4x8 or 8x8 or so--easier on me, easier on customer. But, that's me--I'm old and stove up, not young and spry.
Did 600 sqft of patio over some crappy clay type soil in Massachustess. Excavated down 12-18 inches and used heavyduty filter fabric then plate compacted 4 inch lifts of 1 1/2 crusher run. The last 4-6 inches I used 3/4 inch crush.I did screed the last layer as on post suggestedI would not do a driveway without fabric unless you are on a gravel pit. The fabric comes in 12 foot wide rolls and maybe wider.KJM