I hang all of my doors! We even make our own raised-panel, Shaker style doors. Rarely do we order prehung doors. Our doors are hung “just so”. Here’s how I do it.
I set up a lazer level with vertical and horizontal lines. My hands are free! I put the door frame in the opening and install 8 stop-blocks. The frame is held in place and my hands are free. The benefit here is that the door lies in the plane of the wall (my walls are always plumb). I can move the frame sideways and up, but it always remains true to the plane of the wall. I fasten the hinge side to the shoulder stud using shims and screws. Screws, not nails…you hear me? 😉 My fasteners will, eventually, be hidden by door stop. If my door ever needs adjustment I only need to remove door stop.
With the hinge side secured, I hang the door back on the frame. Now, like a piano tuner, I fine-tune the frame to fit around the door. The reveal all around is always the same. It is a balanced installation. It is beautiful. Best of all, should the need ever arise, I can access my work quickly, without damage to the wood work.
How many can I install in a day? About 8. Routing the door frame for hinges and strike plate, joining frame pieces and placing the door in the frame takes 1 hr of my time. Admittedly, this is not the “mass production”, save money, helter-skelter building technique I sometimes see in my area. The rewards for thoughtful door installations are many. Call-backs are rare. What thinkst?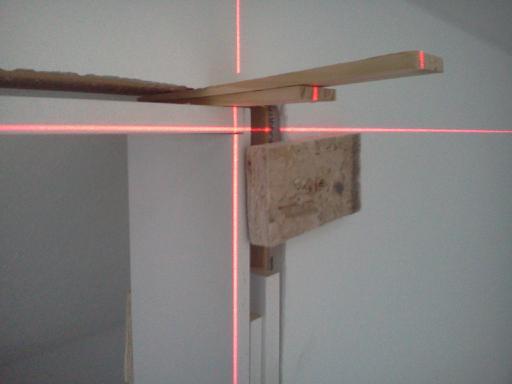


Replies
I'll bet you're proud of how modest you are.
sorry to offend
My point was to offer insight...to encourage dialg. I am very sorry to have riled you. Of course I am glad to have devised this method. I am not, by nature, a shrinking violet. :) I talk about both successes and failures. That's what this forum is for. So...um..tell me what you think. How is this method not good? What improvements do you see?
I am decidedly not a fan of prehung doors...for many reasons. I also do not warm to the hop-gallop mentality that is prevalent in residential construction. I prefer thoughtful installations that take many factors into consideration. Peace.
LOL, that was my first thought as well when I read it!
Nobody does it better
Makes me sad for the rest
Nobody does it half as good as you
Baby, you're the best
Nobody does it better
Sometimes I wish someone could
Nobody does it quitethe way you do
Did you have to be so good?
To be honest, it seems like an excessive amount of trouble to go through just to hang a door.
Perhaps I should add that I do craftsman-style remodels, where attention to detail is expected. Yes, it is less costly and quicker to install a prehung door.
Why would that fact that you built the door have any bearing on the technique you use to install it? I suspect you are overthinking the process.
overthinking?
I like to look at door frame installation from many points of view, because there are numerous variables to consider. I'm particularly interested in exploring the variables typically found in older homes.
Everyone has their own methods. My point is to share mine and learn from others. When you know all the different "tricks of the trade" you can select the one best suited for a particular situation. For instance, have you ever considered setting the hinge jamb in a non-plumb wall, setting up the lazer, marking a verical hinge line down the length of the hinge jamb, and only then routing for hinges? The plumb-hung door will show a variable reveal relative to the jamb, but trim applications will be true to the wall considtion. While I don't generally recommend this method, it has proven useful in a few historic remodel situations, where corrective actions on the wall where out of the question.
This is break-time-shop-talk...the batting around of ideas, thinking outside the box, as we munch on Holiday left-overs. Only the brave dare do this...and..um...pioneers tend to be brave! :)
Your insights are welcome.
NIce work Mel. One of my favorite aspects of finish work is thinking of ways to do better work more efficiently. This seems like a good method for you. I have seen people use the same trick with the stops to hold the jamb in the wall plane. As you noted, this is only a viable method when the walls are dead plumb. I think the best part of building jambs and hanging slabs is that the stop is applied after the door is hanging. You always get nice solid contact on the entire length of the latch side. I didn't take your post as bragging, only as someone passionate about his work and eager to "talk shop". Happy Holidays to all.
Thank you for your thoughtful and kind response! Yes, I am passionate about my work. I bring ooomphff, energy, spit and sparkle to the work I do. I so loooove working with mind, heart and hands!!
I took notice of your claim that stop-blocks only work when walls are plumb. I don't see that. All that is necessary is that both sides of the opening are in the same plane. True, if the wall is not plumb the door will either open or close on itself. So..um...what to do? I install my stop blocks. Then I check VISUALLY for plumbness by standing to one side of the framed opening, and eye-balling the two jamb side for parallel. I add shims to the blocks until the two j-sides are prefectly aligned. I may be necessary to shim some more in order to correct for the non-plumb wall. After my door slab is hung on the hinges, I close the door and check for how the leading edge of the door (lockset end) aligns with the strike plate jamb. Further adjustments may be needed, which is why I liken the activity to tuning a piano. :)
I am curious: what would you do if you have set a perfectly plumb door frame in a non-plumb wall, and the PLUMBED door frame stands proud of the wall? Unless corrections are made, the trim will stick out on one side and not be fully attached to the jamb on the other side. I use various techniques, but would like to know what you do. Thanks for considering a reply.
proud is good
Yes, good idea. I use a variation on the idea, which is to attach two pieces of scrap lumber, one which spans the doorway in top third of door space, the other on bottom third. To which I add, underneath each of the screws,a small washer. When pressed against the stop, the jamb will thus be slightly proud of the wall.
re proud is good
Ok...I get what you are saying...but your method suggests that you are cutting your jambs sightly wider than the wall width. True? Are you installing your scrap lumber across ONE SIDE of the opening only? I can see the benefit of doing it that way, but by screwing scraps into place on BOTH sides, my hands are completely free to shim and sight and "fine-tune" the whole shebang.
My son, the excellentamos trim carpenter, keeps telling me, his Vater (German for father) to make jambs stand slightly proud of the wall on both sides of the wall. He claims it's easier to trim them. We gemerally work with wide, 3/4" thick trim boards that don't allow "tweaking". Your thoughts? Thanks muchly.
Here's the HingeMate routing tool I use. I prefer it over many other tools on the market. I can mark and set it whereever I want, and whatever depth I want.
One of the best carpenters I've ever encountered is a guy who, by his estimate, has hung over twenty thousand doors. I believe him. It's an extremely simple process. No need to rethink the wheel here. The necessary brain activity has been done. Have fun ruminating but you aren't going to improve on the tried and true. Pick some activity that hasn't already been done to death. However, you'll probably have to step outside what we know as construction to do that.
Is there a tried and true for every procedure? Do tried and true methods ever get tweaked? I think the answers are yes and yes.
Regardless, if the original poster wants to share his techniques, it doesn't hurt my feelings any. I like to know more about how the pros do it, even if it seems a tad pretentious. I consider myself a intermediate level carpenter and feel like I will always be learning. Cut the OP some slack.
With my limited experience, the walls are rarely perfect and the jambs-pre-hung often-are not so hot either; there are some really cheap clients out there who think nothing of buying bargain basement doors. I screw two pieces to the wall on whichever side is most visible and put the jamb to that. Often times, the other side requires some tweaking, whether it be some sort of jamb extension or modification of the trim. Block plane work generally suffices. With luck, the whole assembly can be painted. If clear-coated, then you've got a whole other ball of wax.
My father taught me to leave the jamb a tad proud and from what I can tell, this seems like sound advice. Again, apply the block plane to the offending parts and no one needs to know you've planed 1/16" off the corner of a 1X4 piece of trim.
If I am constructing the walls and hanging the sheetrock, maybe I can better control the plumbness of the walls, like the OP. However, how often are we fortunate enough to hang a door on a wall we've framed up?
Thanks, Tuanj
Thanks for your comments, Tuanj. I want to keep learning until the day I die! I'm a spry chicken aged 66+, and my day will come by and by :)
Most of our shop-hung doors are stained and finished in our shop and transported to the site "knocked down". The reason we do this is because we make every effort to "perfectly" match the stain color with the existing color. We have developed techniques that yield true results. Staining frame and stop parts in the shop allows me to apply clear finish with a spray gun. An added advantage is that I don't need to worry about damage when transporting to the work site. Routing for hinges and strike plate will have happened in the shop.
Next comes on-the-job assembly. Then jamb and door installation. So...um...for us planing the door jamb to fit a non-true wall is not an option...not one we wish to take (we are "perfectionists"...the German genes, I know, I know..sigh). We adapt each installation to existing conditions. Sometimes this calls for creative solutions. For instance, where the door frame stands proud by more than a tad, or where the wall is buckled - remember, we do mostly historic remodels- we MAY run over the back of the 1x trim board with a power planer. We leave aprox. 1/2" of unplaned material near each edge. Then we hold the trim into place, scribe, and make final adjustments with the plane on the underside of the trim board that lies on the wall. This method allows us to maintain an even plane across the 1x trim. Only the thickness of the trim on the wall side may vary slightly. In rare instances we may shim where trim boards meet (head of door) and let the board follow the plane of the wall the rest of the way down. Caulking is, generally, not an option...unless we have painted doors. Even then we limit how much we caulk. We'd rather trim-and-fit.
Lemme mention one more thing. B4 I install the door frame I take measurements from the floor to the horizontal lazer line (see photo). I adjust (cut off) one jamb leg accordingly. This way I don't have to shim the bottom of one jamb. That can be an issue when a new frame stands on an existing finished floor.
you're late to the partay....
If you really want some info on how others approach this do a forum search [assuming it still works]. There are some old threads that have a lot of opinions from back when this site had a good many experienced followers.
I'm too uninspired to get into lengthy posts on my techniques again, there just ain't enough readers to justify.
I will say though, I wondered why you didn't address the jamb length/floor level aspect early on.
Hi Mel, Yes. I mispoke. Plumbness is not as important as same plane on either side of the door opening. With prehung doors and a rabetted jamb you have to adjust the jamb so the door hits the stop evenly everywhere. This can create trim issues that have to be dealt with in different ways, when the jambs don't necessarily follow the wall plane. Sometimes that means tapered extension jambs, planing the face of the jamb flush with plaster etc. With the doors you are hanging yourself you undoubtedly avoid some of these issues because the walls don't need to be dead plumb, or in the same plane. The door can be hung and the stop's position is "tweakable" while the jamb can remain in plane with the wall. This is what I like best about hanging my own doors. There is the added bit of adjustability.
This is a great idea for door installation. Thanks
I would love to see the panel doors you make. I was thinking of attempting this myself.
making panel doors
Hi, Vickark
Here are 2 photos of a shop-built, Shaker-style panel door. Making a door is a fairly simple process using hefty dowel joinery Sorry I don't have better photos handy. My butt is distracting, but what the hey!
I stain and seal my panels prior to installation, because (as you may have noticed with manufactured doors) the ongoing expansion/shrinkage cycle can cause the unstained part of the panel to show. I prefer simplicity over decorative cuts. I prefer to let the beauty of stained wood to speak for itself. Incidentally, we used painted 1x4.5" wide trim in order not to "over do" the dark stained look. The hardwood floor, the door panels, and the staircase treads are stained in the same color. Everything else is painted. No carpets are allowed! Tiled bathrooms and free-standing vanities with clean lines. Sorry the photo ain't right side up...not sure what that's about... whatever....sigh.