First time to try posting this stuff, so please bear with me.
Where we started….
Troy Sprout
Square, Level & Plumb Renovations
First time to try posting this stuff, so please bear with me.
Where we started….
Troy Sprout
Square, Level & Plumb Renovations

Listeners write in about ventilation and radon control and ask questions about tightening basement garages, ventilation solutions, and safer paint stripper.


"I have learned so much thanks to the searchable articles on the FHB website. I can confidently say that I expect to be a life-long subscriber." - M.K.
Dig into cutting-edge approaches and decades of proven solutions with total access to our experts and tradespeople.
Start Free Trial NowGet instant access to the latest developments in green building, research, and reports from the field.
Start Free Trial Now


Replies
Well, that worked!
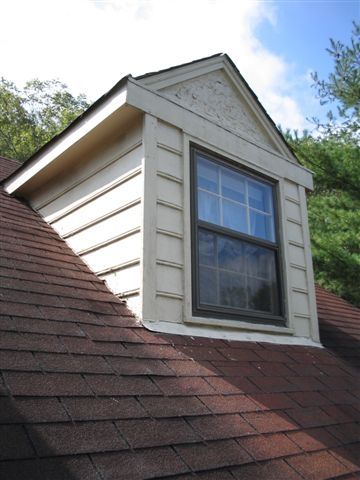
The shingles' lives were finished, so we decided to replace them with Hatteras Weathered Wood. While being staged, I figured to paint the dormers.
It was obvious that the siding was finished. Gonna have to replace it....
Troy Sprout
Square, Level & Plumb Renovations
Now the decision to build out the eaves. What the hey, the sheathing was gone because of the monkeyed up flashing. May as well go all the way.Troy Sprout
Square, Level & Plumb Renovations
The tearoff revealed some interesting framing with the rafters landing on the joists. I added a subfacia to attach the birdbox.Troy Sprout
Square, Level & Plumb Renovations
Some new sheathing, 30# felt wrap and some flashing. I used two layers of 1.5" felt strips to allow an air gap and indicate stud locations for the Hardie beaded.Troy Sprout
Square, Level & Plumb Renovations
I installed the siding high to allow for a sacrificial trim board at the rake. This allowed me to flash as the shingles go down instead of ruining the new roofing by installing the siding after the fact.Troy Sprout
Square, Level & Plumb Renovations
I'd decided to "top-down" the shingles. I took the idea another step by only removing the existing down to the bottom of the dormer rakes. This has prevented damaging the new Certainteed Select underlayment.
I folded the felt up to "flash" under the drainage plane felt at the dormer rakes. You never know where water will go and I wanted to be certain that the last line of defense carried it down intead of into the sheathing.Troy Sprout
Square, Level & Plumb Renovations
Here's where I stand as of yesterday (barely on 9/12 pitch). As you can see, I'm using drywall tape to maintain the lines. I ran the tape at both ends of the roof and pulled a reference string at course #5. Then I set the tapes equi-distant from the most visible side to maintain the lifts. This technique is the cat's a##. Easy to see, mark notes and measurements and I don't feel terrible leaving it for the next guy to wonder about.
I've included some pics of the new presentation and my quality dept.
Thanks to all on this board who share their wisdom. Using that wisdom has made for a much simpler application of this facelift. Many footsteps have been made on the ground that would otherwise have been done on the roof. My feet and mind are forever grateful.
Troy Sprout
Square, Level & Plumb Renovations
...I love the finished look of the dormer, a huge improvement! And I think the idea of the drywall tape used as a story pole is a cool idea...but I don't understand what you were marking on there. Were you just transfering the layout of the first finished dormer over the second dormer that was to-be-finished? If so, why didn't you do both at the same time?
Either way, it looks great, you should be proud.
Justin Fink - FHB Editorial
The tape was laid at the gable ends of the roof with the overhangs, etc in place. The layout marks are marked as to which course (numbered) and which shingle (full tab vs. half tab). I then pulled a string from eave to eave at a specific course below BOTH dormers to set the reference (drywall) tapes for the layout on each side of both dormers.
Given that 15' is the end of a shingle from the eave, I measured across the tops and bottoms of the dormers to chalk a straight line up between the dormers. This allows the shingles to line up below the dormers no matter what they align to (in this case, I can't tell IF they were aligned at all).
FYI I laid the shingles out on VISIO for deciding what the best (fewest) cutting detail would be. These Hatteras are pretty high dollar, so I wanted scrap (and utility blade useage) to be minimized. I am using "starter" shingles to help with cost AND time. Being that I'm a "one-man" operation, ANYTHING I can do to limit time expended is ripe for picking.
Troy Sprout
Square, Level & Plumb Renovations
Looks good. That's a real improvement on those dormers. Do you have a before pic showing the whole front of the house? Like something along the angle of the "ready for tearout", but before you started the facelift.
jt8
"Real difficulties can be overcome; it is only the imaginary ones that are unconquerable. " --Theodore N. Vail
Thank you.
Here's the pic.Troy Sprout
Square, Level & Plumb Renovations
I like the look of that brand shingle. What is their life expectancy?
Welcome to the Taunton University of Knowledge FHB Campus at Breaktime. where ... Excellence is its own reward!
40 years life.
Mike Smith used them on a previous project and liked them. I agree with Mike for NEW construction. Reroof with rakes requires all new flashing for the 8" reveal. If I weren't doing it already, that may have been a deal breaker. 18" high w/ 9" tabs.
The big deal for me after installing some... THEY ARE CONSISTENT! Beats hell outta fighting with bundles that vary in size by up to 1/4". I've actually grown to trust the reveals and tabs to be in line. I snap every course as a matter of habit because of those bastid Owens Corning 25 yr.
Fewer shingles per square is much easier for cutting around obstructions.
18" will stay on top of the ladder while standing on end. Critical for the "nothing stays there" slopes.
BUT, you can't use the reveal foot on the gun. Gotta do that by hand. Troy Sprout
Square, Level & Plumb Renovations
nice work, and way too much fun...
but i really like your crew....
View Image
Mike Smith Rhode Island : Design / Build / Repair / Restore
Best in the bidness... 10 years' experience between them.Troy Sprout
Square, Level & Plumb Renovations
The layout technique transferred past the second dormer at an 1/8" outta true. Must be the adhesive at the edge of the shingles ;).
I'll use this idea many times in the future. Troy Sprout
Square, Level & Plumb Renovations
One of the things I'm always curious about regarding dormers is where the front face is located in relation to the rest of the house walls. On yours, is it in line with the front wall of the house? It looks like the dormers are a little set back, but that could just be an optical illusion.
Dormers are set back approx 4' from front wall. Easier to see the leaks in the ceiling of the front room.Troy Sprout
Square, Level & Plumb Renovations
So that's why it is so hard to find the leaks at my house!Anyway, if the dormer wall is set back, does it have to be supported to the ground/foundation? Seems like you have an end wall just sorta floating over the ceiling otherwise?
Knee wall on 2x10 floor joists. Less bounce up there than down here.Troy Sprout
Square, Level & Plumb Renovations
Nice work Troy. Liked the pictorial. Did you or are you doing the rest of the house siding and trim right away, or is that an "another time" project?
Maybe I missed it, but what is the siding? I will assume a cementitious material?
Nice looking house and setting, too. I get paid to do carpentry. That makes me a professional.
If I work on my own house does that make me a DIY?
After some soffit venting and gutter repair to take advantage of scaffold location/height, it was on to the first wing.
Most of this masonite is in good shape and the paint is fair, so I decided to leave it instead of replacing it with Hardie (cement) board as I did on the dormers. After sanding, washing w/ tsp and wipedown, I applied SW oil primer. I hate that stuff because it dries so quickly, but I need a good bond after the last "painter" did his magic.
After that bit of labor, it was on to cutting back the siding for the new flashing and trim board. You can't see it well from the pics, but the siding is hard on the shingles and silicone caulk is applied the seal the water into the siding. God, I wish people could read instructions.
I started with a straight 2x6 that would give a good "foot" for the saw and mounted the rip fence 5.5" from the blade. After pulling the line 5" off the shingles, I screwed the 2x6 to the siding with 3" screws, set the saw and pulled the trigger.
OOPS, pics won't "go".
Troy Sprout
Square, Level & Plumb Renovations
Edited 11/2/2005 6:04 pm by Hackinatit
Edited 11/2/2005 6:15 pm by Hackinatit
Here are the pics.Troy Sprout
Square, Level & Plumb Renovations
I feel like an archaeologist doing this. I wonder how the plumbers and roofers managed to worked so well together on this configuration.Troy Sprout
Square, Level & Plumb Renovations
Two coats of paints and it's off with the shingles.Troy Sprout
Square, Level & Plumb Renovations
Update:
The roofing and main gables are finished. Just in time for winter in the mid-south!
I'm now on the "seven-step" painting program. Scrape, sand, tsp etch, rinse, prime, paint, paint for all the facia/soffit/windows/storms/shutters/gutters. Catching a day of good weather for the exterior paint will be challenging, but there is plenty of work for the shop in the meantime.
Wife is pretty good at colors, thank goodness!
Slow and steady 'til spring.
Troy Sprout
Square, Level & Plumb Renovations
Update:
View Image
Troy Sprout
Square, Level & Plumb Renovations
Edited 2/3/2006 12:00 pm by Hackinatit
troy.. pretty exquisite...
View Image
2 questions.. is that an electric service mast on the right-hand roof ?
and what is that sticking below the left hand corner of the porch roof.. just barely visible ?
and .. where's the two cuties hanging out of the dormer window ?
guess that was 3 questions Mike Smith Rhode Island : Design / Build / Repair / Restore
Thanks for the complement, Mike.
Service Pole = yep.
Testing a drainage chain (quick home made version) to drain the bit of water out of that gutter. The house has settled on the left side (right side is on bedrock) to the point that I can't quite get level and stay under the drip edge. I don't like the prospect of a downspout adjacent to the sidewalk for various reasons, but will install if this doesn't suit me. BTW The sidewalk has a very nice slope away from the house for drainage.
Kids are in "adult preparation" classes.Troy Sprout
Square, Level & Plumb Renovations
That would make it Square, level, Plumb, or Drainage Chain Renevations; No
Just kidding bro, nice work!
Square(headed), Level(footed) and Plumb(nuts). ;-)
Rain chain will always be plumb!
Gravity... gotta live with it.
Thanks for the complement.Troy Sprout
Square, Level & Plumb Renovations
Update: Just need to add a downspout... as much as I hate to.
Top rail and posts = cedar I assembled from rough sawn 4/4.
Bottom rails and balusters = select SYP
All primed and 2 coated BEFORE assembly
View Image
The useable porch is now 39" instead of 33" after I pushed the balustrade to the outside of the columns. All fasteners are pocketed.
View Image
I made the moulding from cedar to mimic the beading of the siding.
View Image
A pretty good picture.
View Image
Troy Sprout
"Don't forget the screws"
Edited 6/16/2006 9:39 pm by Hackinatit
Edited 6/16/2006 9:40 pm by Hackinatit
Edited 6/16/2006 9:43 pm by Hackinatit
Edited 6/16/2006 9:44 pm by Hackinatit
Edited 6/16/2006 9:44 pm by Hackinatit
Edited 6/16/2006 9:46 pm by Hackinatit
Man that is awesome, That wood is so smooth it looks like metal.I used syp for a porch rails,spindles and ended uptaking it out after about 8 yrs, but I didn't paintbefore installation.But again, very nice detail.Thanks for posting.
Very nice work on the dormers and railing Hack. It looks so good you have my permnission to change your BT user name to "Craftinitrealnice", or just "CN".
Thanks, tex. Nuttin' compared to the stuff you doin', though.
Troy Sprout
"Don't forget the screws"
Thanks, tex. Nuttin' compared to the stuff you doin', though.
I am just an old carpenter who came up thru the school of hard knocks. I have had blessings come my way, tried to learn and play smart. I hope I do not seem too lofty. I still like to get dirty. It is my hope that posting some of my pursuits and projects will give brother carpenters and contractors some encouragement and aspiration.
I have needed plenty of aspirations along the way.....BC Powders.
"Goodies" are preferred... ain't you been listenin' to Richard Petty.
Troy Sprout
"D@mn... forgot the screws."
hackin... really nice work.... when do we get some more pics of the kids ?
View ImageMike Smith Rhode Island : Design / Build / Repair / Restore
Kids with the new "Supervisor-in-Training."Troy Sprout
"Work is the curse of the drinking classes."Oscar Wilde
I am fond of Richard Petty, but I have tried both Goodies and BC are the answer to what ails me.
I remember when I was a youngster framer, BCs were to be found on the dashboard of all older carpenter's trucks. They seemed to be as much a part of these old carpenters as their pinstripped overalls and wooden handled hammers. I did not understand them being there then, but now (being 51) I know.
On days when framing I'd wake up sore and sick, I'd take a BC and be good to go. Now, when I come in from working around my property tried and sore, my wife knows when I ask for a Toddy to fix two BCs in a glass of OJ.....in about 15 minutes I am a new man. No kidding.
Aside from that, BCs are made by Block Drug Company in my hometown of Memphis.
Edited 6/17/2006 10:58 pm ET by txlandlord
Nice...wonder if I could do that on some odd Canadian vinyle siding where my garage roof butts to the gable wall?
Vinyl Siding Blade and some caulk to fill the holes from the "rip" fence.... Can't see why not.
Look Here: http://www.amazon.com/exec/obidos/tg/detail/-/B00008WFT2/103-1087468-2646261?v=glance
Seems most people around here just install vinyl siding over the saturated masonite. Rednecks all over, I guess.Troy Sprout
Square, Level & Plumb Renovations
Yep...
re the "odd Canadian siding"....it has a reciever slot at the bottom edge, and a fin outboard of the nailing flange that goes into the slot on the next lap....it's hollow two sided with one stiffening rib in the interior....maybe I should ask Dinosaur about it....
Hackinatit- I like the build out but tell me - How did you flash the bottom of the siding where it meets that trim board (Post 6) ? It's hard to see in the pics. Don
The step flashing is 4.5" high x 5.5" wide and is inserted behind the felt drainage plane of the siding. The felt is cut 1.5" above the shingles to "hide" behind the trim board. The air gap serves as drainage for the siding AND the trim board.
To answer the question:
The siding is NOT flashed over the trim, but behind it with the step flashing/felt/air gap.
Troy Sprout
Square, Level & Plumb Renovations
Nice job !!Rik