I typed this all out in Word first and now I’ll break it down into smaller posts. If you could, please hold the comments until I get it all posted…. should take about a 1/2 hour. I think it’s easier to follow along if the comments come after it’s all posted. Thanks!
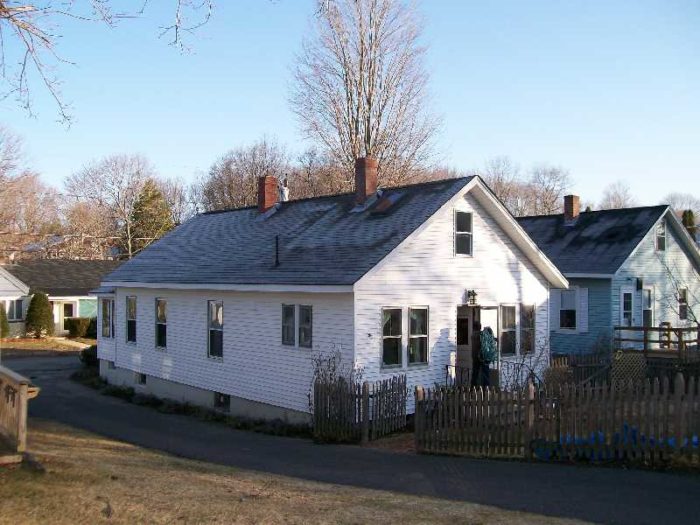
We spent the last three weeks up in <!—-><!—-><!—->Kittery <!—->, <!—->ME<!—-> <!—-> adding a second floor to my SIL’s little house. Nice little job. I did it because they’re some of our favorite family and I had a dead spot in the schedule anyway. I gotta admit, it was nice to work for people who really appreciated us. It makes the work much more enjoyable and easier to strive for excellence. Anyway… here’s how the job log went. Four of us on this job. Simple little box; 22’x41’ but a super tight lot to make material handling very tricky. No forklift, but help was on the way via a power ladder I’d ordered. Sorry about the pictures… they’re not thorough and don’t really match specifically with the end of each day. I was too tired and busy to follow through with a camera each day on this one. So all the pics are from my SIL who was good enough to forward them to me but she has yet to send one of the front porch finished up. But there’s enough there to follow along with I think. What I really thought some of you might be interested in is the job log on this one as it was a complete shell done by one four man crew with no sub work.
Edited 4/30/2008 11:50 am ET by dieselpig
Edited 5/10/2008 7:42 pm ET by dieselpig


Replies
Day One: Arrive. Get our bearings. Walk through the job with the guys. Set up some plastic curtain walls with zipper doors to isolate the new stair location on the first floor. Demo the existing roof (shingles, sheathing, and framing) as well as a finished attic bedroom and one of two chimneys. The body of the roof was gone by lunch but it took most of the rest of the day to clean up the edges so the layers of siding would be out of the way for the new walls and de-nail, vacuum up some insulations, etc.
Day Two: Pull off the tarp and get the green light to demo the second chimney down to the existing 1st floor ceiling. The mason came by and determined it wasn’t worth saving that part and he’d extend it in block later. We took a bunch of readings with the laser and found the high spot of the existing walls. We had a difference of as much as 2 ¼†around the perimeter and down the center bearing line. We nailed one new 2x plate down all the way around and down the center. Then we add a second plate shimmed accordingly (between the two plates) every 4’ to get a new level base to build on.
As myself and one guy went around with the laser and hit it every 4’, my other two guys followed, laying out the joists and shimming at each joist location. Then we installed the rim joists. Two guys ran all the common joists while myself and another guy framed in the new stair opening.... first in the existing ceiling and then mirrored it with the new floor framing. We finished the day by installing the ¾†decking everywhere except the edges. (See Day Three).
View Image
Day Three: We knew this day would be a bit of a loser. We had to wait to get framing again while the rim joist(s) were insulated w/ Icynene. Apparently “first thing in the morning†in ME isn’t the same thing as “first thing in the morning†in MA. Icynene guy showed up around 8:30 and told us it would take at least an hour for him to clean his gun and get the equipment warmed up.
In the meantime he told us he’d need some sort of backstop to spray against so the foam wouldn’t end up higher than the joist tops. And it had to be something that the foam wouldn’t stick to. I decided to sacrifice the spring board I’d ordered to straighten the walls. I used a hammer tacker to tack strips of poly down to one side of it and then we tacked it to the joists tops around the perimeter of the frame. We then cut and assembled all the window packs for the new second floor walls, moved lumber closer to the frame, and kept busy by tearing some of the vinyl siding off. We took lunch and by the time we were through the insulation guys were done.
We finished up the decking around the edges, snapped out our walls, and framed and sheathed the two longest (41’) side walls. We made the decision to leave ‘em down and to make for easier tarping as rain was expected that evening. During the chaos of the insulation installation my new power ladder was delivered to the jobsite. I spent a couple hours getting this thing set up and put together and learning how to use it. This was going to be our life line and easily paid for itself on this one job; not having either a laborer or my forklift.
<!----><!----> <!---->
Day Four: This was to be a long one. We stood the two walls from the previous day and braced them. Then we framed and sheathed the two end walls, stood ‘em, and tied in the sheathing at the corners. While the walls were getting braced I began gangcutting the 22’ I joists which would clear span the frame to form the attic floor as well as cutting up all the LVL’s which would form the attic stair hole. We then ran the rim and joisted the pig.
We used the power ladder to run the 22’ I joists all the way up and over the new second floor walls. The ladder was set up dead center, the joists were run up a few at a time, and a guy on each wall just walked them out to their final positions. After it was joisted we used the power ladder to run all the ¾†Advantec up and decked the new attic floor. While the decking was going down I cut some common rafters and gable parts. We managed to get both end gables framed and sheathed before we wrapped up around 7pm. I also built all the ladder rakes down on the ground complete with return/bulkhead framing in place.
View Image
Edited 4/30/2008 11:50 am ET by dieselpig
Day Five: Rain was expected by 4pm and I wanted to be dried in before then. Everyone knew the deal and was on the same page. There would be no BS today and no breaks. My guys are smart enough to know the skinny on days like this. The eat, smoke, pizz, etc when they need to but keep their noses down for me the rest of the day. Good soldiers.
I began installing the rakes and all the trim on the gables. At the same time one guy cut all the common rafters and two guys operated the power ladder (one to load and one to unload). By the time I had the gables trimmed (Azek PVC) and ready to stand we had all the rafters cut and the attic deck stocked with all the rafters, roof sheathing, collar tie material, and roof staging. We stood the gables, set up some quickie staging, and nailed down our perimeter rafter plates. We then set the ridge and installed all the common rafters. Next we split into pairs to sheath both sides of the roof at the same time. We installed the first course of sheathing and then leaned out and installed the Grace I&W at the eaves.
Next we set up a course of roofing brackets and 2x8 staging. One guy climbed out to the staging on each side and we ran the next course of sheathing. Once we got three courses total down on one side, I climbed out with a bucket of button caps, two rolls of Grace TriFlex Extreme, and a hammer tacker and began ‘papering’ the roof behind the sheathers. By 5pm the roof was dried in nice and tidy, the rakes were nailed off, the hurricane ties were installed, and poly was hung over the open RO’s as a rainy weekend was expected. We were all relieved to not have to deal with a tarp any longer. My BIL picked up some killer burritos for us and we all sat down in the new attic and chowed.
My guys had 56 hours in five days and we were all feeling fat, happy, and proud with a nice couple of days off in front of us. The house was looking like Frankenstein at this point but all the important parts were there and it would stay dry.
<!----><!----> <!---->
Day Six: Monday morning again. Not a drop of rain got into the house over the weekend. When we went home on Friday the house was looking pretty much like a pirate ship and that makes me nuts... I wanted to get it looking respectable again. We had to skip a few steps along the way in order to get the roof on in time. So my guys got some pumpjacks set up.
Because the place was so tight we decided to use the pump jacks instead of wall brackets which would have to be set and then reset at different heights for trim and then for roofing. So we staged it with the pumps and my guys worked their way up a wall at a time. First they’d cut in the sheathing. The old sheathing boards didn’t terminate in a straight line anywhere....it’d get close to the existing top plates but one would be a 1x12, one a 1x3, one a 1x8 etc. So we just let the new ply overhang two feet and then cut it in to jigsaw puzzle with the existing sheathing. Next they’d pull the Typar down and staple it off. Then set the windows. And finally install soffit, fascia, shadow, and frieze boards. Again... all Azek on this house.
While that was going on I started framing stairs and landings. Five sets of stringer and three landings to get from the existing first floor to the new attic.
View Image
Edited 4/30/2008 11:50 am ET by dieselpig
Day Seven: Was pretty much like day six. I was still working on the stairs. They were a little tricky.... two sets with multiple landings. But I finished them up and found some time to lay out the new second floor partition walls while my guys continued with windows, sheathing skirts, soffit, fascia, frieze, and Typar. They even got a couple of corner boards up too.
<!----><!----> <!---->
Day Eight: Two guys inside to strap the ceilings and frame all the new partition walls while myself and another started the roofing. We’re no speed demons with roofing and it took us a bit to get a rhythm going again. We only got one side roofed in 50yr archs but I gotta admit I sure appreciated having the power ladder.
<!----> <!---->
Day Nine: We had the second side roofed by noon and all that was left was to run the ridge cap. While myself and another were finishing the roof, my two other guys did some punch out, installed the collar ties, swamped out the house from attic to first floor, and stripped the front porch roof that my SIL had decided should be re-roofed and re-trimmed. By the end of an early day the house was clean and tidy, the porch roof had full Grace I&W installed on it and we started replacing all the roof line trim on it with Azek.
<!----> <!---->
Day Ten: Friday again. I still had some 42†continuous height sloped walls to frame around the new stairs from 1st floor to attic so I got that done.... this sealed the deal with the inside framing now being complete. Two guys grabbed pitch forks and began stripping all the cedar shingles off the house that were hidden beneath the vinyl. Another guy finished up the roof line trim on the front porch and then roofed it in 50 yr archs. By the time I finished the inside stair walls my other guys had the siding stripped. I got them set up on installing the 1x10 PVC water table. We had to be careful and make sure that the water table was registered to the new frieze boards because of all the shimming we had done to get a level second deck. I’d hate to have that pop back up again and reveal itself as out of level siding courses with tapered rips at the frieze! Yuck. While they were doing that and finishing up the last couple corner boards I made our story poles for the siding.
View Image
Edited 4/30/2008 11:51 am ET by dieselpig
Day Eleven: Another Monday and I’m down one man so there’s three of us. While we were waiting for the pre-finished Hardie-Plank siding to be delivered I used a Kreg jig to make up the window frames out of Azek for the wall we’d be siding. My other guys got some cutting tables set up and put fiber cement blades on a chopsaw and a sidewinder. We goofed around a bit and ran the Z flashing on the top of the water table and Vycor around the window flanges. Then the siding showed up and we got to it. Got the driveway wall done and went home around 6pm. All butt joints were slip flashed and the claps were blind nailed with 2†Bostitch ThickCoat galvy coil siding nails.
<!----><!----> <!---->
Day Twelve: Four guys again. We moved the pumps over to the rear gable end and started there. One guy cutting, two guys nailing, and me running around making Azek/Kreg jig window frames and stocking the cut man. When the nailers got up into the actual gable, I grabbed my shears and started cutting too. I took a guy and the left side and the other two paired up on the right side. By about 2ish we had that gable end done so we moved to the other side of the house.... the tight side with the dumpster and power/cable/phone lines. We got the pumps set up and brought the siding up to about eye level and went home.
View Image
Edited 4/30/2008 11:51 am ET by dieselpig
Day Thirteen: I could tell the long days were catching up with my guys. There were a few catfights and one generally bad attitude which is rare for my crew. I know when to stop pushing my luck. We had been working 10 to 12 hr days with 2 ½ hours of commuting on top of that. I knew it should be an early day.
They finished that third long wall while I started working on that front porch. We wanted to dress it out some so I decided to do the MDO panel thing under the windows. I made up new PVC window frames with the Kreg jig for the banks of windows, created a stock list for the MDO and quarter-round I’d need, and planned out my trim layout. I also had to do some scraping as some of the trim was to be applied directly over the existing trim which was in good condition other than the flaking paint.
Some of you probably just did a double-take and said “you did what?†I’ll explain briefly; in order to get the layers of trim to layer the way I want them to I need to have the casings be proud of the MDO panels to give them a recessed look and line them with the ¾†quarter round. I could either strip the whole thing back to the studs and toss the well preserved T&G sheathing or go over it. I also didn’t want to risk messing up the interior finishes of the room by tearing the sheathing off.
So we decided to go over it. I scraped it down and would separate the new PVC from the old trim with Typar. All that would remain exposed of the old trim is a 3/16†reveal created when I layed out the new trim.... I held it back the 3/16†to highlight the extra wood rather than do a poor job of trying to laminate the two dissimilar materials and try to hide it. Anyway.... the boys were tired, and we went home early for once.
<!----><!----> <!---->
Day Fourteen: My lead guy left for Taladega so we’re back down to three to finish the job in the next two days. We sided the last gable end (front) and took care of packing up the lumber returns and tidying the site up. We also loaded up the truck with the first haul to pull some gear out of there. We took out some horses, the power ladder, pump jacks and other random stuff. At the end of the day the lumber truck showed up and I got my material for the front porch dress-up, and we packed out the returns. Another fairly early day.
<!----> <!---->
Day Fifteeen: Last day. The three of us trimmed out the front porch in recessed panels and Azek. We also lost power from noon until two while the power company and electrician ran a new service from the pole to the house and reattached the meters. During this time we took lunch and started loading staging onto the top of the trailer. We then finished up the front porch once the power was on and spent about two hours packing up the truck and trailer. We left about 5pm to smiles and waves from the neighborhood.
View Image
Edited 4/30/2008 11:51 am ET by dieselpig
Edited 5/3/2008 6:54 pm ET by dieselpig
That's it. I promise to come up with some shots from the other sides, particularly the front porch, as soon as my SIL forwards them to me.View Image
DP,Nice work! Thanx for sharing.Chuck Slive, work, build, ...better with wood
wow that's incredible
Looking much better now!Let me be the first to say - "Mumbele grumble, darn immigrant labour from down south..."LOLI was surprised to hear you drove that distance every day and still put ion those hours! I used to do a 13 hour day including a 66mile mountain drive that could vary from just over an hour to more than 2 hours depending on traffic and weather.BTW, most of the Mainers I know thing of first thing in the morning as about 7AM. Funny onme - I had a summer lady ask me if I could come by to check on a problem once. I said sure - see you about 7AM"Uhm - could you make it just a little latter?"Sure thing, when do you want me? 8:30 -9?"I was, ah, thinking more like maybe 10:30 or so...?"Right - first thing in the morning!
;)
Welcome to the Taunton University of Knowledge FHB Campus at Breaktime. where ... Excellence is its own reward!
Dammm, y'all were smoking! Looks great.. You make me miss framing.
Ain't it SOOOO cool to look in the truck mirror, and SEE what ya got UP!..Spheramid Enterprises Architectural Woodworks
"Welcome to Poo-ville, can I have your socks?Seriously Folks, I need a home for 3 lovers of your life.
You don't miss framing.
Framing misses you.
:)View Image
Great stuff Brian!
The awful thing is that beauty is mysterious as well as terrible. God and the devil are fighting there, and the battlefield is the heart of man.- Fyodor Dostoyevski
nice work....
???
View Image
when did the chimney stork deliver the new chimney ?
and... are you using old style pumps on alum-a-pole poles ?... how does that work out ?Mike Smith Rhode Island : Design / Build / Repair / Restore
brian.... here's a Trex sill on a 400 DH
you have to decide if the rabbet is going to receive one course layer or a two course layer of Hardie
View Image
we screw the sill on right into the rough sill frame and bondo the holes
that's a good tip about assembling the casing surrounds with a kreg jig... consider it stolenMike Smith Rhode Island : Design / Build / Repair / Restore
Geez... that does look nice on the 400. Consider that stolen! Is that 5" exposure Hardi?View Image
no .. i kept the cost down with 6" exposurei prefer the look of 5" .. but the 6" is a nice compromiseMike Smith Rhode Island : Design / Build / Repair / Restore
The chimney stork! LOL
The mason came in right away.... while we were siding... to extend the chimney. That's why I left the staging up there for him. Even he was quick... had the chimney (16x16) extended in block up to the roof sheathing in about two hours. Then he came back the next day, extended it the rest of the way in brick, flashed it, and brought the shingles in. We had stepped back our shingles around the chimney area.
I was short a jack.... somehow got up there with more poles than jacks! Sent someone to HD to grab one of the Qual-Craft ones in a pinch. It worked fine on the poles but I missed having the bench and the nets. View Image
Mike,
I used to use the old style red pumps on the aluma-poles. They work OK. The issues are that when you release the brake to roll down the pump drops down on the pole a 1/2" or so. Just enough to scare ya if you're not ready for it. Also, the roller on the red pumps are not smooth like on the aluma-pole pumps and the they drive the rivets through that hold the rubber on. I use 10' poles, so when I go to slide a splice into the top of a pole to add on another length the splice wouldn't fit. I had to file down the rivets inside the pole.
I have since bought three aluma-pole pumps with the work bench on the back. WOW! What a difference. Now when I release the brake the pump doesn't drop anymore, and the pumps operate so smooth compared to the red ones.
Long story short if you can't afford the right pumps the red ones work, but I would recommend using the aluma-pole pumps.
Brian
The issues are that when you release the brake to roll down the pump drops down on the pole a 1/2" or so. Just enough to scare ya if you're not ready for it.
My Alumapole jacks drops like that too. Can't remember ever being on any set of pumps that didn't.View Image
Do you stand with one foot in the jack stirrup when you go down? That is the trick to having full control over the things. But you have to be a gymnast to squat with one foot in the stirrup, one on the release, and a hand turning the crank.But doing it that way, I have never had a jack slip.
Welcome to the Taunton University of Knowledge FHB Campus at Breaktime. where ... Excellence is its own reward!
I'm so used to the 'drop' that I really don't even think about it anymore, I just expect it. I had assumed it was part of the design... unavoidable. Never noticed that having the jack up would eliminate it or that I could pull that yoga move as well.View Image
The move to really watch out for is leaving the seat downoops - I mean the stirrup, and not standing on it. If you don't stand on it, and don't lift it up like Mike, it will find a way to come up and that is a bad place to be when it smacks you in the nuts. It's one of those experiences where I get to remind the new guys to listen to what I say.;)
Welcome to the Taunton University of Knowledge FHB Campus at Breaktime. where ... Excellence is its own reward!
Brian,
Yous know if this software gig doesn't work out for me, Ima comin' to work for you!!! (But I've been here for 12 yrs so hopefully I'm all set)
We can call the company Stow Contracting, eh???
:)
BTW, where's your new job???? Haven't seen your truck on 117 in a while.
http://www.grosshillrentals.com
Jump in Doug... the waters warm.... I swear. :)
The job we started this week is a big addition/remodel in Needham for 'the beautiful people'. Back to reality for me.... architect meetings every Tuesday... long chain of command for answers... and every square inch of about 5000 sqft is planned and designed for. It's like building a watch. We've got 46 hrs in and it's, what, Thursday? Yeehaw.View Image
when i 1st:
pull the jack arm ALL the way up
THEN step on the release we get zero drop... it just cranks down in full control
if the jack arm is down , then the rig will drop about 3"
but hey, whadda i no ?Mike Smith Rhode Island : Design / Build / Repair / Restore
with it down and nobody standing on it, it does drop, one reason a lot of guys get scarred about using them. It either has to be up like you do, or down with your weight on that stirrup. The way I do with a foot in the stirrup, it will never drop at all, but I have seen them drop an inch to six inches with the arm up - that is on wood poles. no experience with the AL.
Welcome to the Taunton University of Knowledge FHB Campus at Breaktime. where ... Excellence is its own reward!
wooden poles & old style pump- jacks
it was always like playing the lotteryMike Smith Rhode Island : Design / Build / Repair / Restore
Just need a system like me - then you can win big time!;)
Welcome to the Taunton University of Knowledge FHB Campus at Breaktime. where ... Excellence is its own reward!
Well it's time for a well earned beer-thirty.
or two.
Unbelievable.... that looks really good...
Man I'm tired just reading what you guys accomplished in such short time.
One other thing, framers having cat fights? Say it aint so.
Nice job, thanks for sharing it.
Doug
LOL... yeah I know Doug. I think it was the commute that was getting to everyone. 12hrs+ a week in driving was a grind on top of the hours we were putting in. For awhile it felt like the movie Ground Hog Day. I'd get up at 5, leave the house at six, and get home somewhere between 7 and 8:30. I'd eat and be in bed by 9:30 or so and get up and do it all over again. But the time (both in hours and days) did fly by.View Image
That's an impressive job. It's great to see someone frame who cares about straight and level.
Reminds me of the crew I worked on for most of the time before I went on my own. Family operation run by the father, 2 sons 1 daughter, myself and 1 other non relative. After a few years, people would rave about the fact that even though we joked around while we worked, we didn't really talk about the work per se. We all knew what our role was, what the next step was, whoever finished their task at hand moved on to whatever the next lpgical step was, and the father motivated everybody subtly, joking about who was fastest, carrying rafters right there with us. Was a lot of fun.....Enjoy it, as I'm sure you know, the dynamic is hard to come by. Unfortunately, of the guys that have worked for me over the years, the ones I've liked the most, were the most talented and driven, smartest, etc, eventually want to have their name on the truck. And so it goes. Awesome job
Bing
It seemed like you haven't been around much recently. I just thought you were too busy star gazing.
Now we know the truth.
Nice work , BTW. That's a lot of job in a pretty short time.
""I just thought you were too busy star gazing.Now we know the truth."' yep he was busy putting his own star in the sky for the rest of us to gaze at . Very Nice Work.
They can't get your Goat if you don't tell them where it is hidden.
Wow.View Image “Good work costs much more than poor imitation or factory product†– Charles GreeneCaliforniaRemodelingContractor.com
Just
FREAKIN
AMAZING!
I'm, like, agog.
What a crew.
What a leader.
Yer my hero, man!
Forrest - thinkin' maybe I'll take up knitting
Man, what a job. (I especially like the way you told us about it. Precise & concise.) Thanks for taking the time to share with us.
All I can say is wow. I recently did a second story addition and know how logistically difficult it all can be. I think someone else said it was humbling seeing your pics. I am very impressed. thanks for sharing.Jason"it aint the work I mind,
It's the feeling of falling further behind."Bozini Latinihttp://www.ingrainedwoodworking.com
Impressive.
The house looks much larger than the neighbors now. Did SIL make it too big for the neighborhood?"Put your creed in your deed." Emerson
"When asked if you can do something, tell'em "Why certainly I can", then get busy and find a way to do it." T. Roosevelt
Not so much really Eddie. Most of the houses on that street have been added onto over the years. The house to it's right still has it beat on square footage. View Image
Brian, I had ed's thought also at the start. However, the addition fits both the neighborhood and upon itself. Nicely done!A Great Place for Information, Comraderie, and a Sucker Punch.
Remodeling Contractor just outside the Glass City.
http://www.quittintime.com/
looks fantastic! are they going to finish the interior themselves?
They're subbing the Icynene, sheetrock, finish stairs, plumbing, electrical and HVAC. But some of those subs are friends who are pros so they're getting a little 'help'. They're going to handle case, base, doors, and paint themselves. On the plumbing and electrical, I think they're also going to handle some or all of the finish part. At least that's the way I understand it.View Image
I gotta say again.
You guys rock. I revisted this thread, just for a kick in the axe when I think I am tired of this game..you rock.Spheramid Enterprises Architectural Woodworks
"Welcome to Poo-ville, can I have your socks?Seriously Folks, I need a home for 3 lovers of your life.
Thanks Duane (and everyone else, for that matter). It means a lot to me to be complimented by some of the mad talent that frequents this place.
I'm going to try to take a ton of pics on the job I started today. I'm going to really try to keep up on it this time. It's a great project. It's going to take every trick I know to pull this thing off. The roof is cut to sh2t, the trim package is as complicated as any I've ever done.....22' arches, barrel vaults, 750 sqft master suite..... the whole nine. And it's an addition..... total transformation going on.View Image
Hey..we all love pics..do what ya can.
I for one, keep learning.
just be safe, if it's you or the story about you, remember, the story lives on, you don't.
Be careful up there.Spheramid Enterprises Architectural Woodworks
"Welcome to Poo-ville, can I have your socks?Seriously Folks, I need a home for 3 lovers of your life.
Word.View Image
Looking forward to that Brian. Few people impress me anymore. Maybe it's an aging thing.....
I was thinking we might have to take up a collection to buy you a camera!
Eric[email protected]
LOL... I appreciate the gesture but I've got a perfectly fine camera that's just about always in the truck. Never comes out in fact. And that seems to be the problem.View Image
DP,I'll second, or third, or fourth that sentiment (feeling humbled). That addition is absolutely seamless. Nice work. My brother and I did an addition he designed to our parent's house in Vermont last summer. It is a real challenge to do it right.He framed most of it himself, with some pretty complicated roof lines and steep angles.It's hard, rewarding work.Again, thanks for the inspirational pics.- Kit CampTechnique is proof of your seriousness. - Wallace Stevens
Geez I'm starting to blush now. :) In all fairness.... it was about as straight forward a design as one could ever hope for. From a design standpoint this job couldn't have been much simpler.... simple gable, lots of clear spans, a single rectangle, etc. I think it's our execution that I'm most proud of on this one though.
And thank goodness for that. Coulda been some long uncomfortable holidays in the next 20 years!
(forks clinking)
"so......is that roof still leak....."
"yup"
(uncomfortable silence)
(more forks clinking... someone clears their throat)
"nobody ever actually wears their wedding dress again anyway, right?"View Image
Brian,Sometimes simple isn't so much.... as we all know.- KitTechnique is proof of your seriousness. - Wallace Stevens
Fantastic job! You care about your workers, in turn they care about you. Thats hard to come by.
One question on the azek trim: You said you used a Kreg jig to assemble them, did you assemble them down and then set them around the windows and nail them on?
Thanks
Matt
Yes Matt, I assembled all the window frames down on a table in the back yard and then sent them up to the guys to nail on as they reached the respective window. In one of the pics (I forget which #) you can see some of the frames leaning up against the fence. It's a really great way to trim out windows..... looks great and really easy.View Image
Brian,
Did you know that there is a supplier of pre-assembled exterior trim?
Different styles and they include a "sill". Most of them had a rabbett for the siding to slip behind also.
I'm sure you've seen them at JLC. I didn't see them this year but last year I did and I thought it was a pretty cool set up.
Of course the you would have to deal with lead times, and if you wanted to last minute change a window size...........and of course that would mean one less tool.[email protected]
I've seen them Eric.... pretty cool. I do like building them on site though and it's really pretty easy. I like the flexibility. Maybe would consider ordering the pre-made ones if I had a 5000 sqft house worth of them to do, but I don't do them very often.... on my regular frames, window trim isn't usually part of my trim package, oddly enough. The sider usually does them. I'm going to knock together a small frame though... and try to sell them.
What I usually see done is the siders cut all the pieces and nail them on individually. Sometimes they plow out the back for the nailing flange... sometimes they don't. Either way, they rarely look "tight" or even flat. The Kreg jig does such a nice job of making up these windows that I'm sure most builders would see the benefit of letting me do them immediately.... if they had a visual example to get their head around. Just explaining it doesn't really do it justice.
Regarding sill...... I miss them too! I'm surprised that there weren't more comments about the lack of sills on the job. On a lot of windows, it'd be easy enough to make a nice Trex or cedar sill instead of the bottom of the 'picture frame'. But I can't figure out how to make it look nice on the Anderson 400's..... they have sort of a little pseudo-sill already and I think another larger sill might look odd. I'd need to see one that somebody else did to get my head around it. On this particular job though... the sills were a budget decision anyway.View Image
Brian,
About the window trim? Can you take pictures of that? I'd like to see it. Do you cut the trim so there is a gap around the window? I attended Gary Katz' Roadshow last fall and he and Mike Sloggatt showed leaving a 1/4" gap, then putting backer rod in and then caulking it. They said the caulk will look good for much longer.
Also, what do you think of the Azek? I haven't gotten to use that.
Hi Tim,
We use Azek a lot. It's kind of a PIA to work with because the pieces are so long, floppy, and heavy. So where as normally I'd have one guy on the staging to hang fascia and soffit, I have to have two to put up the Azek. And on long runs, the expansion and contraction is always an issue.... I try to forwarn newcomers (to the product) to expect some gaps in the winter.
You also have to be careful when nailing it..... nailing off a scarf or mitered (on edge) corner, you have to be real careful about blow-out. And not just a curled nail type of blowout..... with Azek you can get the kind of blowout that blows a chunk out of the stock. Gotta be real careful when putting corner boards together. And it'll telegraph any inconsistencies in your framing.... especially on long runs. For this reason I've considered adding a 2x subfascia (like we do our rakes) when we work with Azek. I don't use a subfascia normally when working with PP pine trim.
All that being said..... I still think it's a nice product. It wears like iron, looks great, paints up in light colors nicely, and is impervious to rot, insects, etc. And every inch of it is good useable stock. Very pricey though. Compare 1x8 Azek at $2.59/ft and Windsor One at $1.39/ft currently.
I'd rather work with wood..... any day. But on my own house, the trim is all Azek. And that probably explains my opinion better than anything else I can say. And despite what anybody says..... once it's installed and painted, it's VERY hard to tell the difference between the PVC and wood. Even when you touch it or knock on it. View Image
Oh yeah..... until I get around to making up another frame, this is the best I can do for you as they're all installed and the job is an hour and 15 minutes away anyway.
I've zoomed in and cropped a couple of the original pics. In one of them, you can see one of the assembled frames leaning against a fence. The back is visible.... where the pocket hole joinery is visible.
And in the other shot you can see one of the doubles we ganged up on site with the trim installed.
The Anderson 400's have small flashing or joinery 'clips' at the corners which stick out a hair past the rest of the window frame. I measure clip to clip (as it's the longest measurement) and add 1/8" when I make up the frames. This leaves a 1/16" gap at the corners, but about 1/8" around the rest. The flanges are all taped in 9" Vycor flashing tape so I figure with the use of good caulk, it should be a pretty tight package.View Image
This is one of those top of the line renovations that people are going to drive by the house driving very slow and just in awe of the workmanshipI would think if you had one of your company signs in the front yard you would get a lot of business from itI'm not afraid of work - I can walk right up to it and take a nap
Good job, you should consider packaging that product to their neighbors while it's fresh. 50% markup on all of it including your normal sub framing, demo and exterior price. People are very willing to pay your price when you can put that type of quality together in that time frame.
I find that actually using the camera to review my work end of the week or end of the day makes me inspect my own work with a more critical eye, and catch things that need to be finished or corrected. That few moments of peaceful introspection after the cords are rolled and the pace is turned off gives a different perspective on the job
Welcome to the Taunton University of Knowledge FHB Campus at Breaktime. where ... Excellence is its own reward!
Please take pictures. What I do is use Picasa and you can upload to an account (free) that resizes the pics automatically. Then everyone can subscribe to the feed and see the pics and you can always add captions later.
You are the man, your guys have a good boss.
wow, and in only 15 days!
there's no need to reinvent the wrench
--"Smiles and waves from the neighborhood."That was a beautiful ending! Way to go.
Brian, it is a whole lotta work, but you make it look easy!
If it wasn't such a long drive, I bet you could talk several of the neighbors into the same package. Change the face of that block in a hurry.
jt8
My advice to you is not to inquire why or whither, but just enjoy your ice cream while it's on your plate-- Thornton Wilder
The neighbors were all quite chatty and seemed impressed with it all... but no real leads out of there. The drive was tough but it was worth it for family. But if someone else wanted a frame... well.... money talks. I'd drive to do your framing if the price was right! Kittery is a small, somewhat seasonal, community for the most part... the neighborhood is made up of a lot of good blue collar folks... a firefighter, a fisherman, a carpenter.... those are the ones I met. Good folks, but I don't think there's a ton of spare cash floating around up there right now.View Image
Great thread, Brian. Sorry I didn't see it earlier. But I gotta say, just reading your narration exhausted me....
Did you rent that power ladder or buy it for this job? What kind of reach does it have, and what kind of price tag do they come with?
Dinosaur
How now, Mighty Sauron, that thou art not broughtlow by this? For thine evil pales before that whichfoolish men call Justice....
I bought the power ladder Dino. It's been something I've wished I had quite a few times in the past for similar jobs/situations. I first looked into renting, then looked at a couple used ones, and finally just bought my own new one. Mine is made by Tranzporter. There are better ones available for more money and if I used it daily I probably would have bought one.
I paid about $1500 for my set up. That was the basic set up (which gets you to 28') plus an additional 8' extension. And once you go over 28' you need another T brace that foots the ladder against the foundation and braces it at about midspan to take the bow/sag out of it. Those two extra parts account for about $250 of the $1500 I spent. I also could have upgraded from Briggs and Stratton to Honda for another $300 but chose not to because it won't be a 'daily driver'.
It all breaks down into 8' sections which is nice for carting it around. You can buy extensions and take it up as far as 40' with a 400lb capacity using the T-brace. I think the 8' extensions were like $110 each.
If it didn't pay for itself on this one job, I think it came pretty close. I'm confident that I'll get my money's worth out of it.
So was it thinking about the work we did that was exhausting.... or simply my narration of it? :)View Image
Not the narration; just thinking about you and four guys doing in 13 days what it took me a month and a half to do mostly alone on my own place. ;o)
'Course, I was 13 years younger then, too....
I want to look into stuff like those pumpjacks and the power ladder if I start doing more of that kind of work again. For the last 5 years of so, tho, most of my high work has been roofing and a bit of painting. Mostly I just rent pipe scaffolding at the local rental yard, but it's a pain to truck the frames around with a cap on and I don't have a trailer so I'm always looking for alternatives. And now that I've got a midget truck with a 6½' bed, well....
Dinosaur
How now, Mighty Sauron, that thou art not broughtlow by this? For thine evil pales before that whichfoolish men call Justice....
This is the first I've seen of the thread - not spending enough time here. Agree with others, nice job. It looks like it was designed that way.
I did have to chuckle a little - working on a small house that my wife bought doing two extesions and closing in a porch. It's one of the bigger jobs that I've done from scratch (dig the hole and go). I looked back at my "schedule" last week and saw that I had written in "framing" for one day. Needless to say, that didn't happen. :-)
Nice to see how a pro does it. Thanks for posting.
Don K.
EJG Homes Renovations - New Construction - Rentals
Geez, this thread got quite the revival today. Thanks for the kind words Don. Hey.... at least be glad you weren't bidding that job when you figured in one day for the framing! :)View Image
Very Nice indeed. That's what I want my work to turn out like someday.
Thanks for sharing.
-D
Sweet jumping Jaysus on a bicycle... I'd never have believed it. Really remarkable (and humbling) work Brian. Many congratulations!PaulB
Hello, congrats on the expedient project. I understand why one would add-a-level as early in the design phase as possible. (Framing a new floor system over an existing ceiling system makes more sense than sistering existing cjs'.) Can you explain how you did this? Did you first cut back the cj ends and install a "rim joist" before adding the 2x plate(s) all the way around?
Also, can you please clarify the Morning Day 2 picture? The does the front part of the house, where the chimney stands, already have the floor decking in place? The back part of the house seems to have a rim joist, however, no floor joists? Is that temporary staging on top of the existing ceiling joists?
Thanks in advance.
Edited 5/24/2008 8:49 pm ET by djthx
Wow, lotta questions there. For the most part, your eyes aren't deceiving you.
I should first explain that the upper part (towards the front) is the original home. And the 'dropped' part is an addition that came at some point later. In both parts of the original frame, the cj's were nailed on a ledger that was let into the wall studs. That's why you can't see any rim joist.... there aren't any!
It appears as though whoever did the back addition was quite creative. They knew that they wanted to the soffit, fascia, and roof planes to match the original... and that dictated the plate height of the walls. But they also wanted a bedroom up there and didn't quite have the head room they must have wanted. So they dropped the floor down about 10" to create some space. So where (in the back) you think you're seeing a rim joist, what you're actually seeing is the just the top of the wall, but the floor is down inside it about 10". Make sense? It did to somebody! LOL...
On the rest of the house, there isn't any subfloor installed yet. What you described as 'temporary staging' is just that...... sheets of plywood strewn about so we can walk around and take care of business a little easier without putting a foot through a ceiling.
As far as putting a new floor system on top if you go back and read the thread I've detailed how we went about it. In a nut shell, we installed two new plates on top of the original.... one as a base (and to get us up over some other stuff that was in the way) and then used a laser level and shimmed between that new plate and a second new plate. We then installed rim joist and framed the new floor.
To answer your original question, we do sometimes cut back the existing joists and install a rim, then new plates, and then a new floor system over the original ceiling system. But the construction methods used to build the original house are what ultimately determines whether or not that system will work. Sometimes, like on the house in this thread, you have to improvise. But you've got the general idea right.View Image
Thanks for the response and for the clarification of the "optical illusion". (When I first looked at that image, I thought I saw one of your guys standing on top of unsupported drywall.)
You got some crew there Brian, and a good head on your shoulders.
You really know how to rock. I'm sure you put a lot of advanced planning into that project.
Really cool, thanks for sharing.
Eric
[email protected]
Give him another couple years and he could replace Mike Holmes, sans attitude!
Welcome to the Taunton University of Knowledge FHB Campus at Breaktime. where ... Excellence is its own reward!
I've heard of this Holmes guy, that's about as much as I know about him.
Brian is a class act. A stand alone.
Maybe HE should have a TV show![email protected]
Really nice job Brian. Hats off.
Nick
that is what I was saying in a rounabout way.He can write too, even if he won't admit it. I found myself drawn into the story just like as though it was a Tom Clancy novel
Welcome to the Taunton University of Knowledge FHB Campus at Breaktime. where ... Excellence is its own reward!
I dunno Mike Holmes, but I gotta believe he probably looks better on TV than I would!View Image
I wouldn't say that.Big Muscles
Big Mouth
Bigger ego
Welcome to the Taunton University of Knowledge FHB Campus at Breaktime. where ... Excellence is its own reward!
Big MusclesBig MouthBigger ego
LOL....... Ouch.View Image
That's not fair... I've met Brian and his muscles aren' ....
ummmmmmmmmmm
nevermind
;)
(I'm trying not to think too hard about this thread, it makes me feel too inadequate)
PaulB
Couldn't think of a better person to do that for us.[email protected]
Gary Katz trim Dieselpig framing ,work teach website $$$
You got some crew there Brian, and a good head on your shoulders.
You really know how to rock. I'm sure you put a lot of advanced planning into that project.
We've got good chemistry going on this crew right now Eric. It's fun to be a part of. We can burn out some really good work in a reasonable amount of time and manage to have a pretty good time doing it. As for the 'advanced planning' part.... well.... not so much to be honest! It kinda came together at the last minute. The ink was barely dry on their plans when I had a big job fall through (hit ledge). I told them if they were ready for me then to go get their permits cuz I had a hole to fill. About 10 days later the roof was off!
LOL... other than ordering the power ladder in just the nick of time I didn't have much time to plan much of anything. Just the way I like it. I think too much and I'll go and F it all up! :)View Image
Thanks for the photo essay DP. Very enjoyable read.
And a very nice job. Well done!!!
Runnerguy
You mention that you did two sets of stairs with multiple landings. Were you able to poke through the second floor system parallel or perpendicular to the joists? I always find it challenging to get code-compliant stairs in, and your project house seems pretty narrow to boot.
Did you have any complications with the existing framing/foundation? I assume that the existing headers, beams, and footers were of sufficient size, of did you have to rework anything below the first floor top plates?
I see a blue tarp on the job. You didn't use your EPDM tarp trick?
Jon Blakemore
RappahannockINC.com Fredericksburg, VA
Great questions Jon. I'll answer them as best I can:
The stair hole came through perpendicular to the existing joists, however it didn't really matter much as the hole was about 105" x 85" IIRC. The first to second floor set went like this: Up six risers to a landing, turn right, up four risers to a landing, turn right, and up six risers to the 2nd deck. Pretty big hole.
The second set was "L" shaped; up six risers to a landing, turn right, up seven risers to the attic deck. The two stair ways stacked.
No problems really with the existing framing and foundation. The engineer and architect deemed the existing foundation sufficient to carry a second floor. I talked (email) with the architect a little bit near the end to encourage her to design clear spans where ever possible to minimize having to mess with interior bearing walls and/or point loads. If you can keep all the load out on the footprint then it's much easier to deal with, IMO. The cost of large I-joists will usually be much less than the labor involved with opening up and then repairing the finishes in lots of places around the house. Less mess too.
If headers need to be added over existing openings, you can most always just add them up in the new floor framing rather than having to open stuff up. This is another reason why I like to get into an add-a-level as early in the design phase as possible. Framing a new floor system over an existing ceiling system (as opposed to sistering or beefing up an existing) usually make a lot more sense. It gives you more flexibility... especially if you clear span.
Because we were able to clear span much of the new framing we could avoid having to mess with headers in the existing center bearing wall or beefing up the existing center-bearing beam and/or footings in the basement.
No EPDM on this job. It's costly enough that it's not for every job. I've only done it once; on a home that had areas that had been recently remodeled and a new roof line that I knew meant it would have to be opened up for weeks due to it's complexity. On this Maine job we just finished, I knew I could have it closed back up again in 5 days.... as long as I had 5 clear days in a row. We got our wish, met the deadline, and got by with a tarp for the first four evenings.
View Image
Edited 5/10/2008 8:01 pm ET by dieselpig
I hear you on the clear span benefit. We did one last year using 16" floor trusses. It was quite convenient.Did you have to get engineering on this job? We typically don't have an engineer step in unless the circumstances are unique. The last add-a-level we did had no engineer, but I think we will get one for the next. The point about using the rim joist to span over window and door header (we used a 16" LVL) is something that was almost lost on our inspector.
Jon Blakemore RappahannockINC.com Fredericksburg, VA
I don't serve as GC very often at all Jon, so it's rarely up to me to handle any of the design or requirments. The way it usually works around here though is an architect will make the determination on whether or not to call in an engineer based on their own comfort level. If it's a fairly routine situation then they'll make a determination on their own, if not, they'll call in someone with more qualifications. However sometimes a building dept may specifically ask for an engineering stamp if they don't feel comfortable with something they see either in the drawings or onsite. And some things will most always require a stamp, no matter who drew it..... I believe steel beams may fall into that category.
And the big lumberyards are pretty good. Some of them have engineers on staff that will handle basic stuff like I-joist layouts and LVL sizing. The Boise Cascade software they use to generate the color coded layouts usually does most of the work, and the drawings come stamped by the lumberyard engineer. On big I-joist packages I expect to see these drawings delivered in a Tyvek envelope with the drop. One of the nice benefits of these drawings is that they also provide a color coded cut list.... so it all comes pre- rough cut which greatly minimizes waste and mistakes. I've done 2500 sqft decks that were all kinds of cut up and had a pile of I-joist and LVL cutoffs that would fit in a single trash barrel.
Regarding your inspector.... I've run into that sort of thing too. It took me awhile to figure it out, but I've learned how to handle inspectors pretty good now. A lot of 'yes sir, no sir, thank you sir'. And if they're struggling to get their head around something I always try to leave them space to save face.... like they knew all along. That being said, if it ever came down to it I'd blow my top before I'd accept a failed inspection over something that they simply didn't understand. Knock on wood though.... I've never failed a framing inspection thus far.View Image
I hear you about the inspectors and saving face.I'm getting better as well. I generally try to phrase my objections in the form of a question because I've found a "teacher" is more willing to admit fault to a "student" than an authority to an underling.We had a guy a while back who was very problematic. He would point to a schematic and say it shows one thing, when it clearly does not. I'm not talking about complex drawings or anything like that, just a simple drawing of a three stud corner and the nailing pattern.Sure, you can appeal to the building official if you know you're right, but when you're on a schedule a 2+ day delay can be very trying.Fortunately, he was "promoted" to an office job in the County.
Jon Blakemore RappahannockINC.com Fredericksburg, VA
Cool thread.
When you get a chance I need the recipe for your super Hitachi stick nailer. I'm in the market.
Coiled framing nails are getting harder to find around here.
edit: I may have spoke too soon. Tim Uhler may have some coil guns for sale. Dam me for coming here before JLC.
It's not too late, it's never too late.
Edited 5/7/2008 4:53 pm ET by dustinf
i'm still waitin on pictures of the front porch
Here ya go Mike! I just got it last night. Nothing too special... just tried to dress it up a little with some MDO, layered trim, and quarter-round. I like to do the panels whenever I can when I've got a wall with more glass than wood. We did the little double mulls on the sides (that you can't see in the pic) as well.View Image
View Image