FHB Logo Facebook LinkedIn Email Pinterest Twitter X Instagram Tiktok YouTube Plus Icon Close Icon Navigation Search Icon Navigation Search Icon Arrow Down Icon Video Guide Icon Article Guide Icon Modal Close Icon Guide Search Icon Skip to content
Subscribe
Log In
  • How-To
  • Design
  • Tools & Materials
  • Restoration
  • Videos
  • Blogs
  • Forum
  • Magazine
  • Members
  • FHB House
  • Podcast
Log In

Discussion Forum

Discussion Forum

Drywall question – joint problem

rickjl | Posted in Construction Techniques on March 16, 2009 02:47am

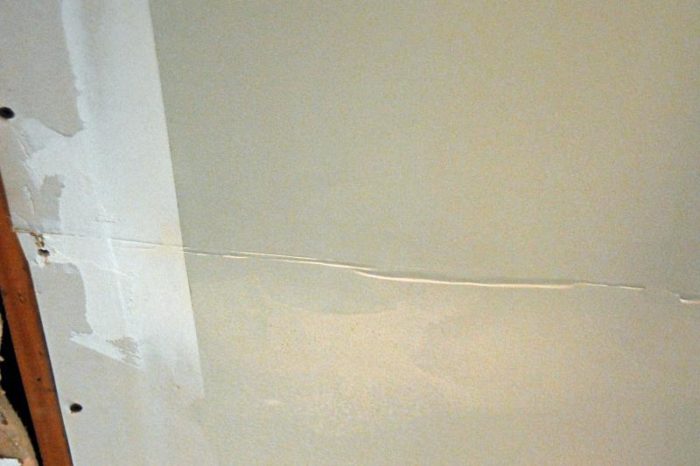
what happend here?  This is the top butted end of two pieces of drywall.  I put drywall up before I put the cabinets in and put a coat of paint on it.  I was going to do the kitchen in stages. 

6 months later this bubble appears.  It almost looks like the drywall pushed apart and came together and pushed the tape out.  This joint is perpendicular to the floor joists above (2×10?).

Reply
  • X
  • facebook
  • linkedin
  • pinterest
  • email
  • add to favorites Log in or Sign up to save your favorite articles

Replies

  1. JMadson | Mar 16, 2009 03:14am | #1

    can't help you with drywall but I can resize your photo...


    View Image

    March Madness
    http://breaktime.mayhem.cbssports.com/e?referrer=MKTG_BM_INVITE
    Our Group password is: tavern
  2. sledgehammer | Mar 16, 2009 03:52am | #2

    Don't know for sure, but we always butt rock on a joist... not perpendicular.

  3. DonCanDo | Mar 16, 2009 04:28am | #3

    I can't tell what I'm looking at.  There appears to be a horizontal indentation, but you referred to a "bubble".

    Over on the left side of the pic there's what appears to be joint compound in a taper, but it's not at the end of the board where the taper would be.

    And what's that discoloration below the horizontal indentation in the center?

    Maybe a picture just can't convey enough information, but if I had to take a WAG, I would say it looks like some kind of stress damage.

    1. rickjl | Mar 16, 2009 04:59am | #4

      Thanks for resizing it for me. 

      It is the tape pushed forward, not an indentation.  To emphasize the bubble I put a light behind the outward V.  That may account for some of the discoloration.  I also put on some mis-mix  latex paint (1$ at home depot) to seal the drywall compound under the cabinets.  I put masking tape up to keep it away from the taper.

      To the left that is a taper.  I am going to finish the ceiling after I get more cabinets built.  What I have is two 4x8 sheets end to end.  The corners, and screw holes are all intact.

  4. User avater
    Dinosaur | Mar 16, 2009 05:36am | #5

    This is called 'ridging'. It happens because of the movement of the underlying framing due to expansion and contraction caused by humidity and temperature changes.

    Ridging can occur on tapered joints but is more common on butt joints. It usually stops after six months to a year, and once it has stabilised, the ridged joint can be blended into the gyprock surface by applying mud to both sides of the ridge and feathering it out into the panel using a wide knife.

    Many professional rockers use a technique called 'back blocking' to minimise ridging in butt joints. This involves locating butt joints between joists or studs, and using a back-blocking device (available at gyprock supply houses or you can make your own out of 1x or scrap pieces of gyprock) to pull the joint back below the plane of the gyprock panels.

    Dinosaur

    How now, Mighty Sauron, that thou art not brought
    low by this? For thine evil pales before that which
    foolish men call Justice....

    1. KenHill3 | Mar 16, 2009 06:01am | #6

      I have used the BUTTHANGER with great results. Obviously you can also achieve virtually the same thing with ply and wood strips.View ImageView Image

      1. User avater
        Dinosaur | Mar 16, 2009 06:09am | #7

        Thanks; good photos.

        Dinosaur

        How now, Mighty Sauron, that thou art not broughtlow by this? For thine evil pales before that whichfoolish men call Justice....

  5. ruffmike | Mar 16, 2009 06:15am | #8

    If it is a butt it should have continuous backing and screwed at 8" max centers, especially on the ceilings. Looks to me you may have got some moisture up there.

                                Mike

        Small wheel turn by the fire and rod, big wheel turn by the grace of god.

    1. rickjl | Mar 16, 2009 07:24pm | #9

      OK   Now that I screwed up how do I fix it?  The ridge is not solid and can be pushed back with your fingers.  I guess I have just been lucky before with butt joints.

      Do I cut it out and put in a new section with plywood backer between the studs

      Cut a hole in it to get the backer in and then fix the hole

      Apply more joint compund to the somewhat soft ridge

      Another thing is this ceiling is 1/2" thick because I need to join into an existing area.

      1. sapwood | Mar 17, 2009 12:21am | #10

        It appears to my non-professional (but I've taped a lot of drywall anyway) eye that you didn't get enough mud under the tape and now it's finally absorbed some interior humidity and let go.

        1. mike_maines | Mar 17, 2009 04:14am | #17

          DING DING DING

          I think we have a weiner.

          OP needs to cut out the bad stuff and re-do with enough mud, and more paper tape, and just a thin layer of mud if any over the paper for the first coat.

        2. User avater
          popawheelie | Mar 17, 2009 07:07pm | #21

          That was my thought as well. It needs to have complete contact with mud under it.

          When it happens to me I cut it out after it has dried.

      2. sledgehammer | Mar 17, 2009 12:49am | #11

        If it were me, at 6 bucks a sheet I'd do it over.... and I'd also prime it with primer, not cheap paint.

      3. ruffmike | Mar 17, 2009 02:55am | #13

        It looks to me you have access to reach in the attic and hold a piece of backing (plywood or 2x4) and screw the edges. Cut out the loose blistered area with your utility knife. Prefill with some hot mud, let set, tape the butt again and finish accordingly.                            Mike

            Small wheel turn by the fire and rod, big wheel turn by the grace of god.

        1. sledgehammer | Mar 17, 2009 03:02am | #14

          2 x 10's in an attic?


          You should look again.

          1. ruffmike | Mar 17, 2009 04:11am | #16

            I just looked at the picture, I did not read his post again.

             Sorry for the misunderstanding. I guess he'll have to cut out a section if he wants solid backing.

            Thanks for keeping tabs on me, Sledge.

             I'm still curious as to how to get shims behind drywall to straighten a wall out. Maybe this poster could use your method to get some backing in there, if you would be kind enough to explain.                            Mike

                Small wheel turn by the fire and rod, big wheel turn by the grace of god.

      4. User avater
        Dinosaur | Mar 17, 2009 03:13am | #15

        Unless you want to tear it all out and redo it from scratch, you will need to wait till it has stabilised before you fix it, or it will just ridge out again. If this is a commercial job, you'll have to persuade the client to be patient and to trust you to come back and fix it later. (If it's in your own home, you have to convince yourself--or more likely, your DW--of the same thing.)

        Generally ridging will stop after somewhere between 6 months and a year. Once it has, simply remove any loose tape, and re-mud both sides of the ridge (with 'hot mud' or setting-type joint compound, as Piffin suggested), then go over it all with standard compound, feathering it out with a 14" knife on both sides.

        Dinosaur

        How now, Mighty Sauron, that thou art not broughtlow by this? For thine evil pales before that whichfoolish men call Justice....

        1. Piffin | Mar 17, 2009 03:07pm | #18

          'twas actually ruffmike who suggested redoing with hot mud, but that is where my thinking was headed. I'm still not clear on the overall situation if this is wall or ceiling and new framing or what. 


          Welcome to the Taunton University of Knowledge FHB Campus at Breaktime. where ... Excellence is its own reward!

          1. rickjl | Mar 17, 2009 05:21pm | #19

            It is a kitchen ceiling in a two story house.

          2. Piffin | Mar 17, 2009 07:00pm | #20

            New framing? Old? Addition? Just hung the rock and finished it or is this an old problem just now noticed or getting around to it? If newish, how long before it showed up after the finish work? Old house with other signs of movement going on?Knowing it is a ceiling eliminates a few of my other possible causes in mind.I think you need to cut out the blister/wrinkle and use hot mud and paper tape.But if something else is causing this, I'd be finding out what and fixin g that first 


            Welcome to the Taunton University of Knowledge FHB Campus at Breaktime. where ... Excellence is its own reward!

          3. rickjl | Mar 18, 2009 08:28am | #22

            OK  What is hot mud?

          4. DonCanDo | Mar 18, 2009 12:45pm | #23

            "hot mud" is slang for any of various setting-type joint compounds such as Sheetrock brand Durabond or Easy Sand.

            More information here and here:

            Durabond in particular is strong stuff that doesn't shrink as it cures which makes it a great product to use to fill gaps between boards.  I would recommend it after cleaning up the failed joint.  Use it judiciously, though, because it's hard to sand.  Easy Sand (as its name implies) sands easily, but it's more of a topping compound and not ideal for filling gaps or setting tape.

  6. Piffin | Mar 17, 2009 12:52am | #12

    Is that on a roof or a wall? It is more than the simple ridging dino is talking about, IMO, But I'd have to know more about conditions and history to say exactly what.


    Welcome to the
    Taunton University of
    Knowledge FHB Campus at Breaktime.
     where ...
    Excellence is its own reward!

Log in or create an account to post a comment.

Sign up Log in

Become a member and get full access to FineHomebuilding.com

Video Shorts

Categories

  • Business
  • Code Questions
  • Construction Techniques
  • Energy, Heating & Insulation
  • General Discussion
  • Help/Work Wanted
  • Photo Gallery
  • Reader Classified
  • Tools for Home Building

Discussion Forum

Recent Posts and Replies

  • |
  • |
  • |
  • |
  • |
  • |
View More Create Post

Up Next

Video Shorts

Featured Story

Ranch Redux

An architect and a handy homeowner team up for an exterior upgrade with energy efficiency, comfort, and durability as part of the plan.

Featured Video

Video: Build a Fireplace, Brick by Brick

Watch mason Mike Mehaffey construct a traditional-style fireplace that burns well and meets current building codes.

Related Stories

  • Tools and Gear for the Moms Who Get it Done
  • An Easier Method for Mitered Head Casings
  • Beat the Heat: Cool Innovations
  • A Practical Approach to Exterior Insulation

Highlights

Fine Homebuilding All Access
Fine Homebuilding Podcast
Tool Tech
Plus, get an extra 20% off with code GIFT20

"I have learned so much thanks to the searchable articles on the FHB website. I can confidently say that I expect to be a life-long subscriber." - M.K.

Get home building tips, offers, and expert advice in your inbox

Signing you up...

This site is protected by reCAPTCHA and the Google Privacy Policy and Terms of Service apply.
See all newsletters
See all newsletters

Fine Homebuilding Magazine

  • Issue 331 - June 2025
    • A More Resilient Roof
    • Tool Test: You Need a Drywall Sander
    • Ducted vs. Ductless Heat Pumps
  • Issue 330 - April/May 2025
    • Deck Details for Durability
    • FAQs on HPWHs
    • 10 Tips for a Long-Lasting Paint Job
  • Issue 329 - Feb/Mar 2025
    • Smart Foundation for a Small Addition
    • A Kominka Comes West
    • Making Small Kitchens Work
  • Issue 328 - Dec/Jan 2024
    • How a Pro Replaces Columns
    • Passive House 3.0
    • Tool Test: Compact Line Lasers
  • Issue 327 - November 2024
    • Repairing Damaged Walls and Ceilings
    • Plumbing Protection
    • Talking Shop

Fine Home Building

Newsletter Sign-up

  • Fine Homebuilding

    Home building tips, offers, and expert advice in your inbox.

  • Green Building Advisor

    Building science and energy efficiency advice, plus special offers, in your inbox.

  • Old House Journal

    Repair, renovation, and restoration tips, plus special offers, in your inbox.

Signing you up...

This site is protected by reCAPTCHA and the Google Privacy Policy and Terms of Service apply.
See all newsletters

Follow

  • Fine Homebuilding

    Dig into cutting-edge approaches and decades of proven solutions with total access to our experts and tradespeople.

    Start Free Trial Now
    • Facebook
    • Instagram
    • X
    • LinkedIn
  • GBA Prime

    Get instant access to the latest developments in green building, research, and reports from the field.

    Start Free Trial Now
    • Facebook
    • YouTube
  • Old House Journal

    Learn how to restore, repair, update, and decorate your home.

    Subscribe Now
    • Facebook
    • Instagram
    • X

Membership & Magazine

  • Online Archive
  • Start Free Trial
  • Magazine Subscription
  • Magazine Renewal
  • Gift a Subscription
  • Customer Support
  • Privacy Preferences
  • About
  • Contact
  • Advertise
  • Careers
  • Terms of Use
  • Site Map
  • Do not sell or share my information
  • Privacy Policy
  • Accessibility
  • California Privacy Rights

© 2025 Active Interest Media. All rights reserved.

Fine Homebuilding receives a commission for items purchased through links on this site, including Amazon Associates and other affiliate advertising programs.

  • Home Group
  • Antique Trader
  • Arts & Crafts Homes
  • Bank Note Reporter
  • Cabin Life
  • Cuisine at Home
  • Fine Gardening
  • Fine Woodworking
  • Green Building Advisor
  • Garden Gate
  • Horticulture
  • Keep Craft Alive
  • Log Home Living
  • Military Trader/Vehicles
  • Numismatic News
  • Numismaster
  • Old Cars Weekly
  • Old House Journal
  • Period Homes
  • Popular Woodworking
  • Script
  • ShopNotes
  • Sports Collectors Digest
  • Threads
  • Timber Home Living
  • Traditional Building
  • Woodsmith
  • World Coin News
  • Writer's Digest
Active Interest Media logo
X
X
This is a dialog window which overlays the main content of the page. The modal window is a 'site map' of the most critical areas of the site. Pressing the Escape (ESC) button will close the modal and bring you back to where you were on the page.

Main Menu

  • How-To
  • Design
  • Tools & Materials
  • Video
  • Blogs
  • Forum
  • Project Guides
  • Reader Projects
  • Magazine
  • Members
  • FHB House

Podcasts

  • FHB Podcast
  • ProTalk

Webinars

  • Upcoming and On-Demand

Podcasts

  • FHB Podcast
  • ProTalk

Webinars

  • Upcoming and On-Demand

Popular Topics

  • Kitchens
  • Business
  • Bedrooms
  • Roofs
  • Architecture and Design
  • Green Building
  • Decks
  • Framing
  • Safety
  • Remodeling
  • Bathrooms
  • Windows
  • Tilework
  • Ceilings
  • HVAC

Magazine

  • Current Issue
  • Past Issues
  • Magazine Index
  • Subscribe
  • Online Archive
  • Author Guidelines

All Access

  • Member Home
  • Start Free Trial
  • Gift Membership

Online Learning

  • Courses
  • Project Guides
  • Reader Projects
  • Podcast

More

  • FHB Ambassadors
  • FHB House
  • Customer Support

Account

  • Log In
  • Join

Newsletter

Get home building tips, offers, and expert advice in your inbox

Signing you up...

This site is protected by reCAPTCHA and the Google Privacy Policy and Terms of Service apply.
See all newsletters
See all newsletters

Follow

  • X
  • YouTube
  • instagram
  • facebook
  • pinterest
  • Tiktok

Join All Access

Become a member and get instant access to thousands of videos, how-tos, tool reviews, and design features.

Start Your Free Trial

Subscribe

FHB Magazine

Start your subscription today and save up to 81%

Subscribe

Enjoy unlimited access to Fine Homebuilding. Join Now

Already a member? Log in

We hope you’ve enjoyed your free articles. To keep reading, become a member today.

Get complete site access to expert advice, how-to videos, Code Check, and more, plus the print magazine.

Start your FREE trial

Already a member? Log in

Privacy Policy Update

We use cookies, pixels, script and other tracking technologies to analyze and improve our service, to improve and personalize content, and for advertising to you. We also share information about your use of our site with third-party social media, advertising and analytics partners. You can view our Privacy Policy here and our Terms of Use here.

Cookies

Analytics

These cookies help us track site metrics to improve our sites and provide a better user experience.

Advertising/Social Media

These cookies are used to serve advertisements aligned with your interests.

Essential

These cookies are required to provide basic functions like page navigation and access to secure areas of the website.

Delete My Data

Delete all cookies and associated data