Drywall seams/joints industry standard?
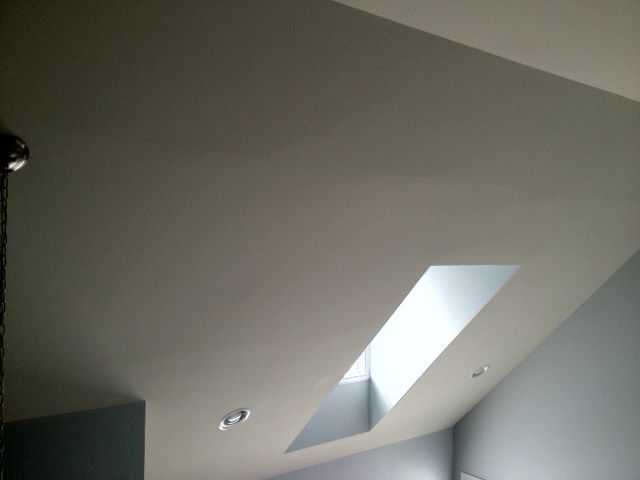
My fiancee and I recently purchased a new home through a “luxury” production builder. In several places throughout the house, there are large visible lines where the sheets of drywall come together. If you look closely, you will see two lines in the above picture. One about halfway between the top of the window and the top of the ceiling, and another about halfway down the window running to the left. These are pretty hard to capture on camera, but they really stand out in the right lighting. We have lines running the entire length of some walls in the house.
The problem is, we have already closed. We could never see these during our walkthroughs because the combo of bright daylight with no window blinds, and builder paint hid them very well. We had the house professionally painted before moving in, and the first evening we were there with different lighting, you can’t miss all of these terrible drywall lines.
We’re basically being told that this is normal, with one guy blaming this phenomenon on the settling of materials in the house and others denying them altogether or “not being able to see them.” I’m not buying it, because we’ve lived in the house less than 2 months and have been able to see them from the beginning. Most of what I’ve read searching around says this is not normal, and a proficient contractor can make seams nearly invisible. By the way, this production builder drywalled 2600 sq ft of house in one day. We’re being encouraged to wait and have repairs made at our 1 year warranty period, and in some cases being told things will just look worse than they do now if they try to fix them. I’m really not comfortable having our house torn back apart by someone who a.) doesn’t acknowledge the issue or b.) thinks fixing it will look worse.
We’ve kept our cool so far, but it looks bad and we’re not happy about it or the run around we’re getting. This picture doesn’t even represent the worst in the house. Is this normal/acceptable or are we justified? Thanks in advance for any professional opinions.


Replies
Drywall should be flat, and you should not be able to see the seams. In an area like where you are looking, it should have a Level 5 finish. Here are the specs for Level 4 and Level 5:
Level 4
If the final decoration is to be a flat paint, light texture or lightweight wall covering, a Level 4 finish is recommended. Level 4 has been modified to read, "All joints and interior angles have tape embedded in joint compound and two separate coats of joint compound applied over all flat joints and one separate coat of joint compound applied over interior angles. Fastener heads and accessories shall be covered with three separate coats of joint compound. All joint compound shall be smooth and free from tool marks and ridges." Before final decoration it is recommended that the prepared surface be coated with a drywall primer prior to the application of final finishes. Gloss, semi-gloss and enamel paints are not recommended over a Level 4 finish.
Level 5
Level 5 finish is recommended for areas where severe lighting conditions exist and areas that are to receive gloss, semi-gloss, enamel or non-textured flat paints. Level 5 requires all the operations in Level 4. Additionally, a thin skim coat of joint compound, or material manufactured especially for this purpose, is applied to the entire surface. (This definition is referenced to Terminology, Section II, Page 2 of GA-214 to make the description of "skim coat" clear to all.) The surface is smooth and free from tool marks and ridges. Before final decoration it's recommended that the prepared surface be coated with a primer prior to the application of final finishes. The Level 5 finish is required to achieve the highest degree of quality by providing a uniform surface and minimizing the possibility of joint photographing and/or fasteners "burning through" the final decoration.
RE: drywall should be flat...
Thanks for the response. Any insight into a reasonable expectation for repairs? Would someone need to start over to get the proper finish, or could this be achieved by sanding and reworking the joints?
jday,
What sheen or gloss level did you paint with? If you painted with anything above an eggshell you are going to need a really good drywall finisher. If painted with flat or eggshell any good finisher should be able to hide the seams.
I agree with the knockdown or splatter on the ceiling.
KK
Paint used throughout the house is satin. What you're seeing on the ceiling is still the builder's beige, did not repaint ceilings.
Small world-one of my better customers is a Jeff Day here, just outside of the Glass City.
The finish is poor, to correct it and the rest you don't show will certainly disrupt your home. The access to those high vaulted areas will be the same challenge as when it was not occupied. Then comes the painting which will be whole ceilings/walls, not just the repairs.
Wait for the one yr warrenty? I wouldn't. In these troubling times, the high end builder might be belly up and gone when you make your claim.
"should be considered normal"?
Only if this is the builder's usual quality.
Best of luck Jeff.
jday,
Make the builder fix it now. With satin you should not see anything even raking it with a halogen light. If any nail pops or anything else occurs before the warranty is up he can come back again.
KK
You're smoking crack if you think a builder is going to have a level 5 finish in that area with any kind of texture. Not going to happen.
To the original poster, you are getting the same treatment the rest of the new owners are getting and they are good at throwing things together and talking their way out of a lot of crappy work. It's no different in any development across the country.
An ex girlfriend was a professional new construction cleaning contractor so I got to see firsthand how a lot of new construction semi-custom builders were throwing things together in Colorado, before, during and after closing. One person has a scratched fireplace screen so we'd see them swap it with another house.
Every one of the fiberglass tubs were scratched to hell - every one! The builders just credited a few hundred bucks for a tub and clients were ok with that.
Drywall cracks and seems were problems everywhere - a friend who owned a house in one development joined with dozens of neighbors and they sued the builder to get them to fix the bad joints.
The list goes on and on - but one thing that I will suggest to anyone and everyone in your situation is that the squeeky wheel gets the grease! If it were me I'd bitch as loud as I could and if that didn't work I'd lawyer up quickly and have your attorney make the requests and get you started documenting things - you'll be amazed at how fast things get fixed and you'll soon know which items the builder is obviously in the wrong on but will fight you for.
One development I know personally had poor soil compaction throughout so foundations were settling a lot and it was obvious to everyone - the builder wouldn't budge and everyone had to sue him. The catch with sueing a builder is that he may not have any money, especially if things go south....wait a year and he may be out of business.
An agressive attorney will show you how he can screw a builder out of more money than you deserve - hopefully you don't go that route, but just get the things fixed that bother you.
I have little sympathy for big builders and the crap they turn out if you can't tell.
You're smoking crack if you think a builder is going to have a level 5 finish in that area with any kind of texture. Not going to happen.
Please explain, as I mentioned nothing about texture. All I did was quote the industry standards of what the finish levels were. I bolded the area that might be important to her.?
What you are doing is looking at the drywall levels based on a couple of paragraphs and interpreting how they are to be applied, but you don't know enough to understand that a level 5 finish is very expensive and rarely used in residential construction, definitely not used in this situation.
A level 5 finish is used so rarely that even with a historic house that is entirely smooth wall and no texture, the vast majority of surfaces will not meet the specifications of a level 5, and it doesn't have to in order to look right.
I would love it if the level 4 was broken down a little to reduce this kind of confusion - a heavy texture and more dull paint with little direct light is a low level 4 and most smooth wall finishes are a high 4, but short of a true 5.
The ceiling in question is a level 4, but it needs to be smooth enough to not show joints as it does. I'll bet lunch that the original paint didn't require as smooth a surface as the new paiint - just as an even higher sheen would require an even more flat surface.
I'll grant you that the level 4 might have been OK with a flat white or a texture for most applications.
This doesn't look like most applications though. This looks like an entryway, or a transition between 1st and 2nd floors. The slopped ceiling is a big part of the visual trasition, and is an important archetectural element. This slopped ceiling is not going to be covered with pictures or furniture.
If you are presenting a great flat plane - it better damned well appear flat, not pieced together.
Just change the lighting -- providing some light from higher up will make the seams invisible.
A level 4 is all that's needed here - it just has to be better than what's there now.
Personally, I would opt for a texture such as a knockdown on that cathedral ceiling portion. IMO, you are going to have a hard time getting a finish on that portion that will please you given your viewing position on it from a open bridge.
If you are seeing the same thing on walls, I would look for them to be fixed
Those are not acceptable joints in any circumstance. They can be repaired in place with regular joint compound and a finisher that knows what he's doing. it looks to me like you have strapping that doesn't lay flat so the drywall is puckered up. You'll have to repaint at least 2 coats and maybe 3 coats to get it looking like the rest of the ceilings though.
While the seams SHOULD be perfectly flat and invisible, it's rarely the case that every seam in a house is. The only way to come reasonably close is to have the entire house skim coated.
You can have a stroke trying to get it fixed, you can have the problem areas textured or otherwise treated to disguise the problem, or you can live with it.
And if you're ever closing on a house again, take along a flashlight. Hold the flashlight flat against the wall and all sorts of imperfections pop up.
I bet they just taped and mudded the joints with no overall skim coat.. Real craftsmen are hard to find these days and that is normal operation but you are left with seams that show under the right light.
Stay in their ass and make them fix it
If they say they will just make it worse, tll them that you will be seeing a lot of each other then
When your drywall joints are fixed they will probably sand the highpoints off, skim the area flat and retexture if it's bad. Sometimes it's not as involved and some carefully applied texture covers - really hard to say without being there and seeing it first hand. Builders have guys who do nothing but touchups so if it's a small issue this is the guy you'll see. If it's a bigger problem (that the drywall contractor will have to fix) you'll see the drywall subcontractor's guys.
Be nice, but be very clear what you want and be firm. If being firm isn't your strong suit, you really are better off hiring an attorney if you get any resistance, and it sounds like you've already reached that point.
If your seeing this throughout the house, then the quality isn't what it should be. That being said, the way that light hits a wall surface can make some decent walls look bad. Perhaps you can look at other homes this builder did and compare the quality. Were there specs?( how many coats,paper tape or fiberglass tape,type of joint compound used..) Sounds like you got more of a commercial taping job than a high end residential one. I'm assuming this is a taping job and not a skimcoat of plaster...