FHB Logo Facebook LinkedIn Email Pinterest Twitter X Instagram Tiktok YouTube Plus Icon Close Icon Navigation Search Icon Navigation Search Icon Arrow Down Icon Video Guide Icon Article Guide Icon Modal Close Icon Guide Search Icon Skip to content
Subscribe
Log In
  • How-To
  • Design
  • Tools & Materials
  • Restoration
  • Videos
  • Blogs
  • Forum
  • Magazine
  • Members
  • FHB House
  • Podcast
Log In

Discussion Forum

Discussion Forum

elliptical door fan

ktkamm | Posted in Construction Techniques on September 3, 2009 05:32am

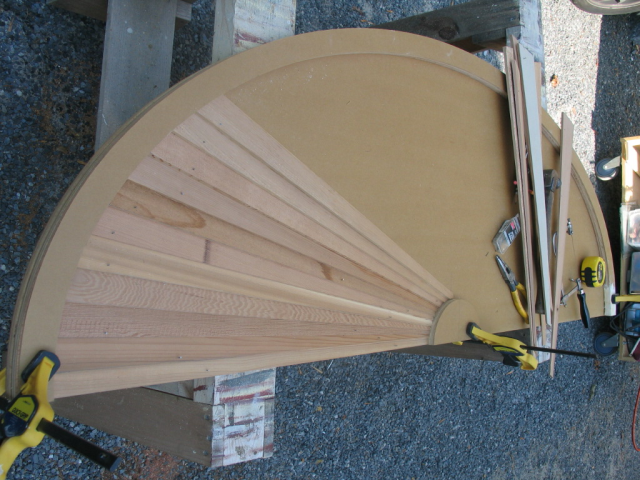
Thanks for the help to date. I am now in the process of building the fan. I am not sure if I am doing something wrong with the sizing or geometry of the “rays”. As I get closer to the middle of the fan, I am afraid I will have to much wood overlap where the rays meet at the base. Any critiques/suggestions welcome. Thanks, Kieran

Reply
  • X
  • facebook
  • linkedin
  • pinterest
  • email
  • add to favorites Log in or Sign up to save your favorite articles

Replies

  1. User avater
    Joe | Sep 03, 2009 06:01pm | #1

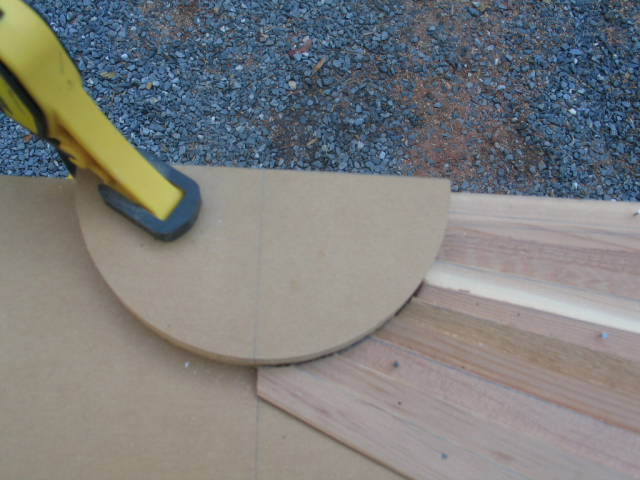
    You'd want to keep the center line of the rays going through the "center point" of the ellipse. This is the point where the long and short axis' meet.

    View Image

    http://www.josephfusco.org

    http://www.constructionforumsonline.com

    1. ktkamm | Sep 03, 2009 06:24pm | #3

      Hi Joe. Please forgive my ignorance on this subject! What I have been doing is cutting out rays that start at 1/2 inch and taper to roughly 2 inches wide at the end. I assume from what you suggest I would continue to do this, however, make a line down the center of the ray and line that up with a corresponding line that originates form the center of the lower half circle of the ellipse/fan structure. Correct? Thanks, Kieran

      1. User avater
        Joe | Sep 03, 2009 06:31pm | #5

        Kieran,Sorry I posted and didn't see your post ;-). Yes that's just about the easiest way of doing it and it would look pretty good when your done.

        View Image

        http://www.josephfusco.org

        http://www.constructionforumsonline.com

      2. User avater
        Joe | Sep 03, 2009 06:35pm | #6

        I would suggest that you remove the center semi circle and mark off equal spaces on the outside ellipse and then draw a line from the tic marks to the center. This would define the shape of each piece you'd need to cut. Put the disc back and have at it ;-)http://www.josephfusco.orghttp://www.constructionforumsonline.com

        Edited 9/7/2009 5:13 pm ET by Joe

        1. ktkamm | Sep 03, 2009 06:39pm | #7

          Thanks Bill and Joe. Back out to the drawing board/driveway (or as it is known in Maine, the dooryard, you know, the yard next to your door!)  Kieran

          1. User avater
            Joe | Sep 03, 2009 06:55pm | #8

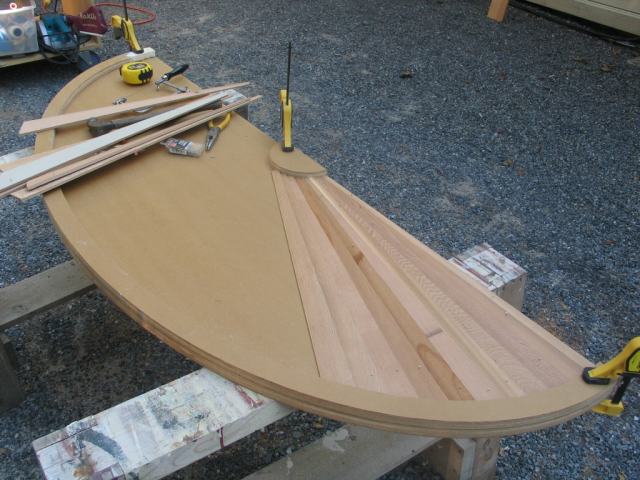
            It would look some thing like this.

            View Image

            View Image

            http://www.josephfusco.org

            http://www.constructionforumsonline.com

          2. ktkamm | Sep 03, 2009 07:02pm | #9

            That is eaxacltly how it is looking now! Would it make sense that I will have to plane down the undersurface of the clapbboards by circle to keep the thickness from building up?

            PS : I think it may have been an article by you on ellipses that gave me the courage to start this part of the project.  Kieran

          3. rez | Sep 03, 2009 07:09pm | #10

             View Image 

          4. User avater
            Joe | Sep 03, 2009 07:49pm | #11

            Kieran,You might have to do a bit of fairing to get everything to lay well. You could also cut a rebate(rabbit) on the back of the clap as well.I've written some stuff on ellipses and if it helped you that's great. I guess that's the sole purpose of writing anyway ;-)

            View Image

            http://www.josephfusco.org

            http://www.constructionforumsonline.com

          5. ktkamm | Sep 03, 2009 08:00pm | #12

            Thanks again Joe.

          6. User avater
            Joe | Sep 03, 2009 09:01pm | #13

            Anytime ;-)

            View Image

            http://www.josephfusco.org

            http://www.constructionforumsonline.com

          7. ktkamm | Sep 07, 2009 10:24pm | #14

            Joe,Finally got it done! Thanks again for the encouragement and guidance.Kieran

          8. User avater
            Joe | Sep 08, 2009 12:12am | #15

            Kieran,The finished fan looks great. Glad I was able to help you out. I hope who ever you did the work for appreciates the effort you put in to it.

            View Image

            http://www.josephfusco.org

            http://www.constructionforumsonline.com

          9. ktkamm | Sep 08, 2009 12:39am | #16

            I did it for my own house. My wife does appreciate it! I keep telling her how much money I am saving us. Lets me take more trips over to Lie-Nielsen.


            Kieran


            Kieran

          10. User avater
            Joe | Sep 08, 2009 01:04am | #17

            Kieran,I've make a few trips there myself ;-)

            View Image

            http://www.josephfusco.org

            http://www.constructionforumsonline.com

          11. User avater
            McDesign | Sep 08, 2009 01:31am | #18

            Hey - looks super!  Always wanted to build one like that.

            Forrest

          12. User avater
            Sphere | Sep 08, 2009 01:45am | #19

            That came out great!

            Show us a pic when ya get it back above the door with the columns.

            Good job.Spheramid Enterprises Architectural Woodworks

            Repairs, Remodeling, Restorations

            "If Brains was lard, you couldn't grease much of a pan"Jed Clampitt

            View Image

          13. ktkamm | Sep 08, 2009 05:06pm | #20

            Thanks to all for the kind words. Will get a photo when it is all done.

            Kieran

          14. reinvent | Sep 08, 2009 06:46pm | #21

            Looks great. I would recommend you back prime and prime all the ends of the claps before you install the fan.

          15. User avater
            Jeff_Clarke | Sep 10, 2009 05:38pm | #22

            Looks nice!

            If anyone ever does one of these really 'exposed to weather' (as opposed to under a porch roof) it helps to make the center (top) fan 'blade' flat, not beveled, and then reverse the fan 'blades' on the opposite side so they shed water.

            This also helps to keep the fan symmetrical-looking by avoiding a build-up of dirt on one side only.


            Jeff

            Edited 9/10/2009 10:40 am ET by Jeff_Clarke

          16. ktkamm | Sep 10, 2009 07:42pm | #23

            This one will be exposed. I think I did construct it in the fashion you descibed. Correct?  Kieran

          17. User avater
            Jeff_Clarke | Sep 10, 2009 08:56pm | #24

            Perfect!   Didn't see that in the previous photo.

            Jeff

          18. mikeroop | Sep 11, 2009 12:21am | #25

            that thing does look great!

            but you did go back and change the layout from the first set of pics? no?

          19. ktkamm | Sep 11, 2009 12:31am | #26

            Yes. I screwed up the initial layout. After guidance from Joe Fusco (who has great plans for a jig to use with a router to cut the ellipse), I ripped out the initial pieces of clapboard, drew the corresponding tick marks on the inner and out circles and went for it. 56+ pieces later and a lot of handplaning, it was done. I compare it to what I think giving birth would be like. Hard as heck to do, got a beautiful end result and would probably do it again after the memory of the process has faded. Kieran 

          20. RedfordHenry | Sep 11, 2009 04:18am | #27

            Looks great.  How are you going to flash it?

          21. ktkamm | Sep 11, 2009 04:26am | #28

            The piece you see in the backround (leaning against the house)goes on top once I have screwed the fan in place. I was thinking about using lead flashing over the top. I am open to any and all suggestions. thanks.

          22. john_carroll | Sep 11, 2009 08:44pm | #29

            I'd use this:

            http://www.ebuild.com/articles/525637.hwx

  2. User avater
    ToolFreakBlue | Sep 03, 2009 06:23pm | #2

    Looks to me like the exposed edges should point to the center of the semi circle   (perpendicular to the tangent of that arc)

    The way it is layed out right now they point to a "point" off the map. 

    TFB (Bill)
    File format
  3. User avater
    Joe | Sep 03, 2009 06:26pm | #4

    Ktkamm,

    Just to clarify, this is the shortest and simplest answer to a fairly involved process. This is akin to laying out an elliptical stair which was discussed here many moons ago. You still might find it if you do a search. If I look around I might still have some of the drawings I did if you are interested.

    View Image

    http://www.josephfusco.org

    http://www.constructionforumsonline.com

Log in or create an account to post a comment.

Sign up Log in

Become a member and get full access to FineHomebuilding.com

Video Shorts

Categories

  • Business
  • Code Questions
  • Construction Techniques
  • Energy, Heating & Insulation
  • General Discussion
  • Help/Work Wanted
  • Photo Gallery
  • Reader Classified
  • Tools for Home Building

Discussion Forum

Recent Posts and Replies

  • |
  • |
  • |
  • |
  • |
  • |
View More Create Post

Up Next

Video Shorts

Featured Story

Grout-Free Shower Panels

Engineered-stone shower panels are waterproof, but proper installation relies on tight seams and silicone sealing.

Featured Video

How to Install Cable Rail Around Wood-Post Corners

Use these tips to keep cables tight and straight for a professional-looking deck-railing job.

Related Stories

  • Preservation and Renewal for a Classic
  • A Postwar Comeback
  • With Swedish Arts & Crafts Precedent
  • Natural Simplicity

Highlights

Fine Homebuilding All Access
Fine Homebuilding Podcast
Tool Tech
Plus, get an extra 20% off with code GIFT20

"I have learned so much thanks to the searchable articles on the FHB website. I can confidently say that I expect to be a life-long subscriber." - M.K.

Get home building tips, offers, and expert advice in your inbox

Signing you up...

This site is protected by reCAPTCHA and the Google Privacy Policy and Terms of Service apply.
See all newsletters
See all newsletters

Fine Homebuilding Magazine

  • Issue 332 - July 2025
    • Custom Built-ins With Job-Site Tools
    • Fight House Fires Through Design
    • Making the Move to Multifamily
  • Issue 331 - June 2025
    • A More Resilient Roof
    • Tool Test: You Need a Drywall Sander
    • Ducted vs. Ductless Heat Pumps
  • Issue 330 - April/May 2025
    • Deck Details for Durability
    • FAQs on HPWHs
    • 10 Tips for a Long-Lasting Paint Job
  • Issue 329 - Feb/Mar 2025
    • Smart Foundation for a Small Addition
    • A Kominka Comes West
    • Making Small Kitchens Work
  • Issue 328 - Dec/Jan 2025
    • How a Pro Replaces Columns
    • Passive House 3.0
    • Tool Test: Compact Line Lasers

Fine Home Building

Newsletter Sign-up

  • Fine Homebuilding

    Home building tips, offers, and expert advice in your inbox.

  • Green Building Advisor

    Building science and energy efficiency advice, plus special offers, in your inbox.

  • Old House Journal

    Repair, renovation, and restoration tips, plus special offers, in your inbox.

Signing you up...

This site is protected by reCAPTCHA and the Google Privacy Policy and Terms of Service apply.
See all newsletters

Follow

  • Fine Homebuilding

    Dig into cutting-edge approaches and decades of proven solutions with total access to our experts and tradespeople.

    Start Free Trial Now
    • Facebook
    • Instagram
    • X
    • LinkedIn
  • GBA Prime

    Get instant access to the latest developments in green building, research, and reports from the field.

    Start Free Trial Now
    • Facebook
    • YouTube
  • Old House Journal

    Learn how to restore, repair, update, and decorate your home.

    Subscribe Now
    • Facebook
    • Instagram
    • X

Membership & Magazine

  • Online Archive
  • Start Free Trial
  • Magazine Subscription
  • Magazine Renewal
  • Gift a Subscription
  • Customer Support
  • Privacy Preferences
  • About
  • Contact
  • Advertise
  • Careers
  • Terms of Use
  • Site Map
  • Do not sell or share my information
  • Privacy Policy
  • Accessibility
  • California Privacy Rights

© 2025 Active Interest Media. All rights reserved.

Fine Homebuilding receives a commission for items purchased through links on this site, including Amazon Associates and other affiliate advertising programs.

  • Home Group
  • Antique Trader
  • Arts & Crafts Homes
  • Bank Note Reporter
  • Cabin Life
  • Cuisine at Home
  • Fine Gardening
  • Fine Woodworking
  • Green Building Advisor
  • Garden Gate
  • Horticulture
  • Keep Craft Alive
  • Log Home Living
  • Military Trader/Vehicles
  • Numismatic News
  • Numismaster
  • Old Cars Weekly
  • Old House Journal
  • Period Homes
  • Popular Woodworking
  • Script
  • ShopNotes
  • Sports Collectors Digest
  • Threads
  • Timber Home Living
  • Traditional Building
  • Woodsmith
  • World Coin News
  • Writer's Digest
Active Interest Media logo
X
X
This is a dialog window which overlays the main content of the page. The modal window is a 'site map' of the most critical areas of the site. Pressing the Escape (ESC) button will close the modal and bring you back to where you were on the page.

Main Menu

  • How-To
  • Design
  • Tools & Materials
  • Video
  • Blogs
  • Forum
  • Project Guides
  • Reader Projects
  • Magazine
  • Members
  • FHB House

Podcasts

  • FHB Podcast
  • ProTalk

Webinars

  • Upcoming and On-Demand

Podcasts

  • FHB Podcast
  • ProTalk

Webinars

  • Upcoming and On-Demand

Popular Topics

  • Kitchens
  • Business
  • Bedrooms
  • Roofs
  • Architecture and Design
  • Green Building
  • Decks
  • Framing
  • Safety
  • Remodeling
  • Bathrooms
  • Windows
  • Tilework
  • Ceilings
  • HVAC

Magazine

  • Current Issue
  • Past Issues
  • Magazine Index
  • Subscribe
  • Online Archive
  • Author Guidelines

All Access

  • Member Home
  • Start Free Trial
  • Gift Membership

Online Learning

  • Courses
  • Project Guides
  • Reader Projects
  • Podcast

More

  • FHB Ambassadors
  • FHB House
  • Customer Support

Account

  • Log In
  • Join

Newsletter

Get home building tips, offers, and expert advice in your inbox

Signing you up...

This site is protected by reCAPTCHA and the Google Privacy Policy and Terms of Service apply.
See all newsletters
See all newsletters

Follow

  • X
  • YouTube
  • instagram
  • facebook
  • pinterest
  • Tiktok

Join All Access

Become a member and get instant access to thousands of videos, how-tos, tool reviews, and design features.

Start Your Free Trial

Subscribe

FHB Magazine

Start your subscription today and save up to 70%

Subscribe

Enjoy unlimited access to Fine Homebuilding. Join Now

Already a member? Log in

We hope you’ve enjoyed your free articles. To keep reading, become a member today.

Get complete site access to expert advice, how-to videos, Code Check, and more, plus the print magazine.

Start your FREE trial

Already a member? Log in

Privacy Policy Update

We use cookies, pixels, script and other tracking technologies to analyze and improve our service, to improve and personalize content, and for advertising to you. We also share information about your use of our site with third-party social media, advertising and analytics partners. You can view our Privacy Policy here and our Terms of Use here.

Cookies

Analytics

These cookies help us track site metrics to improve our sites and provide a better user experience.

Advertising/Social Media

These cookies are used to serve advertisements aligned with your interests.

Essential

These cookies are required to provide basic functions like page navigation and access to secure areas of the website.

Delete My Data

Delete all cookies and associated data