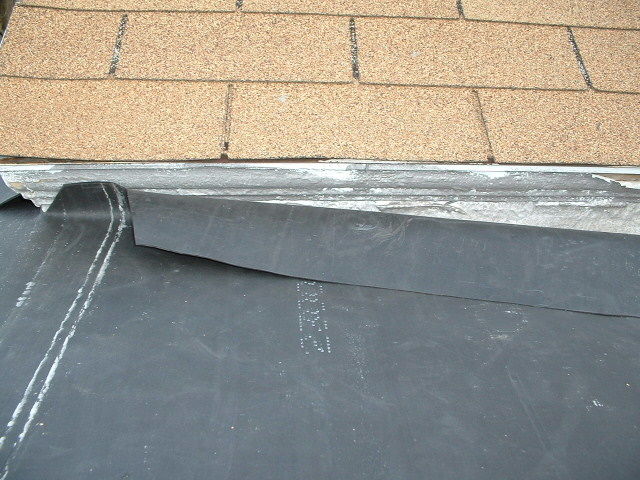
I’ve got all the long pieces glued down (some look better than others <G>) and am in the process of finishing up all the edges. The pics show the intersection of two roofs, with the vertical surface that I need to attach the EPDM to gradually getting taller as it gets closer to the back corner. That surface appears to be metal, with some kind of paint-like silver/gray coating, that fairly easily flakes off. (It may be hard to tell, but that ‘v’ in the EPDM on the left, is an outside corner.)
Because there is so little room to attach the EPDM (on the left in the pic–only about an inch, below the trim) I’m thinking maybe I should completely remove the trim (doesn’t show anyway), wire brush the metal, then glue the EPDM and add the termination bars, leaving the removed trim off. Seem reasonable?
And, now that I’m DONE glueing these 10′ x 25′ pieces I’m curious about the easiest way to do it. I did 1/2 of each sheet at a time, but when sticking it, do you pick it up (how many people) and gradually lay it down, or perhaps leave it horizontal and sort of just push it forward, letting it kind of unroll itself (which worked great for the lap splices)?
Thanks again for the advice!
Thon


Replies
Unroll it the latter way, just nudging it forward. Two pwople always better.
Hate to tell you this now, but that trim needs to come off, and the bottom two or three courses of the shingles. Termination bars are a poor chice in any situation, but halfway acceptable on siding like you have around the corner where it is partially sheltered. When there is a volumn of water flowing over the joit from the pitched roof above, it is gauranteed to leak. The shingles roof is too close to the flat, so I want the EPDM up under the shingles.
You could also build a cqnt strip to span the joint. I suspect since this is already glued and winter is coming, you will just use the termination bar now, and then redo the joint with a cant spaning and new 48" of EPDM over this roof and under shingles next try.
Welcome to the
Taunton University of Knowledge FHB Campus at Breaktime.
where ...
Excellence is its own reward!
tab... yup you gotta get up on the upper roof at least two or three courses.
what is your surface prep? did you use hardboard & plates ? i don't see any plates photographing thru the epdm
you will need lap cement and seam caulk tooMike Smith Rhode Island : Design / Build / Repair / Restore
Asphalt roof shingles are not compatible with EPDM. The manufacturers say the EPDM will break down, although I have yet to see it actually happen. Consider using another material (maybe a modified bitumen felt?) to strip in between the underside of the shingles and "flat" roof.
As you have already heard, you need to get the single ply up and under the shingles. Minimum is to extend the single ply 8" vertically above the "flat" roof. Since you have a sloped roof adjacent to the EPDM, and not a parapet wall, you will have to extend at least the 2 or 3 courses already mentioned.
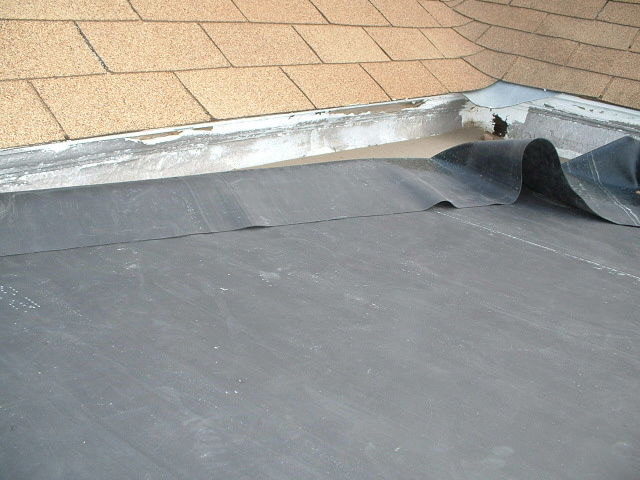
Hmmm.... I HOPE my apparently really bad photography has misled you all.
Both pictures show the same wall plane. The second picture is just further down the wall from the first. Unless I'm misunderstanding the term, that IS a parapet wall, under the shingles. It's about 3" high on the north end (first pic), and 5" high on the south (second pic). If I remove the trim from the top of that wall, the EPDM would then be recessed back from the drip edge under the shingles, by maybe 2 inches. Isn't that an appropriate place to use termination bars? (BTW, the EPDM I just put on the roof on the other side of the house DID have a transition to shingles, and I ran it up under them after asking about it, here.)
Both fiberboard and plates lurk beneath the EPDM already down, and the plates do telegraph through easily--just don't show up well in the photo.
Thanks once again.
Thon
It is amazing how a photo can fail to be definitive!Yes, you are right. Remove the trim. Run the rubber all the way up the "wall" and use a termination bar. Best if you put water stop (grey in color, VERY sticky, out of a caulk tube) under the rubber just under the term bar.That trim is an interesting detail. Seems to be taking the place of ####drip edge. I would be interested to see a pic with the trim removed.I believe I see a plate. You used square plates, right?Rich BeckmanAnother day, another tool.
thon... i'm a little anal so take it for what it's worth..
3" - 5" doesn't reassure me..
i'd run a cant strip all along the bottom and turn it up onto the upper roof plane at least two courses
the asphalt shingles will not react with the epdm.. roofing cement will
too much potential for water to blow up the roof shingles and get above your term bar.. then under the epdm
your way may work fine... but i would have bid the job with my specs to cover my A.. and rolled the cost into the jobMike Smith Rhode Island : Design / Build / Repair / Restore
I had a similar situation on my porch roof, and i left a little slack in the rubber and ran the top edge up under the vertical edge of the drip edge and screwed and glued (and then siliconed the screw heads) the drip edge to the fascia. it worked well.
Rich, I fully understood the photo, and remember this job from all the advice and possibilities we have rendered here for TAB.
But in all my experience, EVERY single detail i have ever seen speced for ANY flat or low slope roof system has always specified a minimum of 8" vertical above the deck for seams, flashigs, jjunctions, and terminations. 3-5 just doen't meet that standard. I give this job a 90% without getting on up under the shingles seamless.That is why I said i predict he will go ahead now for the temporary job and do the term bar and then later find that he wants to go on up the roof next year.for TAB - here is a pic of a parrapet wall - not mine.
http://www.fra.org.uk/media/pics/L-002.jpg
Welcome to the Taunton University of Knowledge FHB Campus at Breaktime. where ... Excellence is its own reward!
I see your point.Maybe I'M misunderstanding the photo. LOL! I was assuming that with the trim removed, we would see the wall back behind the drip edge ending up higher than the drip edge. In other words, well sheltered by the roof. Maybe that's still wrong, but I think it would work.If the rubber is going up the fascia....I concur with you completely.Rich BeckmanAnother day, another tool.
I see - you had your x-ray vision turned up stronger on your monitor.;)
Welcome to the Taunton University of Knowledge FHB Campus at Breaktime. where ... Excellence is its own reward!
Rich, here's the pic of the detail you'd asked about. FWIW, the shingles, and trim are on the 1910 house. The EPDM is on an addition built around 1960.
At this point I'm trying to decide whether to use termination bar here, and/or put similar trim back. The trim would angle in from the drip edge, cover the top edge of the EPDM, and I would think, work like termination bar? And I've yet to finish some of the details like outside and inside corners (slowed down by car repair, computer repair, weather, and on and on).
Piffin, thanks for the parapet info. I see the benefit of the cant strip but you're right, the weather's too far along this year. :-) And, the details of installing it, back in that corner, are, um..., interesting. (I never did test all that well on spatial relationships.)
Mike, you lost me here: "too much potential for water to blow up the roof shingles and get above your term bar.. then under the epdm".
One more thing: Where the EPDM hangs over fascias at the top of walls, it should be glued to the fascia, followed by the termination bars, correct?
Thanks again for all the help.
Thon
TAB_A,The pic is a bit dark and it is hard to see the top of the rubber. That might work.I don't understand what the trim would be attaching to. I think you need the term bar (but you need waterstop under the rubber under the term bar).I think I would probably leave the trim off unless you can come up with something that hangs straight down from just behind the drip edge to just above the roof surface...but, again, I have no idea how you would attach that."And I've yet to finish some of the details like outside and inside corners (slowed down by car repair, computer repair, weather, and on and on)."I assume you are including as unfinished the circled detail in the attachment. That WILL leak if it is left as it is in the pic.Rich BeckmanAnother day, another tool.
Yes, the detail you circled is one of the outside corners I have yet to do.
I've only been able to find one reference to term. bars on fascias at the top of the walls. Seems to show only 'water cut-off mastic' under the EPDM, and no other adhesive. (The term. bar appears to be at the very top of the fascia.) My thought was to run (glue) the EPDM several inches down the fascia and then use the mastic and bar. Overkill? Aesthetically unpleasing?
Do I need to buy their mastic or will hardware store have an appropriate substitute?
Thanks again.
Thon
TAB,If it were me I would do what I said above. Put the water cut off behind the term bar as far up that board as possible.But please note that both Piffen and Smith have a whole lot more experience than me at this. So you might want to be thinking about the cant and running rubber under the shingles."My thought was to run (glue) the EPDM several inches down the fascia and then use the mastic and bar."I don't know what that means. I would run it as far UP the fascia as I could get....etc."Do I need to buy their mastic or will hardware store have an appropriate substitute?"I don't think you'll find a substitute at the hardware store.But if you do, let us know!!!Rich BeckmanAnother day, another tool.
Running the EPDM 'down' the fascia was a reference to the rest of the roof, where the rubber will hang over the edges--the 'easy' parts? <g>
<Put the water cut off behind the term bar as far up that board as possible.>
Will do.
Thanks.
Thon
I am replying to this just now to get it in my listing so when I get home later in the week, I can draw some pictures on my own PC to illustrate some of this for you. Meantime - get the term bar as high as possible and use their sealant behind. There are many others that "might" work, but could also contaian chemicals that are abusive of the EPDM and bring on early deterioration. Use basic hardware stuff at your own risk.
Welcome to the Taunton University of Knowledge FHB Campus at Breaktime. where ... Excellence is its own reward!
nope, not a parrapet wall. Just a facia dropped onto the roof. A parrapet is about three feet tall and does not link to shingles above. - usually the outsiode perimeter of the roof.with the trim molding gone, you have decent odds of being safe from average rains, but not the extreme ones, wind driven ones, or ice and snow build up, which can easily get that high, leaving your termination bar sitting in a puddle.
Welcome to the Taunton University of Knowledge FHB Campus at Breaktime. where ... Excellence is its own reward!
TAB, we usually handle 10' x 100' rolls when fully adhering EPDM. We glue half sheets and push the half horizontally onto the glue. Smaller pieces can be done either way.
I'm not sure where you are located...... i.e. is snow / ice build-up a concern. Up here ( Canada) we run the EPDM minimum 24" above the roof line. Winter time this area will fill with snow then ice, back up under the shingles and leak during a thaw. If it is not visible from the ground leave the shingles off the bottom 2 courses and glue the EPDM to the plywood, run water block caulking under the top edge and nail a course of shingles which will hold it in place. You can use a term bar but it would stick the shingles up or you would have to cover the bar with another flashing membrane, it will leak in this application if left exposed.
GMan ... modified bitumen "felt" is not felt but is a similar composition as asphalt shingles. They are both asphalt based, the mod bit has either glass or polyester reinforcement. The top is covered with granules similar to shingles for the cap sheet or poly or sand for the base sheet.
Edited 12/16/2004 8:24 pm ET by scottbr