extending a roof line for BBQ cover
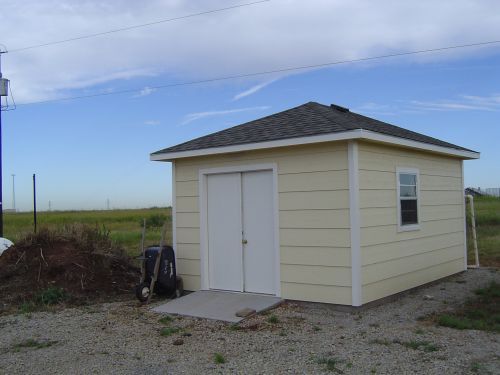
My father in law has a little shed that is similar to the one in the photo, his however is brick veneered. My wife wants me to cover a 12×12 slab that is infront of his shed so he can BBQ inthe rain. I said “no-problem”. But the more I looked into the details , I realized that I would have to make a perimeter beam for the rafters to set on and that rquires thickness. The thickness cant go upward or the roofs wont line up. If I keep the top plates on the same plane, I will have to make the thickness go down…into the bricks. The plan is to extend the hip roof out another 15 feet,..as if it were like that in the first place. And land the corners of the beam on 2 4×6 cedar posts..I would prefer steel colomn with a brick veneer.
This is done by framers everyday and it is no big deal to them. I am a carpenter but my framing skill are only average, (I built the shed in the photo). How does one tackle the beam problem and how thick of a beam should I use. I am thinking a double 2×10.
thanks for the help.
mjb


Replies
I'll get the ball rolling by giving my idea and others can tell why it's wrong or propose something better:
Double the fascia and hang new rafters from the old fascia using Simpson hangers. Make the new roof at a lesser slope than the old and support it somewhere near its outer end with a beam that is supported by PT posts that go into ground at least to frost line. That way you don't have to do a lot of ripping into the old construction. You would have to remove the bottom couple of course of shingles on that side. I'd probably overkill where new roof joins old and put bituthene over the joint between the new and old sheathing before shingling.
buy your outlaw an umbrella, I've seen allot of melted/distorted siding from people BBQing under the eave, and 1 fire ..
I'll second the motion for a portable/movable/temporary solution. If you make it a big permanent structure, it'll be there even when you're not BBQ-ing in the rain. Would it be in the way? Would it make the place look better? Then there's the whole hood/powered vent/grease/crud issue....
-- J.S.
OK OK forget the BBQ. Lets say he wants to sew out there and stay out of the sun.
People BBQ on their patios all the time. It is gonna be alright I swear! I was even going to elevate his ceiling inside there anyway.
I want to extend the hip roof out about 15 more feet and have it open underneath.
I dont think you undertood my problem. I don't want a flat pitched roof hanging off the fascia board. . I want to extend the Hip roof out more to cover the slab. I can see the solution if this were a add-on with stud walls to support the rafters, however I want it open underneath. This will require a beam=strength which= thickness. I cant take the thickness up above the plate because I want the finished roof to blend with the old. And, I need to support the beam as it lands on/in the existing bricked wall.
Let me tell you my ideas and you shoot me down if it is wrong. Support the double 2x10 or 2x8 at the existing wall so that the tops of the beam is the same as the top plate. How I do that ,..not sure. How do I line up the beam with the outside stud wall ( not the brick line)of the existing structure . and support it at the same time. Just to get to the stud wall I will have to remove some bricks on each upper corner...then what. How would you tie into the stud corner post so it all lines up and gives good support? This is my stumbling block. The rest is straighforward (for now) I would take the beam around the area I want, set the beams on top of columns, or timber and begin setting the rafters on the beam for the new hip roof. .Then I have to figure out how to trim it. Maybe I am thinking about this all wrong.
"The plan is to extend the hip roof out another 15 feet,..as if it were like that in the first place. And land the corners of the beam on 2 4x6 cedar posts..I would prefer steel colomn with a brick veneer."
Are you talking about extending the rafters out in the same plane and pitch as the existing roof 15" in front of the doors like this drawing?
If so by the time you go out 15' the rafters depending on the pitch of the roof at the birdsmouth and supporting beam might only be 4-5' off the ground.
nope. Looking at the photo. Bring the facia out 15 feet. In a straight line. (level line).
The hip roof remains EXACTLY the same. just 15 feet further out, and supported on two columns.
I think he means to extend the ridge and eaves by 15 ft., moving the plane you extended rather than extending it. To do that with the bottom open as he said means that the new ridge has to be structural. It also means outward thrust from the new hip rafters which means tension around the eaves.
-- J.S.
here is a quick sketch
I gotcha now.If your going to just continue the hip roof then you need 3 bems for all three sides. The two beams that go into the shed corners you can just cut the corners out the height of the beam so that the beam sits flush to the top plates and at the other end they will sit on top of the brick piers with the 3rd beam.Joe Carola
you lost me at "you can just cut the corners out the height of the beam so that the beam sits flush to the top plates" . I am a trim carpenter so I need details.
thanks for hanging in there for me though!
If you expose the existing outside corner of the shed and it's 3 2x4's or a 4x4 corner and your going to use a 2x10 header you measure down from the top plate of your shed wall 9-1/2" and cut the top plate out and the corner studs or 4x4 out and sit your header right on top of the studs so that they will support your header. Now your header will be flush with the top plate and you can cut the rafters exactly like the existing ones.Joe Carola
You could even notch the header at the top so you don't have to cut out the existing top plate and lap out without weakening the header.Joe Carola
You are reading my mind. The only reason I didnt just go with that idea is that I figured the beams need to be supported by at least 2 jacks, and I was a little concerned about tearing into a corner post and top plate.
I can see from all the responses that this isnt as straightforwardas one might think. When I originally went to look at it I thought "No prob" ...but it is a little tricky. I dont like the notching though. I think it would lessen the strength of the beam...unless I can at least get one jack under it.
Are the studs exposed on the inside of the shed?Notching the beam on the top is not a problem I've done it that way a million times and never once had a problem but you don't have too.Joe Carola
I don't see why you have to make this so complicated. Set two 4x4 posts on the outside forward corners of the shed face. Lag them to the wall framing through the brick veneer. Set the back ends of the eaves beams on those posts. Hang the ridge beam from the pinnacle of the existing roof. Install collar beams to counter wall spreading.
If you don't like the look of the naked 4x4s on the face of the brick shed, box them with matching brick.
Done.
Dinosaur
A day may come when the courage of men fails,when we forsake our friends and break all bonds of fellowship...
But it is not this day.
Dino,
I don't think he is communicating to well.
In 61135.1 , he said "The plan is to extend the hip roof out another 15 feet,..as if it were like that in the first place"
In 61135.4, he said "I don't want a flat pitched roof hanging off the fascia board. . I want to extend the Hip roof out more to cover the slab."
And in 61135.8 he said "Bring the facia out 15 feet. In a straight line. (level line). The hip roof remains EXACTLY the same. "
I figured it out!
View Image
This!
I thought I was communicating it well...I was wondering why everyone was having such a hard time figuring out what I was talking about. I am glad everyone is on the same page now, I apologize if I was misleading.
After I saw the drawing of what you wanted, everything you said made sense, but it is hard to communicate in words what is so easily gotten across by a picture!
Remember if you want this completely open on the bottom that with a hip roof you have outward thrust in all directions. I'd tie the header horizontally to the existing top plates with Simpson straps, and also strap around the new outside corners. I'm not sure how much to worry about the side beams bowing outward.
-- J.S.
Side beams bowing out;
2 2x10s and 3 2x4s or 2 2x8s and 2 2x4s made into a box beam. Use those new Simpson truss screws.
View Image
4x6 posts will give each 2x10 an inch of bearing.
SamT
I like that idea. Put it together with aliphatic resin glue in addition to the screws and it should be extremely stiff.
-- J.S.
what would be the best way to connect those beams to each other at the posts? as well as the existing structure?
cutawooda,
Just bolt the 4x6 posts thru the brick facade as someone already suggested. The existing struture will provide all the Rafter Tie you need there. The 4x6 will seem to penetrate the brick and look like a bigger post.
I would use 6x6 posts at the far end for appearance , it's a little overkill for the structure (maybe overkill, I'm no engineer.)
View Image
Sketch "A" for the 4x6 and "B" for the other end. I would just miter cut the beams at the open end.
Simpson Custom Architectural Brackets division will get you what you need, something like the sketches above. Tell them what you're doing and let them engineer it.
The biggest strength issue at the open end will be uplift. Anchor them posts down.
SamT
Edited 7/29/2005 10:58 pm ET by SamT
Yep. I followed that after getting corn-fused at first, too. But my suggestion is in line with your drawing. All I'm doing is pointing out another way to hold up the back end of the beams that will be supporting the eaves of the extended section. Like this:
View Image
All he has to do is bolt a couple of 4x4 posts in place where the red lines are and set the heel of the beams on those. A lot simpler than cutting into the framing and so forth. He wouldn't have to strip any of the brick veneer, either.
Dinosaur
A day may come when the courage of men fails,when we forsake our friends and break all bonds of fellowship...
But it is not this day.
Sorry , looked at the notch pic again..I thought you had it notched the other way..the pic would work!
Thank goodness you guys replied because I had the same idea as Joe.
I was wondering though, if he could still do what I suggested--basically make a box of subfascia boards (beams), and supporting the first side by attaching as you would a deck ledger to the existing front fascia (using lags or carriage bolts) and supporting the outer two corners (new front) on posts, hanging ceiling joists running parallel to the front facade and then extending the ridge and putting up the rafters and so on to make the new roof. I'm obviously not a roof framer, but it seems like it would work. (The whole thing would be like building a deck, only with the deck as an extension of the side fascias and instead of deck boards, putting on a roof.)
Your wife wants to make the poor old man cook out even on rainy days? LOL
I hear of a house fire about once a year from barbeques being too close to a house, is your wife in the old guys will?
Joking aside, since he has a brick veneer, I would look for a way to build a brick unit integral, and a way to shed rain. i'd need the real shed photo to know how to go.
Welcome to the
Taunton University of Knowledge FHB Campus at Breaktime.
where ...
Excellence is its own reward!
If you can expose the upper two corners of the existing shed, why not get a Simpson hanger sized to hold two 2x10's and hang your beam? At the other end, you could do the same off the post, or cut it 9.5" shorter and have the built beam rest on it, with a Simpson cap of sorts. Others would no doubt know better, but I might guess that you could get away with an 8" deep beam, if your beam to beam distance is short enough, which makes your rafters shorter and lighter.
You want something like this?
View Image
I'll bet ya a beer in the tavern that the shed now has a 4:12 pitch roof. That will give you 6' of headroom just 6' from the wall.
If it has a 3:12 Pitch, you will still have only 8' of usable room.
If you can bring yourself to reduce the new roof pitch to 2:12, you will have 6' headroom 12' from the wall and 5' 6" at the 15' mark.
If the existing wall is not 8' add or subtract the difference to/from these elevations.
SamT
Edited 7/29/2005 12:22 am ET by SamT
no, there is a sketch on a previous post. The roof line never gets closer to the ground. It just gets extended over.
Oh, like this.
View Image
SamT