Good afternoon,
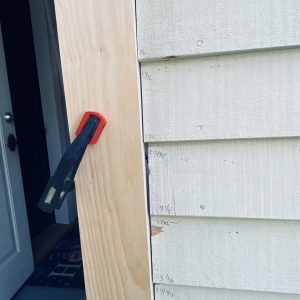
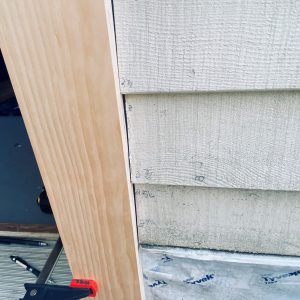
I need some help. I had found some rotten exterior vertical trim to the interior/exterior garage door entrance. So like an ok DIY’r, took it out. When I went to fit the new board against the wooden clapboards on the house, the board had various gaps and widths from a fat 3/16″ to 1/32″. Here’s what I noticed:
1. The clapboards were not flush against the new trim.
2. Where the new trim board sits, it sits against the bottom edge of some of the clapboards.
3. This means that the clapboards are not even going across the house. The reveal of the clapboards ranges from 3 15/16″ – 4 3/16″.
4. It also screws up the reveal for the screen door stop which and it ranges from 1/4″ to to a 1/16″
My first thought was to use silicon caulking between the trim and the clapboards. Did some research and it is most, highly recommended not to. So that idea is out.
My next thought is to trim the the clapboard ends so as to get an even fit against the trim but not sure about that.
Soooooo, I’m looking for some advice. Thanks.
Phil


Replies
Rip a straight line on the clapboards, then cut down a larger piece of trim.
Know that even a professional could not achieve the perfection that would be great on this job.
With the varying reveals of the siding runs, “perfect will never be close enough for this job”
Positioning some sort of “fence” on the siding to run your circular saws base plate against would give you a strait cut. Is it worth it?
Trimming just a couple claps to get it better but not perfect? Maybe.
Or a neat caulk job and nobody but you will see the difference. But under no circumstance us silicone caulk? Siliconized latex maybe. Easy cleanup. Might last awhile.
I’d use OSI Quad. Lasts a lot longer, can be tooled but not as easy as latex. Will stretch so work now will look good next summer.
Best of luck.
ps, get your wife, girlfriend, mother in law or either father and walk them by. Don’t tell them about what it looks like to you……see if they see it.
You could try your 3rd grade teacher as well. They saw everything!
+1 for OSI Quad, and OSI Quad Max has even more flexibility. I installed fiber cement clapboards on my house, and the installation requires a 1/8" expansion gap between clapboard and trim. OSI Quad was perfect, very flexible for expansion and contraction, lasts a long time, and tooled easily.
Looks like trimming the clapboards will be the go to. Appreciate your input Calvin & TaylorE.
If you do trim the claps and have to use a wider trim, the head pc may need to be longer.
A multi tool also works well for this. Screw on a sacrificial straight board to the corner and ride the multi tool along it, using it as a guide to hit the parts of the clapboard that are preventing a good seam. Move it over and do it again if there is still a gap. In the 2nd picture the bottom corner of the 3rd row up seems to be pushing the trim board too far to the left. Hit those spots for a tighter fit. If you don't have a multi tool use a sharp utility knife or sanding block with some 80 grit sandpaper. The deal with silicone is paint doesn't stick to it.
Having differing reveals on the clapboards can actually be a good thing. A good siding installer will use a story pole to layout the siding courses. I like to make a stick with a different exposure on each side. For instance a pole with 4", 4.25", 4.5" and 4.75" so you can roll it over to different sides and see what elevations each layout reveals. This is how you get full boards over windows and doors and avoid skinny pieces of siding at places like the top course. Most people think every course is the same, but it is not noticeable to change the exposure 1/4", or even 1/2" for a few courses to have a full piece of siding over a window. What really catches your eye is skinny and notched pieces. Sometimes it can't be avoided, but a good sider carefully plans this out.
Once the trim is installed and those joints caulked and painted/stained the same color as the clapboards they will not be as noticeable as they are now. Also, if the bottom of the trim will be resting on a horizontal surface, PVC might be a better choice to avoid water wicking. Can't see from the pictures, but if there is no protection on the sheathing joint maybe add some roofing felt or ice and water barrier.
Forget about the gaps that are less than a 1/4". Why are you using wood for the vertical trim and not a PVC or fiber-cement product to prevent future rot?
The trim is wood so I wanted to keep with that. I understand your comment and the reasoning. Call me a traditionalist. I also used bora care on the wood as well. Plus I’m using linseed oil paint on the trim. Using a mixture of linseed oil paint and mineral spirits.
Phil
Those gaps you are worrying about are inconsequential. Ive seen worse by people who call themselves professionals. Make sure that you have some flashing tape or aluminum flatstock slid behind the claps. That will do more to help with shedding water.
Lastly never ever use silicone unless its on glass. OSI Quad recommended b others is great. Polyeurathane caulk is great too.
Hi Steve. I hadn’t thought of that about the flashing tape which I do have. I will be sure to make that happen. Picked up the OSI Quad already.
Thanks for the info.
Thank you to all for the great info. I’m not a professional but I like fixing my own problems. I love my house.