What if you were doing the trim on this house? What would you have done differently than was done when the house was built. You know I’m asking because I am about to start the replacement myself and I would like to do a much better job than the original. Being a rookie I need your help so I really do get it done correctly.
Thanks,


Replies
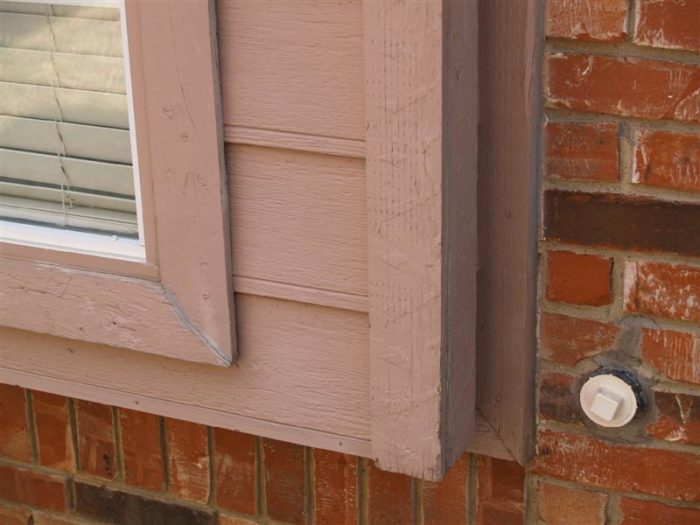
Prime all sides and cuts.
Don't miter the casing.
Run siding to the casing rather than nail the trim up over top of the siding.
Bevel all horizontal runs to shed water.
Install a watertable to kick water out at the bottom.
Weatherstrip/seal all the openings b/4 trim.
Caulk properly and use the good stuff so it lasts.
A Great Place for Information, Comraderie, and a Sucker Punch.
Remodeling Contractor just outside the Glass City.
http://www.quittintime.com/
Install a watertable to kick water out at the bottom.
Can you explain that one just a little bit for me? Is that at the bottom of the window or the bottom of the wall? I agree with everything else you listed but was wondering if there should be something below the window to kick the water out. What kind of chalking are you using?
thanks,
Bottom of wall-above a skirtbd is the way I do it.
The sill is a form of this below the window.
Urethane is what I like-hard to work with but bonds to masonry,metal, wood.
OSI makes some good sealants-many colors.
Painters caulk is not.
Silicone isn't either.
A Great Place for Information, Comraderie, and a Sucker Punch.
Remodeling Contractor just outside the Glass City.
http://www.quittintime.com/
Edited 3/16/2008 10:36 pm ET by calvin
Install a watertable to kick water out at the bottom.
Can you explain that one just a little bit for me?
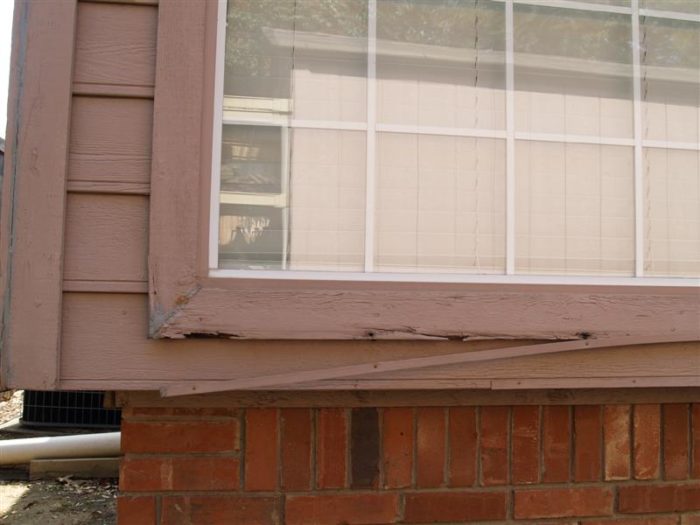
See the attached photo. A sill is directly under a window frame, and in traditional work it is an integral part of the window frame. It was usually sloped at 10 degrees and cut from a 2x8 or 2x10, depending on the thickness of the wall.
A water table is a continuous detail that provides a drip edge around the entire house. In the photo, you'll see a 2x sill under the window (at left). Immediately under the sill is a large bullnose water table. About two feet beneath that is a second water table (this one created by flaring the siding out over the belt band.
View Image
This is a great education. I don't know a darn thing about exteriors.
What Calvin said, but I might suggest ...
Why not get some of the PCV trims out there (AZEK is one) and Hardi cement planking.
BIG upside in cost, granted, big learning curve, but almost indestructible in the long term.
I also suggest you are going to see some rot hidden inside ..Quality repairs for your home.
AaronR ConstructionVancouver, Canada
The US Forest Products Lab recommends painting all of the end grain with a Paintable Water Repelant Protectant before priming..
.
A-holes. Hey every group has to have one. And I have been elected to be the one. I should make that my tagline.
That'd be two steps ahead of what he's got now.
This is back asswardsk, but I can count on one hand the number of times I've seen any cut painted. People must be using their heads for a hat rack.A Great Place for Information, Comraderie, and a Sucker Punch.
Remodeling Contractor just outside the Glass City.
http://www.quittintime.com/
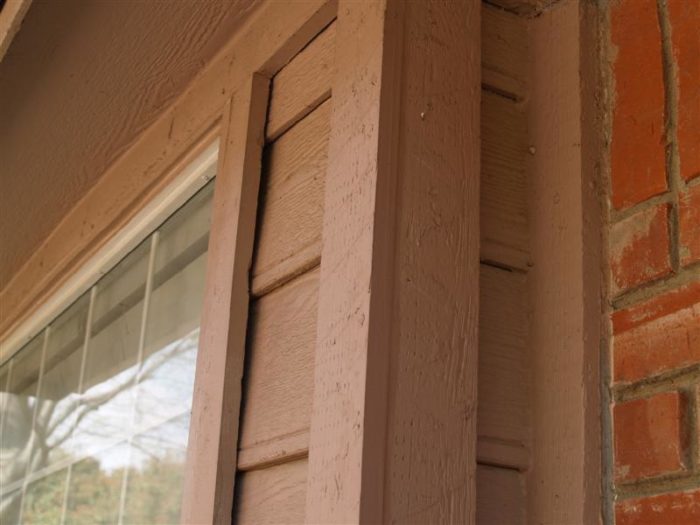
I'd clean up the sides of those boxed out windows by eliminating the small pieces of siding that are visible. Instead of using a 1x4 cornerboard on the side, I'd use a solid 1x that got all the way to the wall without any siding showing at all.
That's my preference. I don't like the proportions of a small sliver of siding peeking out next to the corner boards.
The most glaring mistakes were routine maintenance. It was never properly caulked originally and never maintained.
Cal already pointed out that the trim pieces shouldn't have been mitred. I agree. The joint at the bottom of the window should be vertical to allow any water that might enter, to escape. A properly painted and caulked house won't allow water in though.
I prefer the siding to run behind the trim, but I want that connection caulked, with a high grade, flexible exterior caulk that goes on AFTER the paint. The rubberized caulk bridges the two skins of the different materials (the siding and the trim) and provides the much needed thickness to allow stretching when the movement occurs from thermal conditions.
Most painters want to caulk first, then paint later. I'm not sure that the skin of the paint, which is the only protection for the wood, can stretch enough to prevent cracking and tearing. Underneath, the caulk might be stretching but the skin of the paint fails and the water intrudes anyways, runs over the top of the caulk and under the paint skin.
Bob's next test date: 12/10/07
Very good points Jim. I also have been looking at running a 1x back to the house. I don't really like all those little pieces and all those joints to caulk. Vertical at the bottom of the window, that will help. I think I would have run the bottom all the way across. Caulk after paint that is new to me.
Thanks,
It's new to almost anyone I've ever talked to outside of the Metro Detroit area. We may have been doing it wrong for the last 3 decades that I've seen it done, but the results seem to be working. There is no one in the metro area using any synthetic trim products and no demand. Trim rotting off houses just doesn't seem to be occurring as is implied by other regions. Bob's next test date: 12/10/07
OK....I've requested of one poster some close up shots of his home to get a better idea....so why not ask you for some shots taken at a distance?
Get a better idea of the overall style of the house might help determine what style of trim, thus how to go about it.
Off the top of my head would be to definetly butt the siding to the casing rather than tucking it behind.
J. D. Reynolds
Home Improvements
Pp, Qq
I am picking some good points from this already. I will see if I can get some pictures tonight if it's not raining. I general it's a single story, all brick except around a couple of windows and fire place box.
Looking at the pictures again, I'm wondering if you couldn't do something outside of a typical siding material as you said its basically just around the windows themselves?
Maybe you could go with a panel detail, using whole, solid peices with fewer joints and potential leaking.
J. D. Reynolds
Home Improvements
Pp, Qq
I would love to do just that, however the fireplace area is next and it is 5' 6" wide. I don't know how to make that look right if I try to use sheet goods in a vertical fashion. Installing horizontally didn't sound right to me.
Try and post a pic of that as well when you have a chance.
We'll come up with something. ; )
J. D. Reynolds
Home Improvements
Pp, Qq
As requested: Pictures from a little further back.
Allen,I would trim the window out in solid wood trim pieces w/out siding, as recommended earlier. I would worry about something that wide in PVC because it expands and contracts with temperature. Wood will move too, and you need to take that into account as the trim gets wider. I would add a proper sloped sill under the window and protruding at least an inch beyond whatever trim is below that. I probably wouldn't bother with a water table on that particular window.For the chimney, I might look into brick instead of wood, though it would be much more money. If I was just going to trim and side it again, I might go with fibre-cement siding (hardie-plank) or cedar or cypress with cypress cornerboards. As previously mentioned, butt siding to trim rather than lapping it over. I would wrap the corners with bituminuous membrane under the cornerboards and out beyond them a few inches so the siding lapped over it. I'm gonna get blasted for this, but when using wood siding (but not with fibre cement), I think it's better to just do a good job fitting the siding tight to the trim, prime the cut ends, and leave it at that. No caulk on the vertical joints. The caulk always fails eventually, and water gets in, and it has a hard time drying out again because everything is all gobbed up with caulk. I've witnessed this time and again. The siding is invariably in better shape at the vertical joints on houses I've worked on where they have not been caulked. Better drainage is more important in my opinion.Steve
I would pull all the siding off, and trim around the windows with the cypress. then, instead of replacing the siding, I would use cultured stone, especially around the chimney. Maybe even use the cypress to make a bar counter/plant ledge about 42" up on the chimney . The chimney would also look a lot nicer if it tapered off more gradual like from where it starts now all the way to the top instead of the little 45's it has now . There's a lot less maintenance on stone than on siding, and it's easy to do.
http://www.culturedstone.comJohn
You may want to use cedar for the trim. Looks like white pine was used which is pretty much useless for trim nowadays.
The future. Cypress.
Even better.
Allen, that chimney chase looks like it needs some serious detailing both with flashing and whatever you use to side it.
A Great Place for Information, Comraderie, and a Sucker Punch.
Remodeling Contractor just outside the Glass City.
http://www.quittintime.com/
Well don't just sit there. Out with the details. If it looked good I wouldn't be asking for help.
alright alright, hold your horses.
First off-number 413-I'm not sure where that is. Maybe drop back a bit on the shot.
BUT=the first pic.
Probably the cause of most of the rot-sided, trimmed and finished-in that order. NO paint whatsoever on any cut - wide open for saturation every time it rains.
That's not all of course. Poor roofing/siding flashing details. No kick out flashing to push that water away from the corner-which when added to the corner trim nailed over the siding-sure fire water inlet behind everything.
Look below that and there's a bit of a hump in the roofing/sheeting. I think I see an opening that might be allowing water down under the shingle and maybe on top of the sheeting. With the heat of the sun, a slow cooker. How's the soffit below that spot?
I wish I had a picture of kick out flashing-someone here will have one for sure. Hope they post it, you'll see immediately how it directs the water away from the corner board.
BUT-you must paint seal all cuts b/4 you put any wood up. That chimney chase is also a prime target for Ice and Water shield on top of the step flashing and around all the corners-working from the bottom up. Sno pac (where are you located) wicks right up all that as it thaws. And those areas attract snow like a magnet.A Great Place for Information, Comraderie, and a Sucker Punch.
Remodeling Contractor just outside the Glass City.
http://www.quittintime.com/
Ok. I'm following you now. I thought you wanted to redesign the whole chimney. The flashing is probably not to bad, I'm not high enough to get you good pictures of that. There are some metal kickouts on the backside of the chimney not sure they help any. The siding to trim boards have so many spaces for water to get in, when it blows it has to be flowing water down those corners just like a gutter. I'm not seeing any problems with the roof deck, yet. I'm in Texas so snow is a minor issue. It may snow but it won't last. Not sure what might be behind the siding when it comes off.
Thanks,
On those bottom corner boards you need some metal flashing that goes behind the siding (like the step flashing) and out and around the corner board. With the corner overlapping the siding it makes it harder, but not impossible-a slit would have to be cut in the siding at the corner board. How long has this place been built? A Great Place for Information, Comraderie, and a Sucker Punch.
Remodeling Contractor just outside the Glass City.
http://www.quittintime.com/
Allen...absolutely gorgeous house.
However, I think the chimney is horrendous. Please don't take offense....I have never liked the idea of installing siding on a chimney.
My first suggestion is to do it in stone. I think it would compliment the brick nicely. However...one doesn't just throw up "stone siding" on a wood framed chimney chase. Actual stone would require a foundation of its own.
I might take a beating here for suggesting it...but some of those faux stone sidings really look good. However I have absolutely zero experience with the stuff, so I can't be of help suggestion a manufacturer or where to start.
I think a nice panel detail is really the direction to go with the windows.
J. D. Reynolds
Home Improvements
Pp, Qq
The faux stone would be great on the fireplace. But it is pricey and the wife said no. I don't plan to stay in this house more than a few years so I don't want to take this that far. I do want what I do to be done properly just not over the top.
Thanks,
I've been thinkin' some more on your house....OK, I've got no life...so what.
A stucco finish on the chimney would be nice also. Same color as whatever you paint the wood trim.
J. D. Reynolds
Home Improvements
Pp, Qq
Having a little experience with siding, I would remove every bit of it and start over.
They now have 1 piece corners in material like Azek.
Install tyvek or like material, reflash the chimney, with kickouts.
Install prepainted Hardie plank like material.
Side note, does anyone recognize the siding material?
isn't that a masonite/hardboard product? i think i've used it before ,actually has a little tounge and groove on the top edge for the next one to set into.
thats my guess
i looked at the first pictures and thought,just a old house with everything rotting on it,then the full pics get posted,wow was i wrong,nice house that deserves the attention. larryif a man speaks in the forest,and there's not a woman to hear him,is he still wrong?
One other thing, install the trim pieces before the siding. This will keep the water from behind the trim and siding.
also...... ( hey i like the azek and the stone ... either )
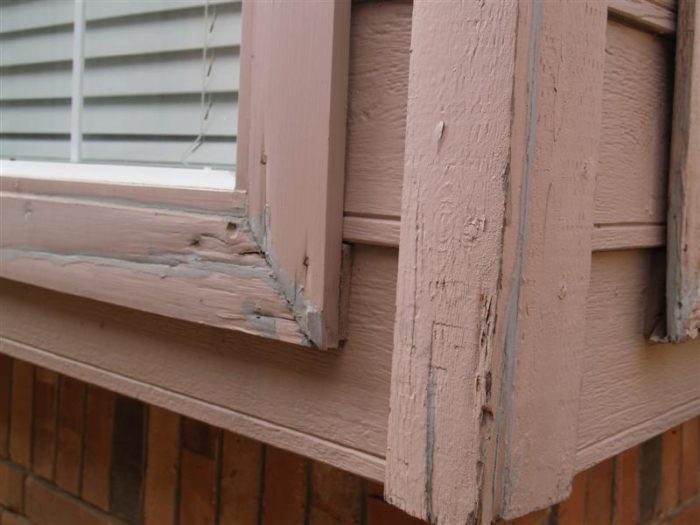
View Image
notice the siding sits right on the concrete
you need a flashing detail here and you have to keep the siding up about 3/4" to allow a drip and ..... backprime everythingMike Smith Rhode Island : Design / Build / Repair / Restore
The flashing would run up under the siding 6 inches down over the cement say 1-2 inches to separate the siding from the cement? This would stop a wicking situation?
Thanks,