Hi breaktime crew,
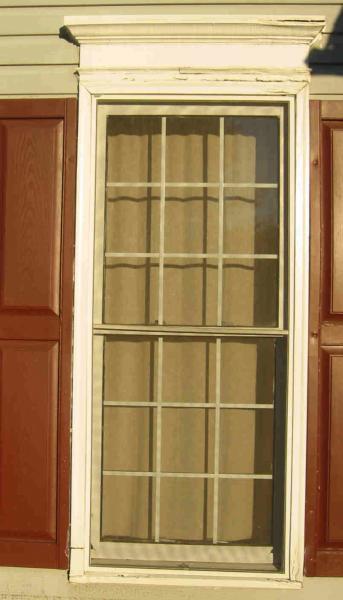
I wanted to repair some window trim on several windows on my home. I had my house painted two years back and the contractor just did a “nice” putty job that came apart after year 1/2 or so. Now I want to do the job and do it right.
Any advice on my approach to replacing all of the trim on the windows would be appreciated. Questions I have:
How much would something like this cost to repair in MD per window?
How easy is this to repair/replace?
Should I use PVC or wood for the brick molding?
Should I remove on trim piece at a time and cut and insert the new replacement.
My skills:
I am prety comfy cutting mitres and handling power tools
I have done small repairs around the house (Never on a window)
Tools:
Mitre saw and box (should I upgrade to 12″ compound mitre saw)
Should I get a nail gun (finish nailer)
Hammer
Molding remover bar 18″
Caulk + caulk gun
Thanks,


Replies
Before you try to do anything with the trim, figure out where the moisture is coming from and fix that. If you replace the trim without it, now matter how "right" it is, it won't hold up any longer than that putty job.
The look of your house makes me ask how old it is? Reason is older homes didn't incorporate moisture barriers and insulation the same way we do today. I see a lot of older houses with painted cedar claps on them and you can't make paint stick to them to save your life. 2 years and it pops off from moisture underneath.
"If you pick up a starving dog and make him prosperous, he will not bite you. This is the principal difference between a dog and a man." - Mark Twain
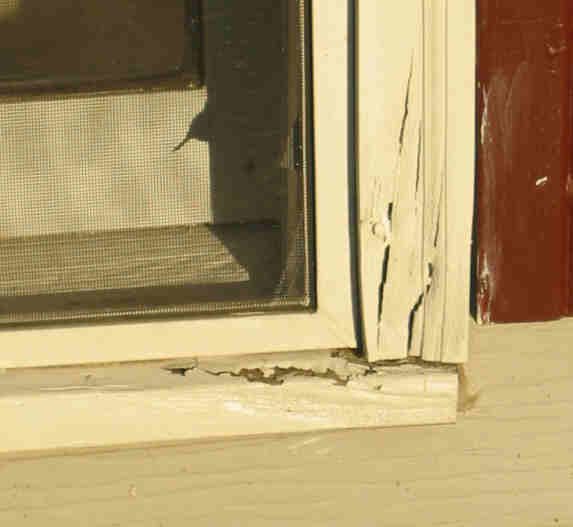
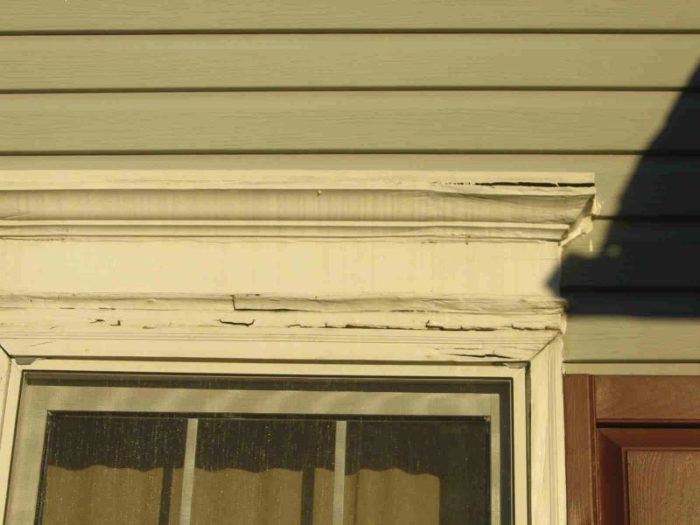
I forgot to mention, the house was built in 1991. I am the second owner. It seems that the water sits on the top decorative trim as it is flat. Not sure how the water gets to the side trim.
Edited 10/30/2005 9:12 pm ET by atfsaw
I live on the Southwest coast of Canada - just a little north of Northwest USA. We see LOTS of rain and with tighter houses, more problems like this.
Now, if it were me, I'd be asking you where you were - you did not fill in the profile. But, nevertheless, I don't hink you are going to "fix" this problem. You are going to be replacing a lot of trim.
My first rule is to strip it down to the framing, if it as bad as it looks in the pictures. Tale lots of pictures so you have the plans in front of you and throw the old stuff away.
Then, find out where the water is getting in. Barriers, caulk (I like polyurethane, but that's me) and a very careful selection of trim. When I'm working with wood (most of the time), I'm careful to select single piece Hemlock and NEVER fingerjoint. Gotta love the fingerjoint, it makes me a lot of money, replacing, unless I'm doing vertical, when it's primed all side Pine facia.
If the painters that follow me saw flat trim where water could sit, they'd just laugh at me. I bevel at least 5 deg, and prefer to work at 13 deg just to make sure the water will fun off. Caulk every joint. Put a second coat of primer on it, then paint ASAP. Unless you are in the Sunbelt, painting time is probably over.
Should'nt happen to a 14 year old house, but it does because of .....
You may want to hire a specialist. It's going to be a job, and you probably have income to earn.
Good luck.
Quality repairs for your home.
AaronR Construction
Vancouver, Canada
Hi Aaron,Couple of questions on your response:
You said "I'm working with wood (most of the time), I'm careful to select single piece Hemlock and NEVER fingerjoint.:My question:Can I buy this Hemlock wood at a home center, or is the brick mold they sell okay for this job? You said:
Gotta love the fingerjoint, it makes me a lot of money, replacing, unless."My Question:I plan on using mitre joints for the trim, so finger joints are not on my radar. Is this okay? I pretty much plan on pulling each side, and cutting the replacement on the spot with my mitre saw.You said:
" I'm doing vertical, when it's primed all side Pine facia"My question:
Where do I purchase it Pine facia?As for having the pros do the job for me, I have some other work I am having the pros do which is outside my skill level and higer up on the house. One reason I want to try is, is to get more tools and to gain the experience 8-). I have couple friends helping out.
You are in Maryland, and available woods out there may be different there than here. I use Hemlock because it's water resistant and I can get lengths - but then, I do more restorations and renovations, so I see more "production" shortcuts that fail. I also backprime. No fingetjoint on the exterior for me! Go to a GOOD lumberyard and ask what to use. Out there, it may be Cypress.
There is a huge difference betweem mitre joints and finger joint. A good lumber yard will know the difference. Mitres are where you angle to wood in such a way as to allow water to run off, or not allow it to get into the joint. Fingerjoint is where the trim maker has cut small pieces and glued them together. The glue always degrades.
I use primed facia, made of Pine, because it is available here. Home Depot has a OSB trim made to the same dimensions. In your case, working on your own house, you may want to look at some of the other plastic (AZEC, etc) which are available. You will still need flashing to stop water getting into the house.
Honestly, you are getting into an area which is a minefield. Nobody knows if the framing is rotten, sill plates, window framing etc. I wish you luck, and keep my email address handy (and a digital camera to record and upload pictures).Quality repairs for your home.
AaronR ConstructionVancouver, Canada
What Aaron said. If the trim is flat on top, water is standing there. When you replace the trim, maybe you can put a piece of flashing there that goes under the siding and laps over the front of the trim.
And yes, you need to upgrade to a big Makita or Bosch double bevel sliding compound miter saw, the biggest you can find. Tell DW you have to have it to do good work. Ok, that probably won't fly, since you're looking at $600 for the saw. When you say you have a miter saw and box ... does that mean the old variable speed reversible cordless kind? Also known as a hand saw? See if you can find a Dewalt 705 saw at Lowes or HD. It's about $275 and a really good saw. 12" single bevel compound, non-sliding.
And you will make good use of a nail gun and compressor. Sounds like you don't have one now. Porter Cable and others usually have a combination package of a pancake compressor and one or two finish nailers, usually a 18 ga and /or a 15 ga. The 15 is what you want. A 16 ga would work if it's part of the package. Lots of discussions about pancake compressors, but they are a good compromise between cost, performance, and weight, and for a part-time DIY they work well. Very handy for putting air in bicycle tires and lots oif other things too.
"When asked if you can do something, tell'em "Why certainly I can", then get busy and find a way to do it." T. Roosevelt
Thanks for all the advice. My todo list for today:
Buy 1 DW 705 Compound Mitre saw
Buy the Porter Cable 3 guns (15 G finish, 18 G brad, stapler) and a pancake air compressor for $299.This is going to be a lot of fun 8-)
Wow, that's only 15 years.
It looks like there is no flashing on that top trim, which is just asking for trouble. A drip edge on a cap flashing would get most of the water away from the window parts below as well.
Also, it would appear that most of the damage is on the right side. What is going on above here? Does a valley empty water here? Is there a gutter?
My biggest concern of all would be that the water is actually coming down BEHIND the siding, hitting the top of the window, and collecting in that crown moulding area. Then it is draining down the right side behing the trim, rotting the windowsill. Do you see evidence of water damage on the inside?
I would not recommend any finish nails in exterior wood. Simple as that.
Is that vinyl siding around the window or actual wood? Looks like dutchlap to me. That makes a difference-at least in the details.
I've replaced a lot of this sort of rot. Be careful- sometimes the brickmould around the window serves as the nailing flange in many windows like this. Removing it and installing new requires care, especially if interior trim is minimally attached to the frame, as the fram is only held in th rough opening at that point by the strongest brad in the interior casing. A nailgun definitely makes it easier, but I have used trimscrews to make sure the connection is strong.
It is Aluminum siding. From what I see from removing the double hung window) there are screw attaching the frame to the house. The exterior trim is more decorative than functional. My plan is to strip the first set of window trim to determine the level of damage to the house. I like the idea of screws even though my rookie nail gun trigger finger is itching to use my new Porter Cable finish nailer 8-)-Andre
"From what I see from removing the double hung window) there are screw attaching the frame to the house."I doubt it.....if you have those old spring loaded tracks, those screws aren't holding the window frame to the house...
Sad to say, to do this job right I'd guess you have to strip the aluminum flashing...unless you like caulk as your only line of defense...
where in Md. are you?
Never mind Hemlock, all that trim can be done in Azec PVC...if you're in the metro DC area make friends with either Smoot Lumber in VA. ot TW Perry in MD...
Okay,What a great weekend. I got to use my new Delta 450 mitre saw and table saw. Did not get to use my nail guns 8-(. I have to rewire my garage shop to get two dedicated 20 amp circuits for my new toys. I will have a electrician come and bid on this for me. I examined my fuse box and there are a few circuits still left.So far I completed the following task:1. removed all the brick, crown moulding
2. installed new PVC brick mould.
3. installed 5/4 x 10" to support crown moulding
4. installed the 1x top board to support crown
5. replaced the sill edge with pvc and bondo rotted areas (this stuff is potent!!!)
6. caulked all openings between siding and boardThings left todo:
1. cut and install crown moulding and caulk
2. set all nails and caulk holes
3. prime all exposed wood
4. paint all woodWish I could do:Replace entire window sill, seems like a job for a pro, vs a home body wanna be carpenter on weekends 8-)
Are you capping the crown in any way?
I didn't see you mention it but you should fashion a drip edge out of aluminum that tucks under the siding above the crown and goes out and over the crown. Make sure you roll the edges on each side of the drip edge over the sides of the crown a 1/4 or so. Many of the rotted wood cased windows I have replaced got that way because the drip edge simply ended at the corner of the trim on each side, so that miter was **just** exposed to the water coming off the edge. The drip edge on top should also be pitched slightly.
Looks very familiar. I found that where the side trim sits on the sill water get wicked up and rots the side trim from the bottom up. I replaced sill nosing and side trim and caulked the bottom of the side trim on 3 sides. Also, if there are storms or screens make sure the weep holes are open and the screen or storm is not butted tightly against the lip of the window sill. PVC worked well and I used stainless finish screws. As everyone else has said finger jointed wood for exposed exterior use is a no - no and a real sin on a horizontal surface. To repeat, flash the top of the trim and run it up under the siding. If the sill itself is bad and you're using a Bondo type filler it's going to only be a temporary fix...water will sit and rot its way through. If the sills are one piece, good luck but if you're staying in the house replace 'em or you'll have a permanent job chasing the water damage....I chased for years before I bit the bullet and fixed things right. Use AZEK brand PVC if possible...real easy to work with...had to route some sill nose pieces that are no longer available commercially. AZEK manufacturer says use a paint with an LRV of 55 or higher.
Good luck.
Edited 11/9/2005 4:30 pm ET by JIMMIE