Failing Crown Molding Joints and Failing Window Trim Joints
We (Homeowners) recently hired a contractor to rehab our home. Contractor hired a carpenter to trim. Everything is new except the foundation. Trim work completed July 2011 on Chicago home. We moved in 16 months ago. We are experiencing cracks in the middle of our crown molding and almost all the joints of wood around our windows and crown molding joints are separating.
Please could someone help us understand what is causing the joints to fail and how we can repair/replace joints properly?
Many thanks.
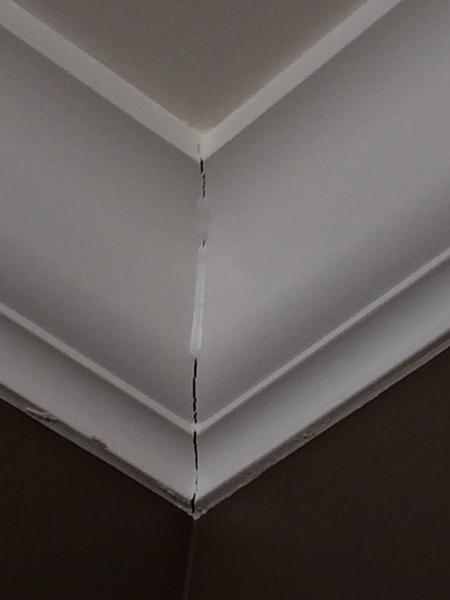
Above photo ceiling crown molding joint separating.
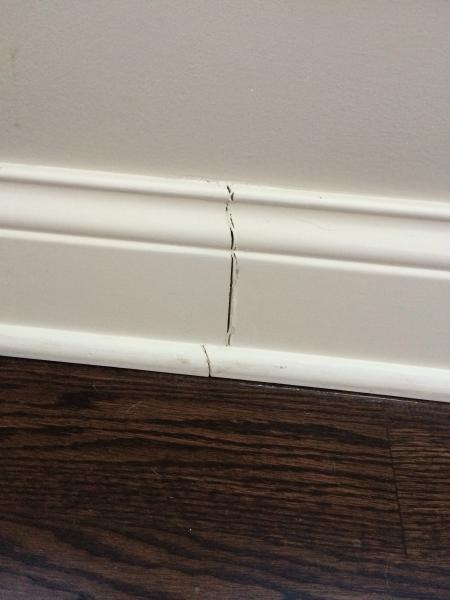
Above floor trim/shoe cracking.
Above chair railing joints separating.
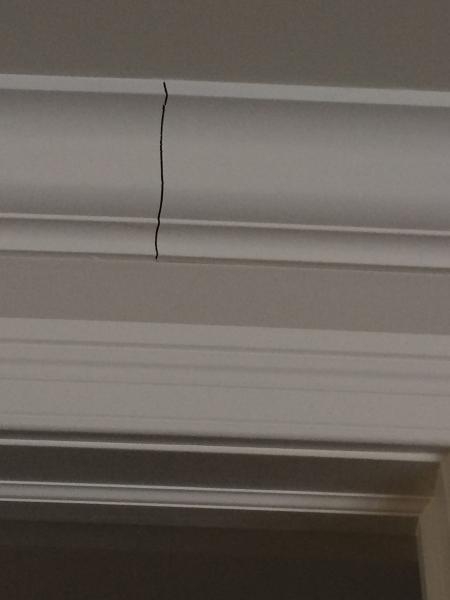
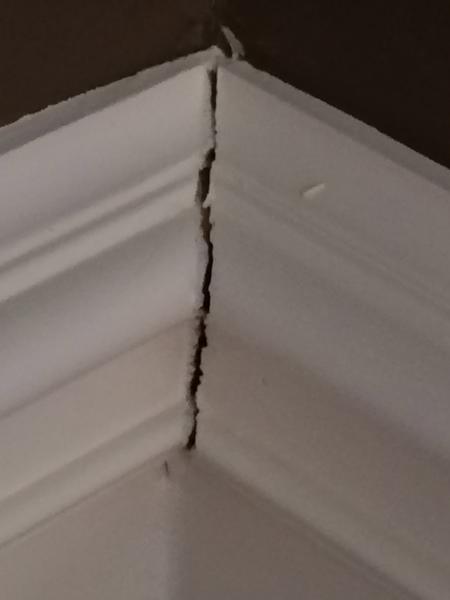
Above crown molding cracked.
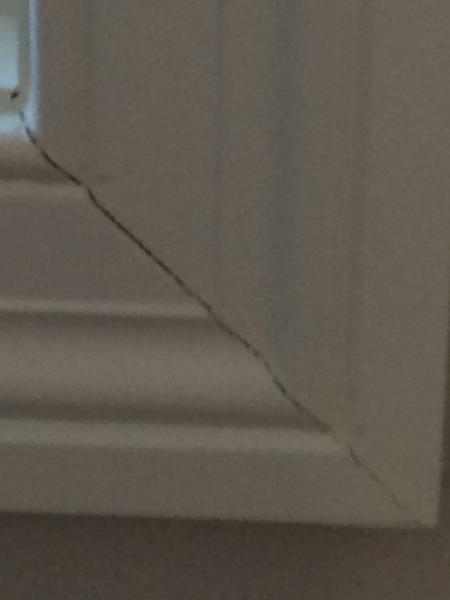
Above window trim joint splitting.

Above ceiling crown molding warped away from ceiling.
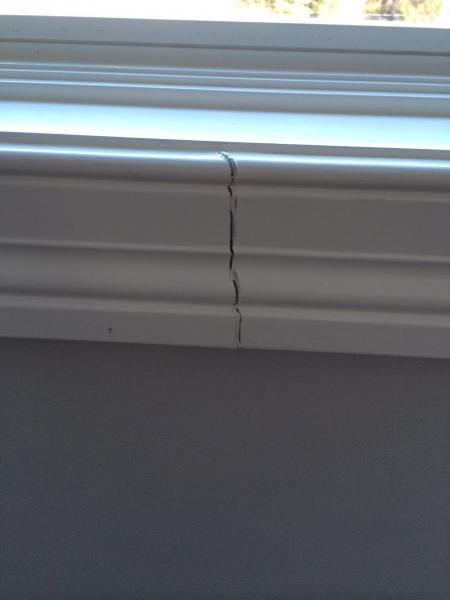
Above window trim cracked.


Replies
What is the material of the mouldings? MDF, Wood ??? Any changes in temperature or humidity since it was installed? What was the weather like when it was installed? Was the house heated when it was installed?
The material is MDF.
The trim was installed in July 2011.
Home is in Chicago are.
House was air conditioned when installed.
MDF doesn't have grain like lumber, so it shrinks and expands in all directions. Lumber shrinks and expands across it's width mainly. So your trim is more likely to get gaps in the winter. I would clean out the joints with something very thin like a putty knife blade. Then fill the gaps with caulk, and I think that should take care of the problem.
Wood shrinks. It does look like alot of shrinkage. Was your house pretty dry when the work was done? Some of your pics show alot of shrinkage. As for crown molding, it was done incorrectly. It shouldhave been coped and not mitered which would have hidden more of teh shrinkage. Secondly it looks like some of your gaps are directly below a window or something, did tehy splice your trim there? WOW?
Well, luckily it is painted trim and you can fill it and paint it.
The work was done in July 2011. Pretty humid.
Yes, a major gap is below a big picture window.
The gap below the picture window was filled in by contractor and repainted. The gap is even bigger today.
Almost all Crown Molding joints are coming apart.
Splices in window trim?
Sorry to say but to splice a four or 5 or 6 foot pc of trim is a cheap install. It is unbelievable. Well, not really, I have grown to expect this kind of stuff. This is why you need to know how things should be done an then ride a contractor like a hawk to see that it is. It is said to say, becuase once in awhile you get a good guy, but you have to hover untill you know you have found that "right quality" guy. Again, no offense to all those fantasitic contractors here. I am sure no one here would splice a four foot pc of trim.
Miter joints are tough to keep closed. There are some great trim carpenters here who likely could tell you/ us if nailing miters or biscits would be good. But again, at least your trim is paint and you can fill the gaps.
I plan to stain my trim and cop corners and use butt joint style door and window trim.
Sorry I am no help.
Like George Castanza said
the pool was cold. Elaine said you mean it shrinks? Jerry said Like a scared turtle.
In other words the guys are right its shrinkage.
As everyone else has said, the cause is shrinkage. As MarkH
recommends, clean the joints and recaulk. Use a good quality siliconized acrylic latex caulk.
That one inside corner looks like maybe it was not properly coped (hard to tell for sure). And it's likely that whoever installed the stuff in general did not "spring" the outside corners slightly to compensate for shrinkage and otherwise work to get joints super-tight. And unless that's a super-wide window, the guy should not have spliced the window trim in the middle like that.
But generally, yeah, it's "ordinary" shrinkage. It sounds like maybe this work was done some time after the original construction, which makes things slightly worse since the framing has already shrunk as much as it's going to. Plus the wood may not have been well-acclimated (and I suspect that MDF is worse in this regard).
Clean out the joints, caulk, and repaint. By now about 95% of possible shrinkage should have occurred so the repair should be reasonably permanent.
Go
When did you first notice these cracks?
I've never had that bad of luck the few times I have trimmed out with MDF. Were these joints tight when installed (I assume) or merely filled and painted so you didn't notice a bad fit.
Go
The shoe/basebd pictures-the shoe shrunk less than the mdf. I don't know the relationship to the site conditions of finger jointed wood vs mdf, but both show signs of shrinkage-the mdf much more.
These joints had to have opened up at least a bit the first winter heating season, no?
Some of the major cracks appeared within a couple of months of our move in. The contractor filled them immediately. 16 months later almost all the joints in our home trim are open.
Go
I've trimmed a whole lot over my 40 yrs in the trade-commercial, residential, new home, remodel, whole house-single room, interior/exterior. I've never seen that many joints (all in the house) open for any type and species of wood, fingerjointed/solid, primed/unprimed, mdf, etc etc............
The job is horrible, probably wasn't that good to begin with and if you or your painter could make them disappear with caulk and paint you've bailed out a contractor and the carpenter that put it up.
Some proper procedure wasn't followed and something about the conditions would have to have been extreme for a job to turn out that bad.
Best of luck.
was the trim stored in the garage or basement and covered with a tarp or visqueen waiting for the work inside to be complete b/4 it was installed?
Did it come from an open air yard during a rainy period?
Something is/was drastically wrong .
A couple crown corners-sure. A couple door/window mitres-probably. Outside corner in base-perhaps.
But never the volume you seem to have experienced. Ever. I would be one embarrased builder if that was my job. I'd start over at no charge to you unless of course-you got the material, you stored it, you called me to put it up and I didn't notice a thing doing it.
wow
Carpentry is a form of art. Most carpentry if done correctly, last hundreds of years, not months. There is nothing I love more than to walk into a home and admire the detailed and intricate wood trim, molding and cabinets. You can't rush carpentry. I admire those carpenters who take pride in their work.
wow. Bad.
Agree. Bad.
I've used a fair amount of MDF over the years. I even have a fair amount of MDF crown in my own house, some of the crown is fairly simple 2- or 3-piece built up crown, some much more. I think the crown in my foyer was 9-piece built-up. Don't ask. lol
Some just MDF, some a mix of MDF and poplar, some just poplar. Door and window casings are also a mix of the two. Pretty much every room has wainscot of some sort. so suffice it to say, I have a lot of trim in my house.
I'm in New England. I didn't have air conditioning my my house for the first 3 or 4 years that I lived here, so the woodwork went through all sorts of gyrations regarding seasonal humidity swings over those first few years.
Here I sit over 15 years later and not a single joint in any door, window, or crown trim has cracked or opened up. None at all. There's no caulk either. And for the trim purists on the forum, none of the inside corners of the crown were coped. They are all mitered. (gasp!) I didnt learn to cope until after I was done with my house. lol
I have one piece of trim where the joints broke and are telegraphing through the paint. It's a segmented poplar arch that trims out an arched entry to my kid's bathtyb/shower surround. It's nothing fancy, just plain flat stock with a routed edge, segmented end-to-end to make up an arch. Of the four end-to-end butt joints, parts of three joints barely telegraph through the paint, and half the width of one joint has opened up maybe 1/32nd of an inch due to tengential shrinkage. That arch has been subjected to moisture from the shower for sure.
Your "3839" image posted above? That looks like a 40 year old trim job.
It certainly does seem like your trim had a high moisture content when it was installed and it has simply shrunk as the trim and the house has dried out and gave up the excessive moisture over the past year. Wood, even MDF, can move a bit. Some trim joints open (during dry winters) and close (during humid summers) as the seasons change.
As we've all noted, and as you are most certainly aware, your movement seems excessive, thus the thoughts from a lot of the posters that your trim was too high in moisture to begin with. Add to that sloppy work from an aparently apathetic installer, and there you go.
Your joints could close up some during summer. Then reopen next winter.
As is, your best bet is caulk. Caulk, then paint. Realize that caulk and paint will simply fill and mask the dark shrinkage cracks. When summer comes, if you trim does then expand, you may have slight caulk ridges or nubs at the joints. In the fall when the joints open up again, the caulk will receed back into the gap.
Too bad.
cold weather makes shrinkage worse
I suspect the super cold weather you've had in Chicago has made the MDF shrinkage even more dramatic. Cold air is very dry. Several comments are critical of mitered joints (not coped), but some profiles of MDF are nearly impossible to cope without breaking the material. This stuff is awesome:
http://www.sashco.com/hi/bigstretch.html
Patriclk McCombe
Go Irish wrote:
Carpentry is a form of art. Most carpentry if done correctly, last hundreds of years, not months. There is nothing I love more than to walk into a home and admire the detailed and intricate wood trim, molding and cabinets. You can't rush carpentry. I admire those carpenters who take pride in their work.
Some of us that do it thought of it as an art. Some think of it as a job..............some, as a way to make money.
I'm not saying anyone of these is in itself the right way...........but that all taken together and added to a bit of pride in your workmanship is what makes for a good job and possibly a successful career.
Put all these together and add some business accumen and damn if it don't work out in the long run.
A bit of reality thrown in.............in real life and on this board, we hear alot of the bad side of building and then face it everytime (well, not everytime) we go look at a job and provide a cost for doing the type of work that you mention lasting a lifetime and then some. Those of us that push quality over economy are often considered at best-a little to high priced for that customers liking.
It's too bad and oftentimes proves the adage of "the sweet taste of a good price often sours with age".
Best of luck fixing this but I'm not sure the end look nor the lasting properties will be worth the effort. At least in the dry season you stand a chance. And do look for the best elastomeric caulk you can find that takes paint well.
I observe that, while the guy who built our house was a bit of a hack, doing a bunch of slipshod work (some of which I'm still trying to figure how to correct 37 years later), virtually all of the trim is still "tight" and pretty well-fitting. (And he was a small time operator who, with his "helper", did all the work himself -- he didn't hire a trim carp.)
I suspect that one big reason is that the trim is all stained oak instead of painted. With painted trim you can get away with a lot of caulk, even on new work, but not with stained trim. And knowing you can't get away with it is strong motivation to avoid sloppy work.
Above I recommended using a good quality caulk, and I
stand by that recommendation unless you decide to replace. The last picture in your original post shows a piece of trim that likely could (and should) be replaced, if I'm correct that it is a piece of window casing. Unless it is longer than 8', there is absolutely no reason to splice it (8' length of trim is available pretty much anywhere and at a good supplier you can get much longer lengths). If it is a piece of casing you should be able to remove and replace easily.
What does the original contractor say?
Will he make it good? He obviously knows there is a problem, as he has been there before. I would exhaust warranty type remedies before attempting any repairs on my own or via another contractor.
IMHO as a long time DIYer, this is krap. I would be deeply embarassed if this were my work.
Good luck.