Fascia Vent / Zero Eave Hip Roof venting design
After a few days of researching past forum threads and articles – including the cover strory from a while back, I’m going to venture out and post up here. I’m an architect / builder (yes – jack of all trades…) and am faced with an 1860’s era Victorian House in Gloucester, MA with no eaves / no soffits and an incredible attic space the owners wish to finish out.
Basic Data:
Attic is aprx. 1300 sq. ft. /-/ Roof is a hip style at a 12/12 pitch with about 10 feet total of ridge (and miles of hip ridges, of course) /-/ Aprx. 140 lin. ft. of fascia, trim, and gutter /-/ Coastal Winds / Wind driven rain and snow are of significant impact as the house is on a large hill, and a stones throw from the ocean /-/ And the other biggie – no eaves to speak of, and a lousy gutter to roof edge relationship to boot – also in the scope of work here.
The desire is to vent the roof all around, using this rather short ridge. The Cor-A-Vent X-5 ridge vent was recommended for the high NFVA rating, and it’s extreme wind resistance. Of couse, it ends up providing a little less exhaust venting than would be ideal – but based on CS represenative discussions with vent mfr.’s, more intake at the “eave” (likely a fascia vent design – part II of the question below) is better than too much up top, at the ridge. More intake is better than more exhaust seemed to be the mantra. We come close to the 1/300 ratio with a the measly 10′-0″ ridge anyhow.
The Cor-A-Vent folks suggested the S-400 installed behind the fascia trim, which looks like it can work – but at 1″ thick seems like overkill for (2) reasons – one, that it provides a huge amount of inlet air relative to the ridge vent exhaust capacity (140 lin. ft. X 1″ thk. and 10″ NFVA), and two – something lower profile would make the aesthetics more tolerable to myself, and the owner. Rough calcs show I could balance the system with a 1/4″ opening all the way around the perimeter – but of course, there is no soffit / fascia vent product that thin.
My instinct is to find a suitable material to use here, at 1/4″ or 3/8″ thick – to provide rain / bug screening. I know there are a number of rainscreen products for under roofing and behind siding applications, but would it be crazy to apply that sort of product here?
My next, related question, or “x-factor” here is venting all those cavities formed by a hip roof design, between all the jack rafters, and between the hip ridges and the main slope that ends at this short ridge. Structurally I see it’s no problem to simply drill a 1 1/2″ diameter hole at the tops of the jack rafters and hip ridge beams to connect up a plenum of sorts – making a passage all the way to the 10′-0″ ridge vent area. Now I know that is not the most fun one can have with a right angle drill in an attic on a hot day – but seems like the best way to truly vent this whole assembly. Hip Ridge Vents were strongly discouraged for a number of reasons – both structural and wind related.
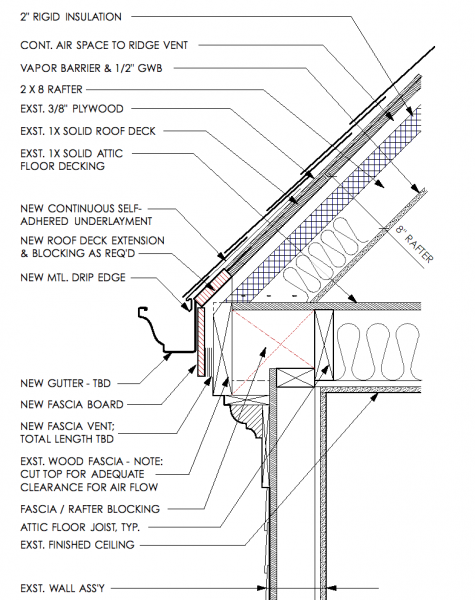
The existing roof is a recently done, quality asphalt shingle job on new 1/2″ plywood deck (over the old 1X) and yes, we’ll be replacing the gutters, drip edge, trim, and flashing(s) as required – so it’s a fairly substantial job – just not the whole roof, if possible. When this is all done – the attic will then be finished out with 2″ rigid insulation boards tacked up 1 1/2″ below the roof deck – providing a channel for air movement to the ridge, then batt insulation, vapor barrier, and finish ceiling.
Hopefully I’ve been able to present the issues here in a way that makes sense, and am thick skinned enough to take any and all suggestions or comments! I’ll try and attach a .pdf of the kooky wall section here as well.
Thanks!


Replies
Greetings
Your original existing roof sheeting? Are there gaps between the boards that would help move that air between rafter bays? Would that suffice?
Shoot - that's a damned good thought. I'll have to take a good look at the joints between the boards, as that seems ideal. They are 1X6's - old school, real 1" thick X 6" wide, and surely the gaps are not air tight. I'll post up what I see, as I'll be at the site for a bit tomorrow.
It was a simple thought that just popped in my head.
Some of the rest of your question confused me. The drawing tho cleared it up pretty good.
Here's something you can do. Send a scale (?) - the triangular rule-to Mike585 in Saratoga Springs-the hose of this years Breaktime Fest. We need more stuff for our give-away table.
thanks.
Don't get stuck on the triangular thing........
Send something cool, something useful...............hell, whatever bakes your potato.
You should have the talent to figure the area of cross venting the sheetings gaps make available-I would think that whatever you end up with at the backside of the facia won't be too far off, depending on the length of the rafters. I guess the question might be if the heat produced by the existing shingles is so high that you should have more coming up from the bottom. Depending on the total opening up top, you might limit yourself on volumn being able to exit.
So in reality I've been little to no help, shipping off a door prize is up to you.
Best of luck.
Well, I do vaguely remember those triangle scale thing-a-ma-bobs, but will have to search the spare parts bins to come up with one. If and when I do, I'll send it along.
In retrospect, perhaps I over-worded the initial post. Here is the core of it, condensed:
Finishing out a huge cathedral ceilinged attic in a house that has no soffit / eave to provide vents in, and it's a hip roof assembly. We'll be providing a new ridge vent and need to get air into each and every rafter bay - then get that air up to this new ridge vent. The trick is that it's a hip roof with a relatively small ridge to vent (9'-0" or so), and getting air into / behind the trim at the facsia / gutter is tricky.
I'm sneaking up on a solution that will likely use a slimmer profile material than the 1" thick Cor-A-Vent material, and will likely use something like the DCI "Rafter Vent" corrugated plastic material behind a new fascia, as we only need a 1/4" to 3/8" thick "intake" at the perimeter of the roof.
Then the 1X2 nailers will be installed at the top inside faces of the rafters, rigid insulation on top of that (forms continuos baffle to ridge / hip rafters), then vapor barrier and finished ceiling. The only so-so component here is the proposed drilling of the hip rafters to vent the baffles over and up to the ridge. Since we're not tearing the roof off, we're sort of stuck here - though the original 1X sheathing does have some large joints in some areas which aid in venting across bays.
Cor-a-vent has a hip ridge vent--gets used all the time down here in Texas (especially on commercial work to meet ComCheck).
Now, how good a hip ridge vent would be in snow country is another question altogether.
Have you looked into a "boston ridge"?
In talking with a few folks - everyone steered away from hip-vents in this area. From the roof you can see the horizon on the ocean - next land fall, Great Britain! It's about 1/4 mile inland and on a high ridge - so virtually everyone - from suppliers to company reps and contractors - has been weary of all but the most bomb-proof vent mechanisms.
The Boston Ridge is interesting - and would be great if there was a way to provide a "storm door" somehow, like the X-5.
But again, the high winds and ocean exposure / snow isssues are substantial. Thanks for the lead on the Boston Ridge - I'd not seen it before and it looks interesting.
glen
Hey Geoff,
Nope - you didn't miss anything, I was just detailing all the info. regarding how to go about venting the roof, if that's the route we go - though i think we're sold on spray-insulating at this point. The roof is so complex with all the penetrations, dormers, chimneys, and other interuptions, it'd be a monumantal task to get effective air flow through all the nooks and crannies.
Now if we can just find a good gutters / GC to get the exterior work down - we'd be in business.
glen
Just got the July JLC....
and in the "innovative Products" is an "Integrated Fascia Vent" made by GAF (GAF.COM) Pricey though at $90 per 12' length. Might be better off with your plan A or a thinner similar product.
You said: >> Of couse, it ends up providing a little less exhaust venting than would be ideal - but based on CS represenative discussions with vent mfr.'s, more intake at the "eave" (likely a fascia vent design - part II of the question below) is better than too much up top, at the ridge. More intake is better than more exhaust seemed to be the mantra. <<
That doesn't sound right to me. If memory serves here the code requirement is that sofit/ridge vent arangements have at least 50% of the ventilation in the upper part of the roof but not more than 80% up there to qualify for the 1/300 spec. Codes differ from state to state (ours is based on IRC 2006) but the concepts are the same: at lease 50% up top.
Mfg recomendations are always good to read and take into account, but for me anyway, taking advice from someone who is selling something is always suspect of being a flawed process.
I indeed saw the GAF Vent - and it is pricey. The initial challenge was achieving the correct balance between intake and exhaust - that was the trick here, and why the Cor-A-Vent and GAF products don't fit the bill; they provide too much intake at the fascia for the given ridge vent capacity. That's where I went on about a thinner / lower profile material.
As for the code - same here with the 50% - 80% requirement for 1/300 reduce venting requirement, but was rendered moot with a vapor barrier - which is part of the plan.
From section R806.2: As an alternative, the net free cross-ventilation area may be reduced to 1/300 when a Class I or II vapor barrier is installed on the warm-in-winter side of the ceiling.
So with a condition met to 'qualify' for the 1/300 ratio, I proceeded - again, trying hard to balance the air in at the perimeter - all the way around this hip roof - with what can be achieved at the ridge in terms of exhaust air flow. That's where I stopped, and decided to look for a much thinner material for a behind the fascia vent assembly. The Rafter Vent corrugeted plastic type material fits the bill perfect - allowing essentially a balanced intake all the way around the (4) sides, behind the fascia, and up to the ridge. Of course, it is not how it is supposed to be installed - but it met all the requirements of the code regarding ventilation materials and tolerances. Hell, I am the one stamping the drawings - so it's up to me - not the rep who thought it was an odd application!
The challenge that proved too daunting in the end was connecting all these rafter bays around the dormers, chimneys, and between hip rafters and all the other complexities. We've all but decided to proceed with a closed cell spray applied insulation under the roof deck, and install a vapor barrier to be entirely safe. This also frees up the fascia carpentry work to proceed in a much less fussy manner - and achieve the aesthetic we were hoping for to boot - AND get some gutters installed that actually function.
As an architect and builder, I do know how far to credit a mfr.'s "advice", but know too that they need to honor warranties - and in this coastal application - I took the very knowledgeable rep's words to be his best practicable advice considering they'd have to back up the product and claims given my papaer trail. So I hope it doesn't appear that my process was too flawed - though the responses and descriptions - and perhaps the design - may be. But I feel confident that I have exhausted as many routes as was possible - and can proceed from here as described - with or without a product manufacturer rep's advice.
Glen
Glen .......... interested in your final decision for the challenging "venting" problem. Have a similar challenge ..... 1923 craftsman style house, gable roof style, exposed rafter tails at eaves, first 30 inches of roof deck is beadboard (exposed underneath), newly replaced asphalt shingle roof, attic area to be converted to living space, cathedral ceilings. The exterior siding consists of wood shingles, painted, that run all the way to the underside of the roof. Seeking "appropriate" intake vent solution through the wood shingles between every set of rafter tails.
Still considering closed cell foam for insulation regardless, but have been reluctant to proceed that way with an 'hot' or unvented roof. Mostly from fear of water penetration from roof side ......... ice dams; severe blowing rain (prevalent here on the Great Plains); failing flashing at chimney, exhaust penetrations, etc; aging of the roof increasing vulnerability over time; not from vapor "escaping" to the underside of the roof through the cell insulation. Have seen two real life examples of such failure in closed cell foam insulated roofs .......... the leak being hidden and never being detected until massive damage to the roof and structure occurred.
Provided the rafters run from eave to ridge nice and straight - and there aren't a lot of interruptions (dormers, chimneys, skylights, etc...) I would vent your roof. I'll dig around for the detail - but there are a number for good products to install just under that roof deck, at the top of the wall. It's a minimal opening - 1/2" perhaps, and would let in plenty of air. Then, use an off-the-shelf system, or build the chase - under that deck, as I had initially figured on doing, and install the right ridge vent for your roof / needs.
With access to the underside of that unfinished roof - it makes a lot of the work pretty straight forward, obviously.
As noted in some of the follow-ups above, we're headed for a so called "hot roof" solution, which in Gloucester, MA never gets all that hot - aside from the south and west facing slopes for a few weeks during the sumer. Nothing like some of the extremes elsewhere. Where we get our extremes is off the ocean, of course!
The hidden water infiltration is of concern - as you are right, there's a chance a leak would not be detected over time, and do damage to the structure before it was obvious. I see that issue as being partially moot in our case, as the vented solution(s) all had an impermeable vapor barrier on the warm side, attached up under the rafters. This would allow for leaks to go un-noticed in a lot of instances, but a vented assembly would at least have the chance to dry out, I suppose - an may show water coming out of the fascia vent! Certainly closed cell foam would not trap too much water - but would keep it up against the wood structure - not so good either...
So many factors to deliberate. But again, in your case - assuming relatively easy to vent runs of rafter bays, I'd proceed with a vent system that works functionally and aesthetically for you.
The rafters run "nice and
The rafters run "nice and straight" thankfully and only a few interuptions. Have decided to vent the roof ............ will build the chase under the deck with rigid insulation ........... will borrow your chase design idea if that is OK.
Appreciate your thoughts very much. If you are ever able to find the references for the "good products" that would fit under the roof deck at the top of the wall between the rafter tails .......... I would be very grateful. Haven't had much luck finding anything very worakble and aesthetically pleasing so far.
Good luck with your project. If it isn't too much trouble post an occassional picture along the way ............ have a soft spot in my heart for "old houses".
where will the vapor barrier go?
.
Vapor Barrier
Would go between insulation and finished ceiling, even if it's slightly over kill - code required or not.