I am preparing to install a balustrade that includes a fairly massive turned newel. The base of the newel is a 6″ hexagon. Any thoughts on tricks to make it sturdy? It occurs to me that a base that size leaves a lot of surface area for something like epoxy. Access to the framing below the stair for blocking is limited to non-existent.
Anybody ever use this system from Arcways?


Replies
Hi Quickstep,
I having a lunch break before going back out to the shop so I'll jump in here.
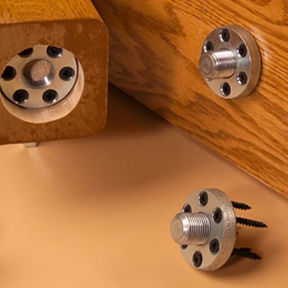
With a 6" block, you could cut a 5-1/2" square access hole and put in blocking. Or use a hole saw to verify blocking.
Then, put the piece of subfloor back on and get yourself a 10" Suretite. The bottom is a 3/8" x 5" lag bolt and is screwed in at the center line of your rail into blocking/stair header. The top 5" is a 3/8" x 5" machine bolt which gets drilled into the bottom of the newel with a 1-1/2" access hole up 5" on the most hidden side.
Not all codes allow these but I've used them extensively on renos...
When you're ready-plumb that is-sometimes a trim is needed to correct
plumb- put some pl premium onto the bottom of the newel. Crank up till plumb but don't put the final tight on it yet.
If anything it should lean into the rail side a bit and you can firm it up even more when the rail goes in, nice and snug. After the rail is attached, put the final on the bolt and plug with supplied plug.
I've used these for years and when you can't cut a hole in the floor
and use carriage bolts, they're the cats azz.
If you're using landing tread,you could cut the floor out where it will be hidden, put in blocking and carriage bolt or lag the newel below the floor using pl premium-always the first choice but not always possible.
silver
I've never used that particular system, but I have used something similar made by LJ Smith. This Arcways thing looks to be quite a bit more substantial than the LJ Smith one... I think I may just have to give that bad boy a try the next time I'm in a situation similar to your's.
Anyway, I personally think that will be an excellent fastening system for what you're doing. I'm a big fan of hidden fasteners. Just make sure you dry fit the newell first and trim the bottom so that when finished it will be plumb from side-to-side, and leaning just a lil' bit toward the rail like Silver suggested.
Hey Mark,How well does that hidden fitting work? Is the newel really solid-what exactly is holding it?Thanks,
silver
The LJ Smith fitting uses a 3/8" X 6" lag screw that you screw up into the bottom of the newell. then there is a metal plate that is attached to the floor with screws. (you mortice it into the floor) There is a tapered slot for the head of the lag screw cut into the plate and you slide it into place, it basically "wedges" the newell tight as you tap it into place.
It works just fine for your typical 3" or 3-1/2" square on the bottom, solid newells. I've installed probably at least 50 newells using this fastener and never had one come loose. But I believe the newell that Silver is talking about is a bit larger than that, which leads me to believe the fastener he posted might be better than mine for his application. " If I were a carpenter"
Thanks for the info...interesting...and sounds easy.
I'm with you Mark but how solid is the newel-how much does it wiggle?I 'd like to add a new trick to my bag. I'm curious if it can be adjusted "tighter" and how well it holds a 3-1/2" newel at the top of a stair against a wiggle test...you shake it yourself and it would work in your house, no problem.silver
and how well it holds a 3-1/2" newel at the top of a stair against a wiggle test...you shake it yourself and it would work in your house, no problem.
If it's just a 3 1/2 newel you can stagger rail bolts into the floor at opposite corners of the post. With a good spread of glue it shouldn't move.
If you've never done it before, it takes a time or two to get the hang of it.
I use PL Premium on these connections. Sturdy.
Hey silver.
As I said, the fastener I've used is quite solid. And as you suggested, it's what I used in both of my own homes when I built them.
If you go to the L J Smith website; http://www.ljsmith.com
it's the "keylock" fastener, item number lj3005. However!!!!! again as I said, it really looks to me that the one from arcways which Quickstep proposed would be quite a bit stronger than mine, especially when dealing with a relatively large newell.
Regarding all of those other fasteners, such as rail bolts, or the "sure tight" 3/4" threaded bolt (LJ3008) I've used them before and they all hold quite well. But they all require you to drill a hole in the side of the newell and then glue a plug in place. I've managed to be pretty creative in trying to color and grain match different plugs to different newells, (mostly oak), but it's impossible, when dealing with something that's going to be stained, to render that plug invisible short of covering it with some piece of trim or moulding. This is why I am a fan of hidden fasteners. The only drawback of using some type of hidden fastening system is that it can be terribly confounding to a carpenter who has been called in to make any sort of alteration to the stairway that might invilve removing, saving, and re-attaching the handrail components.
On the other hand, it's a good reason to call back the origional carpenter who installed said stairway in the first place. ;-)
" If I were a carpenter"
Those screw on fasteners are a bear to get the newel tight and in the right direction at the same time...and they scrape up the floor if it's pre-finished.The keylock, if it can be mounted solidly, is much easier to deal with. I ain't gonna work for Maggie's ma no more.
No, I ain't gonna work for Maggie's ma no more.
Well, she talks to all the servants
About man and God and law.
Everybody says
She's the brains behind pa.
She's sixty-eight, but she says she's twenty-four.
I ain't gonna work for Maggie's ma no more.
Well ok I'm trying a keylock (now I get it) in the next right angle corner I install so I can get used to it.I've never seen one...where do you buy these online...my local stores don't have 'em.Thanks for the new-el info...and please keep me post-ed. It's Saturday night and I'm listening to Saturday Night Blues on CBC and having a well deserved and cold Molson XXX.cheers,
silver
I always got them at the local lumberyard where we got our stair parts. check around locally. (Not Home despot, go to a real lumberyard!)" If I were a carpenter"
I was recently in Ft. Myers visiting my Dad.However as far as I know the keylocks haven't made there way this far north.I'll try the L.J.Smith website.thanks,
silver
The smaller black fasteners, are these Piffin screws?
On "This Old House" they used all-thread up through the center through a block at top inside the post and tightened with nut and washer. There was a thread about that and other methods here before. You may be able to find it with an "advanced search".
There's no reason to not connect the works to framing.
Think simple. Think solid.
Personally, I'd get exact centers on both the bottom of the newel and where it meets the stair tread.
.....................
For those with squemish stomachs please leave the room now.
.....................
The tread is drilled with a 1-1/2" forstner then a long ship auger bit is inserted into the hole, plumbed with torpedo level prior to getting the screw tip started. Drill through the subfloor.
The newl gets drilled 12" x 1-1/2" with a ship auger. Some ship augers will burn the cutting surfaces in hardwood if turned at anything other than very slow.
Purchase 2' of 1-1/2" rod from the local metal supplier, wipe the oil off and give it a quick sand. Epoxy it in the base of the newel till set. Now simply insert the works into the drilled hole and it's at your mercy.
I'd add a little epoxy at the rod to secure the base end of the newel. It's possible to epoxy the rod and the subfloor from above, but that's hard to explain. To solid block the rod to framing simply drill a 1-1/2" hole in a chunk of hardwood, cut the block in half through the hole, shim with hardwood as needed, and through bolt the works to a floor joist so the two halves of hardwood clamp around the rod. Use PL on all surfaces.
The smooth rod will run somewhere under $20 unless you have a well stocked used metal shop, then it's probably half that.
Most who read this and give it a try will think the 1" rod is big enough, but side by side the 1" rod will allow more flex and you haven't saved enough money to buy lunch.
Simple, fast & solid.
Beer was created so carpenters wouldn't rule the world.
Hey all,I didn't start this thread but I was thinking about it today...I've installed lots of newels in my life and I really enjoyed learning new ways of doing something I've done lots of.So thanks-from rail bolts in opposite corners to 1-1/2" steel rod to new hardware and the website...Hey I don't get around much...work my butt off ...and sure appreciate the info.I'm kind of a hit and run kind of guy...don't say much...check my profile...come here to chill after a day's work.But thanks for the fresh thinking-it's easy to get into a rut- I like a better way!silver
Hi Ho! View Image