Feedback wanted Sunken concrete patio
Wow must be the cold meds this is the third time I’ve tried to post this hopefully this time it won’t be full of gobbly-gook…
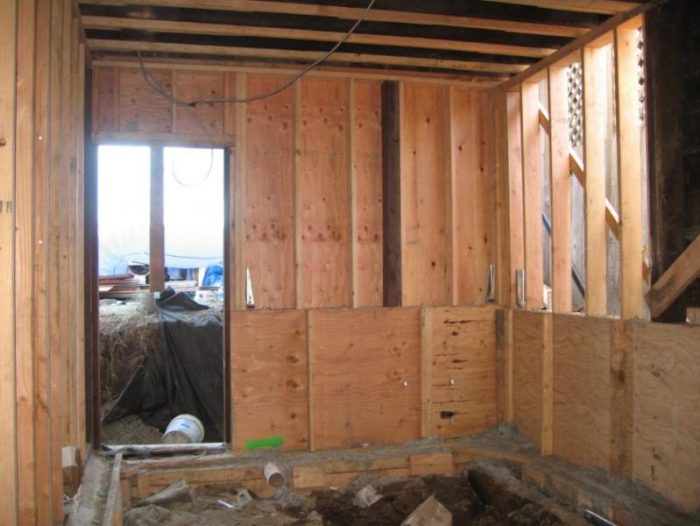
<!—-><!—-> <!—-><!—-><!—-><!—-> <!—-><!—-><!—-><!—-><!—-> <!—-><!—-><!—-><!—-><!—-> <!—-><!—-><!—-><!—-><!—-> <!—-><!—-><!—-><!—-><!—-> <!—-><!—-><!—-><!—-> <!—-><!—-><!—-> <!—-><!—-><!—-> <!—-><!—-><!—-><!—-><!—-><!—-><!—->One of the things we didn’t count on when doing this project was just how much the lot slopes from back to front. At the front the new slab will only be about a foot underground. While here in the back as the picture shows its more like 3′. Can’t have our new door opening into a 3′ tall dirt wall.
Here’s what it looks like from inside the back room looking out into the back yard. We new the back door was going to be below grade, just not this much. In the original contract with the concrete company they are going to excavate out a 20′ in depth hole even with the sides of the house and re-pour the deck post footings so they will be at grade. We were thinking maybe 2′ high walls….well in the back they are going to be more like 3.5′ walls. Walls that tall are going to require a retaining wall we can’t just have them make the cut and go away and get to it later-the walls will collapse.
Here’s what we’ve come up with! A sunken patio that SWMBO is calling our sunken living room. It’ll have a stamped concrete floor (with drainage) to look like flagstones. We were not sure about how the stamped concrete would look but we saw an example on a house and it looked fine. We will use concrete stains to make it look like real stone.
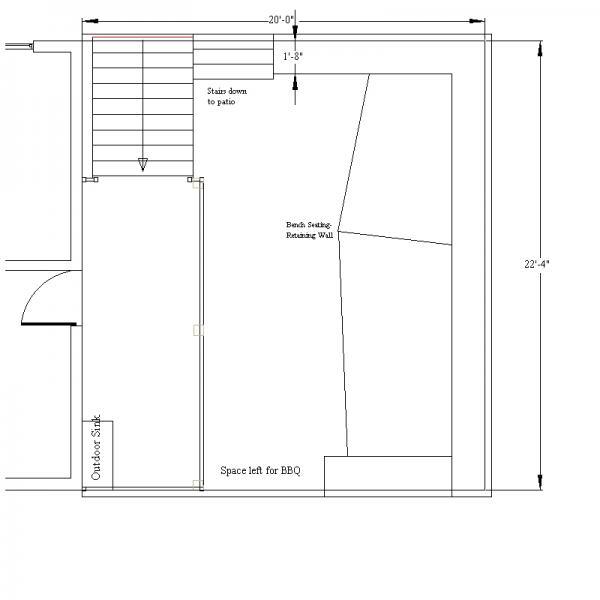
Along three sides of the patio we will have concrete benches. We would like someway to texture the benches so they don’t look like concrete but we don’t know if they can be stamped like the patio? In the upper south-east corner we are going to plumb in a gas line for a fire pit that folks can sit around when it gets cold out. We also left space for a BBQ (which will also be plumbed with nat gas-yea no more tanks to change!!)
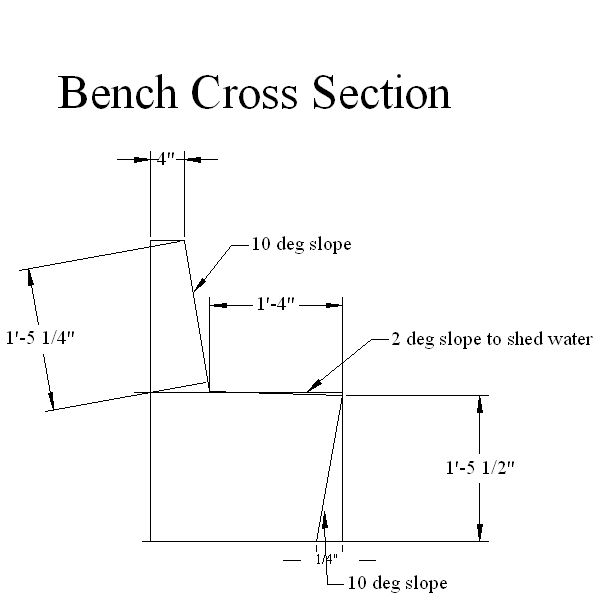
Here’s what the cross section of the bench-retaining wall will look like. The seat is sloped for drainage and the back and knee section will be sloped for comfort.
Here’s the brilliant (I hope) thing-the benches can be viewed as a two tier retaining wall (of odd shape for sure) that won’t require permits!! Or a hand rail along the outside of the patio. The patio does not require permits either so we can do the whole thing without the city getting involved!!! Yahoo!!!! No paperwork, no fees!!!! and we’ll have a super cool outdoor entertaining area for our most favorite BBQ parties!
So, what do y’all think? Great idea? Crazy idea? Any helpful suggestions would be greatly appreciated. Our concrete contractor thinks we are a bit nuts, calls the area our cement pond….
Daniel Neumansky
Restoring our second Victorian home this time in Alamdea CA. Check out the blog http://www.chezneumansky.blogspot.com/
Oakland CA
Crazy Homeowner-Victorian Restorer
Edited 1/5/2008 12:16 am by madmadscientist
Edited 1/5/2008 12:17 am by madmadscientist
Edited 1/5/2008 12:18 am by madmadscientist
Edited 1/5/2008 12:18 am by madmadscientist
Edited 1/5/2008 12:19 am by madmadscientist
Edited 1/5/2008 12:21 am by madmadscientist


Replies
I have a finished basement that has a door to the back yard. It reminds me of your situation. When you are in the basement the grade of the back yard is about 5' off the floor. So when you go out the small back door into the back yard there are steps going up 5'.
I really is restrictive to the access of the back yard. It's a small house by our standards and I want to maximize it's room.
When you are in the improved basement it feels like a basement and the small door doesn't help. My idea is to put in big doors to give access outside and light inside.
Out side I want to demo the concrete stairs and walls and excavate out a sunken patio at the level of the basement. There would be wide stairs at the far end up to the yard. I would have to put in a floor drain for drainage. It would make the basement seem much larger and let a lot more light in. Two things that basements can use more of.
I also thought a sunken hot tub would be nice. It would be much more private in the sunken area.
Just an idea. Instead of taking up room inside with the stairs excavate out that area and create a nice cool spot with some shade overhead. Maybe rebuild that deck further out above it for some shade.
Daniel,
Got a plot plan handy? I'm having a hard time visualizing the whole thing.
Being on sand the the stamped concrete should be just fine (I'd be less inclined to use it on our expansive clay). OTOH, pavers would cost around the same if you lay them yourself. I do prefer that look to the concrete.
I do like the sunken patio idea - I'm a big fan of different outdoor "rooms". One of the things though is that you want to have a flow from room to room. Something to lead the eye, to draw you along. The current design feels a bit too closed in. I'd look at putting steps in the middle back wall to lead to the garden.
My daughter had a deck with side access very similar to yours; when we rebuilt it we made it straighter access to the back yard. The flow is much nicer now and she feels a whole lot more connected to the back yard. Two "L"-shaped benches with steps in the middle back would still give you tons of seating - especially with some chairs thrown in.
The other thing is it feels really square - and disharmonious with the kind of guy you appear to be :-). I like more curves in a yard. That is one of the nice things about concrete - you can be really creative. Go Gaudi! Or at least curve those back corners. They are lost from a seating perspective anyway. Or maybe soften the corners with pedestals for potted plants; or slightly raised planters. Something to blend in the garden with the patio.
Wayne
I don't have a plot plan handy here's a pic of the area from a different angle. The red marks the outside of the bench-retaining wall.
View Image
Here's the new curved corners plan with firepit whadaya think?
View Image
If you are standing in the doorway on the bottom floor looking out I don't think its going to look to closed in. The joists for the balcony are ~9' overhead and the benchs will be 20' away.
Daniel Neumansky
Restoring our second Victorian home this time in Alamdea CA. Check out the blog http://www.chezneumansky.blogspot.com/
Oakland CA
Crazy Homeowner-Victorian Restorer
Edited 1/6/2008 7:20 pm by madmadscientist
Edited 1/6/2008 7:21 pm by madmadscientist
1. Skip the stamped ceement. I love it in the right place. Yours is not that place. Well, maybe on top of that deck. But use pavers down low. With copious amounts of sand beneath. Don't lay them in a retangluar or boxey pattern. Use curves.
2. Drainage is gonna be your biggest problem. If you're like most on the shakey side, your soil is more of a clay. If you're gonna dig a swimming pool, sometimes nature fills it for you. How's the drainage today?
3. Retaining walls are your friends. Embrace them, include them in your plan. Make them with a double function, creating terraces for plantings. Use engineered retaining wall blocks where possible. They don't get mortared together and allow for the "CA flex" without the resultant cracks ceement walls provide. Include your stairs within the walls.
4. Your outside "living room" needs a fireplace and grill. Account for the vent stacks and code requiring it to be 10' away from the structure. And the gas lines running to them.
5. Keep the landscape lights to a minimum, yet use high end ones.
6. Diggin' down to the basement level exposes the footing. Depending upon your AHJ, doing so could result in an footing not being deep enuff for frost protection. Frost protecting your foundation may be necessary.
You didn't describe your budget...
My attempts at the same: http://forums.taunton.com/tp-breaktime/messages?msg=91581.1
I was hoping you'd chime in. I loved that sunken patio, just couldn't remember who did it. It's a great illustration of my points about blending inside & outside, drawing you in, curved spaces.
FYI, he's sitt'n in the middle of SF Bay on a sand dune - I think he'll be OK on the paver base, drainage and frost protection <grin>. And, he's already got the sump pump in place.
If he's got all that going for him, cheep should not be part of the plan.
Yep, on the other hand he just bought the thing, and now is sinking 120K+ into putting it on a foundation...
Hey, it's only money!
True. Those California guys seem to be able to print it upon need.
What about if we used pervious concrete (for drainage) for the patio part and stamped it to look like flag stones? Is the flag stone stamping just going to look cruddy?
If we make the benches/retaining walls out of concrete what I would love to be able to do is make a pattern on them to suggest big slabs of stone mortored toghether. Could we apply something to the inside of the forms to give this effect? Like a small bead of spray foam in a big interlocking stone pattern?
Daniel Neumansky
Restoring our second Victorian home this time in Alamdea CA. Check out the blog http://www.chezneumansky.blogspot.com/
Oakland CA
Crazy Homeowner-Victorian Restorer
Maybe my buddy down there in San Juan Capistrano at BoulderScape is what you have in mind.
http://www.boulderscape.com/index3.html
Ask for Steve.
Wow you buddy Steve does some great work!!! That is truely amazing concrete work. I didn't call him as he's a 7hr drive away on the freeway and it looks like he's way out of our price range.
I was hoping for concrete that looks good from 10ft away not concrete that would fool a geologist....if he was local and could do it for $10,000 I'd jump on it of course...
Daniel Neumansky
Restoring our second Victorian home this time in Alamdea CA. Check out the blog http://www.chezneumansky.blogspot.com/
Oakland CA
Crazy Homeowner-Victorian Restorer
Here's a couple of shots of stamped concrete that I found on the web not in your buddys league of course but I think they look pretty darn good.
View Image
View Image
Daniel Neumansky
Restoring our second Victorian home this time in Alamdea CA. Check out the blog http://www.chezneumansky.blogspot.com/
Oakland CA
Crazy Homeowner-Victorian Restorer
Edited 1/7/2008 5:03 pm by madmadscientist
Edited 1/7/2008 5:03 pm by madmadscientist
Stamped ceement can be beautiful. Your pictures prove that.
But, ceement is guaranteed to crack. It'll chip, get scratched by the groundspeople mowers, and do things you never intended. Stamped or decorative concrete many times has those colors and textures only on it's surface. A chip or scratch will give the unforgiving homeowner absolute fits. Especially when he finds out the repair will be unlikely (some can, many cannot).
Segmented building units allow flex along their joints. Many of these units use an invisible heavy bodied glue as thier adhesive. It all becomes a function of design and color.
Perhaps as a controling cost function, you could find a Hardscape Designer that would design you a nice plan. His input on the type of block alone, not to mention color will be worth his pay. If stamped ceement is appropriate for an area, he'll find it.
Dang I just talked to your buddy. He'd do the sunken patio for me for $15,000 the same price my current guy gave me for just a standard concrete idea...
I've already paid the current guy to do the excavation and to repour the deck post footings so I'm think I'll just have him do that and temporarily shore the excavation and think about it for a while... Your buddies work for $15,000 sure seems like a better deal than what was proposed...
Daniel Neumansky
Restoring our second Victorian home this time in Alamdea CA. Check out the blog http://www.chezneumansky.blogspot.com/
Oakland CA
Crazy Homeowner-Victorian Restorer
I'd think the design expertise included would be worth that in itself. His type of work would make it look like it grewed there.
He does work all over the world. Tells me he has problems with the local (pun?) labor in Aruba. Apparently they have such access to cocaine, they can't funtion well on the job.
Here's an update on the sunken patio idea. Found a local guy who specializes in decorative concrete and who's references check out. Wife went to look at one of his local jobs and swore she was looking at slate.
We are hammering out the details of what and how when he's going to do it for us but it looks like he'll do it this week.
Had the area excavated out and dang I think we might of hit the water table here in the winter. The foundation contractor agrees that we've probably right at the ground water level. Take a look,
View Image
Now I'm concerned about the patio and how we are going to get this done. It seems like now I'm going to need under-patio drainage just like they put drainage under slabs around here.. Probably 'footing' drains around the outside of the retaining walls tied into the underslab drainage with all of that going to a sump pit and then pumped from there out to the street via a hard line...
Dang that's a lot more complicated than I wanted to make this...my wifes outdoor sunken living room...
Any ideas?
Daniel Neumansky
Restoring our second Victorian home this time in Alamdea CA. Check out the blog http://www.chezneumansky.blogspot.com/
Oakland CA
Crazy Homeowner-Victorian Restorer
Edited 2/10/2008 7:20 pm by madmadscientist
If you can't run it to daylite, you gotta pump. Figger out how much area your "pool" will catch the drainage from. Someone will come by and size a pump for you.
Hey All,
Copied this directly from the wife's blog for an update on our sunken patio!! Formatting is a little weird though. It rained this week so they are going to pour the slab Monday if we are lucky...
Sunday, February 17, 2008
Patio Pour
View ImageThis is our back door moments before the sunken outdoor living room started to be poured.We used to have to duck to walk under that back deck, and look at it now! It already looks remarkably like the plans.
The retaining walls are nice and beefy, and will have drainage behind them, as well as under the slab.Here's a shot into the rebar reinforcing the walls/benches
View ImageAnd a shot from above showing the corner radius and our built-in firepit! That diagonal trench is for the gas line so we can have one propane tank next to the house that feeds both the bbq and the firepit.You can see the slope of the benches which will make them more comfortable to sit in.
View ImageThis is the coolest concrete truck I've ever seen! (and I've seen my fair share of concrete trucks recently..)View ImageIt has a wall down the middle with cement on one side and the aggregate on the other. They hooked it up to our hose and mixed the concrete on the spot. It was WAY louder than the usual trucks, but there's no waste. The guys working had mixed opinions though.. because it's mixed on demand the mixture can be adjusted for conditions, but it also is less consistent than a pre-mixed truck, so every so often they'd need to stop and readjust it. I took a little video of the truck in action, and you can see that the concrete was waay thicker than it should be. That was easily corrected a minute later, but someone has to be paying close attention at all times. I think it's the coolest thing ever, plus it has the advantage of not only being very environmental, since there's no extra concrete that needs to be dumped at the end of a day; but it's also very good for the bottom line, since you only pay for what you use, which means it's much more likely more businesses would use it.
View ImageI won't bore you with the million shots of concrete flowing into the forms, but this one shows the rebar in the steps, along with the box for a light.
View ImageThis is the concrete being poked and prodded to make sure there are no air pockets, and that the concrete completely fills the forms
View ImageAnd then the really cool part started..These are the latex stamps which are just about to be used to pound a texture into the fresh concrete.
View ImageOnce the concrete sets up enough for the forms to be removed, a skim coat with color is buttered on. The pigment is also a hardening agent, so it makes the surface even sturdier.Expansion joints were cut at random, to make it look less like concrete and more like giant, very conveniently curved, slabs of slate. They even had a chisel which cut edges that looked just like the uneven edges of a piece of slate.
View ImageThen an accent color is dusted on and the pounding begins. It's a race for time at this point, as the concrete needs to be hard enough to take the texture, but not so hard that it won't.
View ImageAfter a couple days it's pressure washed, then about a month later it'll be sealed which also brings out the colors. Since neither of of those things have happened yet, I didn't take too many pictures of where it's at right now. They'll be pouring the patio slab on Wednesday (assuming the no rain holds up for awhile longer), so there will be many more pictures to come.And now, I've got to get back to my giant stack of bricks.. they're not going scrub themselves.
Daniel Neumansky
Restoring our second Victorian home this time in Alamdea CA. Check out the blog http://www.chezneumansky.blogspot.com/
Oakland CA
Crazy Homeowner-Victorian Restorer
It's always interesting to see the progress - you've come a long way.
And now, I've got to get back to my giant stack of bricks.. they're not going scrub themselves.
I had my brick sidewalk rebuilt last year, and rather than scrubbing the bricks before they were put back down we laid them out on the ground and hit them with a pressure washer. It was a lot less work.
Yea actually after three straight days of scrubbing bricks I happened to mention to the wife that we have a pressure washer and that it would make the whole process go faster....
I was hoping she'd give up on the idea of using the old brick and go with the pavers.... oh well...
Daniel Neumansky
Restoring our second Victorian home this time in Alamdea CA. Check out the blog http://www.chezneumansky.blogspot.com/
Oakland CA
Crazy Homeowner-Victorian Restorer
The drain will be under the firepit? And pump over under the deck?
Good work so far. Keep your plantings in mind.
No the firepit will have a drain but there will be an area drain on the slab along with underslab drainage.
We have the height/depth so we didn't need a seperate sump pit for back here...going to hope the one pit we have is going to be big enough for all this plus the regular drainage for the house...
Daniel Neumansky
Restoring our second Victorian home this time in Alamdea CA. Check out the blog http://www.chezneumansky.blogspot.com/
Oakland CA
Crazy Homeowner-Victorian Restorer
I was noticing your trench to the pit. That must be for gas then.
yea they put in a nat gas line to the pit and put a stub-out thru the wall over where the bbq is going to be. I'm going to love not having to ever change propane tanks.
Daniel Neumansky
Restoring our second Victorian home this time in Alamdea CA. Check out the blog http://www.chezneumansky.blogspot.com/
Oakland CA
Crazy Homeowner-Victorian Restorer
How about some pics of the completed concrete work in the patio area?
Edited 2/25/2008 6:29 pm ET by Matt
Sure, just as soon as its done. We've had nonstop rain here for a while and they are now going to do the slab tomorrow (TUES-29th). The rains did wash away the blue-grey tinted mold release and now the benchs are showing their real color which is a sage green with the blue-grey highlights. Looks a lot nicer than the pics in the post-sorry don't have any of those on me to post.
After the slab has time to set up they come back and clean off all the mold release and then spray on a clear matte sealer. After that step then they will be 'done'
Daniel Neumansky
Restoring our second Victorian home this time in Alamdea CA. Check out the blog http://www.chezneumansky.blogspot.com/
Oakland CA
Crazy Homeowner-Victorian Restorer
BTW - I guess you know you have to re-seal the stamped concrete every year or two. We've got around our pool. It's about 8 years old now...
The patio is done!!!
Well Sorta Anyways...still needs one more cleaning and then they are going to seal it. Then we need to hook up the gas lines to the fire pit and BBQ and re-route the wires for the lights, and , and,... View Image Here the guys from Icon are making the final preparations to pour the patio. They've got the drain rock in and the under slab drainage and the plastic vapor barrier and then the re-bar. All this drainage is tied into our sump pit for the foundation. We hope that the sump pump can handle the extra flow.View Image Here's the obligatory shot of them pumping the concrete. They used the same make-it-as-you-need-it truck as last time. This time the truck driver seemed to pay more attention to the mix and it came out much more consistent in its composition. We had to go run some errands so we didn't get any shots of them stamping in the pattern and coloring the concrete....
View ImageBut here's a shot of it all done!!!! Yahoo! doesn't it look so great! Look, no expansion joints in the patio. They did the pattern deeper and we are hoping its enough to stop any major cracking. View Image Here's the other side. The retaining wall/benches are a blue gray and the patio floor is a sage green. The lights are on in this shot but its still too light out to see them. View Image Here's the all over shot. I had to crawl way up high at the corner of the yard to get it all in. How does it look? We are super excited about it. Can't wait to have a fire in the fire pit. Looks like a pool with a swim up bar doesn't it?View Image Here's a close up of the texture of the patio floor. Looks good doesn't it? Kinda a sage green right? View Image Here's a closer-up shot of the benches. Nice blue-grey color and a nice texture. This shot was taken at dusk so the lights are starting to have some effect. View Image A closer up shot of the stairs at dusk. We think we goofed a bit on the light here in the stairs. It does not light up enough of the stairs. We will have to figure out a way to light them better that does not light up too much of the patio. View Image This was about as dark as we could get it and still have the fricken camera focus well. The lights are on and starting to look pretty good don't ya think? View Image Here's a dusky overhead shot of our sunken patio. Not really in focus but it gives you an idea of how much the patio is lit. It's exactly what we wanted. Just soft low level light for night time parties.
That's it for now. Irene has been working all weekend on the bricks in the driveway. Hopefully our next post will be all about the driveway and how great it looks!
Daniel Neumansky
Restoring our second Victorian home this time in Alamdea CA. Check out the blog http://www.chezneumansky.blogspot.com/
Oakland CA
Crazy Homeowner-Victorian Restorer
Very impressive !!
Looks awesome Daniel! It really came out great. What a neat way to actually get use out of your backyard.
So when do you fill it up with water?
;-)
The weather service is predicting heavy rains next week so maybe then!
One thing that didn't work out so great is that the level of the patio is not as low as I was hoping compared to the level of the slab at the doorway. It doesnt give me a lot of leeway if the slab surface drain backs up...
Daniel Neumansky
Restoring our second Victorian home this time in Alamdea CA. Check out the blog http://www.chezneumansky.blogspot.com/
Oakland CA
Crazy Homeowner-Victorian Restorer
If he's got all that going for him, cheep should not be part of the plan.
I don't think I'm trying to be cheap could you please explain? I want to do this well so it will last for a loooong time.
thanks,
Daniel Neumansky
Restoring our second Victorian home this time in Alamdea CA. Check out the blog http://www.chezneumansky.blogspot.com/
Oakland CA
Crazy Homeowner-Victorian Restorer
Hi Pete, I'm not embarrased to say that your project is what inspired mine...though yours is way more grand than what I'm thinking about...
1. Howcome the no to the stamped ceement? We know it won't look as good as real pavers but will it look that bad?
2. All sand drainage is okay we have provided for underpatio drainage with 6" PVC pipes.
3. I think there was a mis-communication on this part. I'm saying that the concrete benchs are going to pull double duty as retaining walls and benches.
4. Yea fireplace and grill already there see my revised earlier post.
5. We will be desiging our own propane powered area lighting...
6. This is a good point luckly this was the plan from the begining so the foundation on that side of the house was built accordingly.
Budget, budget, budget...yep got the quote from my concrete guy yesterday.. He says he'll do it for $15,000 turnkey...don't know if that's fair or what...
Daniel Neumansky
Restoring our second Victorian home this time in Alamdea CA. Check out the blog http://www.chezneumansky.blogspot.com/
Oakland CA
Crazy Homeowner-Victorian Restorer
I like what the others said about using the retaining walls--you could have broad steps that act as benches to sit on or to put plants on--large areas of steps would also help funnel light into the patio and into the basement. (Depending on what direction it is relative to the sun.)
Using pavers would prevent cracking and if you ever needed access to the drains and so on, it would be easier to remove some pavers than to bust up a slab. Pete had a good point with his concern about protecting the footing from frost too.
The benches along the sides will be built and designed to act as retaining walls.
View Image
Daniel Neumansky
Restoring our second Victorian home this time in Alamdea CA. Check out the blog http://www.chezneumansky.blogspot.com/
Oakland CA
Crazy Homeowner-Victorian Restorer
Edited 1/6/2008 7:29 pm by madmadscientist
Here's some paver pics to get some ideas.
http://www.omnipropittsburgh.com/gallery.html
Unless you can have a gravity drain to daylight, I'm having trouble seeing this as a good idea that won't turn into an indoor/outdoor swimming pool on a big storm power outage day. Sorry to be a curmudgeon - I'm just having a little trouble imagining a hole in the ground as a inviting area, unless it comes with a diving board. Normally, people build a raised area in the back of their home for this purpose - it's called a deck or porch - part of the reasoning being to get fewer steps between the main living area (house) and the outdoor living area thereby making them physically and visually closer and thereby helping the outdoor space be more inviting and usable. I'm not necessarily saying you need a deck but to go the other way- down instead of up - while a novel idea might come under the heading of "why doesn't hardly anyone do this"?
If you can get a gravity drain to daylight, I'd say more power to you although I'd go with a 6" sched 40 PVC just to make it bullet proof.
And BTW - how is the access for getting the 5 or 6 dump truck loads of dirt out of there?
Edited 1/6/2008 12:31 pm ET by Matt
Yes you make good points....
I don't have gravity drain to daylight unfortunately. It will drain to a sump pit that will have a battery back-up and we just have to hope for the best I guess...
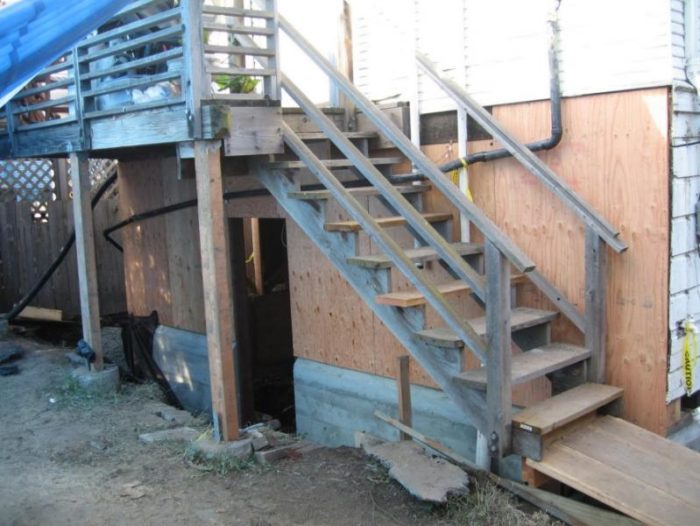
Here's a shot of the last outdoor entertaining area my wife and I built..and when I say we built it I mean we with the help from some friends did everything you see from the ipe to the rockwork on the fishpond walls..
View Image
That deck is roughly 20by20' which just wasn't big enough with the pond chunk taken out of it. I figure that with all the seating around the perimeter this 20by25' area will be a lot more usable. Plus I like the idea of it being sunken for a bit of privacy.
We have 9' clear on the one side of the house to get the bobcats back thru...
Daniel Neumansky
Restoring our second Victorian home this time in Alamdea CA. Check out the blog http://www.chezneumansky.blogspot.com/
Oakland CA
Crazy Homeowner-Victorian Restorer
Edited 1/6/2008 7:39 pm by madmadscientist
Edited 1/6/2008 7:40 pm by madmadscientist
Very nice... I really like the wood tones of the decking and I'm guessing the teak furniture.
Thanks the deck is ipe and the wood furniture is 'white cumaru' one of a bazillion 'south american tropical hard woods with all the qualities of teak and half the price'. We rubbed on a teak stain and no-one thinks its not teak.
Daniel Neumansky
Restoring our second Victorian home this time in Alamdea CA. Check out the blog http://www.chezneumansky.blogspot.com/
Oakland CA
Crazy Homeowner-Victorian Restorer