FHB Logo Facebook LinkedIn Email Pinterest Twitter X Instagram Tiktok YouTube Plus Icon Close Icon Navigation Search Icon Navigation Search Icon Arrow Down Icon Video Guide Icon Article Guide Icon Modal Close Icon Guide Search Icon Skip to content
Subscribe
Log In
  • How-To
  • Design
  • Tools & Materials
  • Restoration
  • Videos
  • Blogs
  • Forum
  • Magazine
  • Members
  • FHB House
  • Podcast
Log In

Discussion Forum

Discussion Forum

Fixing cracked bath tub

jet | Posted in General Discussion on July 15, 2003 07:46am

Hi all.

Thought I’d show you all how I fixed My FIL fiberglass bath tub after he fell and put his knee through the side of it.  Both tub and knee are fine now.

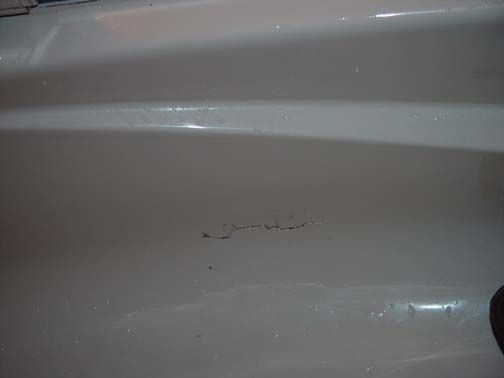
The crack is on the inside of the tub and is about 6 inches in length.


If at first you don’t succeed…try again! After that quit! No sense being a dam fool about it!       W.C.Fields

Reply
  • X
  • facebook
  • linkedin
  • pinterest
  • email
  • add to favorites Log in or Sign up to save your favorite articles

Replies

  1. jet | Jul 15, 2003 07:50pm | #1

    We were lucky enough to have access to the head of the tub by a closet. So after cutting through the wall, I was able to get to the space between the tub and the front panel (fixed front panel so no access that way, would have been too easy)

    If at first you don't succeed...try again! After that quit! No sense being a dam fool about it!       W.C.Fields

    1. jet | Jul 15, 2003 08:00pm | #2

      The next thing was to open the crack so the two surfaces would line up. (Pic 5397)    Then using a dremel and a small sanding disk I removed about half the thickness of the wall of the tub to allow the repair build up to stay flush with the existing surface.(sorry no pic)

      Then taking a clear plastic sheet I traced the out line of the sanded area and duplicated it on to another sheet several times to get 5 layers of fiberglass. Then sandwiched the cloth and resin between plastic and using a squeegy prepregnated the cloth(Pic 5403) Cutting out the shape of the repair area and applying it to the tub (pic 5404)If at first you don't succeed...try again! After that quit! No sense being a dam fool about it!       W.C.Fields

      1. jet | Jul 15, 2003 08:03pm | #3

        Once the Glass build up was cured I used car body repair bondo with long fibers and smeared it on the tub through the access hole we cut into the wall. You can see the break in this pic as seen through the access hole.If at first you don't succeed...try again! After that quit! No sense being a dam fool about it!       W.C.Fields

        1. jet | Jul 15, 2003 08:07pm | #4

          This shot is to show why the tub broke in the first place. By putting a strong light in the hole in the wall and turning off the lights in the bathroom we got this picture.

          You can see how thin the walls are from the light shining through the fiberglass.If at first you don't succeed...try again! After that quit! No sense being a dam fool about it!       W.C.Fields

          1. jet | Jul 15, 2003 08:16pm | #5

            I'm now at the point of using car spot and scratch filler to smooth out the repaired area and getting ready to paint the tub. Either with car paint or bath tub paint if I can match the color enough so as It will not show.  More pics to come of the final fix and paint job.If at first you don't succeed...try again! After that quit! No sense being a dam fool about it!       W.C.Fields

          2. kostello | Jul 15, 2003 08:42pm | #6

            i put my knee through the side of our bath a couple of years ago.

            we were going to be moving the bathroom the following year.

            i had to repair it.

            ended up using a strip of epdm roofing and gluing it on with contact adhesive.

            18 moinths later when i took the bath out the repair was still good.

            aleks

          3. User avater
            NickNukeEm | Jul 15, 2003 10:38pm | #7

            When you're finished, I have some serious rust on my truck you can tackle.

            I never met a tool I didn't like!

          4. jet | Jul 15, 2003 10:39pm | #8

            How far away are you from Quebec Canada??

            If at first you don't succeed...try again! After that quit! No sense being a dam fool about it!       W.C.Fields

          5. User avater
            NickNukeEm | Jul 16, 2003 01:05am | #10

            Too far, unfortunately.  You seem to be very good repairing fiberglass, and I'd hazard a guess auto body repair has been a part of your past, however distant.

            I just bought a utility back truck from California ( my brother drove it out east.)  It was assigned to the Orange County Search/Rescue, so it sat in the salt air alot.  Rust as eaten holes along the seams where the utility top attaches to the sides, the welded seam above the gutter placed above the lock boxes, as well as along the front top seam.

            Any ideas on how I can fix this without losing my first born to the local auto body repair man?  Although I don't have an array of auto body tools, I have grinders, sanders, and polishers galore.  I just need a blueprint for success, so-to-speak.

            I know it is off-topic, and I hate to steal your thread, but you appear to be an expert in the field; so if you have a moment?

            Thanks.

            I never met a tool I didn't like!

          6. jet | Jul 16, 2003 03:04am | #11

            You could do a fiberglass repair if it's not structural. However I think that if the weight of the box is being held by the seams then your only repair would be to weld in new metal.  Yes that can be expensive. But vs the cost of a new truck It still could be worth it.

            As for the gutter, Can the gutter be removed intact? If so then a fiberglass repair could be done. and then pop rivet the gutter back on after.

            The repair can be done by making each layer 1/2 inch wider than the one under. Then it can be feathered and smoothed with the spot putty. It will leave a lump but atleast it would be over an area that can be hidden somewhat.

            It will keep the cops away atleast.If at first you don't succeed...try again! After that quit! No sense being a dam fool about it!       W.C.Fields

          7. User avater
            NickNukeEm | Jul 16, 2003 04:43am | #12

            Thanks for the reply.  The problem areas are varied, some fixed with fiberglass, others may require new metal.

            Good luck painting the tub.

            I never met a tool I didn't like!

          8. CAGIV | Jul 16, 2003 08:16am | #13

            nice threadNever be afraid to try something new. Remember, amateurs built the ark, Professionals built the Titanic.

  2. jet | Jul 15, 2003 10:42pm | #9

    This is the picture of the bath tub with the spot filler done and sanded to 1000 grit. FIL thinks he found the right color. I now have to find a car paint store that will mix a costom paint color.

    Will keep you posted on the final color and results.

    If at first you don't succeed...try again! After that quit! No sense being a dam fool about it!       W.C.Fields

    1. bobtim | Jul 16, 2003 04:50pm | #14

      hey Jet

      Nice work!     I think you should consider "painting" the tub with gel coat.  That is most likely what the orgional finish was. 

      Got any boat stores around there.  They will have everything you need.

      1. jet | Jul 16, 2003 11:11pm | #16

        Going with a 2 part acryllic epoxy paint. The same as a high end car finish.If at first you don't succeed...try again! After that quit! No sense being a dam fool about it!       W.C.Fields

    2. sungod | Jul 16, 2003 05:23pm | #15

      After the tub us repaired, what are you gonna do to fully support the bottom so it wont happen again.  Lots of Plumbers put low slump cement to avoid flexing of showers and tubs.

      1. jet | Jul 17, 2003 04:22am | #17

        I used cement on the initial install 3 years ago. This crack is on the side of the tub. To give it more support and strength I smeared the side with long strand reinforced body putty. Hoping that this will solve the problem.If at first you don't succeed...try again! After that quit! No sense being a dam fool about it!       W.C.Fields

        1. jet | Jul 17, 2003 04:45am | #18

          This one is just for TheodoraIf at first you don't succeed...try again! After that quit! No sense being a dam fool about it!       W.C.Fields

          1. GregGibson | Jul 17, 2003 06:24pm | #19

            That last shot must have been doctored to remove the " other " crack !

            Great thread, Jet - this is just the sort of thing I come here for !

            Greg.

          2. jet | Aug 15, 2003 12:34am | #23

            These are the pixs that you asked for to show the contraption I used to vent the Bathroom.

             Also the pixs of the final product. So far after two weeks of use the car paint is holding up well.

            If at first you don't succeed...try again! After that quit! No sense being a dam fool about it!       W.C.Fields

            Edited 8/14/2003 5:36:23 PM ET by jet

          3. User avater
            Qtrmeg | Aug 15, 2003 05:43am | #24

            Thanks guy, and to think people just toss old furnaces out...crazy people.

            Beautiful finish. No dusting? I would have made a mess of that, spraying down.

        2. Texfan | Jul 18, 2003 04:50am | #20

          Support for your fixed crack might be found with "Great Stuff" foam. You might need to stuff newspaper to  the side and below to hold it in place until it sets up. It also works under the FG tub too.

          1. jet | Jul 18, 2003 06:33am | #21

            My FIL asked about foam to support the side. Unless I filled the cavity between the tub and side I not sure about it. The entire tub walls are all on interior walls. Had the side that was damaged be on an exterior wall then yes I would have foamed the cavity.

            As for under the tub I did that to my tub at home and regret it after the fact. even with the tub filled half way it still lifted and ended up off level. Not enough to stop the draining but enough that if you look at the tiles along the tub they are not even distance from the top.If at first you don't succeed...try again! After that quit! No sense being a dam fool about it!       W.C.Fields

          2. Texfan | Jul 18, 2003 07:24am | #22

            Yes, I was thinking that cavity between the tub and outside panel. I assumed the front did not detach. I used the foam under a one piece tub unit and had not problem. I applaud your DIY work on the tub. I'm afraid I'd call a tub patch co. for that. I often do for clumsy trades that drop things in my tubs............I'm at work tonight and enjoy reading this forum and your thread was interesting. I'm tuned into and grooving with KGSR radio out of Austin Tx. online. At 1122 hrs CST it's regae hour. Not your top 40 type of station. Very nice to me. But then I'm an eclectic babyboomer.

Log in or create an account to post a comment.

Sign up Log in

Become a member and get full access to FineHomebuilding.com

Video Shorts

Categories

  • Business
  • Code Questions
  • Construction Techniques
  • Energy, Heating & Insulation
  • General Discussion
  • Help/Work Wanted
  • Photo Gallery
  • Reader Classified
  • Tools for Home Building

Discussion Forum

Recent Posts and Replies

  • |
  • |
  • |
  • |
  • |
  • |
View More Create Post

Up Next

Video Shorts

Featured Story

Fight House Fires Through Design

Smart construction decisions and material choices can significantly improve occupant safety and survival in the event of a fire in the home.

Featured Video

Micro-Adjust Deck-Baluster Spacing for an Eye-Deceiving Layout

No math, no measuring—just a simple jig made from an elastic band is all you need to lay out a good-looking deck railing.

Related Stories

  • xoxo test post 3
  • xoxo test post 2
  • xoxo test post 1
  • Midcentury Home for a Modern Family

Highlights

Fine Homebuilding All Access
Fine Homebuilding Podcast
Tool Tech
Plus, get an extra 20% off with code GIFT20

"I have learned so much thanks to the searchable articles on the FHB website. I can confidently say that I expect to be a life-long subscriber." - M.K.

Get home building tips, offers, and expert advice in your inbox

Signing you up...

This site is protected by reCAPTCHA and the Google Privacy Policy and Terms of Service apply.
See all newsletters
See all newsletters

Fine Homebuilding Magazine

  • Issue 333 - August/September 2025
    • A Practical Perfect Wall
    • Landscape Lighting Essentials
    • Repairing a Modern Window Sash
  • Issue 332 - July 2025
    • Custom Built-ins With Job-Site Tools
    • Fight House Fires Through Design
    • Making the Move to Multifamily
  • Issue 331 - June 2025
    • A More Resilient Roof
    • Tool Test: You Need a Drywall Sander
    • Ducted vs. Ductless Heat Pumps
  • Issue 330 - April/May 2025
    • Deck Details for Durability
    • FAQs on HPWHs
    • 10 Tips for a Long-Lasting Paint Job
  • Issue 329 - Feb/Mar 2025
    • Smart Foundation for a Small Addition
    • A Kominka Comes West
    • Making Small Kitchens Work

Fine Home Building

Newsletter Sign-up

  • Fine Homebuilding

    Home building tips, offers, and expert advice in your inbox.

  • Green Building Advisor

    Building science and energy efficiency advice, plus special offers, in your inbox.

  • Old House Journal

    Repair, renovation, and restoration tips, plus special offers, in your inbox.

Signing you up...

This site is protected by reCAPTCHA and the Google Privacy Policy and Terms of Service apply.
See all newsletters

Follow

  • Fine Homebuilding

    Dig into cutting-edge approaches and decades of proven solutions with total access to our experts and tradespeople.

    Start Free Trial Now
    • Facebook
    • Instagram
    • X
    • LinkedIn
  • GBA Prime

    Get instant access to the latest developments in green building, research, and reports from the field.

    Start Free Trial Now
    • Facebook
    • YouTube
  • Old House Journal

    Learn how to restore, repair, update, and decorate your home.

    Subscribe Now
    • Facebook
    • Instagram
    • X

Membership & Magazine

  • Online Archive
  • Start Free Trial
  • Magazine Subscription
  • Magazine Renewal
  • Gift a Subscription
  • Customer Support
  • Privacy Preferences
  • About
  • Contact
  • Advertise
  • Careers
  • Terms of Use
  • Site Map
  • Do not sell or share my information
  • Privacy Policy
  • Accessibility
  • California Privacy Rights

© 2025 Active Interest Media. All rights reserved.

Fine Homebuilding receives a commission for items purchased through links on this site, including Amazon Associates and other affiliate advertising programs.

  • Home Group
  • Antique Trader
  • Arts & Crafts Homes
  • Bank Note Reporter
  • Cabin Life
  • Cuisine at Home
  • Fine Gardening
  • Fine Woodworking
  • Green Building Advisor
  • Garden Gate
  • Horticulture
  • Keep Craft Alive
  • Log Home Living
  • Military Trader/Vehicles
  • Numismatic News
  • Numismaster
  • Old Cars Weekly
  • Old House Journal
  • Period Homes
  • Popular Woodworking
  • Script
  • ShopNotes
  • Sports Collectors Digest
  • Threads
  • Timber Home Living
  • Traditional Building
  • Woodsmith
  • World Coin News
  • Writer's Digest
Active Interest Media logo
X
X
This is a dialog window which overlays the main content of the page. The modal window is a 'site map' of the most critical areas of the site. Pressing the Escape (ESC) button will close the modal and bring you back to where you were on the page.

Main Menu

  • How-To
  • Design
  • Tools & Materials
  • Video
  • Blogs
  • Forum
  • Project Guides
  • Reader Projects
  • Magazine
  • Members
  • FHB House

Podcasts

  • FHB Podcast
  • ProTalk

Webinars

  • Upcoming and On-Demand

Podcasts

  • FHB Podcast
  • ProTalk

Webinars

  • Upcoming and On-Demand

Popular Topics

  • Kitchens
  • Business
  • Bedrooms
  • Roofs
  • Architecture and Design
  • Green Building
  • Decks
  • Framing
  • Safety
  • Remodeling
  • Bathrooms
  • Windows
  • Tilework
  • Ceilings
  • HVAC

Magazine

  • Current Issue
  • Past Issues
  • Magazine Index
  • Subscribe
  • Online Archive
  • Author Guidelines

All Access

  • Member Home
  • Start Free Trial
  • Gift Membership

Online Learning

  • Courses
  • Project Guides
  • Reader Projects
  • Podcast

More

  • FHB Ambassadors
  • FHB House
  • Customer Support

Account

  • Log In
  • Join

Newsletter

Get home building tips, offers, and expert advice in your inbox

Signing you up...

This site is protected by reCAPTCHA and the Google Privacy Policy and Terms of Service apply.
See all newsletters
See all newsletters

Follow

  • X
  • YouTube
  • instagram
  • facebook
  • pinterest
  • Tiktok

Join All Access

Become a member and get instant access to thousands of videos, how-tos, tool reviews, and design features.

Start Your Free Trial

Subscribe

FHB Magazine

Start your subscription today and save up to 70%

Subscribe

Enjoy unlimited access to Fine Homebuilding. Join Now

Already a member? Log in

We hope you’ve enjoyed your free articles. To keep reading, become a member today.

Get complete site access to expert advice, how-to videos, Code Check, and more, plus the print magazine.

Start your FREE trial

Already a member? Log in

Privacy Policy Update

We use cookies, pixels, script and other tracking technologies to analyze and improve our service, to improve and personalize content, and for advertising to you. We also share information about your use of our site with third-party social media, advertising and analytics partners. You can view our Privacy Policy here and our Terms of Use here.

Cookies

Analytics

These cookies help us track site metrics to improve our sites and provide a better user experience.

Advertising/Social Media

These cookies are used to serve advertisements aligned with your interests.

Essential

These cookies are required to provide basic functions like page navigation and access to secure areas of the website.

Delete My Data

Delete all cookies and associated data