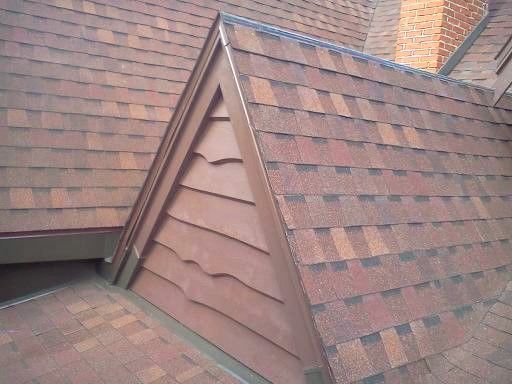
This photo shows how I restored and protected the details of an existing roof line. I won’t go into the details regarding why I did not cut back the fascia boards. What I want to bring to your attention are flashing details. Each board was flashed and, get this, counter flashed. To counter flash, I make thin kerf cuts in the fascian and freeze boards using my DeWalt oscillating cutter. Into these cuts I slipped custom-formed, L-shaped counter flashing. Kerfs were sealed (Lexel) and painted. The details of the original design are left undisturbed, and the flashing is barely visible from the street.


Replies
Mel
Regarding the trough and those roofs coming together on the left of the photo.....
Are you in an area of marginal snow? Detailing that area would be something to hear about.
thanks.
detailing a complex roof
Thank you, Calvin, for asking. There is a saddle roof (barely visible) that straddles the steep-pitched roofs. The trick here is to work in layers. The first layer is a self-adhering membrane; the stuff we commonly call "Ice and show barrier". I protected this membrane while I did the tear-off and carpentry work further up. When all was ready, I laid a custom-formed pan over the entire stretch of saddle roof. I used thick aluminum made by Pella (the window manufacturer). Where laps occured, I used Lexel glue-caulk and roofing nails. All nails were laid into a bed of sealant. Over the pan I laid a second layer of self-adhering membrane, allowing it to lap generously up the adjoining roofs. And now comes the interesting and, possibly, controversial part.
I laid 35 yr architectural shingles over the entire saddle roof. I reduced the exposure by 1.5" and HAND SEALED every fastener. I used Lexel generously and kept nails to a minimum. I have had very good results with this method on low sloped roofs. I don't recommend doing this on pitches less than 3/12.
I live in east central IL and snow is not a big issue (well...it depends). I always go for max protection and long-term good results. A similar roof I did 25 yrs ago shows no curling of shingles...and no leakage at all. Any other questions? Fire away! :) Attached is a view of the intersecting roofs and the saddle roof that links them. Notice how incredibly steep the roof is! I schlepped all the shingles up by m'self! And I'm 66 going on 25! :)