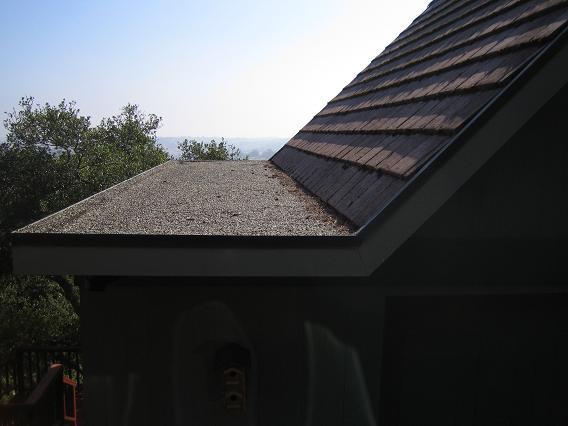
I have several small (~6’ x 20’) flat tar and gravel sections that come off a 45 degree pitch with concrete tiles. See attached photos. No corners, few penetrations. The portion over the main house is a bit more complicated – ~25’ x 50’, two vertical walls with an outside corner and vents for the furnace and kitchen.
I’m a DIYer, but have never done a roof. In my reading EPDM looks appealing, though one supplier was trying to direct me toward TPO (which they sell). I want the approach that is safest and requires the least amount of expertise. Paying a bit more for materials is ok. Is EPDM the way to go or are there other approaches I should consider?
I live in a part of California where it doesn’t snow but it does rain a lot for 4-5 months.
Some specific questions:
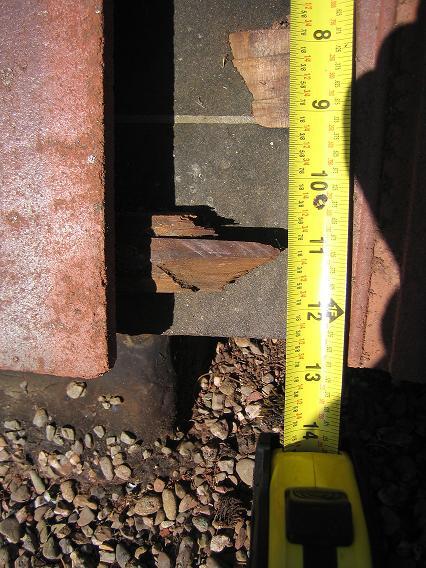
1) If EPDM how would you handle the point where the flat portion meets the pitch? I’ve read that asphalt products degrade EPDM. My plan would be to remove the bottom row of tiles and the lower baton (shown in detail photo at 11â€), peel up the felt(?)/underlayment(?), remove whatever tar or asphalt product is below that, run the EPDM up the pitch as far as I could reach (about 8â€?) and adhere it without a termination bar, place aluminum flashing between the EPDM and felt, replace the felt, batton (with nails – yikes!), and tiles. Is there a better way to make this transition? Can I peel up the felt or is it going to be strongly attached? I’d be a little uneasy putting the EPDM on top of the felt out of fear that water that made its way under the tiles would also get under the EPDM. Also worried about the felt degrading the EPDM.
2) I’d probably cut the copper flashing on the pitch at the top of the lowest row of tiles, adhere the EPDM up to the top of the fascia board and finish with a termination bar, then cover the termination bar with copper flashing which I’d slide under the original flashing that was still attached on the pitch.
3) The gravel stops are heavy-gauge copper. Is there a way to remove the tar and reuse them? This probably isn’t cost-effective for professional roofers, but I’d like to remove them without destroying them if possible.
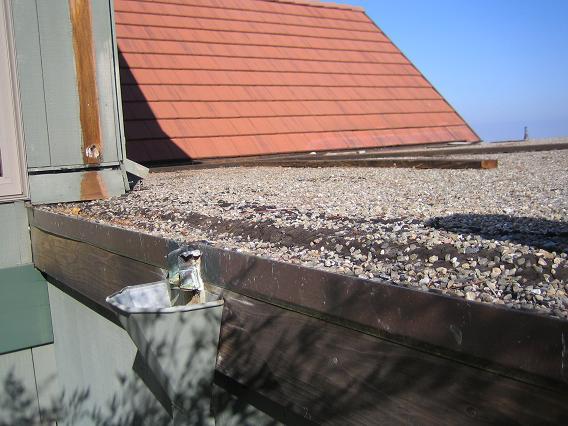
4) There are 2 scuppers (see photos), the other drains are through the roof. Any suggestions on these details would be helpful.
Thanks so much for your help!


Replies
Is EPDM the way to go or are there other approaches I should consider?
TPO is relatively simple, but you need a $400-$500 heat weld gun if there are any seams or penetrations and I've never seen one for rent.
If EPDM how would you handle the point where the flat portion meets the pitch?
Continue the EPDM up the slope. If there are asphalt products below the EPDM, then you need to use recovery board between the two. There are one way pop up vents available to allow any off gassing from the asphalt to escape.
Also worried about the felt degrading the EPDM.
I'm not concerned about the contact between felt lapping over the top of the membrane, but if you are, use a synthetic underlayment.
I’d probably cut the copper flashing on the pitch at the top of the lowest row of tiles, adhere the EPDM up to the top of the fascia board and finish with a termination bar, then cover the termination bar with copper flashing which I’d slide under the original flashing that was still attached on the pitch.
I don't understand the question there if there is one.
The gravel stops are heavy-gauge copper. Is there a way to remove the tar and reuse them?
You'll probably bend them up trying to remove them, but if you don't, some mineral spirits and elbow grease will get them clean.
There are 2 scuppers (see photos), the other drains are through the roof. Any suggestions on these details would be helpful
Same as above. Get 'em clean and adhere the EPDM to them.
View Image
Thanks for the pointers! Some follow-up questions:<!----><!----><!---->
“Continue the EPDM up the slope. If there are asphalt products below the EPDM, then you need to use recovery board between the two. There are one way pop up vents available to allow any off gassing from the asphalt to escape.” <!----><!---->
To make sure I understand, you peel the felt back and put the epdm beneath it, correct? Is that felt that’s visible in the photo labeled ‘pitch’ in my original post? Do you need a termination bar on this portion? When replacing the baton is it ok to nail through the felt + epdm? <!----><!---->
<!----> <!---->
“I’d probably cut the copper flashing on the pitch…..”“I don't understand the question there if there is one.”
Sorry about that. See attached photo. The flashing extends about 6-8” under the tiles and about 6’ up the fascia board where it overlaps with the next piece. There’s no way to get under the flashing as it is without removing tiles. So I thought I’d just cut it at about the level of the lowest row of tiles to allow me to get the epdm to the top of the fascia board. Is there a better way to handle this?
Thanks again!
you peel the felt back and put the epdm beneath it, correct?
I doubt you'll be able to do that, but if possible, yes that's correct. Personally, I'd probably just cut the underlayment (It's probably hot mopped to the roof) and slip a new piece into the cut and over the top of the membrane. If the underlayment is hotmopped, I'd use a strip of I&WS to stick to the existing underlayment and lap it over the top of the epdm.
Do you need a termination bar on this portion? No.
When replacing the baton is it ok to nail through the felt + epdm?
Are the battens (horizontal) on the roof itself or on verticle runners?
There’s no way to get under the flashing as it is without removing tiles.
You've got to remove/replace some lower courses of tiles which is much harder to do than removing/replacing rake tiles. Take them off.View Image
<!----><!---->“Are the battens (horizontal) on the roof itself or on verticle runners?”<!----><!---->
They are on the roof itself, placed directly on the the underlayment and nailed through to wood.
<!---->
“You've got to remove/replace some lower courses of tiles which is much harder to do than removing/replacing rake tiles. Take them off.”
Yeah, I’ve started this with the lowest course. Tedious, but I’m able to get the nails out without breaking the tiles. To make sure I’m clear here, you’re saying remove enough rake tiles so that the flashing can be lifted up to get the epdm underneath, correct?
<!----><!---->
Seal-o-flex it! Use their CT product as it looks like you get some standing water up there.
http://www.sealoflex.com
Z
I'm not real crazy about coating type roofs, but this might be an excellent application for one. I checked out the application manual and this would suit his application very well. I'm unsure how long this stuff lasts, though.
My experience with these type systems (I haven't used this one, but I've tried others) is that if applied under ideal conditions, they are fantastic. If the conditions are less than ideal, then a mess can be made in a heartbeat.View Image
I don't disagree ;)But for a DIY project, I think they're great. I've done two roofs with Sealoflex and Inland RC2000 (my sealoflex supplier was out so I had to use this stuff). I've not had a problem with either, though I like the sealoflex product better than the RC2000, since SF stands behind their product with a 10yr warranty that is renewable with another topcoat of white. Also Inland claims that their system doesn't require a fabric reinforcement, but I'd rather have the fabric than not, especially over an OSB deck. The stuff is both very forgiving and not forgiving at all depending on the situation. You must absolutely have a good substrate for it which also means good curbing with good transitions since it does not span gaps like roll roofing. But it's cinch to flash most anything, and it requires nothing more than art project skills to apply.With Seal-o-flex, absolutely use their flashing fabric which has a different weave than their decking fabric. Not only does it speed up all the reinforcing over joints that is necessary, but it conforms to surface much better than the deck fabric. If you've a complicated flashing detail, buy 2x as you expect, since it's easier to flash with than the deck fabric. I like the 4" width.Z
Mackzully, Thanks for your referral to the sealant. I wasn’t aware of this. I’ll have to do some reading. I like the art project skill level.
How good does the substrate need to be? I’d get the loose gravel off of course but do I need to get the tar/BUR off as well? Some parts are delaminating.
And I must admit I'm not entirely sure what you mean by good curbing and transitions. Cant strips?
So imagine that you've got a fresh deck on your roof. You'll have all the seams where the sheet goods meet. For a heavy, thick roofing material like EPDM or TPO, there isn't a problem bridging those gaps. But when your membrane is basically three layers of thick rubber paint, you need to deal with those cracks, so as the Sealoflex application guide says, you have to reinforce those areas with an extra layer of fabric and 'pink' (the basecoat, the topcoat is usually just called 'white'). This is the easy part. The hard part is when you have to transition from horizontal to vertical, overlap existing roofing, or if your substrate is not clean, smooth, or tight. I had issues when I did my rowhouse roof has roofers in my area never do tear-offs, they simply cover the original metal roof with Cellotex and a new layer of torch-app. At the common walls, they'd simply run the roll over the wall. When the neighbors replaced theirs, they'd do the same, so you end up with 3-4 layers of roofing at the walls, plus the old metal underneath. Since the metal/cellotex/torch app interface was degrading, I had to do a tearoff and I put a fresh deck down. But that left me with a dilemma as to how I was going to flash where the roof met the wall, since I couldn't cut all the roofing off the wall, as that would jeopardize the neighbors roof integrity. Instead I cut the old roofing off right where it bent up to run over the common walls, then I cut curbs from 2x8's and 2x6's so that the sealoflex didn't have to span any gaps and was fully supported as it climbed up and over the wall. The top lip of the curb held the old roofing flat and tight to the wall, and a bit of PL made sure it would stay that way. It's really not hard if you give it some thought, and my situation was somewhat unique since I couldn't just tear everything off. But if you think of it as more like painting than roofing, and identify places that would be hard to paint, you'll be quickly on your way to getting in the right mind set. As for your application, I would remove the gravel, the SF can go right over the existing roof if it's still good. I've found their tech support to be very helpful, even their chief chemist stepped in to help answer a question I had about using over Grace I&W (conclusion: nothing sticks to polyethyene plastic, so don't try it)Whatever you do, buy the flashing fabric as well as the decking fabric. The flashing fabric sped things up tremendously on the second roof I did with SF.Z
Ok, it makes sense! The tough part is knowing whether my current roof is good enough for the SF to go on top of it or should come off. There are a few spots where it's delaminating - feels like a 1' x 2' air bubble under the top layer. A roofer who does spray-on foam said he'd just staple down those areas and apply the foam to the existing roof.
Alas, Prop 65 makes both Sealoflex and Inland product unavailable in CA. Thanks for the suggestions though!