In our new home, I need to install subfloor and finish (wood) flooring over 4X10 exposed timber joists. The joists were installed green, about a year ago, and have bowed and twisted in various directions while they were drying. Since the deviation varies from joist to joist as well across the length of each joist, I cannot simply shim across each one to level them out. What is the best strategy for working with this scenario?
Shawn


Replies
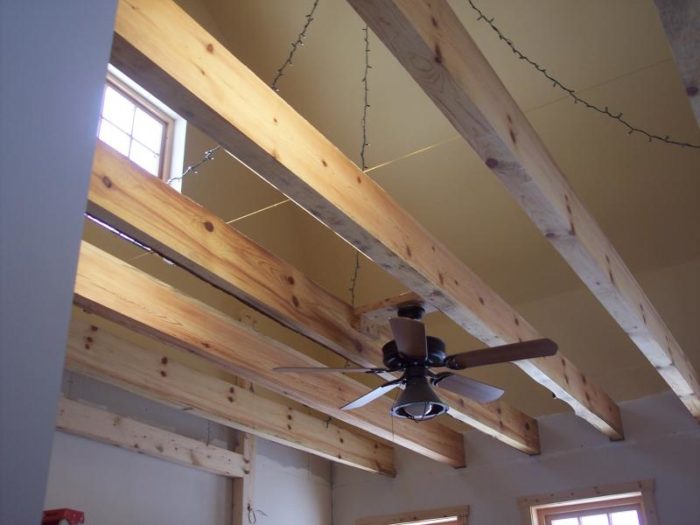
Here is a photo of the job:
View Image
Edited 3/7/2009 2:17 pm ET by shawncal
Stringline, 4" power planer, and patience.
BTW, I do not understand your project. You've got what you say are to be exposed joists (exposed from below, obviously), but you plan on nailing subfloor to the top of them.
That subfloor will be visible from down below, and will spoil the effect of your exposed timber joists.
Typcially, floors laid over exposed joists like yours are laid without subflooring of any kind. The usual material is 2x6 or 2x8 'roof decking'. This is a type of tongue-and-groove planking with a finished thickness of 1-3/8", a vee-joint bevel on one face, and a square edge joint on the other. It is usually made of red pine or another of the harder softwoods and withstands foot traffic well and is appropriate for use as finish flooring.
The square-edge joint is laid upwards and the floor is sanded, stained, and finished. The vee-joint face does not need to be sanded and it makes a very nice looking ceiling above the exposed joists. (If you want it stained any particular colour, though, you should stain that face before you install it. Staining overhead is a major PITA.)
Dinosaur
How now, Mighty Sauron, that thou art not brought
low by this? For thine evil pales before that which
foolish men call Justice....
Thanks for the suggestions.
I forgot to mention my plan is to put down 1/2" drywall first, upside down over the joists. Then the subfloor, then the finish flooring. I choose to go this route rather than the single layer of T&G as I think it will quiet the noise from above and we like the look of DW between the exposed timbers- it has a brighter look.
It seems that several of the timbers bowed downward in the center (despite my putting temporary posts under them for several months), and more than half are okay as is. So I really need to build up the low spots, rather than planing off the high point. I thought I would lay the DW tight against the timber joists, then try to shim between the DW and plywood subfloor. But not sure exactly the best way to do it- can I just put spacers every 24" along the joists, or will this be too spongy?
thanksShawn
You think the DW will take the compressive load without disintergrating?
I forgot to mention my plan is to put down 1/2" drywall first, upside down over the joists.
You're kidding, right?
MikeInsert initially amusing but ultimately annoying catch phrase here.
Umm, no...what am I missing here?Shawn
you might consider installing the drywall between the timbers from below once the subfloor is installed
So, I guess you'll be laying 2" wide sleepers centered
on top of the joists. Planed and shimmed level, then in filling between sleepers
(and over joists) with sheetrock.
I wonder what elevation he has allowed for with the stair layout in this house.
Welcome to the Taunton University of Knowledge FHB Campus at Breaktime. where ... Excellence is its own reward!
Yeah, sure seams like a good time to keep it simple and
use the "normal" tongue and groove solution.
I guess the first Q should have been from the OP, here is what I want to accomplish - how can I do it best.Right now, I don't know if he wanted this way because he assumed it would cost less or because his goal is a smooth white ceiling there. priority of style or budget???
Welcome to the Taunton University of Knowledge FHB Campus at Breaktime. where ... Excellence is its own reward!
I forgot to mention my plan is to put down 1/2" drywall first, upside down over the joists. Then the subfloor, then the finish flooring. I choose to go this route rather than the single layer of T&G as I think it will quiet the noise from above and we like the look of DW between the exposed timbers-
This will not work. Others have mentioned the reasons, prime among which is that the gyprock will disintegrate and leave you with a very expensive mess of epic proportions.
The principal problem is that you want the cleanliness and quiet of a modern, suburban-type framed floor-and-ceiling structure, but with the look of a traditional exposed-joist rustic overhead.
I hate to be the bearer of bad news, but you can't have your cake and eat it too. Most places you've seen that looked as you describe did not feature exposed structural members: instead, the floor and ceiling structure was framed with 2x joists, then subfloored, floored, and gyprocked...and then fake exposed beams/joists (often made of moulded, dark-coloured polystyrene to imitate old, hand-hewn beams)were attached under the ceiling for looks. This is the 'rustic country home look' so sought after by city folks who want the look of the country without any of its inconveniences. Sort of like a gas-fired fireplace with fake ceramic logs in it.
If you insist on getting this look, the only suggestion I can make is that you nail 2x2 blocking to the joists, put in some ROXUL Safe-N-Sound sound insulation, then screw strips of gyprock to the blocking. Then tape, finish, and paint the 'rock, all without getting gyprock compound or chalk on your exposed joists.
That's a lotta work just to fake something, if you ask me.
Dinosaur
How now, Mighty Sauron, that thou art not broughtlow by this? For thine evil pales before that whichfoolish men call Justice....
In place of your crumbling drywall, why not just substitute a good one side paint grade plywood (or even mdf) then throw some subfloor ply over that so that your floor staples don't pop thru the paint grade ply.You could even pre-prime and -paint them to avoid cutting in. the end.
MDO would be a good choice for this idea of replacing the SR with ply
Welcome to the Taunton University of Knowledge FHB Campus at Breaktime. where ... Excellence is its own reward!
why not just substitute a good one side paint grade plywood (or even mdf)
I assume you mean to address that to the OP, not to me, but I'll comment anyway.
Your idea isn't bad, but I wouldn't use MDF; it sags so badly it would never stay flat over the span between joists. Plywood wouldn't sag...but painted plywood will look like...painted plywood.
Also, neither of those options does much for reducing sound-transmission from upstairs.
I think what the OP or his DW may have seen somewhere to give them this idea is the Elizabethan, half-timbered look in stucco gable walls. I doubt he is ready to do all the work required to accomplish that, however.
Dinosaur
How now, Mighty Sauron, that thou art not broughtlow by this? For thine evil pales before that whichfoolish men call Justice....
Thanks for all the suggestions and brutally honest comments about my original idea.
Just to clarify, the beams are 4X10s (actual size), 2 ft spacing and span just under 16 feet at the wider side of the barn (and only 12 feet where the stairs come up). This scenario met the loading/deflection criteria, according to our code here. When I designed the project, I had intended to use the tradition T&G decking/floor method, using 2X6 material. However, it was suggested to me in previous postings on FH NOT to do this because it would be very noisy and eventually dirt and dust would work through the gaps in the floor and fall into my bowl of oatmeal down below...so I came up with an alternate plan.
This a barn home and we are definately not interested in faux beams or anything like that- Every single piece of wood you see was milled from century-old timbers out of the original barn we deconstructed on site (I have my own sawmill). IAQ is very important to us and there is no place for offgassing products like MDO. The use of DW was for two purposes- to provide at least some sound abatement and to give the room a brighter look, IMO. I had first thought of nailing 2X sleepers to the sides of the timbers and cut pieces of DW to fit in between the joists. This would require some fancy scribing, alot of mudding, or the use of trim to cover the irregularities in the beam that are somewhat bowed and twisted. Hence, the idea to just lay the DW sheets across the top, upside down, with the end seams centered over the beams. then subfloor and finish floor over the top.
Admittedly, I have not contacted the DW manufacturers with the idea- I *assumed* that DW had sufficient compressive strength to far exceed this application...sounds like I may be wrong.
The staircase has not been built yet, so i do have some flexibility to adjust the floor height.
I'm not really sure what to do at this point, so appreciate all the advice!Shawn
Why don't you create an air space between the sheetrock and floor above that you can fill with rockwool insulation (for sound deadening) or use to run wiring?
Attach a 2x2 nailer to the sides of the joists about 2" down from the top, and attach sheetrock to the nailers. Then use crown or cove molding to cover any remaining gap between sheetrock and the beams. This will give you a 2" space for insulation (some is better than none) and leave about 7 1/2" of the beams exposed if you use 1/2" rock.
Billy
Edit: Just going through the thread and I see Dino already suggested this...
Edited 3/11/2009 10:45 pm ET by Billy
I may have bewen the one who mentioned the dust in your wheaties from a T&G floor there.What I did on mine was use 1x8 T&G pine( we prefinnished the beams with stain and poly before laying the ceiling over it, then prefinished the 1x8s also - easy on benches rather than up over your head) After the 1x8 for ceiling, I have homasote, then osb , then hardwood flooring.
Welcome to the Taunton University of Knowledge FHB Campus at Breaktime. where ... Excellence is its own reward!
should note that it's mandatory (to me at least) to prefinish the T&G. If you don't and the boards later contract (which they will) the unstained toungue will get exposed for a pretty ugly appearance.
Yes, it probably was you...I think it was Wheaties, not oatmeal...
So, the Homasote is for sound deadening, and the OSB is the structural subfloor? I take it the Homasote is not an acceptable subfloor by itself? What thickness of each material did you use?
Thanks!Shawn
3/4" T&G
1/2" homasote,
1/2" OSB
finish flooringThe homasote for sound deadening and the osb for nailing surface for th efinish floor. Plenty of construction adhesive throughout. screw down the osb at the joists.frenchy mentioned 3/8" osb but it would be poor holding power for the flooring nails. need 1/2" minimum, 5/8 or 3/4 far better.I am also not a great fan of osb anymore. a plywood ac underlayment plywood would be a good choice instead.
Welcome to the Taunton University of Knowledge FHB Campus at Breaktime. where ... Excellence is its own reward!
ShawnCal
If your floor will be strong enough. I'd go back to your original plan and make a couple of minor changes..
first I'd use 1x material tonque and grooved just like you planned.. Then I'd put a layer of say 3/8ths OSB to stop dust from falling down and dampen sound somewhat and put on the finish floor.
Thanks for all the suggestions and brutally honest comments about my original idea.
I guess I'm the brute. ;-)
Actually, on mulling over this a bit more, I think you might be able to get most of what you want by doing the same things the original inhabitants of houses of that style often did...and which they did to get the same results you're looking for.
For the brighter look downstairs, you can simply paint the bottom of the T&G white before you install it.
For dust containment and sound deadening, lay area rugs and carpet runners upstairs in high-traffic areas.
Dinosaur
How now, Mighty Sauron, that thou art not broughtlow by this? For thine evil pales before that whichfoolish men call Justice....
you have more problem than you realize since you plan sheetrock first. The compression load and vibrations and uneven plane means some areas will break down and become crumbly.
Also, part of what makes a floor SYSTEM work is that the subfloor and the joists are tied together with glue and fasteners so they work together as ONE unit.Separating them with sheetrock means you are far more likely to have squeaks in the future. It is too late now, but these should have been tied together with some 2x4 strapping every few feet while they cured, and it sounds possible that they could have been crowned more carefully.You are going to need to make some shims where these are reverse crowned, and plane down high spots on others. Then find very dense sheetrock for the application. Not sure which, but I'm thinking Type X 5/8"
Welcome to the Taunton University of Knowledge FHB Campus at Breaktime. where ... Excellence is its own reward!
>Then find very dense sheetrock for the application. Not sure which, but I'm thinking Type X 5/8"<
Are you saying to go ahead with his plan to put the SR between the joists and the subfloor?
not really - I am thinking out loud and still waking up on second cuppa joe.The AC plywood is good idea and MDO one faced is better. Dino's detail would be good for soundproofing and make for a better cavity appearance from below while providing some sound buffering, but is very labor intensive.*I* would not use any kind of SR there, but some people are going to ignore everything said here and proceed with their plan anyways. I have no idea if the OP fits that profile or not, but if he does, at least mentioning the Type X will give him a leg up. It might work for 10-15 years. 1/2" regular would be crumbling and sagging by time he finishes the job.
Welcome to the Taunton University of Knowledge FHB Campus at Breaktime. where ... Excellence is its own reward!
I'm not convinced by the idea either, but if he's set on drywall and drywall only, here are a couple of ways to accomplish the look without forcing the drywall to bear weight:
1) If the stairs aren't built yet, or are built to accomodate an extra few inches, he could put 2x3s or 1x3s (or x2s) on the flat on top of the planed joists, rip one or two layers of 5/8 drywall to fit into the space between the flats, with a 1/2 inch (or inch) overlap on top of the joists, then use short screws (1 inch for the first layer and 1 5/8 inch for the second layer) to attach the drywall to the subfloor, which would hide the cut edges of the drywall, probably allow space for a joint knife, and create a little reveal. If it's not possible to get sheets of drywall long enough to clearspan the ceiling, it would be best to shave the butt ends for the one joint so the reveal can be reasonably consistent.
2) If there's no space for (1), he could put the subfloor right on the joists, use short screws to attach 2-layered strips of drywall to the subfloor, and rip little angle mouldings to match the unfinished look of the joists and hide the drywall cut ends after the drywall is taped and finished.
sketches
good thoughts - or he could use a router with a 3/4" x 3/4" bit to hog out a rabbet for the DW to seat into
Welcome to the Taunton University of Knowledge FHB Campus at Breaktime. where ... Excellence is its own reward!
I got into an argument with an architect once -- he wanted to use drywall as a semi-structural element like the OP wants. I thought it a bad idea. He contacted the DW manufacturer. I won.
OP: If you want to put down drywall first, you'll need to first run 2" plywood nailers down the center of each beam. Then the drywall can rest on the beams between the nailers. You'll still need to fasten the DW in the field -- don't expect it to stay up without sagging otherwise. I'd also beef up the subfloor to maybe 1-1/4" (a layer of 3/4" and 1/2") so you don't have problems with fasteners blowing through.
As another option, you could use something other than drywall. I've used Homosote before with OK results. The problem there though is the seams. It's kind of textured, so you will need to disguise the seams or they'll stand out. I wound up putting a knock-down texture on it to make it work.
Mike HennessyPittsburgh, PA
How are you going to fasten the wood flooring to the subfloor?
If you use 3/4" wood flooring the staple will punch thru the drywall.
the timber joists are 4" wide, on 2 ft spacing. I would center all the fasteners over the joists, so that nothing penetrates the DW in the joist spaces below.Shawn
The biggest problem that I can foresee, is as someone else already presented.... I would worry about the gypsum board disintegrating over time. It is not designed to be applied as you want to use it.
<!----><!----><!---->
I refuse to accept that there are limitations to what we can accomplish. Pete Draganic
Take life as a test and shoot for a better score each day. Matt Garcia
You need about twice as many fasteners as that to hold a wood floor snug.But you can get fasteners short enough that they will just miss coming thru if you use 3/4" subfloor and 5/8" rock.This is all a very delicate detail you have created for your self with no room for error
Welcome to the Taunton University of Knowledge FHB Campus at Breaktime. where ... Excellence is its own reward!
I'm not sure about the compressive strenth of the drywall in this situation either,
How big is the variance between joists? If its 1/4" or less from one joist to the next, I probably wouldn't bother shimming at all.
If you want a painted surface, I might consider laying down 1/2" AC plywood first, then scribing filler strips on top of that to level it if necessary. You would only have joints in the ply showing every 8 ft. You could treat the joints as part of the design, apply molding, or finish them with compound (just like drywall)
Instead of using drywall I would go buy a white wood like Birch, maple, or Basswood and nail it down. I found if you buy direct from a sawmill you can buy some wood cheaper than sheetrock..
Then once the wood is nailed down I'd shim and adjust the floor to level and put down a subfloor followed by the finish floor..
My concern is that just looking at it I don't believe you can prevent that floor from being very bouncy..
Looks to me like 4x12s @ 24" OC spanning 18'. That might be upper limits but shouldn't bounce with all the mass.
Welcome to the Taunton University of Knowledge FHB Campus at Breaktime. where ... Excellence is its own reward!
Unless I missread (possible) I believe they were 4' on center. Which would be outside the recommended spacing..
"the timber joists are 4" wide, on 2 ft spacing."Let me help with your remedial reading classes.
The above quote is from post #9 in this threadI think I see where you got 4 feet on center from that. Review the text and get back to me.Meanwhile, you could also go back and LOOK at the photo in the second post of the thread. That is where I got my info from
Welcome to the Taunton University of Knowledge FHB Campus at Breaktime. where ... Excellence is its own reward!
If it was me,, I'd forget the drywall idea as mentioned. I'd probably go over it with my big straight edge or a 6' level and power plane down the high spots. OR if they're really bad,, i'd string lines on perimiter at 1",, then on each joist. I probably would just plane down level,, keeping my torpedo level handy when planing.
I'd then lay a t&g floor,, as is common in timberframing. 1 1/2 or 2". Then you'll achive a nice wood ceiling to look up at,, and a sturdy wood floor to walk on.
Wonder what the drying has done in terms of crown? What's the cupping like? Is it similar on all joists?