FHB Logo Facebook LinkedIn Email Pinterest Twitter X Instagram Tiktok YouTube Plus Icon Close Icon Navigation Search Icon Navigation Search Icon Arrow Down Icon Video Guide Icon Article Guide Icon Modal Close Icon Guide Search Icon Skip to content
Subscribe
Log In
  • How-To
  • Design
  • Tools & Materials
  • Restoration
  • Videos
  • Blogs
  • Forum
  • Magazine
  • Members
  • FHB House
  • Podcast
Log In

Discussion Forum

Discussion Forum

Floor support problem

gotquestions | Posted in General Discussion on October 10, 2008 12:23pm

We are renovating the bathroom and many have convinced us that removing the original pine flooring all the way down to the joists is best. We’ll start fresh with two layers of plywood, CBU, and tile.

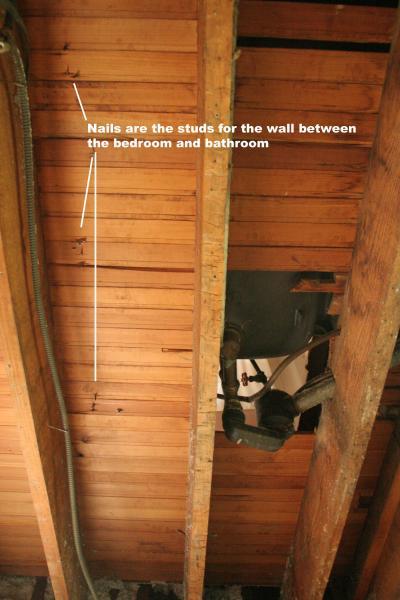
The problem is that I noticed the studs for the wall to the room next door don’t rest on a bottom plate–they are nailed directly into the t&g pine. What’s more, they don’t rest on top of a joist but are a couple of inches away from the closest joist under the room next door. I’ll be cutting the pine off against the face of the studs on the bathroom side, but then there’s nothing directly under the ends of the remaining pine, and I’m wondering if this is a big issue. These studs are turned the shallow way and I don’t think provide much structural/load-bearing function. Perhaps a bigger issue is that the new floor laid on the bathroom side of the wall will then have over a foot until it has a joist under it, and there will be a clawfoot tub right in this space. See attached photo (reposted in message #8 below) to visualize what I’m talking about.

Solutions? We are sistering the joists, and blocking between them. Will blocking installed every foot or so below this wall be enough?

Reply
  • X
  • facebook
  • linkedin
  • pinterest
  • email
  • add to favorites Log in or Sign up to save your favorite articles

Replies

  1. frammer52 | Oct 10, 2008 01:56am | #1

    If I understand the question, your answer is yes.  Those studs are obviously not a load bearing wall.

    1. gotquestions | Oct 10, 2008 02:09am | #2

      Okay. But what about the flooring on that bathroom side of those studs that will hold the clawfoot tub? These things can weigh 350 pounds without any water or a person in them. The floor overhang to the next joist on this side is about a foot, where it's only a couple of inches for the unsupported studs...

      1. frammer52 | Oct 10, 2008 03:39am | #3

        Blocking?  New tub install or old one?

        1. gotquestions | Oct 10, 2008 04:57am | #4

          It's a new tub install.I'm not sure how to answer "Blocking?" Are you asking me what I mean by that or are you making an uncertain suggestion to try blocking?Thanks for your time.

          1. frammer52 | Oct 10, 2008 04:33pm | #5

            Blocking the floor joists together would help, to be honest, I am responding to you to help keep this question on the first page, that means more of a chance others may jump in to help.

            There is a lot of talent responding and someone may have run into situation you have and can give you answers how they solved it.<G>

          2. User avater
            BossHog | Oct 10, 2008 04:50pm | #6

            If the tub is really heavy, you might want to consider beefing up the floor joists while ya can.BTW - Posting monster pics like that makes it difficult for those of us without high speed internet to look at them.
            Laugh and the world laughs with you, cry, and you're probably watching the wrong channel.

  2. Deleted | Oct 10, 2008 04:59pm | #7

    “[Deleted]”

    1. IdahoDon | Oct 10, 2008 07:21pm | #8

      It's more correct to install a joist under the wall rather than block between, probably faster as well. 

      Beer was created so carpenters wouldn't rule the world.

    2. Piffin | Oct 10, 2008 07:32pm | #9

      Ah, the joys of home owneership!place a joist running directly under the studwall, and another immediately next to it on the bath side to receive the new subfloor. 


      Welcome to the Taunton University of Knowledge FHB Campus at Breaktime. where ... Excellence is its own reward!

      1. gotquestions | Oct 10, 2008 08:55pm | #10

        The nails from the studs coming down through the floor above are angled and will prevent me from putting a stud directly under them. Unless I cut them off where they exit the bottom of the floor...is this what I should do? Also, adding two new joists into this space probably means I don't need to sister the joist next to them on the bath side, right? I think this would be overkill unless there is something structurally wrong with the old joist, which I don't think there is.

        1. gotquestions | Oct 10, 2008 09:59pm | #11

          Besides the angled nail problem, there's a stud coming down the exterior wall onto the top plate right where the joist under those nails would go. Should I put a joist a couple of inches over, cut off the pine a little further into the bathroom and have it rest on half of the new joist and the plywood rest on the other half?

        2. Piffin | Oct 11, 2008 01:47am | #12

          Yes, you probably don't need to doubl eup the nearest one too."he nails from the studs coming down through the floor above are angled and will prevent me from putting a stud directly under them. Unless I cut them off where they exit the bottom of the floor...is this what I should do?"Lot of options here. You can clinch them over flat to the underside of the flooring there.You can back them up to flush, then drive then in tight again after getting the underframing done.You can use a sawsall or a grinder to cut them off in place."putting a stud directly under them"This is a joist you are putting in under. 


          Welcome to the Taunton University of Knowledge FHB Campus at Breaktime. where ... Excellence is its own reward!

          1. gotquestions | Oct 11, 2008 04:19am | #13

            "This is a joist you are putting in under"--right, this was a typo. See my post below it where I correctly called it a joist. Any suggestions for what to do about a stud coming down the wall cavity and resting on the top plate right where the joist would sit if I were putting it directly under the nails?Thanks for the ideas!

          2. Piffin | Oct 11, 2008 04:33am | #14

            use sawsall again.cut it so that it is 1/8" or so above top of the joist, and once joist is in place, drive cedar shim tight. 


            Welcome to the Taunton University of Knowledge FHB Campus at Breaktime. where ... Excellence is its own reward!

          3. gotquestions | Oct 11, 2008 06:15pm | #15

            Ugh. This is becoming complicated! My sawzall technique is still in its developing stages and I'm worried about kickback while trying to cut that stud out of the wall cavity. It just doesn't seem like there's enough space to have the saw at the right orientation.So what if I opt to NOT cut out all of the original pine tongue and groove??? Then I wouldn't have this support issue. There are a few places around the tub drain, toilet and vanity where these boards have been cut out to some degree. Is there any problem with leaving this layer, trimming those holes so the edges always fall halfway across a joist and then just cutting patches from 3/4" plywood to insert in these areas???? Then I would put my 1/2" ply and 1/4" CBU layers on top of this.This seems like so much less effort on so many counts, but am I compromising anything by going this route?

          4. Piffin | Oct 11, 2008 07:12pm | #16

            That would probably work fine too as long as you glue and screw the 1/2" down 


            Welcome to the Taunton University of Knowledge FHB Campus at Breaktime. where ... Excellence is its own reward!

          5. gotquestions | Oct 11, 2008 10:32pm | #17

            I've become aware that the 3/4" ply is not actually 3/4" and is therefore slightly different in height than the pine floor around it would be. I like this idea, though. Are there ways to solve this issue?

          6. Piffin | Oct 11, 2008 11:43pm | #18

            You could buy real 3/4"A lot of the old flooring i've seen was 13/16"Sometimes you can shim with 30# tarpaper, but the disallows glue. You can squeaze some extra PL Premium down when overlaying. When it hardens, it has become a shim at the transition. 


            Welcome to the Taunton University of Knowledge FHB Campus at Breaktime. where ... Excellence is its own reward!

Log in or create an account to post a comment.

Sign up Log in

Become a member and get full access to FineHomebuilding.com

Video Shorts

Categories

  • Business
  • Code Questions
  • Construction Techniques
  • Energy, Heating & Insulation
  • General Discussion
  • Help/Work Wanted
  • Photo Gallery
  • Reader Classified
  • Tools for Home Building

Discussion Forum

Recent Posts and Replies

  • |
  • |
  • |
  • |
  • |
  • |
View More Create Post

Up Next

Video Shorts

Featured Story

Podcast Episode 688: Obstructed Ridge Vent, Buying Fixer-Uppers, and Flashing Ledgers

Listeners write in about removing masonry chimneys and ask about blocked ridge vents, deal-breakers with fixer-uppers, and flashing ledgers that are spaced from the wall.

Featured Video

Micro-Adjust Deck-Baluster Spacing for an Eye-Deceiving Layout

No math, no measuring—just a simple jig made from an elastic band is all you need to lay out a good-looking deck railing.

Related Stories

  • Guest Suite With a Garden House
  • Podcast Episode 688: Obstructed Ridge Vent, Buying Fixer-Uppers, and Flashing Ledgers
  • FHB Podcast Segment: Finding the Right Fixer-Upper
  • Keeping It Cottage-Sized

Highlights

Fine Homebuilding All Access
Fine Homebuilding Podcast
Tool Tech
Plus, get an extra 20% off with code GIFT20

"I have learned so much thanks to the searchable articles on the FHB website. I can confidently say that I expect to be a life-long subscriber." - M.K.

Get home building tips, offers, and expert advice in your inbox

Signing you up...

This site is protected by reCAPTCHA and the Google Privacy Policy and Terms of Service apply.
See all newsletters
See all newsletters

Fine Homebuilding Magazine

  • Issue 332 - July 2025
    • Custom Built-ins With Job-Site Tools
    • Fight House Fires Through Design
    • Making the Move to Multifamily
  • Issue 331 - June 2025
    • A More Resilient Roof
    • Tool Test: You Need a Drywall Sander
    • Ducted vs. Ductless Heat Pumps
  • Issue 330 - April/May 2025
    • Deck Details for Durability
    • FAQs on HPWHs
    • 10 Tips for a Long-Lasting Paint Job
  • Issue 329 - Feb/Mar 2025
    • Smart Foundation for a Small Addition
    • A Kominka Comes West
    • Making Small Kitchens Work
  • Issue 328 - Dec/Jan 2024
    • How a Pro Replaces Columns
    • Passive House 3.0
    • Tool Test: Compact Line Lasers

Fine Home Building

Newsletter Sign-up

  • Fine Homebuilding

    Home building tips, offers, and expert advice in your inbox.

  • Green Building Advisor

    Building science and energy efficiency advice, plus special offers, in your inbox.

  • Old House Journal

    Repair, renovation, and restoration tips, plus special offers, in your inbox.

Signing you up...

This site is protected by reCAPTCHA and the Google Privacy Policy and Terms of Service apply.
See all newsletters

Follow

  • Fine Homebuilding

    Dig into cutting-edge approaches and decades of proven solutions with total access to our experts and tradespeople.

    Start Free Trial Now
    • Facebook
    • Instagram
    • X
    • LinkedIn
  • GBA Prime

    Get instant access to the latest developments in green building, research, and reports from the field.

    Start Free Trial Now
    • Facebook
    • YouTube
  • Old House Journal

    Learn how to restore, repair, update, and decorate your home.

    Subscribe Now
    • Facebook
    • Instagram
    • X

Membership & Magazine

  • Online Archive
  • Start Free Trial
  • Magazine Subscription
  • Magazine Renewal
  • Gift a Subscription
  • Customer Support
  • Privacy Preferences
  • About
  • Contact
  • Advertise
  • Careers
  • Terms of Use
  • Site Map
  • Do not sell or share my information
  • Privacy Policy
  • Accessibility
  • California Privacy Rights

© 2025 Active Interest Media. All rights reserved.

Fine Homebuilding receives a commission for items purchased through links on this site, including Amazon Associates and other affiliate advertising programs.

  • Home Group
  • Antique Trader
  • Arts & Crafts Homes
  • Bank Note Reporter
  • Cabin Life
  • Cuisine at Home
  • Fine Gardening
  • Fine Woodworking
  • Green Building Advisor
  • Garden Gate
  • Horticulture
  • Keep Craft Alive
  • Log Home Living
  • Military Trader/Vehicles
  • Numismatic News
  • Numismaster
  • Old Cars Weekly
  • Old House Journal
  • Period Homes
  • Popular Woodworking
  • Script
  • ShopNotes
  • Sports Collectors Digest
  • Threads
  • Timber Home Living
  • Traditional Building
  • Woodsmith
  • World Coin News
  • Writer's Digest
Active Interest Media logo
X
X
This is a dialog window which overlays the main content of the page. The modal window is a 'site map' of the most critical areas of the site. Pressing the Escape (ESC) button will close the modal and bring you back to where you were on the page.

Main Menu

  • How-To
  • Design
  • Tools & Materials
  • Video
  • Blogs
  • Forum
  • Project Guides
  • Reader Projects
  • Magazine
  • Members
  • FHB House

Podcasts

  • FHB Podcast
  • ProTalk

Webinars

  • Upcoming and On-Demand

Podcasts

  • FHB Podcast
  • ProTalk

Webinars

  • Upcoming and On-Demand

Popular Topics

  • Kitchens
  • Business
  • Bedrooms
  • Roofs
  • Architecture and Design
  • Green Building
  • Decks
  • Framing
  • Safety
  • Remodeling
  • Bathrooms
  • Windows
  • Tilework
  • Ceilings
  • HVAC

Magazine

  • Current Issue
  • Past Issues
  • Magazine Index
  • Subscribe
  • Online Archive
  • Author Guidelines

All Access

  • Member Home
  • Start Free Trial
  • Gift Membership

Online Learning

  • Courses
  • Project Guides
  • Reader Projects
  • Podcast

More

  • FHB Ambassadors
  • FHB House
  • Customer Support

Account

  • Log In
  • Join

Newsletter

Get home building tips, offers, and expert advice in your inbox

Signing you up...

This site is protected by reCAPTCHA and the Google Privacy Policy and Terms of Service apply.
See all newsletters
See all newsletters

Follow

  • X
  • YouTube
  • instagram
  • facebook
  • pinterest
  • Tiktok

Join All Access

Become a member and get instant access to thousands of videos, how-tos, tool reviews, and design features.

Start Your Free Trial

Subscribe

FHB Magazine

Start your subscription today and save up to 70%

Subscribe

Enjoy unlimited access to Fine Homebuilding. Join Now

Already a member? Log in

We hope you’ve enjoyed your free articles. To keep reading, become a member today.

Get complete site access to expert advice, how-to videos, Code Check, and more, plus the print magazine.

Start your FREE trial

Already a member? Log in

Privacy Policy Update

We use cookies, pixels, script and other tracking technologies to analyze and improve our service, to improve and personalize content, and for advertising to you. We also share information about your use of our site with third-party social media, advertising and analytics partners. You can view our Privacy Policy here and our Terms of Use here.

Cookies

Analytics

These cookies help us track site metrics to improve our sites and provide a better user experience.

Advertising/Social Media

These cookies are used to serve advertisements aligned with your interests.

Essential

These cookies are required to provide basic functions like page navigation and access to secure areas of the website.

Delete My Data

Delete all cookies and associated data