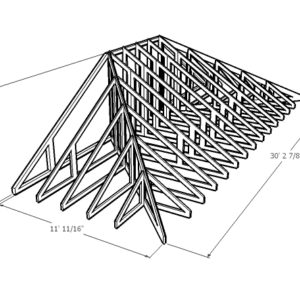
This is coming up an a month or so. The hip set of trusses, shown here, goes up 22 feet in the air, atop a second story. There is oodles of room an an adjacent flat concrete slab to build the two that go up there, and crane-hoist them up mostly done.
Some questions.
I’m thinking we build on as much as we want, before the fly-up. That means blocking, bird blocks, sheathing, subfascia, felt. No shingling, because we will have a few penetrations where we attach bolts and shackles and eyes for the pick. Sound OK?
What is the best way to rig it so it flies up level?


Replies
2 slings is all you need to pick. It makes no difference if it goes up level.
Now we don't sheathe it first, how hou have it built is how we fly it.
We do have all of the buckets put on and the monos are to long, we use a 2x4 lineal to help keep them from falling apart. A third strap is used if needed slung around the 2x4's
PS I'll resize these pics in the next post.
Gene, I've never sheathed much of them but I've always pre-framed them.
If it were just framed (no sheathing), you wouldn't need anything special to hook and set it. A little 32'er like that is very simple to hook and set.
Heres some pics of a similar sized one without sheathing. This particular hipset has a stepped ceiling built into the trusses. That feature adds a little bit more weight.
As you can see, we are sending it up with it hooked in only two spots. It's far closer to being balanced than it appears. One man can easily grab the tails and level it out when it gets close to where we set it. Most of the time we'll have two guys receiving it but its not uncommon for one guy to receive it. Basically, we grab it when it gets close, level it out and just drop it. From there, it's very easy to move by hand a couple inches either way. On really big and heavy one's, we'll drop it, then tighten the cable for a little crane assist to move it, but little ones like we are looking at will move easily with one man giving it a tug.
Ours is showing a little bowing but nothing that is stressing anything. If you put plywood on, it won't be bowing at all.
I've debated the laying of plywood and I just never could rationalize the need for it. A piece of plywood takes the same time in our system on the table or on the roof.
Bob's next test date: 12/10/07
Resized Bob's next test date: 12/10/07
I'm surprised you didn't sheath it on the ground. Wouldn't that have saved a lot of work? Also made it even more ridgid, rather than strapping with 2x's.
Looks cold there!--------------------------------------------------------
Cheap Tools at MyToolbox.netSee some of my work at TedsCarpentry.com
I will answer that, by sheathing you can't nail the monos down to the top plate.
Ah, that makes sense.
Just seemed it would have been a bid labor saver. I helped sheath a couple of roofs in my time and seeing the framing on the ground had me wondering. --------------------------------------------------------
Cheap Tools at MyToolbox.netSee some of my work at TedsCarpentry.com
We could work around that "problem" because we typically put the hurricane ties on after sheathing anyways from down below off a ladder or walkplank. Nailing to the plates isn't a requirement with the simpson tie system. Bob's next test date: 12/10/07
I agree with that, but we don't use them often<G>
It really doesn't save any work. Think about it. Lets say that it will take 12 sheets of plywood to sheath the hip end. If it's on the ground, it's 12 sheets. If it's in the air, it's 12 sheets. It takes me the same time in the air or on the ground. Bob's next test date: 12/10/07
Nope, I don't agree that it takes the same time in the air or on the ground.
We build them this way all the time and we sheet them on the ground. Girders always straight and so is the facia, or we wouldn't be doing it that way anymore.
Never had any trouble nailing them down from the inside either. We must have higher heels than you guys are used to.Legal Disclaimer: The preceeding comments are for entertainment purposes only and are in no way to be construed as professional advice. The reader of these comments agrees to hold harmless the poster, EJCinc, from any and all claims that EJCinc offered professional advice, ideas, or comments to the reader that may or may not have resulted in the damage, injury, or death to the readers property or person.
Why don't you have them drop the tops of the hips so you could run 2x4 on the flat, fron the girder to the top?
We do that now, and it reduces the amount of time. Don't have to cut all those little rafters.<G>
Frammer, we call that "quick framing". Its a beautiful thing when you can just cut 1 long board, mark the diagonals and nail it up from the girder to the main. same with the hips.
Im not sure sheeting it down would be a good idea. Even if it was a perfectly flat surface how would you make sure your girder didnt have a bow in it. If you did make it happen how would you fasten the trusses to the top plate?
"Even if it was a perfectly flat surface "Therein lies the dilemma. There is a certain amount of flew left in a hipset that isn't sheathed. The time spent creating a plane that will be exact to the plane of the exising walls is time consuming. Then, there is the squareness factor. Yes, we square the decks and walls and everything is level and flat but the reality out there in the real world is different from theoretical. So, we tried a few methods over the years and the easiet, fastest way is to do some of the pre-fab, but stop short if you need any significant staging time. In my pics, the entire hip is built and assembled. I probably only did that two times in my career. We normally didn't put the hip in or the small jacks till it was up on the walls. Putting the hips in is a little risky but I gave it a shot on that set. I wouldn't do it again. Bob's next test date: 12/10/07
They do lower the stepped trusses but the girder hipset is usually set in the plane of the roof. I prefer it that way for several important reasons. We did have one Canadien firm who also dropped the girder hipset and I could handle it but I prefer the other way as shown in the pics. In these pics, the truss co has sent out the layover truss. I don't like using them either. I'd prefer to use linial and do it myself. We have prebuilt these and sent them up as a test to see which way was fastest. I like doing it myself with linial. Bob's next test date: 12/10/07
I WILL second that.
How do you block the hips?
The hips get one long 2x laid on the flat and beveled in some cases. Normally, I didn't bevel the hips but that required a careful ply cut so it really a six of one, half dozen of the other. I've did it both ways though. In my later years, I doubt that I beveled any unless there was a very specific reason. Bob's next test date: 12/10/07
I only had to cut those little rafters on the first few hipsets that were sent like that in the mid 80's. On the third set that was sent out to me like that, I rearranged the truss layout myself to allow for the layover. It was soon after that the truss company caught on and started dropping the stepdowns for the linial on the flat. Bob's next test date: 12/10/07
This pic shows what our truss supplier calls a "common cap," and as you can see, it does the job nicely of providing on-center nailing and hip edge support, right where you want it. I highlighted it in a nice color so you can't miss it.
View Image
Every step-up from the girder on up is dropped the appropriate amount so the flatwise 2x assembly planes out perfectly, its arrises aligning dead nuts on the hip lines.
I just checked my recent quote for one, and I'll tell you what, for $42.74 plus tax, you can't go wrong.
View Image
"A stripe is just as real as a dadgummed flower."
Gene Davis 1920-1985
We have had those, and the very seldom work. The reason is the real world may be slightly different than the prints. They just never seem to work out. I think most of it starts with masons unable to read their tapes. We do try to square it up as we go, but lately, last 10 years it is getting worse.
In the real world, I'm often the one up there doing the fit-up, bags on and nailgun in hand, and have never had one not work that I have ordered.
That said, I have seen them designed and dimensioned incorrectly at drawing submittal time. It surprises me how sometimes the truss engineer, with his sophisticated software, can get it wrong. It is up to me, the builder, to review the prints and make corrections.
A truss job, IMHO, is little different from a stickbuilt roof frame, as regards planning and execution. The plans will tell you all you need, before the walls even get built, for cutting every part. It is up to you to get it right.
We never give a final go-ahead for trusses to be built until the foundation is proofed against plans, and have on some occasions found we needed to grow or shrink things to work, because of a concrete bust. Those re-plan numbers need to get to the truss designer, so that the revised truss-build works for us.
It's called communication, son. If someone in the chain of build-and-supply is asleep at the switch, you'll be out there at roof frame time scratching and whacking. I prefer to work smart, and avoid all that.
When this current one gets built, I'll post some photos.
View Image
"A stripe is just as real as a dadgummed flower."
Gene Davis 1920-1985
I agree with your posts, except I worked a lot with homes that are not custom. The problem is, we go in on most houses up to 3000sq.ft. and frame in less than a week. The trusses are made and sitting on most jobs with the lumber package when we arrive.
Custom homes like you are working on are a lot different, and can be done as you say.
I love to see pictures as have been almost completely house bound for the last 2 years.
I agree with Frammer2. Gene, you spend a considerable amount of time studying the plans and going back and forth with the engineers and designers. In most cases, the truss package can be 3 to 4" wrong and still work fine for the houses I've framed. If the trsuses are 4" and the pitch is 6/12, it just means that the heel is 1" taller than theoretical, which wouldn't mean a hill of beans to me. Yes, there are some key critical areas of a truss package that needs to be scrutinized, but for the most part (99 times out of 100), we can make any package work as long as we have them onsite before we start the basement. Even in that 1%, the tweak is usually very easy and all it ever took was a call to the superintendent for an okay. So, I'd rather just make the ten second decision on site rather than spend 10 and 15 hours each job scrutinizing every detail of the package. And...as for those layon...even if they were perfect every time, I wouldn't want them. I know you think I'm crazy but I've framed at least a hundred and probably closer to 200 of those layons and I've done them every way imaginable...and maybe a few other ways too and I know what I like and I know why I like to do things. I prefer to do those layons in individual stick builds which typically consists of a few studs and a few linial. Bob's next test date: 12/10/07
Jim,
It wasn't table framed, but I framed a dormer and sheathed it before we set it. It was a lot of fun and I'd do that again in a heartbeat. I didn't worry too much about lifting it level.
http://picasaweb.google.com/TimothyUhler/Lot35Muirkirk/photo#5212608217325292114
Tim I have always enjoyed your pictures! Have you looked at Brians thread?
Excellent work there Tim. The photos and great. I liked the barrel ceiling system too. When you did the dormer, did you get it all right or were there some adjustments that you had to make? It's actually pretty simple after you've done one that way. It might seem intimidating at the first one but after that, it's all routine if you know your cuts or know how to use the framing square. For instance, would you be willing to put all the plywood on the roof on the next one? I don't see why you couldn't. I'd just hook that little dormer with one strap through the ridgevent hole. Bob's next test date: 12/10/07
Jim,
Everything worked the first time. I did cut back the subfascia so it'd be 3 1/2" off the roof for the tile, but that was planned. I figured since the slab was nice and flat it would be easy. I left off the valley sheathing so I could nail the sleeper to the roof and I'd probably do that again.
I'd like to do some more thinking about the valley too. I didn't particular like the way I framed it, it would have been nice if it could have had a better connection to the last rafter, but when we lifted it, it didn't move at all. I think that the little jack held it in place well enough.
The barrel and the cove will be finished Monday. Just ran out of steam today and we aren't working tomorrow :-)
Thanks for the comments.
Edit: I should add that I drew it in SU so I could visualize it.
Edited 6/19/2008 8:32 pm ET by Timuhler
My thoughts are that I can nail that sleeper through the plywood. If I'm concerned, I'd pound a few 20d commons through the ply and sleeper into every truss.Also, you normally have access from underneath. Bob's next test date: 12/10/07
We do it a different way. We set all the trusses with a boom truck. When flown in we cut truss blocks approx 30". We sheath and remove the blocks as we go along.(they become dead wood or nailers). On the hips we take one of these blocks, they fit, square cut, on the flat nailed to the first plywood. Then bevel the other side nailing to the blocks.
I know, I was sceptical at first, but it is very strong and works!
Attach a comealong or a chain hoist line to the hook or above the ball. Attach the the body to the low end.A few cranks will usually level up the frame.
mike
Gene, I absolutely agree with mike that chain falls and or come a longs should be utilized to level the pick.
there are some basic rigging charts that will show exactly how much the weight increases depending on the angle but it doesn't hurt a thing to just rigg for twice the weight. So if it weighs about 500 lbs you should be good at any angle with two 1000 lb capacity chainfalls.
Carefully positioned eye bolts shoud allow all shingling except cap on hip.
A chain fall is overkill. The entire thing will balance out with a guy lifting the low end with one finger. I've set hundreds of these. They usually are so close to being balanced that the exact anchor point would be only a few inches below the top of the girder. If there was any significant weight, the come along would be putting stresses on some relatively flimsy framing members down lower. Since I know there isn't any signficant weight, it really wouldn't matter. If flying it was critical, then a 1/4" piece of sisal twine could be rigged to level it out. Tie the twine to the overhang and run it up to the straps. Keep in mind that every situation is different so the opinion is made based on my twenty years of setting them. Each one had different weight distributions based on the length of the common jacks and the weight of the girder. There is not one answer but I can tell you that I only remember one girder set that needed three anchor points. It becomes plainly evident when lifted. You will know before the tails leave the ground and probably much sooner than that. Bob's next test date: 12/10/07
overkill is a good thing in rigging.
i think gene is talking about building a section of roof structure on the ground and flying it, and i did not mention a spreader bar to avoid confusion.
i also have over twenty years of experience with heavy rigging, have actually attended classes and been certified, with documentation. required for some of the jobs i work.
if it were me doing it, i would also rely on my experience and judgement at the time, and would make a number of scenarios work.
if it were rigged in the middle and balanced a one point pick is acheivable, but an engineered set of picking points with adjustable rigging may be better, especially if finding the center/balance point of the load is jury rigged at the last second, and it is questionable whether that one point will support the entire load.
I wouldn't suggest picking it with only one point. We always used a two point lift. Typically, the truss sets are symetrical like the one Gene posted. The straps are connected to the girder which is holding all the jacks. Each jack stays anchored by it's own fasteners. The rigging does not put any particular tension on each individual jack. When you start rigging it to level it out, you either have to shift the two point system down onto the jacks, which changes the needs of the connection or you have to put additional straps down lower, which again puts strain on the jacks and requires additional connection adjustments. But.....since the amount of lift on the lower regions is negligible, not hing really needs to be done to the jack connection in 99% of the cases I've worked on. I have a feeling that you don't believe how balanced the entire thing is. Do you believe that one man could easily balance the thing level with one hand? Remember...I've set hundreds of these and I've received many of them alone. Typically, on small ones (25' or so), even if the guys were busy working on the second story partitions, I wouldn't even bother to ask them for help, even though it would only disrupt them for a minute or less. Bob's next test date: 12/10/07
Keep in mind, all my comments are directed at hipsets that do not have sheathing and subfascia attached. I do not think it would change the way we hooked it though and if the girder was two ply, which many in that size are, the extra weight of the second ply would do a lot to counterbalance the weight of the ply. So, if we built the girder system and sheated it, we'd just start our hoisting process as usual and if it didn't meet our standards, we'd abor t the lift then start the Plan B rigging. Plan A is: two point lift and see how it balances. If it bows, set it down before it bows too much. In my early years dealing with these things, I had one go up that needed a four point hookup. Then, the crane operator bounced it in mid air...that wasn't a good thing. It cracked the bottom chord on a very large girder. I was thinking thousands of dollars. The fix was two 2x10's 8' long nailed to each side of the crack.The lesson I learned was don't let the crane operators continue when it's not going up in great shape. Bob's next test date: 12/10/07
Edited 6/21/2008 12:09 pm by Jim_Allen