I have a fairly unique problem with one wall the foundation of my house, or at least the waterproofing contractors that have looked at it seem to think it is uncommon.
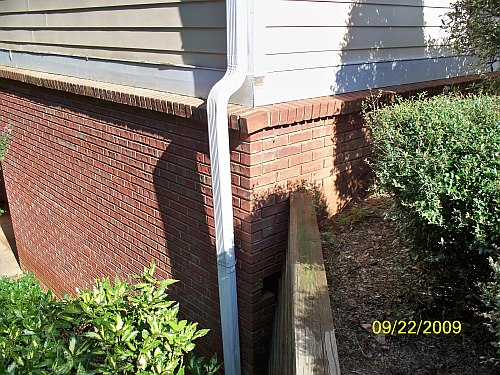
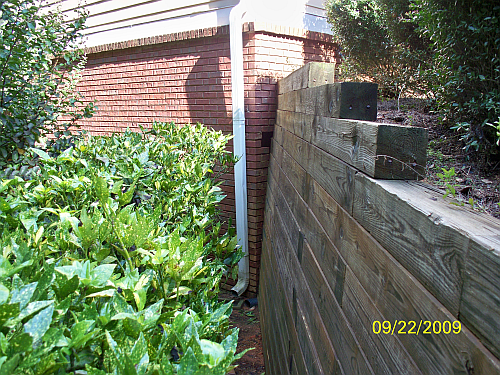
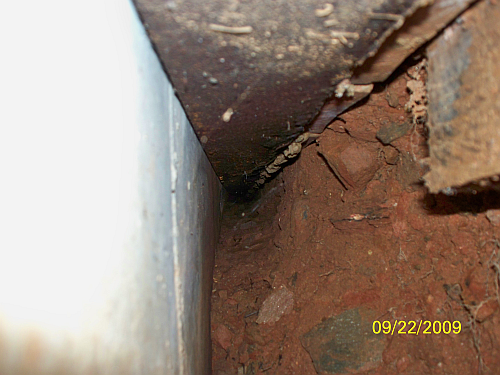
The problem is with the wall pictured in pic 310 and 311. The side of the wall that is below grade is sitting on a steel angle rather than a brick ledge. The area that goes down to the ground level does not return to the poured wall. The result of this is a gap between the poured wall and the brick that is about 1 1/2 – 2″ wide along the eight foot length of the wall for it’s full height. The wall transitions to a framed wall about eight feet to the left of the corner. (see pic 312)
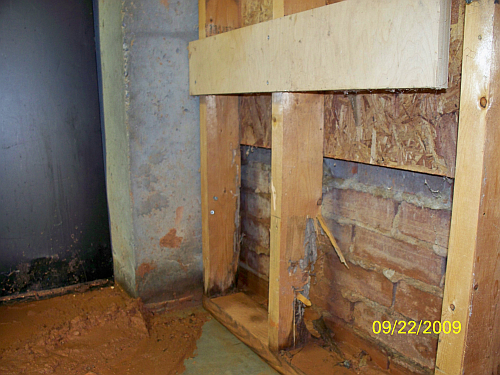
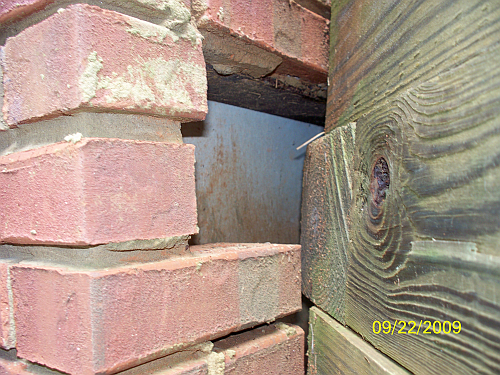
Pic 316 is looking inside, looking left, you can actually see the edge of the sheathing where the transition is. Pic 315 is looking left along the angle iron under the brick below the upper grade. Both of those pics were taken from the small opening where a couple bricks were removed.
What happens is during a heavy rain, water and mud/silt washes through this gap and into the interior of the building where it transitions from poured to framed wall. This was masked for years behind the sheathing as mud built up behind the sheathing until it rotted out. Now it just washes into the room.
The stud and sheathing repair is easy, it’s the gap between the brick and the poured wall that is the issue. My gut instinct is that this gap needs to be filled with something. Concrete or some type of grout seems the best solution but that may be easier said than done.
I had one guy suggest waterproofing spray foam which sounds easy but I have concerns about termites/ants tunneling in the foam. Another suggested a mudjack contractor pump heir solution in and I had one come look and he “thinks” it will work and be waterproof, but if it isn’t then I really have a mess to contend with.
A couple contractors want to completely remove the tie wall and run the brick back to the house at the corner but, honestly, that is way out of the budget.
Another suggested simply packing the inside gap (after removing the sheathing to gain access) with hydraulic cement. Seems to me that that is just inviting future problems with mud building up behind the brick again.
I can clean the gap out thoroughly with a hose fairly easily all the way back to the bottom corner.
So any suggestions?
Can I pour a very wet concrete mix in there and expect any kind of reasonable result?
If I need to clarify anything let me know.
Thanks


Replies
you house is built wrong. never you wood below grade, never use brick below grade, it looks like somebody raise the grade around the house. Need to pull that four feet out of there. if you want to keep the grade. pull the wood out and pour a concrete wall. water is running through the brick down the wall and rotting out the wall, in other words, a hack built the house
There is no wood below grade. The wood is to the left of the corner about eight feet away from any contact with the ground.
I'm going to guess that the house was built with the wood part above grade but at some point someone decided to raise the ground level and use brick to protect the wood. That's why the brick is on a steel angle and not the foundation. I saw this done before but the wall was protected with stucco. Just stuccoed over a couple of windows and a door too. In that house the owner built the foundation up to above grade.
No, I have been in this house since new and the is none, and neve has been any wood below grade. The angle is bolted to a poured wall where they forgot to pour brick ledge. The area where the water is entering is eight feet away from the corner where the wood tie wall meets.(to the left.) The poured wall extends eight feet that direction before it meets the framed wall.The only time ground ever had contact with wood is when the water washed it into that gap and it gradually filled it up behind the sheeting. The brick should have met up with a brick ledge at the corner and there would not have been a gap.Hope that clears it up some. I know this is a builder screw up, but he filed bankruptcy just as he finished this house.I have well over 150' of poured wall below grade and not a single leak anywhere else, and the rest of the house has brick ledge where it should have it.
I'm not sure how to fix this but one thing I'd do is any wood wall and sheathing that gets replaced that's below grade I'd use PT lumber that's designed for below grade. And SS fasteners. Good luck with this.
Again, there is no wood below grade.
How about some re-sized photographs?
I can put up some high res ones if it would help.
No, low-res! Bandwidth friendly
Here is link to pics. They should be easier to see here.http://picasaweb.google.com/tlwilk67/FoundationDamage?authkey=Gv1sRgCICJj4ai8dnJWQ&feat=directlink
in that third picture with the soil against the red brick, what is behind the red brick? and why is there soil against the red brickThe picture with the wood, with the back of the brick showing, whats on the other side of the brick at the bottom foot of the wall?
Edited 9/22/2009 9:41 pm by brownbagg
third pic has poured wall behind brick, pic with wood has outside air behind brick, it is eight feet away from the wood retaining wall (left of the wall when looking at the corner from the outside)
This is where the water is entering the building. This pic is at floor level eight feet away from the corner of the building where the gap between the brick and the poured wall begins. The poured wall is approx eight feet tall
http://lh3.ggpht.com/_VyZCSlhsrtM/Srl2pJElBDI/AAAAAAAAACU/bwG5yDF5Zjk/s800/100_0312.JPG
I have to agree with the contractors who want to return brick at corner. Anything involving the soil side near the wood looks like it would require removal of dirt and wood retaining wall so a deflector of sorts could be fashioned. Neither one would be inexpensive.
Hydraulic cement might work, haven't lost a whole lot if you DIY and it flops. I wouldn't touch it as a contractor though.
Everything will be okay in the end. If it's not okay, it's not the end.
My thought is that I have a approx 8' tall by 8' wide 2" deep gap that needs to be filled. (approx 10 cubic ft of material)I have some access to it via the bricks that have been removed near the retaining wall, and I can have access to it inside by removing a bit of the sheathing. It probably only need to be filled to a max level of 6' but 7 or eight would be even better. The issue (in my mind) is really what to fill it with.
I think something like Perma chink for log homes. Its pricey, but its a rubbery , sandy mix that oughtta be waterproof enough.
It comes in 5 gallon buckets and maybe could be pumped in some how.
Just shooting first thoughts, I'll sleep on it and maybe have an epiphany or nightmare for ya.Spheramid Enterprises Architectural Woodworks
Repairs, Remodeling, Restorations
View Image
oooh..maybe a roofer witha tar kettle? Fill it with tar.Spheramid Enterprises Architectural Woodworks
Repairs, Remodeling, Restorations
View Image
This is the corner of the house where the issue starts. The opening in the brick by the tie wall is at the level of the angle that is bolted to the poured wall supporting the brick on the front of the house. The poured wall turns the corner and runs approx eight feet and then transitions to a framed wall. All wood framing is above grade level and the full wall height brick sits on a proper brick ledge. There is a gap between the vrick and the poured wall that is just left open to the tie wall/dirt at the corner. That is where the problem is. All brick on the front of the house has poured wall behind it.http://lh6.ggpht.com/_VyZCSlhsrtM/Srl2n9Kp-CI/AAAAAAAAACI/_WSgDchrurk/s800/100_0310-1.JPGOpening in brick near tie wall.
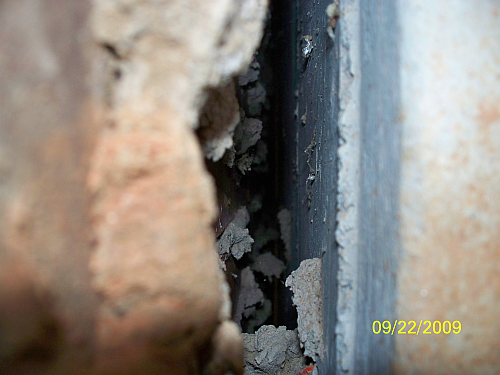
http://lh5.ggpht.com/_VyZCSlhsrtM/Srl2pfumjuI/AAAAAAAAACY/GtOhNEyjIOM/s800/100_0313-1.JPGIf you look in the opening horizontally to the left you see this (and if you look close you can see where the wood sheathing starts approx 8 ft away.)
http://lh5.ggpht.com/_VyZCSlhsrtM/Srl1MQemMFI/AAAAAAAAABk/i8lM-uVQASw/s800/100_0316.JPGLook to the right through the opening and you see where the dirt is being washed away from under the angle.
http://lh3.ggpht.com/_VyZCSlhsrtM/Srl2qTJ88tI/AAAAAAAAACk/NFclNLPv_g8/s800/100_0315-1.JPGHope that clears it up a bit.
Why fill the whole thing? If I'm gettin' this right, the water comes down the retaining wall side around the corner and behind brick veneer, correct?
Maybe just plugging the area of entry would be a better bet, if it doesn't work at least you've still got original option. Perhaps fill gap on retaining wall side, then build an angled deflector to channel water to side. May need to cut some brick for access. Filling the whole thing with anything cementious would put a bunch or pressure on brick, I'd be afraid of blow out and a huge mess.
Everything will be okay in the end. If it's not okay, it's not the end.
You are understanding the issue correctly.I'm not sure I would need to fill the whole thing, the problem being how to dam up an area to prevent filling the whole thing. If I want to fill just the area where it is entering I'm not sure how I can prevent it from flowing all the way across the wall. If I do it from the area whe it is coming in the room then eventually the mud/water will build up behind the brick.I am a bit concerned about the blowout issue, but then again, I don't know just how much force a 2" wide area of "whatever" would exert on the brick. Could be done in lifts I suppose.
If I do it from the area whe it is coming in the room then eventually the mud/water will build up behind the brick.
And flow around it to somewhere near the downspout right? Gravity will be your friend ;)
I was thinking more of troweling the deflector on with stiff mortar, but that would need access you'd have to create
Good time to learn some masonry skills?
I guess you could inflate something in there as a dam, a bike inner tube, maybe.
I'll puzzle on it while I eat and watch TV.....might even sleep on it,
Everything will be okay in the end. If it's not okay, it's not the end.
I really don't want mud built up behind the brick if I can help it. That's actually how I first realized there was a problem. The brick was getting mold/mildew at the lower courses where mud had been building up behind it so I pulled the insulation back to expose the wood sheathing and found the rotted sheathing with mud packed behind it and loaded with termites. Kind of why I am leaning to towards just filling the whole damn area with concrete. This was suggested by one contractor and from the product description it sounds plausible. If nothing else it may be a good way to form a dam in the wall that I can fill up to.
http://www.acehardwareoutlet.com/%28tvz0bzyfydlmucnnyuxcunuj%29/ProductDetails.aspx?SKU=1000000940
You're right about not wanting mud behind the brick, it makes a great , unnoticed, protected, path for termites.
What's the height of the 6x6 retaining wall for the sake of reference?
Retaining wall is approx 6' tall.
and I take it you've done all the things to redirect rain water away from the area?
What about footing drains? Were they installed?
ETA: wait, just answered that in the 1st pic. Why isn't the water flwoing through the drains then?
Edited 9/23/2009 7:11 am ET by john7g
Drains were installed during original construction. I think that the backfill was not compacted well and ferore water gets down to the footing drains it finds it's way over to the gap in the brick. No other leaks anywhere in the foundation. I am going to redo some of the drainage at the surface in that area, but not until I have fixed this issue since a repair may involve digging a good portion out, though I am really trying to avoid that.
Any new ideas out there?
Have you run any scenarios on reducing the water pressure behind the retaining wall with additional drain lines above the footer drain? I'm thinking you could carefully remove a 6x6 and work a rigid PVC drain back in there somehow. it is kind of a straw grasping idea though.
There isn't that much pressure there. It will flow out through the tie wall fairly easily but the path in is so much easier it flows that way. I need to close that gap up with something even without the water issue. I'm sure it is also an entrance for mice, insects etc...
I have a plan for the surface and roof water to get it well away from the house.
Part of the problem is the gutter on that part of the house goes to the foundation drain so the is a lot of water flowing near that area, but that has since been temp diverted and the issue is still pretty bad.
I still think hot roof tar would work.Spheramid Enterprises Architectural Woodworks
Repairs, Remodeling, Restorations
View Image
That actually may not be that bad of an idea, but it sure sounds like a mess to do. How would you do it? What would you dam it up with at the inside edge to keep it from flowing everywhere.
Tar kettles have pumps to get the tar up on the roof edge. That could be piped to your void.
I guess plywood rips or lumber dams would work. I'd do it in "lifts" let the bottom solidify then add more.
I'd have to see it in real life , but I know I could dam it somehow.Spheramid Enterprises Architectural Woodworks
Repairs, Remodeling, Restorations
View Image
How well does that stuff flow and how fast does it set. It is an interesting idea.
Bobbys probably has more recent exp. than I. We used to mop it on outta five gal buckets. Viscosity was like warm honey.
Set time depends on ambient temps and thickness, but it stiffens up pretty quick. The kegs were split with an old axe, so when it's fully hard, it is pretty much like brittle taffy or peanut brittle w/out the peanuts.
Hmmm..no reason why you couldn't use aggregate or pea and dump lifts of tar, pea, tar, pea outta buckets if you have an access hole or make a chute.Spheramid Enterprises Architectural Woodworks
Repairs, Remodeling, Restorations
View Image
I still think you need a concrete wall till couple inches above the soil then brick. I really dont like soil backfilled against brick
Not sure what the issue is with the backfill. Any brick that has soil against it has a poured concrete wall behind it. there isn't anywater getting in that way. In fact it only goes maybe a foot below grade that way. There is no way i'm pulling all the brick off the front of the house to remove 5 or 6 courses of brick that are below grade and not causing any issues. What is the problem with it?
the brick is pourious water will run through brick so it getting into the area behind the brick and running along the wall. If it was just plain dirt against the concrete then the soil be damp and holding the water back. The bricks are acting like a soil filter.
really we need more pictures, its hard to understand the problem with what we see. what I seen was1) a high backfill againstt brick
2) a wood wall back side of brickso its diffulcult trying to figure out where the wood wall is and how come there so much fill against the brick. we need about ten more pictures.the wood rotted outfrom the water and mud, where did the water come from, did it come from the high backfill. What about french drains, Does the gutter dump on the backfill or against the brick. what is the drainage around the house?
The water is coming in below the level of the brick that has on it. The gutter enters a drain that is tied to a foundation drain and I beleive some is coming in at that level, in fact I believe water from the foundation drain (since it is the plastic porous type) is also washing through the gap between the brick and the poured wall. 8' tall poured walls extend both directions from the corner shown, going to the left (as viewed from outside) the poured wall extends about 8' then changes to a 8 tall framed wall. That is where the water actually enters the structure. Going to the right the poured wall extends about 40'. No issues there. Some of the water is coming from a walkway that was poured on porrly compacted backfill and has since sunk at the end towards the house so water flows back towards the house. This is in the plans to be replaced but not until I determine how to repair the brick/poured wall issue.If not for the gap between the brick and the poured wall, there would be no path for water to enter.
Maybe this will help.
View Image
Yellow line is where the framed wall starts. Green circle is where the pictures looking inside the wall were taken from (at the gap and the angle iron)
Green line is where angle iron is bolted to poured wall. Poured wall extends to top of brick.
Orange line is where silt/dirt had built up over time between the poured and framed walls and the brick.
I want to find a way to fill the gap between the yellow line and the corner of the building.
knock a couple of the ledger brick loose to provide a hole access, and fill up with wet groutok I understand now, here what I myself would do. After the mud was clean out, a can of foam just behind that 2x, to plug the end. then knock a couple ledger brick loose, they can be re mortar back in. fill the void up with wet grout. The box stores has a bagged grout, not cement, not concrete, that be perfect for this. Once is set the wall and brick be a solid unit
Edited 9/26/2009 11:39 pm by brownbagg
would you need to make a dam to keep it from running over to the framed wall & out?
great idea btw.
ETA: you added to your post the answers to my questions
Edited 9/26/2009 11:41 pm ET by john7g
Thanks. I'll take a look and see what I can find. Is there a specific kind of grout I need to look for?
How wet should it be mixed?
I would pour almost like water so it fill all the void. home depot as a quickcrete grout in a brown bag.
http://www.lowes.com/lowes/lkn?action=productDetail&productId=6496-1295-24210&lpage=none
Is that the type of product I'm looking for.
no, something like thishttp://www.quikrete.com/ProductLines/NonShrinkGeneralPurposeGrout.aspyou could also use.http://www.quikrete.com/ProductLines/CoreFillMasonryGrout.asp
Edited 9/27/2009 1:11 am by brownbagg
Thanks, I'll see what I can find locally.
I have access to a portable mixer. Should I use that to mix it and do I need to worry about blowing out the brick by pouring too much in at one time. Would it be better to do it in 1 or 2' lifts?
Thanks for the help on this.
a mixer be great, there wont be that much pressure,
You want to re-grade when you fix the problem, but the grading is the problem. I'll bet the soil against the house goes uphill from those 6x6s? The runoff is washing its way underneath the steel brickledge and right into that veneer corner.
Fix the framing in the basement. Pull out the retaining wall and move it BACK several feet. Easier said than done, because there will be alot of digging. You will essentially be widening your driveway. Hire a brick mason to dress up the brick at the corner. Regrade the soil alont that side of the house with the ledger.
I have a plan for the grading. The issue really comes from a couple gutters that are being re routed. No way that retaining wall is getting moved. The is actually very little surface water that can drain there, maybe two 10x10 areas. Won't be hard to fix once the gap in the wall is taken care of.
I wasn't trying to be flippant with my last post. This pic will show why I don't want to move the retaining wall. The circled area is the corner where the retaining wall meets the house. As you can see the driveway that you saw in the other pics is the lower drive that goes to the shop basement. Upper driveway is probably only 8 feet from that wall so moving the wall six feet gets it way too close to the upper drive and throws off all the landscape. I can fix the grade issues and drainage here fairly easily after fixing the wall issues.