Free-Standing column installation way

Needed to install (6) 10″ X 10′, 100# columns by my lonesome. Perfectly positioned, and all equal in height. The big challenge is making the column-to-pier joint transfer a lot of cyclic bending moment – two 6′ porch swings will be installed on the back beam. Vertical load isn’t a problem – each column is rated for #10,800.
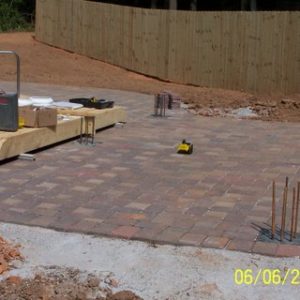
The paver guys left me (6) 12″ squares of removable bricks, on about 9-1/2′ centers. I pulled the bricks, and post-holed/ spaded down 30″ deep. Filled with Sakrete, and (6) 4′ rebar pins in each. And yes, it was a true 100 degrees yesterday, as I wheelbarrow-mixed 28 80# bags of Sakrete!
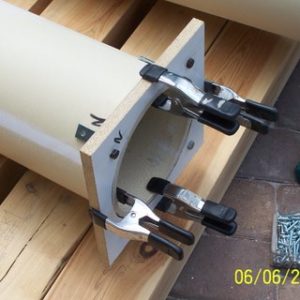
Made a jig that would locate both the column clips and the concrete expansion anchors. ready to drill for the clips now.
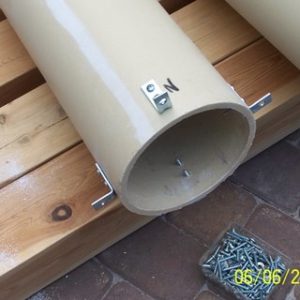
Slid the ID of the jig over the column bases, and bolted all the angle clips on – had to modify what I could find. #14 sheetmetal screws – the extra length will be handy later.
Using the jig outside shape in the paver recess, I stood on the jig and drilled all the 3/8″ anchor holes. Note the arrow north, so everything is aligned the same.
Forrest
Edited 6/6/2008 6:04 pm ET by McDesign






Replies
After setting all (24) expansion anchors, I threaded on another 3/8" nut, and a washer. With my trusty rotary laser, I taped the receiver 4-1/8" up my rule. I adjusted the the top nut up until I first heard a steady tone. this way, all (24) washers are within 1/32 - 1/16" of eachother level.
View Image
I set the jig back over the Red Heads, and bumped them as needed into alignment. Then, as I grunted the columns up and over the rebar, I knew they would slip right down on the threads.
View Image
Had to hog out the underside of the bases; used a Forstner bit in the drill press/ Material is a skinned urethane foam.
View Image
Forrest
Edited 6/6/2008 5:53 pm ET by McDesign
Final plumbing adjustment with a bubble level, below where the columns start to taper. Remember - this is not strong enough to support the column; it's just all just a locating mechanism -
View Image
Last, slid all the bases down, rasped them to fit the pavers, and bedded them in caulk and caulked the top joint.
View Image
Tomorrow, when the caulk is dry, I'll mix up and pour 2-3' of Sakrete down each hollow column. That will integrate with the rebar pins, and the rough inner surface of the column, as well as the protruding sheet metal screws.
This will provide the load-bearing capacity - the instructions require that the columns be 100% supported under the bottom edges
And, hopefully, all the cyclic bending moment will be transferred to the buried footings, which are also braced with the plane of tight-fitting pavers.Forrest
Edited 6/6/2008 6:03 pm ET by McDesign
Always on top of your game man! I hope you enjoy your new gig as well as you seem to this one. I love the way you think. I would love to have a crew of guys like you.
Me too!
Forrest
Excellent ideas there, i have a similiar project coming up in spring. ive been worried about sway. my pergola will have joists atop with 1x lattice. ive had a hard time finding pure vinyl or similiar products in my area(chicagoland) because ill have nine columns (polycast), grid pattern spaced 10' apart and joists with lattice that have to span 10-12', so wrapping these in aluminum may be my only choice for ultra low-maintenence.
how high are you pouring into the columns? i'd imagine a good two feet would eliminate any sway issues....but do you think those little bolts in the bottom are good enough to keep it from cracking under 'normal' situations....Dan Lynn, Dan Lynn Construction, Joliet, IL
QUOTES TO LIVE BY: 'The bitterness of poor quality lasts far longer than the sweet taste of a low price....' 'Anything worth doing is worth doing well' "If it was easy......ANYBODY could do it"
I think I went up 2-3' with the mud. The little bolts and screws in the bottom are ONLY for alignment during the concrete placement.
Forrest
I forgot to ask earlier but how are the beams fixed to the columns?
Mike
Cut a disk of 2x material to fit tightly into the top of the column. PL adhesive and lots of screws and through the top into the edge of the disc - like maybe 12-15, spaced radially.
Then the beams were thru-bolted from the top into that 2x disk with three 8" TimberTech screws.
Forrest
Thanks,
The disk fits flush with the column top yea? Not quite picturing the beam to disc connection. What dimension of beams? I'm thinking 8". Too big for an 8" screw to go from top to bottom.
Sorry, I'm missing something.
Mike
Edited 12/4/2008 3:52 pm ET by MBaybut
I did countersink the bolt head down with a 1" spade bit an inch or so in the beam, then Bondo over.
Forrest
Forrest,
Hate to be an anorak about this but I've just tried a google search for 8" TimberTech screws and nothing came up as regards an 8" screw. Is it a screw or a bolt. So I'm picturing a 8" deck screw going through 8" beam (1" countersunk)so it's only penetrating the disc 1"? I'm really interested in your method but I think I'm not picturing it right.
Mike
Here's what I used - http://www.grainger.com/Grainger/items/1NA90
View Image
My local lumber store carries them, luckily. I can run them in with a battery impact driver
Forrest
Thanks,
I guess the idea is not to show any hardware? Did you do the same for the rafters?
Mike
Forrest,
Just looked to see if the was a supplier near by, would you believe there's one next street to the lumber yard I go to.
Thanks again.
Mike
i know they are placement, i was referrring to any movement in the columns might put pressure on the bolts and possibly crack the column bases if the cement didnt go up high enough..Dan Lynn, Dan Lynn Construction, Joliet, IL
QUOTES TO LIVE BY: 'The bitterness of poor quality lasts far longer than the sweet taste of a low price....' 'Anything worth doing is worth doing well' "If it was easy......ANYBODY could do it"
I think that one in the back corner is out of plumb by a good quarter inch.
;)"...craftsmanship is first & foremost an expression of the human spirit." - P. Korn
CaliforniaRemodelingContractor.com
cool, very resourcefull
there's no need to reinvent the wrench
McDesign - everyone should read this - the detail is fabulous - what a lot of work but it is rock solid in design. I really like the way you put this together. All the Best - D
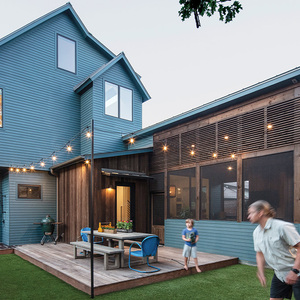
Thanks! Did you see it finished?
View Image
Forrest - used to do that
Edited 5/2/2009 1:02 pm ET by McDesign
I forget the trade name of them garden benches with the scrolled back, but I had a customer contract me to make 2 of them, scaled up to 7' long and 42" high at the crest. They were sofa frames, all 8/4 cherry and I rolled bendy ply and veneered w/cherry on the arms.
After I delivered the first one ( small truck back then) his DW contacted the upholsterer and when they got the price for custom cushions they about shatted. The cushions we're more than I charged to make the wood part!
He tried to CANCEL the remining sofa ( I had it made already) and I said something along the lines of "Ummm, no, that will not be an option" ( I had just seen my bud get killed in a Motorcycle wreck, and wasn't ina very good mood, and I was covered in blood, when the phone rang)..."Matter of fact, is that not only not an option, if you even think of stiffing me, I will feed you this couch splinter by splinter" Told ya, I was in a bad mood..
So he accepts delivery and paid me..a week later calls and asks if I could come and cut the legs down, they are too tall for his liking...I went back into the "feed you the splinters" mode..LOL
Anyway, your pic reminded me of that guy ..I have to scan the pic I have of the frame in the shop.
Sphere-reminiscing.Spheramid Enterprises Architectural Woodworks
Repairs, Remodeling, Restorations
"If Brains was lard, you couldn't grease much of a pan"Jed Clampitt
View Image
McDesign - no, I did not see the finished product - I appreciate the work effort = digging out the 12x12 footing for the column bases after the stone is in -- it is hard stuff to do; I especially like the small angle brackets that are then screwed into the set-up concrete - that is exacting work that few appreciate. Neat to was the re-bar sticking out of the base the columns set up and then the interior of the columns filled to 2-3 feet it all tied in and should last forever and be rock solid. Am always curious about the transfer form column to slab - I now have a new way.
Not much is made today that has this kind of thought.
I did the ceiling that and you commented: "Great! Ceilings are greatly overlooked for decorating. Or maybe underlooked?" 112526.3 in reply to 112526.2
I like the detail and every time you can see it but very few appreciate - it just takes so much time -- Tks and all the best - Dudley