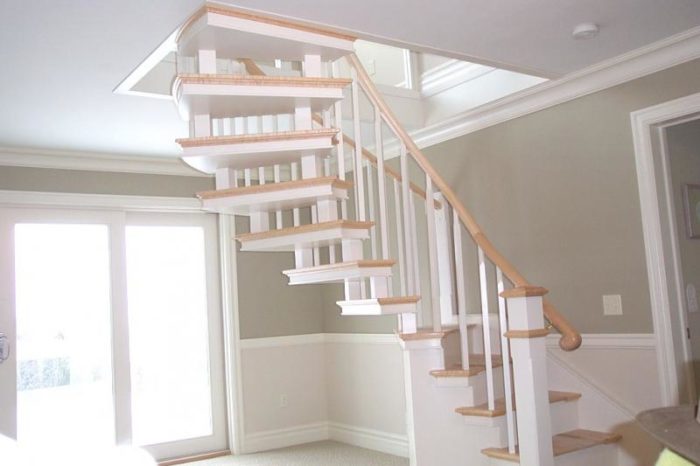
Over the years I have built several freestanding spiral stairs. The usual inside and outside laminated stringers. This client wanted something more open looking and left it pretty much up to me how I ended up with the intended results. When I first looked at the site it left me with a feeling of dread, as the framed in opening was way too small to build anything functional. The stairs was to service a third floor loft area with a spectacular view of the harbor. My guess is the loft area was an afterthought and the framer was not into creative solutions since the initial opening was a scant 36 x 44 inches, maybe enough space for a ships ladder. I managed to talk the builder into increasing the opening to 46 x 84 inches. Still not enough but about the best that could be had after the fact. To further complicate the project, because of my schedule I couldn’t get started for another 8 months. In that time span the owners moved in, carpeted the second floor and installed a cork finish floor in the third floor loft, fully furnished and occupied. I started out making full sized templates and story poles realizing I didn’t have much wiggle room for mistakes during the install. Once I was back at the shop I proceed to layout the unit full scale, none of my conventional methods worked, simply not enough tread width or to steep to be safe to use. In the end, in order to gain a little extra tread width I settled upon half of an ellipse as opposed to the usual half circle layout. The end result was a very small comfortable to use staircase that fit into the setting nicely.
Treads are birdseye maple ends/carpet center/painted undersides. Hard maple raillings with Birdseye maple balcony caps.
Photo’s of completed stairs
Edited 3/1/2006 4:35 pm ET by riverman


Replies
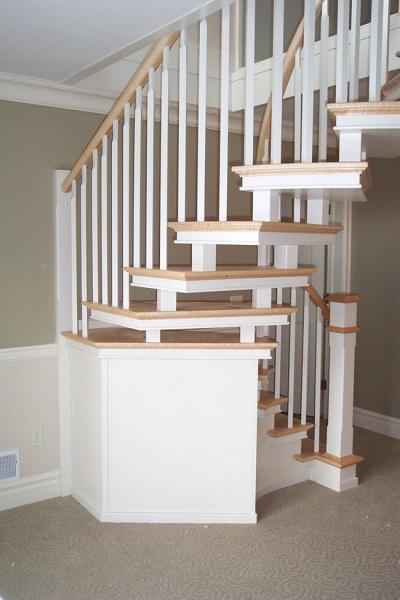
Detail photo's of birdseye/painted treads and underside view of treads.
I am just an old cabinetmaker from " knots" who is in trouble with his retirement shop (see block basement shop?). I have been here before -for 40 years- I am the guy who hired the architect, the engineer and the GC and tried to not let the GC eat my lunch or the sub's. yet still get it done. I have seen some very smart work but your staircase is really outstanding and I truly understand the sensitivity of a residential job vs. commercial. My largest commercial scope was unfortunately the technology and engineering for 8 floors of tower 1 WTC. (93-100) I lost a lot of friends.
You stair has a fit and finish-forget the engineering- that sparkles. I HOPE the client appreciated the effort. all the best, Pat
Third floor balcony, glass panels, upper newel and duck bill rail return. I added a bookcase on the back end of the left hand balcony rail. The front half is stepped back allowing the rail to climb over onto the floor, gaining 3 inches in width. The duck head or duck bill rail return is something I stumbled upon as I attempted to make the best of a bad situation, as in, attaching the rail to the newel in a code approved manner without looking like another off the shelf home depot rail fitting.
Ahhh, for one week to have your ability! Nice stuff! DanT
All I can say is, WOW!
Can you tell us some of the structural side, like how you built in the strength and rigidity needed?
How much did all that birdseye stock cost you? I just made a 3'x3' picture frame of the big house with walnut stripes and it was $100. Great work and good taste with the birdseye.
How much did all that birdseye stock cost you?I live where the stuff grows and buy it by the trailer load so for me it's not all that bad if you don't factor in the time it takes to find it. This project used about $200 of the really nice stuff.
Well next time you pick up a trailer load keep me in mind.
Beautiful, Armin.
Hey, is that one room the entire third floor? You have any photos of the view from up there?Tipi, Tipi, Tipi!
Hey, is that one room the entire third floor? You have any photos of the view from up there?It's one big room, my guess is 12 x 30 full 8 ft. ceiling. No I don't have a view photo, looks to me you can see about 10 miles of shoreline. I will get one when I return for phase 3.
way beyond cool... reminds me of that miraculous stair in Santa FeMike Smith Rhode Island : Design / Build / Repair / Restore
Wow , nineteen and not one .
I was thinking that that would be a good setup for a tight spiral stair and no pole in the center.
Very nice.
Armin: Just further proof you are the best I know in this business. Simply stunning......
Stan
Beautiful work, Armin. Very slick solution for an awkward area. I love how the treads connect. On first look they seem to defy gravity. Musta spent more hours thinking it through than building it!
Thanks guys for the compliments. I'll post more on the inner workings as soon as I get back into the shop and sort through the boat load of construction photos.
Edited 3/1/2006 7:42 pm ET by riverman
Musta spent more hours thinking it through than building it!
You got that right, I nicknamed this project "My insomnia stairs"
Abo-friggin-lutely awesome! Very impressive. I have saved this for future reference just in case I'm ever able to "play" like this. Beautiful work.I get paid to do carpentry. That makes me a professional.
If I work on my own house does that make me a DIY?
Absolutely awesome, maestro!
"Citius, Altius, Fortius"
Very impressive.
At first, I thought this was going to be a lame thread asking how to build an open tread, stringerless and columnless spiral stair. I was prepared to answer that it could not be done. Oh "contraire mon frere!" You have proved me wrong on so many levels and with great elegance.
Bravo!
How did you connect each tread? Did you use threaded rod?
Frankie
There he goes—one of God's own prototypes—a high powered mutant of some kind never even considered for mass production. Too weird to live and too rare to die.
—Hunter S. Thompson
from Fear And Loathing In Las Vegas
You got any pics of it under construction in your shop?
Your duck bill return should have an inlaid eye. ;-)
!
I'm not sure what else to say- fine work, creative design.
zak
man... i use to think most anyone could do most anything... with basic skill sets and time... you are so far beyond what i think 99.9 % of "normal" people could do ... ur in the super human space.... do you rock back and forth and play classical piano with no lessons also?
if i was pick'n new heros...
I'd wish i could do work like that but if i had those kinda wishes I'd rather spend em on the lotto and then watch you do it for me....
great work
P
Armin, that is really something, nice touch upon nice touch...can't see why you couldn't work with the original space, though<G> Hey, pocket doors can't come off the track if they're nailed open
Did you use nails or screws? ; ^ )
Mike
Trust in God, but row away from the rocks.
Did you use nails or screws? ; ^ )That's funny, you must have read some of the joist hanger thread bs.
Photo's of master newel. Since I had no way to tie into the existing framing I opted to secure the newel to the floor and stair stringer using a weldment. Unfortunately I didn't take a photo of the steel before I set the first tread. The upright is a 20 inch section of 1-1/2 x 2 x 1/8 wall rectangular steel tube welded to a 6 x 14 steel base plate with a wing welded to the side of the tube enabling it to be screwed to the stair stringer. Connection to the floor and stringer utilized 21 #14 Spax screws. The wood newel is fastened to the steel tube by way of 4- 5/16 socket head screws hidden by the white buttons visible in photo 15.The rail climbed at such a steep angle I had to move the rail out another 1-1/4 inch so a persons knuckles would clear the newel post cap. I ended up merging a turned birdseye bracket spacer with the newel trim.
Nice!
I I have trouble framing a straight run of stairs. Laminated a 15" radius once, no fun at all!
Jim at Great White
WOW!!
Raises a lot of questions.
How do you charge for something like that.
My question is this: Did the homeowners' say, "WOW!" I mean, did they understand that a mastercraftsman did the d@mn near impossible and made it beautiful to boot? Inquiring minds want to know.
Jay
Beauty runs deep riverman.
I'm hoping to understand what you are about to explain.
Gord
Wow, beautiful! Seems to defy gravity! Nice work!
Extremely impressive work. I hope you know that talent such as yours exists in only a select few. Unbelievably beautiful. I hope you charged accordingly and your client appreciates what you did for them.
The CM
Thanks one and all. Several posters asked pretty much the same question, in different variations, as you did. As in "I hope you charged accordingly and your client appreciates what you did for them."As to how I charge for something of this nature: I have been at this for over 39 years so I can pretty much tell how many weeks it should take based on something of similar size and complexity I had built before. The staircase in this thread was something new, something I have wanted to try for many years. In most cases it’s difficult to sell an idea that is totally out of the box and when I found that rare client who was willing to give us the freedom to build something different no questions asked I jumped at the opportunity. I built the main staircase in their house a year earlier and could tell they would recognize and appreciate what would go into building this one. The client had no clue what they were getting until I installed it. The WOW response was well beyond what I expected. I made money on the deal, not as much as I should have but I went into it for the experience and the opportunity to work out the bugs for an upcoming job that will utilize many of the structural aspects of this one. I learned more on this project than I had in the past ten years combined, shortcuts and timesavers that will make up the difference in profits down the line.
Can't wait to see how you built that Riverman ..
I'm not sure if I should bother with the praise, as it is obvious that you have exceeded everyones idea of what is possible. Great stuff, thanks for sharing!
I know it's not polite to talk money, and that it's all regional anyway, but I am impressed with the seeming amount of time this would take. Did you track the hours of design, build and install?
Can't wait to see the build pics! And a view shot somewhere down the road would be cool too. Thanks!Jake Gulick
[email protected]
CarriageHouse Design
Black Rock, CT
Did you track the hours of design, build and install?Yes I did but since it's a prototype it's kind of meaningless. Lots of wasted motion and trips back to the drawing board. Once I blew past the point of no return I had no other choice but to soldier on and make the best of what I had started with. I'm planning on doing a second one minus the self inflicted snags and feel I could do well at 16 grand plus mileage for delivery which is comparable to what I charged for the other freestanding units we built.
Riverman,
Those stairs are incredible.What does this situation in my life ask of me?
I'll do my best to describe the details of construction. This may take a while and if anyone has questions along the way feel free to ask. I wish I had taken more photos along the way but time has a habit of running away.The inner core of the stair system is welded steel tubing. 2 x2 for the horizontal members and 1-1/2 x 2 for the vertical riser tubes. I welded up frame sets to take the place of conventional risers. Once I had the required number of frames I built support staging on the full-scale stair layout drawn on a sheet of Masonite. The treads (OSB) are cut to size based on the template and set upon the staging. Once I had all the risers in place I cut the tubing to size for the tread stretchers (not shown in photo). It’s not apparent in the photo but since the stair is laid out on a half of an ellipse every tread spreader is at slightly different angle. The finished tread at the line of travel is uniform however because of the ellipse there was no way to mass-produce any of the tread sections. Once all the parts were fitted to size I moved everything outside and welded the joints together.
Once the staging was reset outside I started welding the sections together and removing the supports as I went. The top section was screwed to the side of the barn and the bottom frame screwed to the template setting on a level base tapconed to the slab. Because the stairs were to be installed in an existing occupied home connecting the second and third floor I opted to build the steel carriage in two sections.
The first section comprises of treads one through five. The vertical tubing frame on the lower left is the outer edge of the first section. More photos on this later. Threads six through twelve make up the upper section. The two sections are through bolted with three socket head bolts. Once the welding was completed and all joints checked I lowered the upper section with the tractor, painted the frame and moved the two units back into the shop. Incidentally the upper section weighed 140 lbs. Lightweight and strong, the big plus of steel tubing.
Edited 3/3/2006 8:58 pm ET by riverman
The two sections positioned in the shop ready for the woodworking phase. Note the master layout template on the floor. This template was used through the entire construction phase as well as the final installation. Once at the home site the template was positioned, checked and double checked and finally with sweaty palms the hole in the carpet was cut.
armin... slick !
is that an 8' Stabila hanging on the wall?
View ImageMike Smith Rhode Island : Design / Build / Repair / Restore
No it's a 6-6 jamb level. I thought about springing for the 8 ft builders level but decided I would be better off with a straight edge long enough to span floor to floor which also doubles as my story pole for riser layouts.What's the trick for posting the pictures with the text?
click on your attachment.. when you can see it, right click it to display a menu
choose "copy" hit your "back " button
then go to the bottom of your post and choose "edit"
when you get to the edit.. scroll thru until you want to insert your photo
go to the top of the screen & select "edit" ....choose .... "paste"
it will insert your photo..
go to the bottom and click on "apply" then "continue"
it's actually faster than the description
View ImageMike Smith Rhode Island : Design / Build / Repair / Restore
detail of base section underconstruction. There is a fair amount of steel bracing hidden behingd the framing. The base is screwed to the floor with 24 #14 spax screws, into the joist whereever possible.Thank's Mike. I Must be doing something wrong as I get a "can't copy message". Will try again in the morning.Edited 3/3/2006 11:28 pm ET by riverman
Edited 3/3/2006 11:34 pm ET by riverman
you juxtapose your finished pic..
View Image
with your shop pic...
View Image
and you can almost develop xray vision
no matter ... the finished stair is really gorgeous...
'bout 3 months 'till spring in the uppa ?
Mike Smith Rhode Island : Design / Build / Repair / Restore
Edited 3/3/2006 11:31 pm ET by MikeSmith
Very very cool. Getting that stair to look so good, and be so well finishe dAND be code compliant was a real trick. Again, nice job. And, I would say that you didn't charge enough!Jake Gulick
[email protected]
CarriageHouse Design
Black Rock, CT
Really, really sweet! As soon as I saw the first pic, I knew there had to be some steelwork goin on in there.
Once again, you have done it. Made the best damm staircase I have ever laid eyes on.!!!
Spheramid Enterprises Architectural Woodworks
BEAUTIFUL WORK!
1 question: Is the span bouncy?
1 question: Is the span bouncy?No bounce at all, like none. At a later date I'll post pic's of how I did it. Not that it would fit but you could carry a piano up there and it wouldn't flex.
You dun good !!!!!!!!!!!!!
34&0
enough already....we are dying to know how you did it.
Just about the time I start to get a little bored with the building business, I see something like that!!
That is not only incredibly beautiful, but the challenge of designing something like that is what turns me on.
I hope you can post some construction pics.
Now if I could find a client who could afford something like this........
Maybe I need to add another story to my house???
Armin
Those stairs are simply beautiful!
Very well done
Doug
Just FANTASTIC! Please inlcude more photos! The attention to detail, like the trim circle under the rail support, just pushes this one beyond cool. Oh yeah, then there is that little floating-that's-not-possible effect! Just inspiring....that's not a mistake, it's rustic
Truly a masterpiece........you should be proud.
You, my friend, are an artist disguising yourself as a carpenter.
I see people referring to you as Armin. Are you the famous Armin Hammer from the old(er) days? Your work is really inspirational. I wish FHB would show more work like yours in the mag! That, my friends, is fine home building...
Hey, it ain't rocket surgery...
the very same.. think we can lure him down to andy's for TipiFest ?Mike Smith Rhode Island : Design / Build / Repair / Restore
think we can lure him down to andy's for TipiFest ?Me thinks you just want to watch this flannel shirt yooper walk around the city staring up at the tall buildings.
pssst... looka armin... what a strain he's puttin on his adam's apple
nah.. i just wanted to drink beer and swop lies with youMike Smith Rhode Island : Design / Build / Repair / Restore
Mike, Armin passed through here maybe two yrs ago. I managed to get him to pause long enough for those couple beers and a burger at Dales.
I will say this. He can pack more stuff under the cap of a (ranger) p/u than any known man.
He does not have a 6-6 mouth/5-6 body.
Softspoken and a good time.
I tried to lie cheat and steal to get him down here for a disertation at Riverfest. I almost had him and his wife convinced to make the treck down, but the well over a thousand miles to the U P must have been too much with the workload. If we can get his daughter in law pregnant last month, there's a chance he could take a turn after being there for the delivery.
Let's see if Andy C has better luck with the enticement.A great place for Information, Comraderie, and a sucker punch.
Remodeling Contractor just outside the Glass City.
Quittin' Time
well, i can dream , huh ?
now... we gotta work on fusco ... how about it vince ?Mike Smith Rhode Island : Design / Build / Repair / Restore
Fusco?
Well, if'n he were in the mood he can't be more than a couple blocks and maybe a ferry ride away, no? We could go get him if we could figger how to unlock the fence. I'd like to meet him and very much would like to meet his daughter-the one that posted while he was incommunicado way back then. She sounded like a nice smart girl.
Could John T8 maybe do one of those flash things with Vince roaring up? He could use it every year as sort of a marketing technique.
Two jumbo buckets in restless anticipation-12 bucks early bird. All you can whack in an hour.A great place for Information, Comraderie, and a sucker punch.
Remodeling Contractor just outside the Glass City.
Quittin' Time
I think Joe moved...up to New Hampshire or something, didn't he?
I thought he was planning on attending Rhodesfest but something came up. I was disappointed, for sure. Tipi, Tipi, Tipi!
http://www.asmallwoodworkingcompany.com
I thought he was planning on attending Rhodesfest but something came up
Yup, his house burnt down.
But I think he's rebuilding on the same spot, correct me if I'm wrong.A great place for Information, Comraderie, and a sucker punch.
Remodeling Contractor just outside the Glass City.
Quittin' Time
Cal, thanks for the great review. Had I known you would be so enthralled with my truck loading job I would have stopped in town, picked up a few empty boxs and jambed them into the remaining spaces. As it was I had to jetson a few minor items to make room for some baked goods at the awsome bread joint it town.
That be me, the product of many long northern michigan winters.
Great stuff .Keep it coming.
I had trouble copying pictures at first .I kept trying ,no luck .I decided to resurect Internet Explorer(I was using firefox)I can copy with Internet Explorer but not Firefox.
Hope this helps.
Cool I'll try that later, thanks
Armin, thank you for sharing that inspirational project with us. Your skills and craftsmanship are nothing short of spectacular.
How many miles are you from Oakland county, MI? I'm trying to figure out how much I need to get one of these.
blue
Thanks Blue, round numbers about 400 miles.
A freestanding spiral stair is only as ridged as it’s connections to the house framing. The base at the bottom acts like a torsion box and if properly constructed will carry pretty much most of the load on it’s own. Usually while under construction I bolt the steel base components directly to the shop floor while the top is only screwed to a header in several places to keep it from drifting out of line. The size of the base is determined by how positive a connection can be made to the floor framing. In this case I was hampered by the fact this was a retrofit staircase and tying into the floor framing by adding extra steel below the floor line was not an option. Thus said I opted to integrate the torsion box effect into treads 1 through 5. Photos below show the extent of the wood framing surrounding the steel components. The base steel consists of a 1-1/2 x 2 steel header supported by three vertical tubes of the same cross section. Welded to a base frame of 2 x 2 x ¼ angle iron. The vertical tubes are angle iron braced to the base in two places.
Unfortunately the photo I took of the steel torsion detail did not make it into the computer files.
Edited 3/4/2006 11:04 pm ET by riverman
I was going to say, you post pic's of your dog in bed but not the stairs.LOLJust to add to the wealth of well deserved accolades: Fantastic job!The steel structure alone with glass treads would make an awesome stair too.
The steel structure alone with glass treads would make an awesome stair too.That idea was tossed around until my engineer friend asked "What are you going to call it; The beaver view?" After that I decided not to mention it to my lady client.
LOL!Some of the Apple computer stores have glass stairs, but I beleive the glass is sandblasted, probably for that reason.
To give the screws some extra meat to bite into I screwed and glued a sub-base of ¾ plywood over the existing ¾ OSD sub-floor catching as many floor joist as possible.
Well, some of your "how to" posts and Stan's posts from a few years ago gave me the courage to attempt a spiral stair in my house. I should have it done in a few more weekends. But it's like a kid's bike with training wheels compared to your Mercedes.
Hey, it ain't rocket surgery...
Armin: I am still in awe of your most excellent display of craftsmanship....and the high level of patience to achieve what you have done here.
You are hands down so far out in front....I cant even see you.
Stan
Edited 3/5/2006 3:22 pm ET by StanFoster
Ya, but could he build a gyrocopter??
good answer !Mike Smith Rhode Island : Design / Build / Repair / Restore
Steam I could do, however, if its got a gasoline engine on it count me out. Come to think of it a wood fired, steam powered gyrocopter would be a sight.
Bo: Armin could build that gyro....and it would be even better. NOT even a doubt. I know when I am about at my limits.....
His display of stairwork has me looking a lot closer at myself..... would I have taken on such a project? My answer probably would be I would .....but I am 100% of our family income and my bid would be so cautious....I doubt it would have been accepted.
I would have been in la la land taking on such a masterpiece. But Armin truly is by far the best qualified for such a project.
Stan
Stan, we've seen enough of your work to know that you can do pretty much anything you want. You and Armin are the "stair masters" (so to speak). It'd be like trying to decide between a date with Kathy Ireland or Elle MacPherson. Well, sorta like that... ;-)
Hey, it ain't rocket surgery...
Stan, I think he just called us "girlie stairbuilders" LOLCrash, I'm more like a Helen Hunt type of a guy.
Hmmm... good point. And after seeing Stan's picture in his copter thread I'm thinking "Mrs Captain Kangeroo..."
Hey, it ain't rocket surgery...
Here's the proof...
Hey, it ain't rocket surgery...
Thanks again Stan. I cant even see you.A lot of that has to do with the glare from my bald head.A couple of under construction shop photos
photo of the balcony book case end.
Is that cork flooring on the top floor or are my eyes just goofy?
Jon Blakemore RappahannockINC.com Fredericksburg, VA
Your eyes are darn good, that's cork. First time I ever seen the stuff. Quiet and warm to walk on. Don't know how durable it is but it looks pretty cool.
That reminds me of the two blonds discussing if florida or the moon was closer . Their conclusion was it had to be the moon because they could see the moon.
Hey Hey, I used to be a blonde before I lost it on the headboard.
Same two blondes happen later to approach a stream from opposite sides.
Blonde #1 ' How do I get to the other side?'
Blonde #2 "You're ON the other side!"
"Citius, Altius, Fortius"
Photo 1 Outer rail glue upPhoto 2 inner rail blank finished, outer rail clamped
I have a couple of questions about your railing glue-up. Have you ever done this using a vacuum bag and/or do the clamps give you an advantage over the bag? Are the red painted supports something that you use for all your glue-ups? And finally, what processes do you use for final shaping of the rail? Thank you for sharing this work. I've done a few railings, but never the full stair. Well done.
Have you ever done this using a vacuum bag and/or do the clamps give you an advantage over the bag? Are the red painted supports something that you use for all your glue-ups? And finally, what processes do you use for final shaping of the rail?Jeeze you guys are one step ahead of me. I'm working on another thread "Freeforming a spiral handrail" It's a long winded process so I thought it better to present it on it's own and unless someone suggest otherwise I'll post it in the Construction Technique section this weekend. As to the vacuum bag, I have tried it and didn't like the results. The laminate joints are not as tight as using rail clamps. I believe it's because the laminates are narrow and under so much strain that there is insufficient pressure to pull them tight. When you consider I space my clamps as close together as I can get them, sometimes 100 clamps per rail, 22 laminates at a time a bag system will not be able to pull everything together. I'm sure someone out there will dispute this but it has not worked for me. Whenever possible I resaw my rail laminates from one plank so I get a nice grain/color match the last thing I want is gaps and fat glue joints. I still use the vacuum bag for large diameter stringers but never for railings.
photo of stairs under construction, both inside and outside rails set.Also photo of underside, note balusters are screwed from the underside and covered after installation with the bottom tread cover.
This is a really interesting project to me .Like nothing I have ever done.Those are the kind I love.I noticed a few pictures back those red bracets on the treads,I am guessing they are what you use when you glue the rail laminates,are they bolted down?Where did you get them?
After you glue up the rails what do you use to shape them?
Are your clamps insured?
Thanks
Rick
View Image
View Image
Thanks RickI am guessing they are what you use when you glue the rail laminates,are they bolted down?Where did you get them?After you glue up the rails what do you use to shape them?They are C-clamped to the treads as needed, in this case, since the center of the tread will be carpet I used one screw through the plate to eliminate one clamp. I welded up my own, use them for a lot of similar tasks such as curved jambs, trim anything that needs to be bent lamanated. As to the shaping of the rail, I have another thread in the works, free forming a spiral handrail. Will post it in the Construction Techniques section by the end of the weekend, should give you a good idea of what my method of madness is.
Earlier in the week it was "...post it this weekend." Now that Friday afternoon is here, it's "...post it by the end of the weekend". Glad to see I'm not the only one paddling wildly just below the surface. <g>Tipi, Tipi, Tipi!
http://www.asmallwoodworkingcompany.com
post this weekend covers up to and including the end of the weekend. Didn't realize I was keeping some of yous guys in suspense. Ya would think I was gonna post a thread on rebuilding the grand staircase in the playboy mansion or sumptin.
"Ya would think I was gonna post a thread on rebuilding the grand staircase in the playboy mansion or sumptin."Only if you were using Hugh's helpers to do the job!
Didn't realize I was keeping some of yous guys in suspense. Ya would think I was gonna post a thread on rebuilding the grand staircase in the playboy mansion or sumptin.
I think your project here is beyound anything I have done but its simple enough I can almost grasp it.The way your breaking it down.Your working in a relm I strive to be.Don't know if i will get there.But I have done a lot of things that at one time I did not think possible.A Grand master in Taekwondo used to teach ,today not possible,tomorrow possible.
But I have done a lot of things that at one time I did not think possible.I agree. Sometimes I feel like the proverbial Darwin wood monkey, having crawled out of a sawdust bin and evolved over time. Looking back think I could have built this 40 years ago however my guess is the fit and finish would have been a tad primative. Not to mention the size of the scrap pile would have been huge.
My local (and well paid) hardwood supplier calls that process "making designer firewood."
Riverman:
I've built a curved rail or two with a pitch change, but I doubt I'm qualified to sweep the floor of your shop. I could possibly carry Stan's tools from the truck to the house, if the master would allow.
I am grateful to share the same state as you and Blue.
Thanks for the inspiration.
i didn't think the uppa was the same state .....Mike Smith Rhode Island : Design / Build / Repair / Restore
Lol, ya sure you betcha you been here.
Don't even mention my name in a post to Riverman. He's forgotton more stuff than I'll ever know.
My skills don't even compare.
I'd spend ten months building that set (if I could conceive of it) and it would cave in and look like a kindergardnew built it.
blue
He's forgotton more stuff than I'll ever know.
Talk about forgetting. I forget more stuff than I care to admit, like where I put my pencil, tape, and coffee mug, worse yet I spend as much time looking for my truck in the parking lot as I do walking the isle at HD. I wish someone would think about us old farts and invent a GPS for misplaced tools.
invent a GPS for misplaced tools.
We'd lose the GPS!
blue
I'm helpin on that job ,If I havta pay .
You just wanna be a body guard and I'm not talking about guarding my body either.
More like body grope
Let's see some photos of that thing, Roger!Tipi, Tipi, Tipi!
http://www.asmallwoodworkingcompany.com
Jim,
Pretty soon. I should finish the carpentry on it this week and then it's paint and urethane. I have a few other "finishing touches" as well.
Hey, it ain't rocket surgery...
Armin:
This is indeed beautiful work. Can you tell us a little about any "engineering" calculations done to confirm the strength of the structure and/or any dealings with city/county/etc. on code compliance and structural approvals?
--Ken
Can you tell us a little about any "engineering" calculations done to confirm the strength of the structure and/or any dealings with city/county/etc. on code compliance and structural approvals? I have a fair amount of experience in metal working so I had a good idea of what I needed to pull this off. Once I settled on the design I submitted the drawings to a friend who works in the engineering field, he ran the calculations through the company computer and determined that my original design, with a third set of tubing at the line of travel, was total overkill. Which was good news since I needed to cut down on the weight as much as possible. I don’t know what program they used but I was informed if required I could get a certified stamp, however if I didn’t need it I would be money ahead. Calculations aside the weak link is welding the joints, I decided to error on the side of caution and weld gussets over all the joints. In some parts of the country, the welding must be done by a certified welder. If that turned out being the case I was prepared to tack all the joints and haul it to town and have the deed done as required. Armed with this info I went to the building department and presented my project knowing I could get an engineers stamp faxed to them if needed. The staircase is pretty small and so all they asked was that it passes a fully loaded field test. We ended up having 6 people stand on the stairs at the same time and it was signed off without a hitch. I do know in some areas of the country it’s not that simple. The best approach is to do your homework and be prepared to answer the building departments questions in a professional manner and be prepared to furnish the required data if asked for. In extreme cases the cost of the required engineering certification could kill the project. Best to let those project go unless the client wants to pay for it.
how did you get that into the house? did you move the finsh stairs as a monolithic unit? or did you stage everything in your shop, tear it down, and perform final assembly on site?
i am very interested to know, especially after see you use the tractor to lift the subframe.
The heaviest section weighs 140 lbs. The steel is two parts, what you see hanging on the tractor is the upper section, the base weighs about the same but is a bit more bulky. It's pretty much knock down, delivered pre-painted and finished. A few photos showing the tread install
I am just in awe.
Some things some people are capable of is amazing to me.
-----------------------------------------------------------------------------
WWPD