First of I want to thank you for your help with this question. I’m just a homeowner with no professional experience on the construction field.
Situation: 20’x30′ Garage 10′ walls 8/12 pitch.
Location: Orlando Florida.
Goal: Add attic space for storage and light traffic using 2x12x20′ SYP joists.
See attachment for what I plan on doing and tell me if it makes sense.
Sergio
“Portugee” woodbutcher
Edited 2/8/2008 8:16 pm ET by Portugee


Replies
post pictures of inside of garage. rafters.
This is what it looks like.
Just looked at the pic again... Question: Currently are there any horizontal members tieing the (L&R) rafter pairs together?
Only collar?? ties if that is the correct name for them about 1/3 down from the peak of the roof.
Sergio
You need this floor system to be installed - just to keep the walls from spreading. And if you want to install them below the wall's double top plate that's fine but face nail them well into the wall studs. How wide (overall) did you say the building is?
How long has the structure been up? I'd be curious to know if the fascias along the 2 long sides the the ridge board are still straight...
I think riversong has got the proper way to frame this as building is built. My concerns are 2x12 20' long. If you put the 2x12's on top of top plate you will have to cut the tops to correspond to roof pitch. This will actually reduce the strengh of 2x12 down to equivalent to 2x6 or 2x8. 20' long 2x12 will have quite a bit of bounce. I think poor choice. For clear span I think you have to go to engeneered floor joists.
sorry to post last message to you. By the way, coller ties are meant to keap walls from spreading. I'm trying to understand how and where you came up with, that they don't? Am willing to learn.
You are correct: As you say, 2x12s spanning 20' will be over-spanned.
However, collar ties do not keep the walls from spreading - although they may help a bit. Their purpose actually is to keep the ridge from splitting open in, say a high wind event. A quick Google yielded this as the first hit: http://qcfocus.com/answered-question/collar-tie-purpose
Sometimes collar ties are confused with rafter ties so we could just be talking a matter of terminology here. Collar ties are in the upper third. Rafter ties are in the lower third, and are similar to or the same as ceiling joists. Rafter ties keep the walls from spreading.
This is not to say a roof cannot be built with collar ties only. One way is with a ridge beam (structural ridge). In the pic the OP posted I thought I saw a ridge board - not a ridge beam. Another way is if the rafters are up-sized quite a bit, but this is not the best way to go.
I'm sure others will be along to explain it more effectively.
BTW - My sister lived in a ~circa 1920 story and a half balloon framed farm house. Collar ties and a floor system that was ~ 4 or 5' down from the wall/rafter connection. The perceived problem (by her and her husband) was a bouncy 2nd floor floor system due to over-spanned floor joists (which BTW had been sistered up two times previous). Actually the ridge was sway backed and the center top of the walls that were parallel to the ridge were bowed out. They got an engineer out there to evaluate the structure and the building ended up being condemned and has since had a fatal meeting with a track hoe!
Matt
The garage is 20' wide, 30' deep, hence my "griddyness" with clear spans.:)
Considering dividing the depth into quarters and placing an lvl or other form of engineered lumber with blocking to stabilize things.
Thanks for all the input.
Great information
Sergio
You may find this span table of some use. For what you are doing 30 PSF live load (LL) and 10 PSF Dead Load (DL) will probably be fine.
Here's a drawing I did showing the rafters on top of the joists.Joe Carola
Sorry, but I didn't read your post #9 and see that this is already framed. Your ides is right on. All you need to do is shoot the 2x12's to the stud and up against the top plate and just nail another 2x4 underneath. Anything else is a waste of time.
Now, that will pass inspection where I'm from, so maybe where you're from you might need the other 2x4 to sandwich the joist.
Joe Carola
If you have access to the top of the top plate, you can attach Simpson hangers that will carry a tremendous load. 2x12 is pretty deep - planning on hosting a dance in that space?
Rebuilding my home in Cypress, CA
Also a CRX fanatic!
If your hair looks funny, it's because God likes to scratch his nuts. You nut, you.
Attic trusses.
Woods favorite carpenter
If you can make it look that clean, do that. You will be wise to go extra heavy on this, you'll never have to worry about not being strong enough and the cost isn't really that much more than a 2x10. I would probably even put a big fat lvl or steel beam in the center.
Assuming light storage (live load 20 psf) and good quality SYP #2 or better, you can just get by with 2x12 24" oc, but would be better off placing them 16" oc.
Solar & Super-Insulated Healthy Homes
i'm assoming existing garage. How is going to instal the 2x12 against his rafters. If it were mine I would use 9.5 tgis.
Yes it makes sense.
The question will be: how are you supporting each joist? I would put a stud under each one.
Another question: Will you be boarding the wall? If so, draftstop each cavity.
Another question: how bouncy/strong do you want your floor? You can put less or more joists to achieve your goal.
Bob's next test date: 12/10/07
Sorry if the initial drawing didn't explain things better.
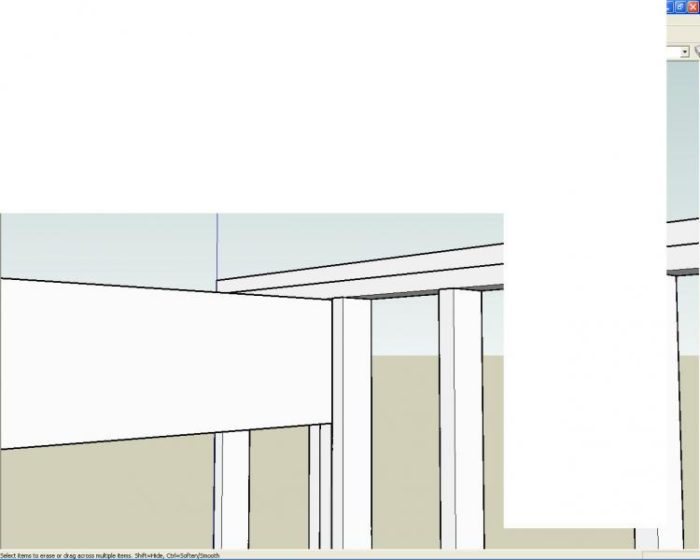
Yes. The existing wall 2x4 are 16" OC so I'm just planning to place the 2x12 top against the bottom of the top plate, supported by a 2x4 and sandwiched with another 2x4 all the way from sill plate to top plate and bolted across.
Hope this makes sense.
Thanks for all the responses.
Sergio
If I wuz doing this, putting joists below the top plate, I'd just balloon frame it -- Face nail the joists to the studs, and put in a 1X6 let-in banding below it. No need for three studs at each joist.
Mike HennessyPittsburgh, PA
"I'd just balloon frame it -- Face nail the joists to the studs, and put in a 1X6 let-in banding below it."
Could you explain a bit simplier:) this is all new to me therefore some concepts just fly right by me.
Thanks all for your patience
Sergio
Balloon framing involves notching into the studs for a 1x4 ledger board (1x6 is excessive) to carry the joists which are also side nailed to the studs (see drawing on right).
View Image
Riversong HouseWright
Design * * Build * * Renovate * * ConsultSolar & Super-Insulated Healthy Homes
Why are you not simply putting the 2x on top of the top plate and fastening it to the rafters and top plates as is standard for platform construction? But what Mike was getting at is making a 3/4" deep x 5 1/2" tall notch in the face of your studs with the top of the notch being at the level where you want the bottom of the joists to be. Joists rest on a horizontal 1 x 6 that is nailed into that notch in the face of the studs as well as having the joists nailed to the sides of the studs.
They can't get your Goat if you don't tell them where it is hidden.
This garage is a woodworking shop wannabe so I figured that 10' walls would be nice, then I got greedy and decided I wanted a attic storage/office so with 8/12 pitch a compromise of 9' ceiling(10'walls minus depth of 2x12 joist) and just about 3" more of head room on the attic.
That was my reasoning, as flawed as it might be:)
Continuos thanks to all of you.
Sergio
Two comments. 1) 10' is a very nice height for a shop, makes moving sheet goods easy. 2) Be careful not to drop the ceiling down so far that a roll up door track (if that is what you are using ) doesn't fit. 1' above door opening is as tight as I have ever seen the tracks work in.
They can't get your Goat if you don't tell them where it is hidden.
From your post I understand that 9' ceiling is not a bad compromise then.
And you are correct about overhead doors 16'X7'
Sergio
Not a bad compromise. Check with your door supplier to ensure the minimum overhead clearance needed. Doing the ledger as suggested and then shown in Riversongs drawing will allow you to add additional joists for more strength fairly easily.
They can't get your Goat if you don't tell them where it is hidden.
The structure has been built. All this attic work is retrofit since my budget didn't allow construction of "dream" building:).
Overhead door already in place and all this will be built as budget allows.
Does cutting into the studs fall into code permissable?
Sergio
Might check with your BI on that one, but I would say yes from my perspective. However, if you submitted plans for the structure and had them approved without the attic storage then you will run onto problems for sure if you don't clear it with the local authority first.
They can't get your Goat if you don't tell them where it is hidden.
Should work OK either with the support stud below each joist or the ledger...
Be aware though that modern framing techniques (and building codes) require that each building assembly be isolated from adjacent assemblies for fire protection reasons - In other words the walls must be isolated from the above floor assembly which must be isolated from the rafters above. What I'm driving at is you need to fire block the walls at the ceiling level and possibly elsewhere to prevent fire from "racing" thorough the structure - in the event that a fire occurs.
"I'd just balloon frame it -- Face nail the joists to the studs, and put in a 1X6 let-in banding below it."
Could you explain a bit simplier:) this is all new to me therefore some concepts just fly right by me."
What Riversong said, but just a bit different than his drawing. The drawing doesn't show the top plate, since it's a drawing of a building that's balloon framed from the start. I agree a 1X4 is probably sufficient -- that's what's usually used.
To do this, just mark the studs by tacking the 1X4 so it's top is just at the bottom of the new joists. Mark all the studs where the 1X4 crosses them, top and bottom. Cut on each mark with a circular saw set at 3/4" deep. Knock out the wood between the kerfs with a chisel. It's easier if you make several kerfs between the top and bottom marks. Keeps the notch depth more constant, even if the grain in the stud is a bit wild.
Mount your joists, nailing them into the studs. Then set the 1X4 into the notches in the studs. Nail that in as well. It's OK to notch the studs this way because the notches are filled in with the 1X4. (This is also how let-in diagonal bracing is installed.)
Mike HennessyPittsburgh, PA
Your third stud is not needed. You could devise an alternate method of supporting the joist, but the simple installation of the supporting stud is fastest, easiest to explain the the inspector and easy to do. Now that you've posted that picture, you might get some other better answers. One suggestion: you don't have to hold the joist up to the top plate. You can drop the floor as low as want (within reason) and create more space in the attic. Bob's next test date: 12/10/07
I don't understand why you're not putting the ceiling on the top plates. If you're worried about cutting the slash cut on top of the 2x12's, just nail a box around the top plates and install the 2x12's like floor joists and then nail a 2x4 plate on top of the joists and nail your rafters on the plate.
>> I don't understand why you're not putting the ceiling on the top plates. <<
I think he wants more head room in the attic, and with the current 10' high first floor walls he is willing to sacrifice a foot or so of head room on the first floor.