Over the past few years, I’ve shared a number of projects on my 1830s home. My wife and I have finally gotten the interior closer to a “finished” state, so here’s a tour of some of the downstairs rooms. We’ll eventually be adding wallpaper, artwork, etc.
I’ll follow-up with some construction shots.
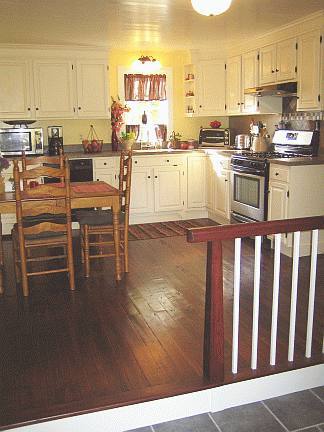
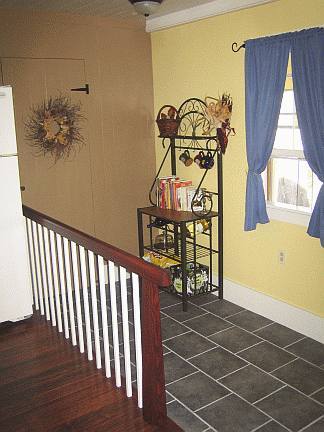
Here’s the kitchen, as one enters from the east porch. We rearranged and painted the cheap 1980s cupboards, changed knobs and replace the sink and countertops. I ripped up the vinyl floor and sanded, stained and varnished the old planks. And added the tile and bannister for the “mudroom” area:
This kitchen view is toward what once was the only bathroom in the house (wreath on plank door). I lowered the floor in the mudroom area to the original 1830s kitchen floor level. The salvaged 6-over-6 window replaces a 1980s vinyl one:
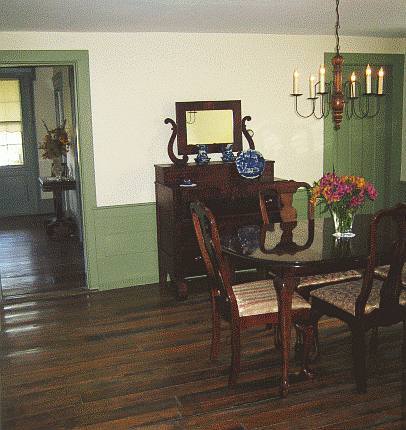
Entering the dining room from the kitchen, facing toward the east parlor. Original woodwork and chestnut floor:
This wall, doors and woodwork is my replica of what was removed in the 1980s:
The dining room view back toward the kitchen:
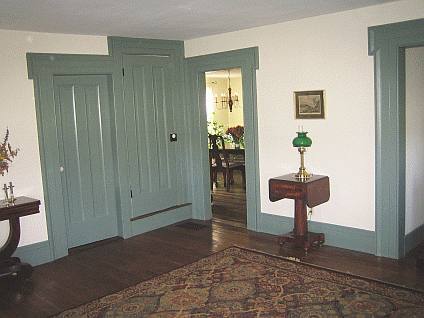
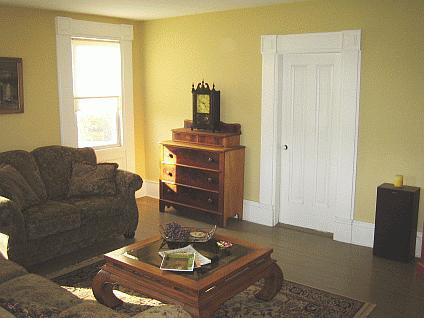
Entering the east parlor from the kitchen. All original windows and woodwork here, as is the chestnut floor which I lightly sanded and shellaced:
Facing east in the east parlor. Windows and trim are original; I’ve replicated the woodwork surrounding the restored “niche.” The woodstove will eventually go to the correct original location (where the dresser is now):
Back toward the dining room are doors to the stairs and to what was likely originally a maid’s quarters. At the far right is the recreated niche surround:
Around 1870, a hall closet was removed, and the doorway from the east parlor to the front hall (and west parlor beyond) was widened and made taller, with double doors installed. Here, I’ve restored it to its original scale:
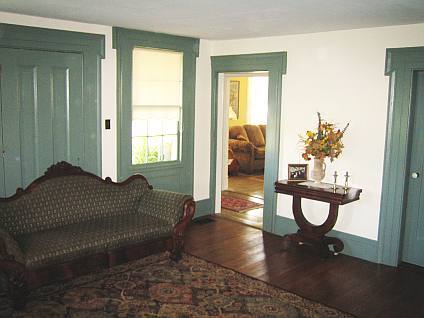
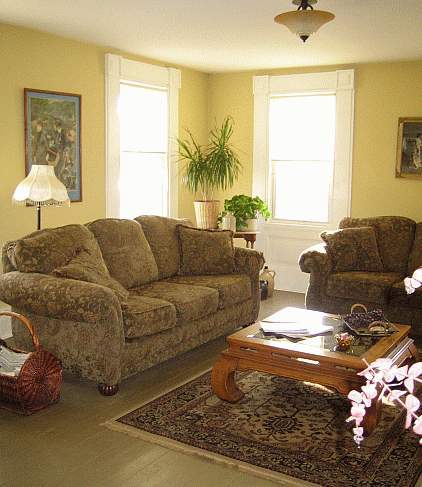
Here’s the west parlor as one enters from the front hall. The original basswood floor was probably destroyed by powder post beetles and replaced with fir, which I have painted:
Looking back toward the hall is another doorway that was expanded and relocated around 1870. I’ve restored the original height, and moved it back to its original location. I uncovered no definitive evidence for the original width, so I kept the wide, 1870 dimension:
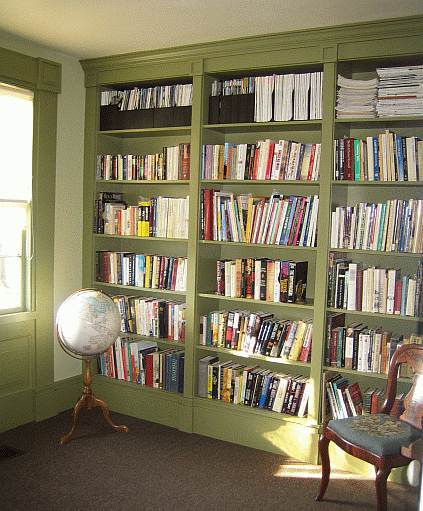
This is the view toward the library door. All the woodwork and door is original, but the original sash were replaced with vinyl (new “old sash are in progress in my workshop):
I reconstructed the floor and built bookcases for the library:
This wall had been removed probably early in the 20th century. I rebuilt it, but added a window to share some natural light with the room beyond:
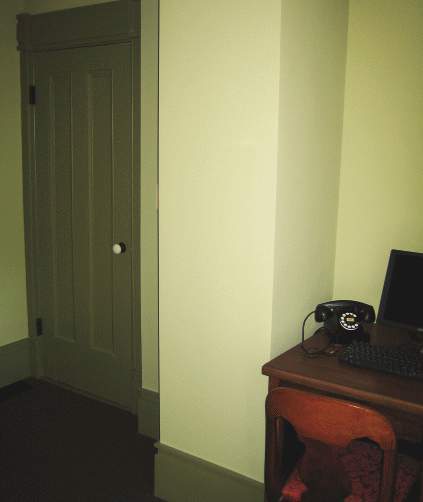
I had to box in the furnace flue. A desk is tucked into the resulting niche:
Off the east parlor I converted the former maid’s quarters to a full bath. I stained and varnished the original basswood floor:
Construction photos to come.
Allen


Replies
Let me be the first to say -
NICE!
I'm going to peruse them now as I eat my frosted MiniWheats.
Forrest
Forrest, many thanks. For those who haven't seen my previous postings, or don't recall, here's the exterior view. The east parlor is the porched wing. The dining room and kitchen make up the north wing (not visible here). All original 1830s footprint.
Missing are the original shutters, except for the inoperable ones (painted white) on the second floor. No window there; the shutters were for appearance only. They will be painted green when I make and install the rest of them!
View Image
Allen
I've recently built my house and have included some exterior Greek Revival details such as thick pilaster columns on the corners of the house and a large frieze at the bottom of the roofline. I have been having problems trying to find stock molding to replicate the capital at the top of pilasters for the corners and doors. The local lumber yards in NJ don't carry anything similar except crown molding, which really is not the same molding profile as on your house. Do know where I could get stock moldings equivalent to ones on your house? Or, at least a set of mouldings that I can rip and match yours?
Cheers, Mike
Mike, when I had to recreate those mouldings (smaller version for the porch columns, and full size for the big corner pilaster bases) I ran the stock diagonally through my table saw for the coves (or "cavetto"), and for the ovolo and torus profiles, simply used a flat handplane to round it over.
Before rounding with the handplane, I ripped the stock at a 45-degree angle. It really goes very quickly. If you look closely, you can see some flat spots from the plane, but it's not obvious.
I can explain it further, if you're interested.
I've attached a photo of the smaller porch column capitals and bases, below.
Allen
edited to correct my spelling of "mouldings."
Edited 9/27/2007 1:58 pm ET by WNYguy
OK, I guess I need it broken down more. That base molding is 3 layers or 2 or 1? Give me the play-by-play on the layers that make it up.
View Image
Almost looks like:
View Image
Which looks like a couple round-over routs and a cove cut. But yours looks like it has more depth.jt8
"I was gratified to be able to answer promptly.
I said 'I don't know.'"
-- Mark Twain
John, that's three layers. A flat board on edge (the plinth), then a torus, then a cove (or cavetto) as the classical "scotia" on a column base.
In the picture below, I've got some of the millwork stacked up. A couple of the plinth pieces are laid out at the bottom right, and a couple torus pieces are at the top of the right stack.
Near the top of the left stack are a couple of the cove pieces.
View Image
Allen
If you can get a scrap of the trim you're after, you can take it to a woodworking (millwork type) shop and have them make a blade of that profile. Price varies depending on how complex it is. jt8
"I was gratified to be able to answer promptly.
I said 'I don't know.'"
-- Mark Twain
" Price varies depending on how complex it is."Varies more according to size and species of wood.Also, the setup and grinding is all up front cost - $200-500 bucks, so for ten feet of materials it is far better to do it by hand like WNYguy did. OIncce you get up over a couple hundred feet of molding, a custom profile begins to pay off or balance closer to common stock profiles
Welcome to the Taunton University of Knowledge FHB Campus at Breaktime. where ... Excellence is its own reward!
Also, the custom millwork places often keep in inventory of knives they've previously "custom made."
If he's not trying to exactly match an exisiting profile, something in their stock might work just fine. I think he could save some of the set-up costs that way.
Maybe? Or do most millwork companies charge the same for set-up either way?
Allen
I am not sure of the details because when I was turningthat over to a milshop, they gave me a quote and filled the order without itemizing it.I charge for the new knives on the first job, then fifty bucks for sharpening when using same for the next customer. Most of my work is cost plus so no set-up FEE though they do pay for that time.What drives me crazy is when a customer can't make up their minds or are not sure how much money they have to spend ( yeah, sure!) and they want me to mill and trim these two rooms, so that is how much stufff I mill out. Then after all is said and done and the machine and knives put away, I here, "That looks so lovely, can you do the same in those rooms now?"Doesn't matter that I explain increasing costs by chopping the job into pieces like that...OTOH, I have had a couple of ustomers for whom cost was no object, but timeline and deadline was. I have made or ordered the trim for a whole house ahead, and then had them or the archy or designers change their minds by time it was ready for trim ....They pay the costs, but never seem to understand that I can't manufacture time.
Welcome to the Taunton University of Knowledge FHB Campus at Breaktime. where ... Excellence is its own reward!
Varies more according to size and species of wood.
In my case, I would get the millwork shop to make the blade and then give it to the small town woodworking shop. Just used him 2 or 3 months ago to replicate some exterior trim (although in this case he didn't need a knife, he was able to make the trim with 2 or 3 cuts).
Small town woodworking shop dude price per ft is just a hair higher than Lowes stock trim prices (and I'm not talking fancy stuff) and the dfir or whatever he used looked a WHOLE lot nicer than the Lowes stuff. So for me it was a no-brainer.
The millwork shop was several times higher per ft.
jt8
"Those who wish to sing always find a song." -- Swedish Proverb
See if there is a Dykes Lumber near you. They have an extensive line of nice moldings.
They are primarily based in NYC, but I think they have one in NJ.
You can google them up and see what they stock - cad drawings and jpg profiles as I recall.
Welcome to the Taunton University of Knowledge FHB Campus at Breaktime. where ... Excellence is its own reward!
Allen
Very nice! I see you have some nice period pieces of furniture to round out the place, nice touch.
I really like the dinning room colors, the whole place looks good. I never tire of seeing your house from the outside, this most recent shot is a new one for me.
Doug
Thanks, Doug. Yeah, we're slowly collecting American Empire -- or is it it more correctly, "Pillar and Scroll" or "Restauration Style"? -- furniture from the 1830s and 40s. It's period to our house, of course, and we love it. And it's still very affordable.
The sofa is later, I think. 1850s or 1860s??? We came across it at an estate sale, and the DW loved it. I like it, too, although I this is more what I had in mind:
View Image
Allen
Doug, I forgot to mention your stunning work I saw in the "poplar and mdf" thread. Amazing! Makes me a bit ashamed to post photo of my somewhat "rustic" efforts.
Allen
Thanks Allen but to tell you the truth I would rather work on older homes then do all that fancy shmancy stuff on the new ones.
We were supposed to close on our new/old home Friday but it got bumped to next week, damn HO didnt schedule the septic guy on time so.........
Our house wont be of any distinctive style like yours but I should have some fun with it none the less!
Doug
Doug, I'm looking forward to seeing shots of your "new" old house. "Vernacular" style, eh?
Since you like photos of my old pile of wood, here's one from a year ago that shows the two wings -- a very, very common configuration:
View Image
Allen
Very nice! Do you sometimes wish you could have bought your house just a few years earlier, before previous owners had a chance to make 'improvements'? My 1913 sort-of-colonial stayed fairly intact until sometime in the middle 1970s; I'm still undoing some of the previous owner's attempts at remodeling.
I hear ya, Stuart. I bought the house in 1995. Just nine years earlier would have saved me A LOT of work! But I've also undone quite a bit of stuff from 120 years ago.
Still, this was one of the most intact homes I found in a four-county search at the time.
Allen
tip 'o the hat - well done -
thanks for posting -
reminds me that FHB #1 cover story was about a Greek Revival rescue -
hope you enjoy many happy years in your house -
"there's enough for everyone"
VERY NICE
Welcome to the
Taunton University of Knowledge FHB Campus at Breaktime.
where ...
Excellence is its own reward!
Here are some of the East Parlor construction photos, and a couple hallway views.
This is a view of the east parlor doorway to the front hall (doorway on the left). It was made taller and wider around 1870, with double doors. A shallow hallway closet or perhaps a built-in of some type was sacrificed to do so:
View Image
Rather than recreate the hallway closet, I used that recovered space as a plumbing chase for a bathroom I installed upstairs ... knowing I was eventually going to restore the adjacent 1870s doorways to their 1830s dimensions:
View Image
Here it's enclosed:
View Image
And a look toward the opposite direction. The front door is original (except for half of the bottom rail) as is its Carpenter Patent rim lock and transom window:
View Image
The niche in the east parlor had been walled off probably around 1870. Then in the 1980s it was opened up with a rough, unfinished drywall surround. The owners then used the space for their woodstove ... a clunky awkward stove I replaced with a small Jotul:
View Image
I replicated the original surround -- missing for probably 130 years -- and created a built-in storage "chest" of sorts behind the stove to cover a big chunk of missing flooring:
View Image
Of course there was a lot of scraping, plaster repair, removal of a popcorn ceiling and fan, floor refinishing, etc.:
View Image
Here I've revealed some of the previous woodwork colors. The bright blue was too much for DW's eyes, so we went with the gray-green color of the second paint layer. The tan and white layers were even later. But the Prussian Blue was the original 1830s finish:
View Image
Allen
Edited 9/25/2007 11:53 pm ET by WNYguy
Not at all! Nicely downsized, but stilll quite viewable
Welcome to the Taunton University of Knowledge FHB Campus at Breaktime. where ... Excellence is its own reward!
removal of a popcorn ceiling and fan
That just aint right!
Popcorn in a 1970's ranch is bad enough but in a 1830's house, there ought a be a law.........
Doug
Very Nice!The in progress photo's area nice contrast to the finished shots.Been working on it since '95?
Mclaren
Mclaren, yes, it's been an "in-progress" project since 1995. Lots of now invisible stuff like sill repair took years as I worked off and on.
Just removing inappropriate windows, shop-building "antique" replacements and a little wall repair was a job:
View Image
Allen
Looking at the "before" photo's makes meshake my head in disbelief.. You are to becommended for the effort and dedication to returnyour home to "like new".
Beautiful work, Like the links to the older threads.Thanks for keeping us updated.
Mclaren
Absolutely awesome work!
Somehow these threads need to be put into one so we can get it all in the documentary thread! I have come across several sections, but I'm not sure how to make one link.
This may have been suggested already. I didn't check to see.
My brain + his brawn = a perfect team
Thanks, ladyfire. I don't know how helpful those threads might be to anyone; not much "step-by-step" info.
JohnT8 posted a couple links. Here they are again and a couple others:
Bathroom with shower: http://forums.taunton.com/tp-breaktime/messages?msg=66931.1
Porch construction and reconstruction: http://forums.taunton.com/tp-breaktime/messages?msg=67082.1
Sill repair, "faux" chimney, stone masonry, wall reconstruction: http://forums.taunton.com/tp-breaktime/messages?msg=67119.1
Last summer I also posted a lengthy, step-by-step thread on the costruction of a large Italianate porch. I still need to get back to that jobsite for a "finished" shot. Note of caution to dialuppers: imbedded photos are in the 100K range ... I didn't realize that simply changing "color depth" to 256 would've knocked them down to 20K!
Italianate porch: http://forums.taunton.com/tp-breaktime/messages?msg=78333.1
View Image
Allen
These are all great photos. I think they're looking more for show and tell as you go thing. Guess we could post to homedesign and see what he thinks.
I will be looking today to see if I can find the sequence in which your posts of your house start and end as of yet.
Again awesome work!My brain + his brawn = a perfect team
The "Italianate Veranda" would probably fit that category. That was a job I did for a client last year.
No real step-by-steps from my own house, though.
Allen
Italianate Veranda"
Great! Do you remember what month you started that post by any chance?
My brain + his brawn = a perfect team
"Do you remember what month you started that post by any chance?"
Sept. 6, 2006 in the "General" folder.
Link: http://forums.taunton.com/tp-breaktime/messages?msg=78333.1
Allen
Thanks, Piffin. I hope that long string of photos didn't tie up your dial-up for too long.
Allen
Morning Allen,
Just saw this thread and wanted to chime in on what gorgeous work you and your wife have done!
Was the porch original to the house? I really like how that sits off to the side.
Best,
Steve
Steve, the porch is original. It's very common with this gable-front-with-wing configuration on a Greek Revival house.
It did take some work to restore it, however:
View Image
I built this east porch where none originally existed, but porches along the rear wing of these type house also are appropriate:
View Image
By the way, this is a "before" shot before I got rid of the 1980s deck, windows and door:
View Image
Allen
You mentioned you were going to move the wood stove out of the niche and into the room. Are you going to do tile or brick on the wall or anything?
And what does the niche become when there's no stove? Closet?
jt8
"I was gratified to be able to answer promptly.
I said 'I don't know.'"
-- Mark Twain
John, thanks for posting those links. To move the stove, I have to rebuild the missing "hanging" chimney. The stove will sit far enough from the wall so no special treatment will be necessary, I hope.
Well, actually, I have to eventually rebuild that entire wall, between the windows, as it has bowed out significantly (a weakness in "stacked plank" construction).
I'm not sure how to "use" the niche in the future. Originally, I suspect there was a small bed there, close to the stove. Sometimes useful for a sick member of the household.
Originally, by the way, none of the walls were painted. Bare plaster or wallpaper only.
Allen
The previous owners removed the wall separating the pantry from the dining room, which I have since rebuilt.
This photo is after I replaced two vinyl windows with salvaged 6-lite sash, and roughly replastered the wall. Transition on the ceiling and floor show the original wall location, as well as the door locations, which I later recreated:
View Image
Here, DW starts to remove the popcorn from the dining room ceiling. That window behind her was 9-over-6 when the house was built, and I have most of the millwork done to replicate the original (and enough antique glass, too):
View Image
Allen
I converted what was likely a maid's quarters into a full bath. When I bought the house, the only bathroom was off the kitchen. It's now converted to a storage room. The bathroom had been installed in 1948 (only an outhouse prior to that), and was in somewhat rough shape:
View Image
In the maid's quarters, a wall had been removed opening the room up to what is now our library. Here I've reconstructed the wall, but included an opening for a window for some natural light:
View Image
Interestingly, the room already had an "interior" window, original from the 1830s. It opens up to the stairway. It had been converted to a cupboard, but I found the sash re-used in one of the barn doors! The sash is operable, as it can slide up into an empty cavity above:
View Image
Here, I've framed in for the jetted tub and a half-wall separating it from the toilet. DW insists one should NOT see a toilet whilst soaking in a tub!
View Image
Allen
Edited 9/26/2007 1:01 pm ET by WNYguy
In the west parlor, I scaled back the doorway (enlarged c.1870) to its original height, and moved it to its 1830s location.
Here, I've removed plaster and lath to reveal the original opening. The 1870 double doors are to the left (that's a shoe rack hanging on one of the doors):
View Image
In this photo, the door opening is reframed. I should mention I kept the 1870 width dimension, as I could uncover no conclusive evidence as to the original width; it may well have been a single-door size. My new "plumbing chase" is visible at the left, and the 1870 double doors to the east parlor are behind the plastic sheating:
View Image
Allen
The basswood floor in the "library" had been decimated by powder post beetles ... the same fate that had previously led to the replacement of the west parlor floor in the early 20th century.
Visible here is one of the gaping holes. And most of the surrounding floor would not support my weight:
View Image
Here, I've kept the original joists and added additional ones to support 3/4-inch plywood:
View Image
This is the oil furnace flue which I unfortunately had to run up through the house. The plywood floor is installed, also, here:
View Image
The PVC pipe will duct the new bathroom fan; it had to come through the library to access an exterior wall. One of the new bookcases had to be built around the heating duct also visible here:
View Image
The bookcases are simple construction of plywood, faced with painted pine. Here are the plywood boxes:
View Image
I don't like books to be caught behind a face frame, so I incorporated a small reveal:
View Image
Allen
Here's how the kitchen appeared just a few weeks ago. Cheap 1986 cabinets ... pressed-fiber boxes, oak doors, maple face frames.
I had previously replaced the double crank-out window with a shop-built 9-over-6 window, and replaced the dishwasher and stove.
The vinyl floor looks a lot better in the photo than it did in real life:
View Image
Our long-range plan is to lower the entire kitchen floor to the 1830 height, so I had built the exterior door with that in mind. The temporary "well" for the door was really awkward, however (I constructed the door and screen door, also):
View Image
So, here I've removed flooring and joists to reframe an entire "mudroom" area to be lower than the kitchen:
View Image
And new joists installed:
View Image
And here it is tiled after plywood, isolation membrane and cement board:
View Image
Exposing the plank floor required removal of 1/4-inch luann and HUNDREDS of staples:
View Image
To dress up the old cabinets, I extended them to the ceiling with a cornice; DW painted them and replaced the knobs. I also built a shallow set of shelves to create symmetry around the new 9-over-6 window (which is partially hidden behind the backplash and counter ... remember we hope to lower the ENTIRE kitchen floor someday). The plank ceiling is original:
View Image
Allen
Thanks Allen,As a porch-ophile, I really like those.I saw your photos from the bath that John posted. Do you have any additional ones of the storage pilasters you created? Those are very clever and I'm curious as to whether I could adapt that idea to a bath I'm working on.Best,
Steve
Steve, I used full-extension ball-bearing style drawer slides, making up the construction as I went. A look at standard spice-rack kitchen pull-outs might reveal a better technique than what I cobbled together:
View Image
In one of the drawers, I incorporated an outlet and built a slot to hold the hairdryer. That way it's always conveniently plugged in, and out-of-view when not being used:
View Image
Allen
I might steal that bat6hroom pilaster idea someday.Here is another one I fit into a wall for decoration...
Maybe you can use it between studs sometime.
Welcome to the Taunton University of Knowledge FHB Campus at Breaktime. where ... Excellence is its own reward!
Looks good. But that broken pediment feels more Georgian to me.
Allen
Thanks Allen,Very clever indeed.And now that I've read this thread through, I didn't realize you were the same guy as the creator of the Italianate Veranda. How did that finally turn out?How close are you to Ithaca? I went to grad school not too far away at Colgate. Lovely part of the world, but I don't miss December - March. LOL
I grew up near Canandaigua, and later owned a house near Geneva. But I'm west of Rochester now, maybe 3 hours' drive from Ithaca.
I've been waiting for the homeowners to wrap up some things before I take the final photos of that Italianate Veranda. I'll try to get over there this weekend to check it out.
Allen
Hey Allen,
I'd love to see some more pictures of that bathroom...any chance you have some shots that are a little more pulled back?Justin Fink - FHB Editorial
"Everybody wants to know what I’m on...
What I'm on? I’m on my bike, busting my ### 6 hours a day…
...What are you on?"
- Lance Armstrong
Take a drive over there with your wide angle lens!;)
Welcome to the Taunton University of Knowledge FHB Campus at Breaktime. where ... Excellence is its own reward!
Justin, I'm assuming you mean the upstairs bath with the shower? Like Piffin, said, very tough to get a "wider" view without a fish-eye lense.
The bathroom is only 5-foot by 6-foot-six, not counting the 3 x 6 shower. There are two entrances: one from the hallway, and one from the master bedroom.
I just shot a few more photos, but they don't really show any more.
01 is the view from the bedroom.
02 is the view from the shower, showing the two doors. On left is the original beaded-panel door from the bedroom; on the right is my homemade version, which opens to the hallway.
03 is also from the shower, showing the homemade door. The bumpout at right contains the vent stack. The paper holder has a beaded frame. Behind the roll, I kerfed, steamed and bent a piece of pine to a semicircle so there's no inside corners.
04 is the view from the hallway through the homemade door (flat-panel with applied mouldings to match existing doors). The shower is visible straight ahead, across the bathroom.
If you meant the downstairs bath with the jetted tub, let me know. BTW, too bad you couldn't make it to Andy's Bikefest last year. You missed a good ride and a good meal!
Allen
Very nice! I've said that several times about your photos, but every time I'n struck anew at your work.
Yup, you got it right - the upstairs bath. I was looking for a photo just like #01 so that I could see how those pull-out drawer pilaster thingies worked. I'm stealing ideas!!
Thanks, and terrific work - I love the style.
Justin Fink - FHB Editorial
"Everybody wants to know what I’m on...
What I'm on? I’m on my bike, busting my ### 6 hours a day…
...What are you on?"
- Lance Armstrong
Edited 10/5/2007 10:31 am ET by JFink
Nice house.
Mike
Trust in God, but row away from the rocks.
Hi Allen,
I'd been really fond of your postings for some time, then this summer we bought a an Eastern NY Greek Revivial. I've gone back and scoured them more carefully since. This set of shots of the interior are great. Could I ask a favor of a closer shot of the window trim details? In our place the windows were replaced and the trim surrounding the ones in the "formal" rooms is just not right. We're working on replicating some of it but want to come closer than what we are so far.
Thanks,
Dave
Dave, could you post a photo of your current situation? I have measured drawings of many Greek Revival details that might be more helpful than the specific molding in my house, though I'll take a closeup shot of that, too.
Allen
Allen, as usual it looks great. That 'before' pic just makes me shudder. And popcorn?! Blech!
For those who may have missed your porch thread a 'while back', here it is:
http://forums.taunton.com/tp-breaktime/messages?msg=67082.1
View Image
And the bathroom thread:
http://forums.taunton.com/tp-breaktime/messages?msg=66931.1
View Imagejt8
"I was gratified to be able to answer promptly.
I said 'I don't know.'"
-- Mark Twain
Dave, here are some closeups of the window surrounds.
The east parlor surrounds are "Atticurge" style with those projecting "ears." The molding is a flattened quirk ovolo with fillet:
View Image
The west parlor has simple corner blocks; the strips that hold the sash are quirk bead:
View Image
Allen
I had knives cut to make that same backband detail for one here, Same cut on some baseboard cap
Welcome to the Taunton University of Knowledge FHB Campus at Breaktime. where ... Excellence is its own reward!
"I had knives cut to make that same backband detail for one here, Same cut on some baseboard cap"
I had to reproduce about 30 feet of that molding. I did it by making several passes through the table saw, then finishing with a chisel and sandpaper! It's a flattened ovolo, but not completely flat.
Didn't turn out too bad, though:
View Image
To get the staff bead (or double quirk bead), it took three passes with a quarter-round knife on my table saw.
I've also made about 90 feet of a smaller version of the flattened quirk-ovolo-fillet for door panel molding ... using the same painstaking method. I REALLY should have made a knife or found an old molding plane!
And I still have more to make another 32 feet or so to finish the new doors in the dining room. You may have noticed the lack of panel moldings there.
Allen
Edited 9/26/2007 3:00 pm ET by WNYguy
I'm not sure I can find a closeup detail of the millings we made.
Anyways, if you get to where you need a big batch of it, I could trace out the profile and mail it to you to see if you want the same made up.That drop floor mudroom is a good way to capture cooler floor drafts come winter.Your raised door to the upstairs reminded me of this place too. It had a first step up in the threshold too. We totally rebuilt that area though because it was a 10/7 rise/run.
Welcome to the Taunton University of Knowledge FHB Campus at Breaktime. where ... Excellence is its own reward!
Great looking place.
I don't need any more of the larger, backbanding molding. It's more of the smaller, 1 1/8-inch version that I still need to make for door panel molding.
I'll get to it eventually, but in the meantime, I don't mind the dining room doors sans molding.
Thanks.
Allen
"Your raised door to the upstairs reminded me of this place too. It had a first step up in the threshold too. We totally rebuilt that area though because it was a 10/7 rise/run."
The stairs in our house are a bit better than that 10/7! Ours are 9-1/2 rise and 9 1/2 run. They are the only stairs in the house, and they're tucked into the back of the two-story section. Usually in a gable-front-with-wing configuration, there is an open staircase and hall as one enters the front door.
Here, DW is painting the risers. That little window to her left is original and opens to the former maid's quarters (now a bathroom); we found the original four-lite sash reused in a barn door:
View Image
Allen
Edited 9/28/2007 3:35 pm ET by WNYguy
There are several of those front door capes here with the stairs immediately there, going up about 5-6 steps to a land and then breaking to turn both ways, one up to each of two bedrooms.I re-built another staircase a couple winters ago that started out close to your pitch. I think it was 9/8 and scared the snot out of me to walk it. The owner's wife had to grab the rail with both hands and descend sideways to go down. Now she can actually live in the house.I had to open one wall, and bump out a greek recessed entry to flush the front of the exterior to gain spaceThat is the biggest drawback of the older capes and greeks - stairs too steep! usually they sent the kids up to sleep there and that was about it, so us older folks didn't need to worry about being spry and agile enough to get up and down them a lot.When I design renovation work one of the first things I have to do is decide where the stairs will fit for safety, form and function
Welcome to the Taunton University of Knowledge FHB Campus at Breaktime. where ... Excellence is its own reward!
Excellent work, and much safer and more practical in the "after" photo. But as a "purist," I really appreciate the "before" shot. The original ballusters are particularly nice.
Allen
OK, I'm not sure I've got the trim figured out. Is that 3 pieces? 1. green circle that you've routered the door-side edge 2. blue circle sitting on top 3. strip of trim around it all? Or is blue & green one piece... Sorry, but my brain isn't working today.
View Image
jt8
"I was gratified to be able to answer promptly.
I said 'I don't know.'"
-- Mark Twain
Great looking work!
Thanx for sharing.
Chuck Slive, work, build, ...better with wood
Chuck, thanks for the kind words. I know you do superb work, so you comments mean a lot!
Allen
I am curious on that detail too.On mine, the red is an added backband piece laid over a 1x4 with beaded edge as you circle in green, but he has that extra step in the middle.
Welcome to the Taunton University of Knowledge FHB Campus at Breaktime. where ... Excellence is its own reward!
"On mine, the red is an added backband piece laid over a 1x4 with beaded edge"
See my response to John. The staff bead is run on the inside door frame pieces.
On the other side of the wall, however, a simple quirck bead (half-circle instead of three-quarters) is run on the surround itself as you describe. It depends on which way the door opens.
Allen
Edited 9/26/2007 5:27 pm ET by WNYguy
John, counting the staff bead, that's three pieces of wood. That's all original, not my reproduction work.
Here's a cross-section of the stepped surround (one piece), and the applied "flattened quirk-ovolo-fillet":
View Image
The staff bead was run on the inside door jamb piece, and is mitred at the top. Likewise, the quirk bead at the window is run on the thin strip of wood that interior sash stop (mitered at top corners).
When I reproduced the surround, however, I applied quarter-inch thick stock to a flat board to create that first step (your blue circle).
Clear as mud, right?!
Allen
Man, that is SOOOOOOO sweet. I love that you could save the floors so well. Just beautiful.
Spheramid Enterprises Architectural Woodworks
"If you want something you've never had, do something you've never done"
Thanks, Sphere. We had an open house and picnic here this past weekend, and one of my friends was disgusted that I had stained the basswood floor. Not historically accurate, but DW and I like it.
I also slightly darkened the chestnut floor before applying the shellac. But don't tell my preservationist friend!
Allen
Man, it is your home, not a museum. You are doing the highest quality restoration work I've seen...you can stain your wood any color you want. I think it is amazing what you are doing there.My house was on the "practice fire" list for the Fire Dept. Spared the fire, but then subjected to my crude renovation (with just a sympathetic nod to historical restoration). My place is 20-30 years newer than yours, but is one of the few pre-Victorian buildings here. Seeing your work, makes me wish I had done more historical homework before I started work. You posts and work will undoubtedly lead others to do better work on these historic homes.Thanks.
one of my friends was disgusted that I had stained the basswood floor.
The bathroom isnt original to the house but tell your friend that your keeping that too!
Doug
Very nice craftsmanship, congratulations to you & your wife, that's what a Home should be like, makes it hard to leave each day to go to work or go anywhere on the weekends when your already there.
Try this one on for size, TOH !! No corporate donations or PBS money here.
Again very very nice, My wife & I will look many times
Paul
No one should regard themselve as "God's gift to man." But rather a mere man whos gifts are from God.
Paul, thanks. You know, home really is my favorite place.
Allen
Nice work!!! I love the colors, & the woodwork, & the floors...You have really captured the ambiance of an old house livable today.
Thanks, Kate. I was fortunate to find a place that was largely intact; not too much guesswork to restore it.
We're planning on period wallpaper for most of the rooms, as finances allow. My wife shudders at most of the 1830s patterns, though! And we might restore the original woodwork colors, eventually: Prussian Blue for the east parlor, Pale Stone for the west parlor, Blue-Gray for the dining room and Ash Gray for the stair hall.
In the meantime, we'll live with the "historically appropriate but specifically inaccurate" colors we chose just because we liked 'em.
Allen