Hello all,
I have received some emails recently from posters asking how to make floor repairs. Instead of answering each one on an individual basis, I took some time today to document some repair work.
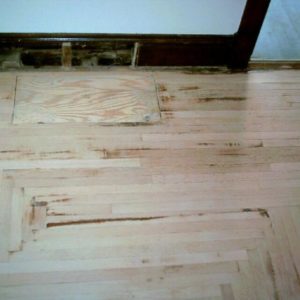
This is typical of old homes, return or conditioned air ducts. Often the ducts have been converted to wall units (why?), or the grates have been lost:
Ditch


Replies
The floor has already had a good cut. A clean floor will be easier to work on.
Using a square, mark a straight line across each board where you want it removed. If you can, try to use an existing bond for the other end, that way you only need to make one plunge cut. Often times these old floors used long length boards. In that case making 2 plunge cuts may be safer than trying to pry a 7' board out of the floor.
You can use the old fashioned way (hammer and mortise chisel) or use one of these Fein tools to make the plunge cuts. After the plunge cuts are made, drill 1/2 inch holes every few inches thru the boards with a spade bit.
Ditch
Edited 7/10/2003 5:13:50 PM ET by luvditchburns
Connect the dots with a good, wide sharp chisel. Don't use a screw driver or some old Stanley that's been rolling around in the bed of your truck. A dull tool is dangerous...more importantly....Ya' have to hit a dull tool harder......that's hard on the floor, and may result in breaking a sister board.
Chisel a channel out between the holes and remove it. Angle the chisel towards the tongue on the groove side of the board...tap the chisel...the groove side should slide right out.
Do the same thing on the tongue side, except this time chisel slices of the board away. Cut about 1/2 at a time. This will allow you to expose the fasteners without destroying the chisel...which should still be sharp. Using a fence tool, clean the timber out from around the fastener with the pointy part. Then use the clamping teeth to pry and twist the fastener out of the floor.
They should look something like this:Ditch
More tomorrow.Ditch
Ditch,
I'm wondering why you don't use a circular saw to split the board to be removed? It seems that you would be faster than with a drill and chisel.
I surely don't mean to criticize, but I have done it that way before and it seemed to work pretty well. Is there something I'm missing?
Jon Blakemore
I used to do it that way.
1) Too much dust.
2) The drill and chisel is faster, and safer. You can cut all the way to the ends of the boards with a circle saw, but then you still have to chisel the shallow kirf out.
3) I got tired of wasting blades hitting sub floor hardware.Ditch
I've always made two parallel cuts with the circular saw, about 3/4" apart, down the center of the board with the depth set to slightly less than board thickness. Lever up the waste with a chisel and knock each side in toward the middle to free it from the T&G -- much quicker than drilling holes and no risk of cutting into pipes or cables below the floor surface.
IanDG
Hi Ian,
Haven't seen you around much. Anyway, like I said, I stopped doing it that way (circle saw) a few years ago. For me the drill and chisel is faster..... and a lot less dusty..... I can take a board out in less than 5 mins. this way..... I attach a stop to the bit so it won't cut deeper than about 7/8"....whatever works for ya'. Ditch
You're the man... But please don't fast foreward.
Excellant threads.
Thanks.
Hey 'Bro,
Thanks for all the nice posts. I'll take as many pics as I can, and be as specific as I can. Thanks again.Ditch
Wow. I'd probably fall through the danged floor...hehe. Don't see those kind of floors in the south.
I have my ways and you yours. Everything you have posted as of late has been very informative. There is nothing that says I can't adapt the way you do to the way I do. I'm not here to critasize any thing. Good learning curve.
My method of floor piece removal is to use an up spiral bit and a router hooked up to dust collection.
I'm always interested in plan "B" so drive on Ditch.
Edited 7/10/2003 11:28:21 PM ET by IMERC
Methods:
Techniques:
I've seen guys cope crown with a coping saw, a die grinder, a rasp, a jig saw with a special shoe.....who's more correct?
My wife thinks my eating habits are weird. I eat one item at a time. Last night we had pork loin, rice, corn on the cob and a spring salad. I eat around the plate clockwise....one item at a time until I'm finished. She likes to sample a little of everything, slowly. I eat fast.
Who's right? In the end we're both satiated. The plates are clean.
I like the up spiral bit method......and when I buy the Festool plunge router I will try it.
This forum is about learning.....not burning......
Thank you for sharing your methods with me.Ditch
Thank you for taking the time to do a great tutorial! I do not think anyone was taking you to task on your methods. I am looking forward to the rest of the story.
I have an upcoming project where several room divider walls were removed that left a 4 1/2" gap in 45 year old oak flooring.
I had the multitool from Fein. Ditch tipped me to the blade useful for floor repair. What a good tip! Here's some wall removal repair using his methods, the fein tool and a little on site ingenuity. When possible, use the natural breaks in the flooring and rob and recycle from the existing stock. Thanks ditch.Remodeling Contractor just outside the Glass City.
Quittin' Time
Here are a few pics of a patch I did to cover a scar from a removed wall. You can't see in the photos well, but the problem I ran into was the spacing width-wise. The old flooring has slight gaps from house movement over the last 80 years. I was trying my best to match up the ends from one side of the wall to the other, but the old flooring wasn't perfectly tight.
I started nailing in my new pieces and the nailer was snugging them up nicely, but after I got about half of them in they starting not matching up well. I had to force in some gaps, up to maybe 3/16 or 1/4" in a couple of places, in order for the to stay on track.
Now I've got some gaps to fill before refinishing. This is a high traffic area. Is there a filler that one of you would recommend that might be flexible/permanent enough for this?
Edited 7/11/2003 10:40:09 AM ET by CAMPBELLDUST
Nice work! When we put in our cherry floors, 5" shorts, our paint guru suggested mixing lacquer with sanding dust from the floor to make a paste. Do not do what one of my helpers suggested ( supposedly came from Bob Villa) which was mixing the dust with carpenters glue. I will not take stain or finish the same and will stand out ugly. We used a mix of premium tung oil, boiled linseed oil, and mineral spirits ( 1/2, 1/4,1/4)for our finish. Dw hand rubbed several coats and I buffed it out to flatten with fine scotch-brite.
You should be asking Ditch or one of the others about fillers. I believe there are several excellent products out there. Good luck.
I haven't yet had a chance to manage and edit the rest of the repair photo's, but here's a finished patch with new base shoe.Ditch
You the man....
Had to come home to pick up 1 stick!
Anyway I was not at all offended by anyones comments. I welcome new and different methods.
Stan Foster...who is probably the most skilled craftsman...and gentleman.... on the board...and who has forgotten more about compound carpentry than most of us will ever know....is always open to new and different methods.
Be like Stan!Ditch
Some thing more on those spirial bits.
I use machinists bits from Wholesale Tool instead of router bits in some applications. In an application where the bit is at risk the ones from WT have it. Cheap and expendable. 3 or 4$ for an 1/2" upspiral. They are M2 steel or HSS. Sure beats accidently trashing one of the more costly carbide bits.
I'm betting you get to this tomorrow or next time you pick up this thread but...
How do you get last board in, when I have done it, I've had to rip the bottom part of the groove off and pop it down with a few face nails?
So how does a real pro do it?Never be afraid to try something new. Remember, amateurs built the ark, Professionals built the Titanic.
I used my Makita 3 3/8" trim saw to cut really close to the adjacent boards and then finish with a chistle. Really quick and I could set the depth precisely so I didn't cut into the subfloor, which I found difficult to do with the drill bit. The very thin kerf of the trim saw produces almost no sawdust.
BTW, I have a $700.00 Festo plunge saw, hooked up to the Festo dust collection unit...but it will never see a floor fix.....Ditch