FHB Logo Facebook LinkedIn Email Pinterest Twitter X Instagram Tiktok YouTube Plus Icon Close Icon Navigation Search Icon Navigation Search Icon Arrow Down Icon Video Guide Icon Article Guide Icon Modal Close Icon Guide Search Icon Skip to content
Subscribe
Log In
  • How-To
  • Design
  • Tools & Materials
  • Restoration
  • Videos
  • Blogs
  • Forum
  • Magazine
  • Members
  • FHB House
  • Podcast
Log In

Discussion Forum

Discussion Forum

Help…complicated drywall repair

jdarylh1 | Posted in General Discussion on March 11, 2015 12:12pm

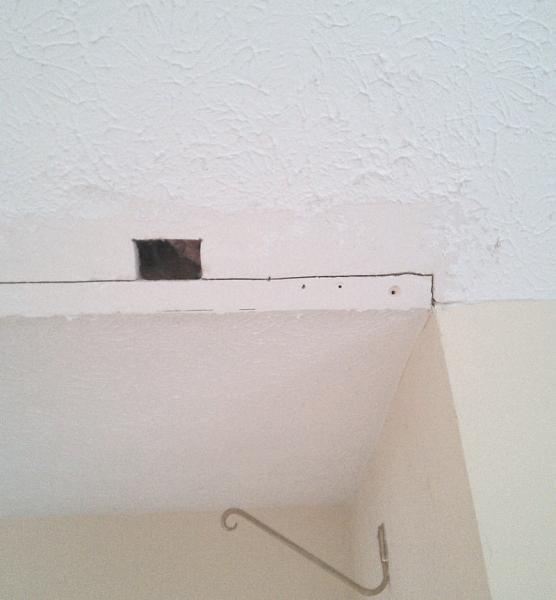
I hope there’s an easy way to fix this problem. The part of the ceiling shown is on an angle and the installers didn’t bother to put backing blocks behind the drywall but only nailed the angled corner bead every 16″ on the rafter supports and didn’t tape it. Of course it cracked.

I didn’t know that and when I went to repair it and put in additional screws, the screws didn’t bite into anything. So I cut a hole to see what was wrong and found the problem.

Do you think I can V out the crack, mud and tape it (paper tape) and it’ll be good? Or am I going to have to cut out a 6″ strip down the whole 4′ length so I can put backer blocks in?

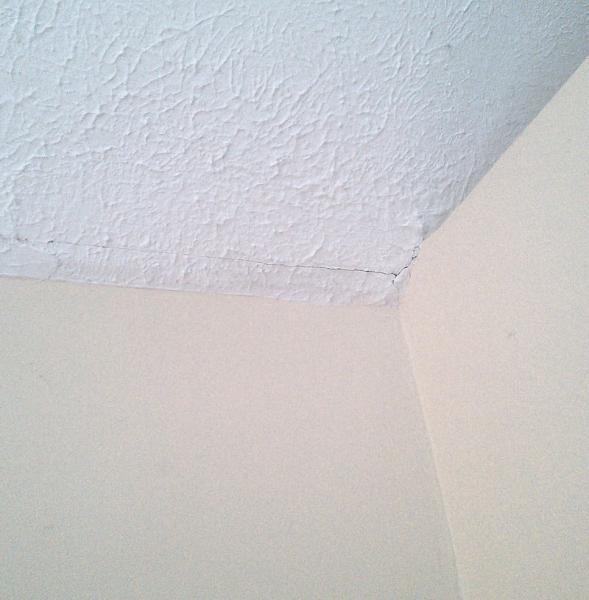
Further on down by the closet (same ceiling), there’s a crack at the top of the off angle tape. Do you think I can scrape down the texture in that area, mud in a new piece of tape over the crack and fix it that way? Or am I going to have to dig out the tape over the whole 6′ length of wall and ceiling and redo it with Strait-Flex?

Sorry for the angled photo, the walls are not angled, the ceiling is.

Reply
  • X
  • facebook
  • linkedin
  • pinterest
  • email
  • add to favorites Log in or Sign up to save your favorite articles

Replies

  1. calvin | Mar 11, 2015 06:39pm | #1

    Is that corner plastic or an attempt at flattening regular metal corner bead ?

    is there a joist or beam there at the turn and rafter fastened to it?

    whenever confronted with dislodged tape, I'll pull it out, stopping by cutting it with a knife and leaving the healthy tape.  Metal or plastic bead is a bit more difficult but can be done the same way.

    by getting the tape or bead out, along with the mud on top leaves you with a recess back to the original.  This allows you to bed the new trims and NOT leave a big ass'd hump from the new build up.

    plastic adjustible angle bead can be stapled, nailed or set with spray adhesive.  On new work I have success with the spray and no over-taping.  Matter of fact don't think I've taped over bead more than a couple times.

    the spray adhesive gives you complete adhesion, not just at the crimps or nails.

    messing with the texture adds another level of difficulty.  Best of luck with that.

    the real key is:

    is the framing done properly?

    take a look at trimtex for the parts.

    1. jdarylh1 | Mar 11, 2015 07:36pm | #2

      Not plastic, they flattened down a metal bead. From what I can tell by that hole I cut, there's no framing nailer directly behind the drywall, for either the angled ceiling nor the flat ceiling that butts up to it. Other than the 16" center rafters which they nailed it to, the nearest framing piece seems to be a couple inches back.

      I could cut the metal bead out but I'd have the same problem again...no nailer. But maybe wide Strait-Flex or No-Coat might work? I hope??

      Or maybe wide TrimTex if I can find it, except it's edge might be a bit thicker than the other two. I thought I saw a pre-glued version the other day. Just wet it down.

      I'd rather do the above than the royal pain of cutting out 2 long pieces of drywall, putting in a nailer then reinstalling everything. Then like you said I'd have butt joints to deal with. One on top, one underneath.

      Do you think that despite the framing screw-up I could successfully use one of the 3 wide solutions above without adding a nailer???

      1. calvin | Mar 11, 2015 09:40pm | #4

        thats certainly not a good place for metal bead.  I'd use the adjustible angled plastic bead from Trimtex and I'd spray contact adhesive it on, maybe a staple here or there to fine tune.  I'd first coat with Durabond from USG.  Resulting coats I'd use timed mix, 45 or 90 perhaps 20 if it worked.  Final skim. Might use bucket mud, maybe not.

        even tho you have that dob texture, you need a good finish.

        edit:

        http://www.all-wall.com/Categories/Drywall-Corner-Tape/trim-tex-magic-corner.html 

        theres a PDFs install sheet you can go to

        http://www.all-wall.com/c.590358/site/PDF_files/Magic_Corner_Cutsheet.pdf

        1. jdarylh1 | Mar 12, 2015 07:47am | #6

          Magic Bead looks pretty good, I wasn't familiar with that. The PDF indicates that if you use spray glue, you can have up to 3/8" of movement which will certainly take care of the cracking problem....WITHOUT putting in backer blocks! If I can just get that metal bead out without busting up the drywall edge.

          One thing that bothered me was that they say NO setting compounds for either setting or finishing. Strait-Flex and No-Coat also say the same thing.

          I rarely use standard compound, just about always use hot mud (USG Easy Sand) for everything often even last coat. Guess I'll have to change for this repair.

          Does that rubber edge (or whatever it is) look weird compared to the other edges in the room after it's finished?

          1. calvin | Mar 12, 2015 10:29am | #7

            j

            to cut the bead, I take my utility knife at an angle and tap down on it with a hammer.  It cuts through the metal bead.  You decide if it'll work at or near some place you have a pc of framing so you don't bash a hole.

            or

            take the complete stick down, 8or 10' is corner bead.

            i don't maybe use magic corner specifically.  My supply house has 8 or 10' sticks of a plastic angle corner that looks a hell of a lot like what I linkd to.  Whatever brand, I do set it in Durabond and proceed as written b/4.

            Let me take a quick look in the shop and I'll see if I can link to the specific product.  I'm trying to load up to get outta town and if you have a wife, you know what I mean........

          2. calvin | Mar 12, 2015 11:06am | #8

            This page from the trimtex site shows what I have used

            http://www.trim-tex.com/products/drywall-accessories/corner-beads/standard-corner-beads/adjustable-inside-corner-bead/

            elongated holes big picture.  I can't get it to load the install instructions, but you might.  8-9-10 ft. sticks.

            who knows, they might have discontinued it......seems the norm for things I get to like.

            i read up on the magic corner, seems like your answer.  As to the look of the expansion strip?  Call them for a sample or see if a supplier has one.  The additive says strength, Durabond too brittle for heavy movement.  Should mud set rather than spray adhesive.  Safe, follow the guidelines.  Chance taker.......I might be.

            10 days camping in Tennessee and Alabama.  Maybe some golf, hiking, some botanical gardens and the Petis bridge......off in the a.m.  If you're close, we'll drop in.

      2. calvin | Mar 11, 2015 09:53pm | #5

        j

        This is another good place to use a line laser.  You can get this line if long, perfect.  Nothing worse than a wavy corner transition.  I lay the bead to the line, either the edge or right down the center.

        get it right to the line and no need to step back and say "oh fuc"

  2. DanH | Mar 11, 2015 08:24pm | #3

    I think I'd consider just taping over with fiberglass tape.

Log in or create an account to post a comment.

Sign up Log in

Become a member and get full access to FineHomebuilding.com

Video Shorts

Categories

  • Business
  • Code Questions
  • Construction Techniques
  • Energy, Heating & Insulation
  • General Discussion
  • Help/Work Wanted
  • Photo Gallery
  • Reader Classified
  • Tools for Home Building

Discussion Forum

Recent Posts and Replies

  • |
  • |
  • |
  • |
  • |
  • |
View More Create Post

Up Next

Video Shorts

Featured Story

Picture-Perfect Pergola

Built from locally sawn hemlock, this functional outdoor feature uses structural screws and metal connectors for fast, sturdy construction.

Featured Video

Micro-Adjust Deck-Baluster Spacing for an Eye-Deceiving Layout

No math, no measuring—just a simple jig made from an elastic band is all you need to lay out a good-looking deck railing.

Related Stories

  • Old Boots Learn New Tricks
  • Install Denim Insulation Like a Pro
  • Podcast Episode 691: Replacing Vinyl Siding, Sloping Concrete, and Flat vs. Pitched Roofs
  • FHB Podcast Segment: Roofing on Commercial vs. Residential Buildings

Highlights

Fine Homebuilding All Access
Fine Homebuilding Podcast
Tool Tech
Plus, get an extra 20% off with code GIFT20

"I have learned so much thanks to the searchable articles on the FHB website. I can confidently say that I expect to be a life-long subscriber." - M.K.

Get home building tips, offers, and expert advice in your inbox

Signing you up...

This site is protected by reCAPTCHA and the Google Privacy Policy and Terms of Service apply.
See all newsletters
See all newsletters

Fine Homebuilding Magazine

  • Issue 332 - July 2025
    • Custom Built-ins With Job-Site Tools
    • Fight House Fires Through Design
    • Making the Move to Multifamily
  • Issue 331 - June 2025
    • A More Resilient Roof
    • Tool Test: You Need a Drywall Sander
    • Ducted vs. Ductless Heat Pumps
  • Issue 330 - April/May 2025
    • Deck Details for Durability
    • FAQs on HPWHs
    • 10 Tips for a Long-Lasting Paint Job
  • Issue 329 - Feb/Mar 2025
    • Smart Foundation for a Small Addition
    • A Kominka Comes West
    • Making Small Kitchens Work
  • Issue 328 - Dec/Jan 2025
    • How a Pro Replaces Columns
    • Passive House 3.0
    • Tool Test: Compact Line Lasers

Fine Home Building

Newsletter Sign-up

  • Fine Homebuilding

    Home building tips, offers, and expert advice in your inbox.

  • Green Building Advisor

    Building science and energy efficiency advice, plus special offers, in your inbox.

  • Old House Journal

    Repair, renovation, and restoration tips, plus special offers, in your inbox.

Signing you up...

This site is protected by reCAPTCHA and the Google Privacy Policy and Terms of Service apply.
See all newsletters

Follow

  • Fine Homebuilding

    Dig into cutting-edge approaches and decades of proven solutions with total access to our experts and tradespeople.

    Start Free Trial Now
    • Facebook
    • Instagram
    • X
    • LinkedIn
  • GBA Prime

    Get instant access to the latest developments in green building, research, and reports from the field.

    Start Free Trial Now
    • Facebook
    • YouTube
  • Old House Journal

    Learn how to restore, repair, update, and decorate your home.

    Subscribe Now
    • Facebook
    • Instagram
    • X

Membership & Magazine

  • Online Archive
  • Start Free Trial
  • Magazine Subscription
  • Magazine Renewal
  • Gift a Subscription
  • Customer Support
  • Privacy Preferences
  • About
  • Contact
  • Advertise
  • Careers
  • Terms of Use
  • Site Map
  • Do not sell or share my information
  • Privacy Policy
  • Accessibility
  • California Privacy Rights

© 2025 Active Interest Media. All rights reserved.

Fine Homebuilding receives a commission for items purchased through links on this site, including Amazon Associates and other affiliate advertising programs.

  • Home Group
  • Antique Trader
  • Arts & Crafts Homes
  • Bank Note Reporter
  • Cabin Life
  • Cuisine at Home
  • Fine Gardening
  • Fine Woodworking
  • Green Building Advisor
  • Garden Gate
  • Horticulture
  • Keep Craft Alive
  • Log Home Living
  • Military Trader/Vehicles
  • Numismatic News
  • Numismaster
  • Old Cars Weekly
  • Old House Journal
  • Period Homes
  • Popular Woodworking
  • Script
  • ShopNotes
  • Sports Collectors Digest
  • Threads
  • Timber Home Living
  • Traditional Building
  • Woodsmith
  • World Coin News
  • Writer's Digest
Active Interest Media logo
X
X
This is a dialog window which overlays the main content of the page. The modal window is a 'site map' of the most critical areas of the site. Pressing the Escape (ESC) button will close the modal and bring you back to where you were on the page.

Main Menu

  • How-To
  • Design
  • Tools & Materials
  • Video
  • Blogs
  • Forum
  • Project Guides
  • Reader Projects
  • Magazine
  • Members
  • FHB House

Podcasts

  • FHB Podcast
  • ProTalk

Webinars

  • Upcoming and On-Demand

Podcasts

  • FHB Podcast
  • ProTalk

Webinars

  • Upcoming and On-Demand

Popular Topics

  • Kitchens
  • Business
  • Bedrooms
  • Roofs
  • Architecture and Design
  • Green Building
  • Decks
  • Framing
  • Safety
  • Remodeling
  • Bathrooms
  • Windows
  • Tilework
  • Ceilings
  • HVAC

Magazine

  • Current Issue
  • Past Issues
  • Magazine Index
  • Subscribe
  • Online Archive
  • Author Guidelines

All Access

  • Member Home
  • Start Free Trial
  • Gift Membership

Online Learning

  • Courses
  • Project Guides
  • Reader Projects
  • Podcast

More

  • FHB Ambassadors
  • FHB House
  • Customer Support

Account

  • Log In
  • Join

Newsletter

Get home building tips, offers, and expert advice in your inbox

Signing you up...

This site is protected by reCAPTCHA and the Google Privacy Policy and Terms of Service apply.
See all newsletters
See all newsletters

Follow

  • X
  • YouTube
  • instagram
  • facebook
  • pinterest
  • Tiktok

Join All Access

Become a member and get instant access to thousands of videos, how-tos, tool reviews, and design features.

Start Your Free Trial

Subscribe

FHB Magazine

Start your subscription today and save up to 70%

Subscribe

Enjoy unlimited access to Fine Homebuilding. Join Now

Already a member? Log in

We hope you’ve enjoyed your free articles. To keep reading, become a member today.

Get complete site access to expert advice, how-to videos, Code Check, and more, plus the print magazine.

Start your FREE trial

Already a member? Log in

Privacy Policy Update

We use cookies, pixels, script and other tracking technologies to analyze and improve our service, to improve and personalize content, and for advertising to you. We also share information about your use of our site with third-party social media, advertising and analytics partners. You can view our Privacy Policy here and our Terms of Use here.

Cookies

Analytics

These cookies help us track site metrics to improve our sites and provide a better user experience.

Advertising/Social Media

These cookies are used to serve advertisements aligned with your interests.

Essential

These cookies are required to provide basic functions like page navigation and access to secure areas of the website.

Delete My Data

Delete all cookies and associated data