Help for Reverse Board and Batten, Plus 2nd Batten
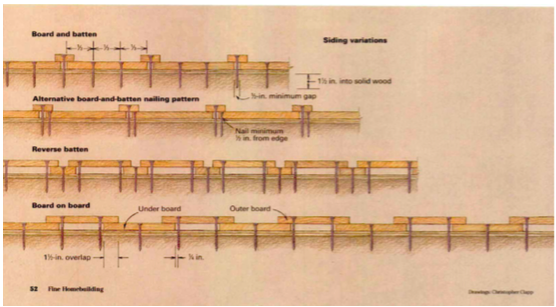
We are installing reverse board and batten to have a built in air gap (rain screen) between siding and sheathing. We will then add a second series of battens over the gaps between boards to achieve the traditional board and batten look. So inside to outside there will be: 5/8 plywood sheathing, WRB (house wrap), vertical 1×3 or 4″ battens, 1×10″ boards, and vertical 1×3 or 4″ battens. We plan to use the reverse board and batten nailing pattern from the chart in the 1992 Fine Homebuilding article Installing Board-and-Batten Siding by John Birchard. The only difference is the outer battens will be screwed through the gap between boards into the inner battens and into the sheathing. You can visualize this by imagining battens over the boards in the reverse board and batten nailing pattern. I’ve attached the nailing pattern chart. We will use screws instead of nails for the siding as recommended for attaching to sheathing in the article. The windows and doors are aluminum clad wood with nailing flanges attached to the sheathing.
Any comments on the idea of reverse board and batten plus an outer series of battens?
Any comments on this nailing (screwing) plan?
Any suggestions how to handle window, door and upper and lower horizontal trim, since ideally that trim would be in the same plane as the outer battens? The outside of the aluminum window and door frames project about 1″ beyond the nailing flanges/sheathing. Since there are two layers of 1″x battens and one of boards, the outer battens and trim would project 2-1/4″ to 2-1/2″ beyond the sheathing, and 1-1/4″ to 1-1/2″ beyond the window and door frames.


Replies
It sounds like pretty conventional rain screen construction. We would use different nomenclature for the parts. The first strips against the plywood are called furring rather than battens. So, you're going to install furring strips , then 10" boards then battens over the gaps. All very normal and conventional.
Nail the boards with 2 nails and the battens with one nail right in the middle. Wrap your windows with 1 X 6" furring all the way around, then 2 X 4"s over that. The boards will butt into the 2 X 4's so give you a finished edge thewn the battens can go on and butt into the same 2 X 4 so there are no open edges.
Use a stainless steel ring shank nail, much faster and holds almost as well as a screw. While I'm at it I would use Advantach Zip wall sheathing rather than plywood and a vapor barrier. It will save you a lot of time and money.