Hello All!
First, I am a laymen, with no official woodworking or construction training, so treat me as you might a mere child with regards to knowledge and common concepts! I have done projects with friends/relatives, but never been in the business at all.
I recently decided to rip up an ugly/smelly runner on my stairs, and that lead to a whole long conversation between my wife and I about replacing the stairs in my 1890’s colonial.
Long story very short, she wins and we decided to replace the stair treads! Off I go to research/buy treads/learn about stair installation.
I have ripped up the old treads, sistered a few middle stringer pieces that were loose or sketchy, leveled a few stringers that seemed out of sorts, ripped, chopped and stained the treads, and used PL Premium along side some 2.5″ finish nails to secure the new treads.
So far (4 days later) we are squeak free and feeling pretty solid about the project.
When I removed the old balusters they were nailed into the banister, and a wood dowel counter sunk into the tread. I was careful when removing them and since we both agree we like the look, we decided to re-paint and re-install them.
We made sure the new treads were the same thickness as the old as to preserve the spacing and height of the balusters. The new treads are slightly deeper than the old (.5 inches), but as a whole I think we should be ok.
My question is how to determine where to drill down into the treads in order to ensure the balusters meet up with the banister in a vertical position. I believe they are “Rail Oriented” and each baluster is cut to mimic the angle of the banister with the decorative pieces going up the stairs in order.
My first thought, because the banister has the outline of where the balusters were set into it, would be to just drop a plumb straight down from the middle of that imprint and where it lands drill the hole. Would there be any reason that would not be an acceptable solution.
I am attaching a few pictures or the before/during/after for reference, so please let me know your thoughts on how to finish the last bit of the install.
Thanks for any help!
Joe
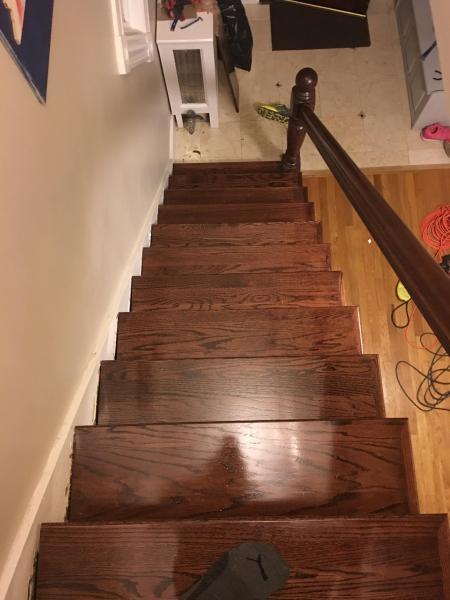
New Treads
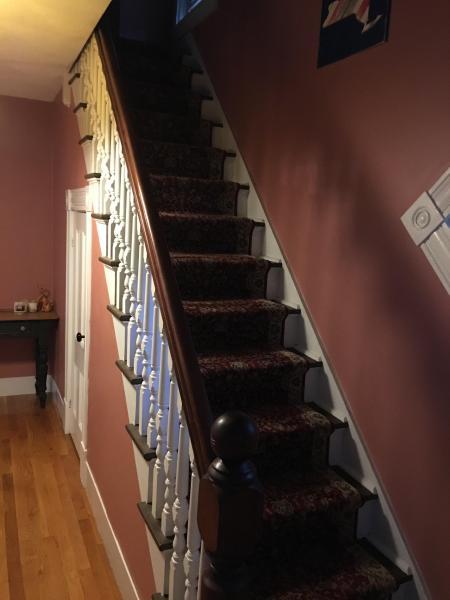
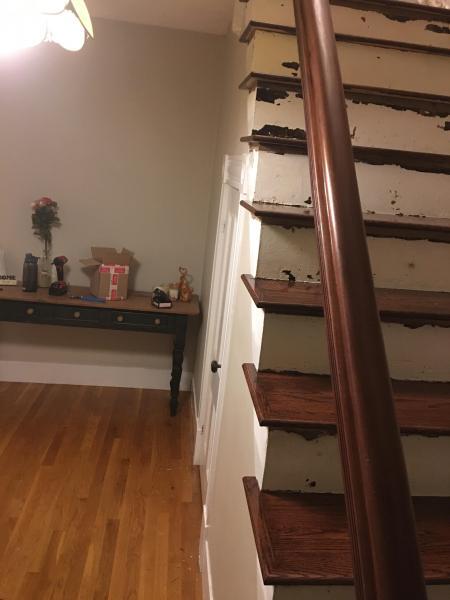
Old Runner and Stairs
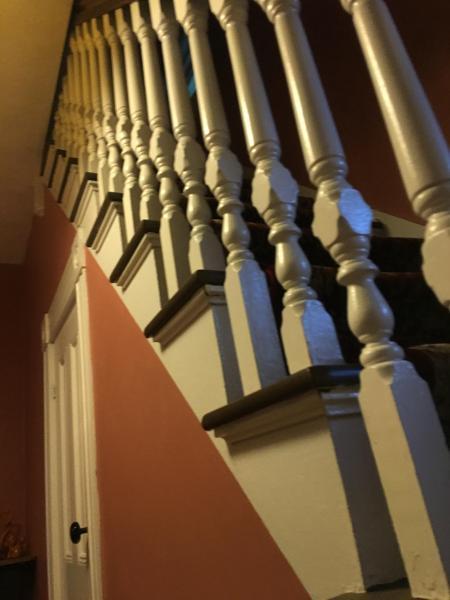
Old Stair Baluster Install
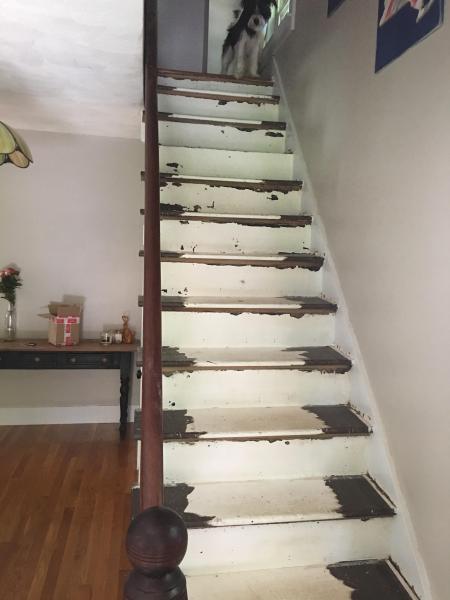
Old Stairs with Runner Removed, and Watson staring at me!

New Treads – risers will be painted, cove moulding and shoe molding will be installed (post balusters)
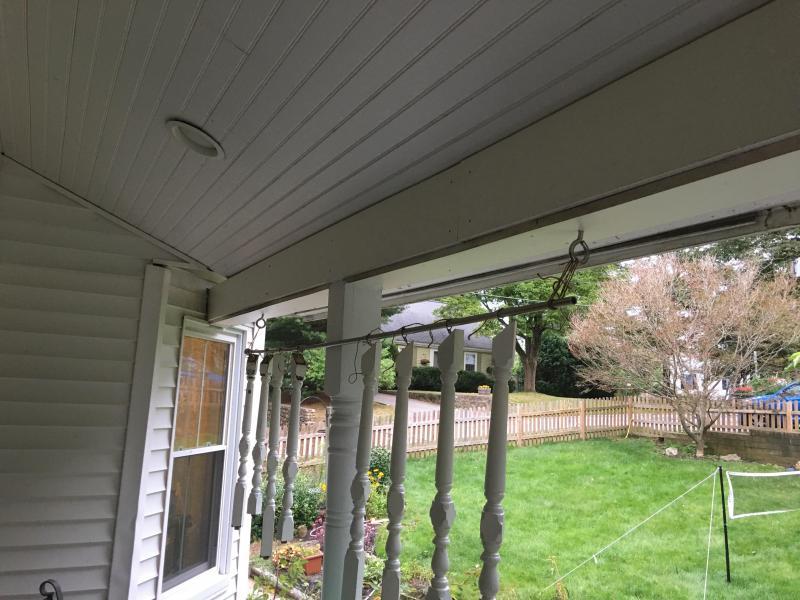
Baluster painting trick ( and old curtain rod and some plant hanging hooks! )
New Treads again.


Replies
Your stairs look great! looks like you did a good job, rookie or not. Your plum bob idea should work fine. Post more pictures when you're done.
J, another thumbs up on your work
I have a self-leveling plum dot laser which would make the job easier.......but.
get some small screw eyes and run them up into the rail at your baluster center location. Try to pre drill a hole as close to plumb as you can. Now you can run your string of the plumb bob through the eye and slide it up/down to locate the center on the tread.
should be easier than trying to hold the string on center, lowering to the tread and marking...
use a pc of masking tape on the tread so your pencil mark is easy to see.
Maybe you should just ask Watson. Some folks claim he's pretty smart.
Another idea is to get a small block of wood the same dimension as the top of the baluster. Cut one end to 90 degrees and the other end to the same angle as the top of a baluster. Drill a hole dead center into the square cut end and put a blumb bob stirng into it. Position the top end in the outline on the underside of the bannister, extend the plumb bob and mark the position on the step. In order to free both hands put a small nail or screw in both sides of this template, and hold to the underside of the bannister with a small bungee cord or heavy elastic.
I love this suggestion. So simple and effective even Watson might find it elementary
Actually, I'd be inclined to center the ballusters at appropriate intervals on the treads, then fudge the top end as required to make them vertical, vs working from the top. If the bottom intervals are at all irregular it will stick out like a sore thumb.
If done this way wouldn't a potential problem be that balusters might be too short or too long? Too long not a problem as the baluster(s) could be shortened but too short would be. Also, I assume that the original position had the front edge of each tread's front baluster aligned with the face of the riser below it.....the common way of doing it. He said the new treads were 1/2" wider....what he does need to watch with baluster placement is the spacing between them for code compliance.
If the treads are deeper then one might want to move the ballusters slightly "downhill" anyway, which would imply shortening them slightly. And if the ballusters end up being too short (which could easily happen with the plumb bob technique, given wood aging, fiddling with the stringers, etc) it's a fairly simple matter, on a painted piece, to install a shim.
based on your info......
First thing I'd do is measure all the balusters [or most] and see if they are the same. If so, good omen and I'd then I'd place a few of them in place, friction fit, back off and eyeball. Check with 2' level.
Pretty quick you should be able to come up with the correct layout, make up some layout templates for the dowel holes and proceed. A 2' level and the occasional back off and eyeball the results should make for a reasonably labor effective and visuallly acceptable result.
The plumbbob thing strikes me as a cumbersome way to go.
Based on one of the pictures they have dowels on the ends which would prevent the friction fit.
Thank You!
All,
Thank you for the wonderful suggestions - it's so funny to see all the different approaches that make perfect sense in their own ways.
I went with the small hook and plumb line idea and, while not 100% perfect, the variance is so slight that it would be hard for anyone to notice - especially with the bannister hanging over them. I actually think they are looking pretty good!
I will say drilling a 7/8" hole into my freshly finished stair treads sent a wave of anxiety over me for sure. What is the old saying, "measure 485 times and drill a huge hole once?"
We painted them 8 at a time since we had to hang them to paint/dry, so here are some pictures of the first 8!
Thanks again for all your help, and I can certainly post some pictures after the molding is in and the risers have been reckoned with – which prompts another question … the existing finish on the risers is super bumpy and generally not smooth, any recommendations on how to fix that with the stair treads already installed (probably should have been handled as I went, but I sanded them – but didn’t realize how crummy they would look when being painted.)
Regards,
Joe
ps. Two Watson Pictures ... my last name is Holmes - so it's only fitting!
What are the risers made of? Do you want to keep them and fix up the paint job? What is the wood species and color of the treads? You could cap the risers with some 1/4" plywood of the same species and stain color as the threads. What is the tread nosing overhang meeasurement? If you want to keep the risers then sand/scrape/fill them to make them smooth and repaint.
Hey
Not entirely sure what they are made of, some sort of old hardwood. They basically created a box around the whole stair (pictured here).
My intial hope was to keep them and just smooth out and paint them white - but I have toyed with the idea of getting a veneer, cutting it to size to put in front. The goal is for them to be white, so the species shouldn't really matter I would think.
I am not certain of the overhang (I can measure tonight), but it would certainly support a 1/4" veneer and then some - I would think closer to 1".
We also played with the idea of a thin wainscotting to cover the riser - but we are unsure we we really like the pictures we have seen online.
The issue we couldn't get past was how to hide the extra piece from being unsightly from the side, the best I came up with was caulk and paint.
Thanks for the input!
The reason I asked about the overhang is because for treads less than 11" deep Stair Building Code calls for an overhang.
Your stairs look awesome! I wish they stained the balusters instead of painting them - those look great!
My plan is to do cove molding under the tread and around to the return (white), and shoe molding (stained the same color) on the back where the riser and step meet, and have that all go along the edge where the tread and stair skirt meet.
So I am not sure if that would work with the cap your indicating - it may look even busier then it already does. Also - in cutting the face at a 45, can I really get another small piece at a 45 there to finish the return?
Attached is a picture of the plan, and it is basically to alleviate some of the sins of my amateur wood cutting skills!
So you'll just fix up and repaint the existing risers? If you can, mitered returns on the cove, aka scotia, and shoe molding will look nice and give them a nice finished look.
That does appear to be the plan - I will have to research about the mitered returns but I have installed chair rail before, so I would be pretty confident I can do something like that - fortunately I didn't need that type of return in my room!
Would you have recommendations for smoothing out that area - removing lumps/impurities.
Would you recommend paint stripper to get the old paint off and then sanding to smooth the finish?
I would stay away from stripper unless the paint is actually peeling. A good sanding with a random orbital sander will take the lumps off, it's a little late now, you should have done it before the treads were installed. Anyway your shoe molding should hide scuffs on the stair treads so just go for it. You may have to smooth out chipped areas with Bondo (body putty).
A regular paint scraper or 5 in 1 tool will work too. Will be easier to get closer to the edges and corners. Fill the divots and dings. Sand smooth and feather out any edges with sand paper to get a really smooth surface. Min Wax makes a good 2 part wood filler that will work or use the Bondo as Steve suggested.
Shoe mold placement
Installing shoe mold on the walking surface of the tread is NOT appropriate, it is a
tripping hazard and will not pass inspection. I know you probably aren't aren't having this inspected
but DON"T put the shoe mold on the tread, and if you already have done it, remove it!!
Geoff
Geof
The shoe appears to be at the riser / tread and tread / skirt.
the cove under the tread at the top of the riser.
If you added a cap you could cut the end at a 45 degree angle and install a small 45 degree angle return to it's end. Window sills are done this way. Or you could add an overlayed corner cap. I faced my treads with 1/2" ply which had an exposed end. I covered with a piece of molding which I milled up...pic attached
Pic..trying again.
You can plumb Bob....You can plumb your terlet...but why don't you just take your old tread and make a template/gig?
Assuming you made the new treads the same width, the hole you want will be the distance from the edge on the new tread as it was on the old. double check the old treads and see if the holes are all reasonably close to the same spot. Drill an old tread completely through (drill the old dowel holes from the top with a spade bit the same size. put a piece of plywood on the top of the old tread lining it up with the spot where the riser paint line was on the back of the tread. The ply needs to overhang the side of the tread by 3/4 of an inch. Tack it in place or screw it down. (BTW make sure you new riser was the same thickness as you old riser or you need to adjust.
Get some scraps of square screen stock/moulding and nail/screw it to the underside of the plywod overhang flush with the outside of the old tread. Flip the whole thing over and drill from the bottom of the tread through the plywood and now you have a gig that you can use to aling the holes on every tread.
The idea is to make a gig you can hold against theface of the riser and the edge of the new tread that will put your holes in the same spot as the old baluster holes.
Now is the point that you tell me you chucked all the old treads....but hey you learned a lesson.
But you can still make a gig to drill all of the holes once you get the first two placed on one tread. Go buy a dowel center at Homer de pot and put it in the holes you drill on your first tread and then lay your plywood on that first tread and pound it down on the dowel centers...now you know the exact center of the new holes. Put your guid edges in place on the plywood up against the new tread and then remove the plywood drill out the plywood and use the gig on all the rest of the treads.