Help! remove insulation between rafters
Hi. I own a small Cape Cod style home. In the summer it gets really really hot upstairs even with my AC on. As much as 15 degrees different than downstairs which is at 75 degrees F with the AC on. The AC system just can’t keep up with the heat gain. (Funny, when they installed it two years ago, they said that my heat problem upstairs would be solved). Well, guess what? Not! In the summer when I feel the walls upstairs you can actuall feel where the 2X6 rafters are thru the drywall ceiling by the increase in warmth at those locations.
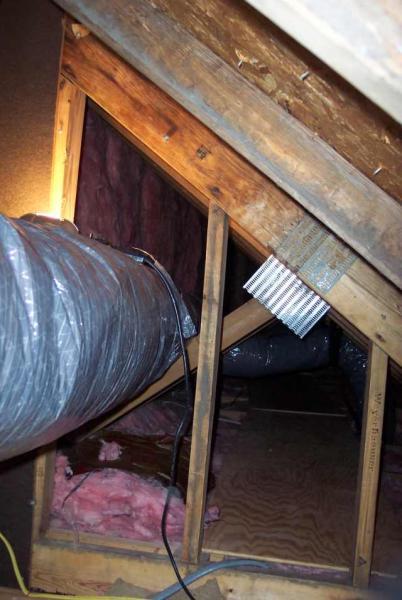
This past weekend I crawled behind the knee wall space to try and remove the insulation that is stuffed between the roof rafters above the slanted part of the ceiling to create proper airflow up to the ridge vent system that I have. In the hopes that this will help it to be somewhat cooler up there come summertime. Well in the first rafter bay, I managed to pull about 2 feet of insulation away only to discover that the rafter bay is stuffed all the way up even further and I can’t get to them. When I try to pull on the ones I can get to closest to me in the next bay they just rip and tear. Does any one have any ideas as to how I can pull the rest of that insulation out of there to create a free air flow channel up to the ridge vents. My home has both ridge vents and gable end vents. And, yes, I know all about the controversy over the effectiveness of having one and/or the other. I bought the house like this. The house has soffit vents but only on one side of the house (oddly). The rafter bays are stuffed with insulation on both sides of the ridge. Please check out the pictures. I would appreciate any ideas or help. Thanks in advance everyone!


Replies
Sorry about those larger file pictures, I've re-sized them here.
Are there any air return lines upstairs.
A two story house really needs return for the AC to work properly.
Yup. I have a large one upstairs.
To all, by the way, my house is located outside of Philadelphia PA.
pizza-
It looks as if there are no foamboard chutes lining the batts between the batts and the roof sheathing. Either the batts are catching on protruding nails from the roofing or the batts are layered over onto the flat ceiling area and won't be moved.
I would assume what you are looking to do is create ample air flow between the roof sheathing and the top of your batts without getting into a big project and tearing into anything which is understandable.
What will work to provide the airflow is compressing the batts down away from the sheathing instead of removal,
if the problem is indeed just the batts bunching up somewhere impeding the air flow.
One way to compress the batts away from the sheathing seeing it is such a short length of rafter to contend with could be something like 1" or 1 1/2" pvc conduit which has flex ability and feeding it from the kneewall spaces up between the rafters.
In the event it is too tight of an area in the kneewalls to complete the needed length to the ridgevent,
the conduit can be cut and a coupler added after the max length is between the rafters and the remaining length needed then added. The ends of the pvc conduit would need be rounded off to help minimize snagging.
Seeing your pics and the fiberglass batts in what looks to be 2x6 framing, are the batts faced R-19 and what rips is the paper facing?
Is it damp up there between the rafters or any signs of moisture be it then or now?
A real correction to this has the potential of a much bigger job if you want to lean that way.
Cheers
Parolee # 53804
The paper on the batts are facing toward the room (in other words the paper facing is against the drywall ceiling, not aginst the underside of the roof sheathing). I haven't looked closely for moisture evidence.
the batts are R-19
What would the "real correction" (as you put it) to the problem be?
Seeing you have been around BT since at least 2003 I take it you are probably somewhat familiar with the site and are aware of the search function.
Regardless it will not hurt to cover basics...
If you scroll up in the upper left corner of your screen there is an advanced search function that will take you to a page of instructions directing you to previous threads dealing with whatever you type in the search bar.
If you type in 'roof venting', 'foam insulation', 'dense cellulose' or other keywords of the subject matter you'll get a supply of data from those old threads.
There is no general location in your profile ie: what state the house is in, which would have a bearing on the various techniques available in a retro fit of this nature.
In a nutshell to really correct your situation generally it would take opening the rafter bays for access from the ceiling or roof to install the insulation system.
I say generally as there are dense cellulose applications and the same for spray foams which I have no familiarity with so hopefully some other poster might be able to expound on that idea.
What use the upstairs area is planned for will have a bearing also in that your willingness to remove the fiberglass insulation hints that summer cooling is more important than winter heating.
There are plenty of intelligent and experienced folks that read here and if you desire an exact recommendation it will need a bit more info for the BTers to be made aware of.
Ideally some outside pics of the house and the roof in question would be a help, the use of the structure, general location and any details you might be able to add.
Fiberglass batt insulation is generally considered as a last resort in that it carries inherent difficulties and shortcomings.
Cheers
Parolee # 53804
Thanks for the info!!
I did mention a while back in my 4th post here that I'm outside of Philadelphia PA.
Yes I'm well versed in the matter of roof insulation techniques (learned all about it here and thru all of the links everyone has provided) and the controversy that rages here about it. It seems to me that creating the air channel from the soffit to the roof vents is the way to go based on my research here. I think Joe Listurbek's pdf files on this bear this out too. I don't want to remove the insulation entirely because, yes, I realize that that would create winter heating problems. If I could create an air channel and slide rigid insulation (of sufficient R value) up in there that would help. I'm trying to avoid removing the ceiling to get at the insulation batts. I'm going to call the AC company that installed the system two years ago and see if the return just isn't drawing fast enough (although, they promised that it would). I'll bet it'll be a wrestling match with them now.
Sorry, I'd missed the location as I'd just reread your initial post and skimmed the others again before the last reply. My bad.
The consensus for the depth of the air vent channel between the insulation and bottom of the roof decking had commonly been 1 1/2" though others claim 1" will do and the foamboard channel inserts vary.
Blowing off the whole idea of venting and going with a hot roof is another option although in a retrofit it takes great attention to detail and would be more of the major project.
Seeing the short span it makes one dare trying simpler fixes. If you could find a way to feed those foamboard chutes up there that might do the trick but a 6"fiberglass R-19 batt is pretty minimal for affect on heating and cooling but is better than nothing.
Feeding foamboard up there from behind the kneewall could be a possibility depending on how much you hate yourself and the desire of the masses here would want to see the video:o)
If you are going to try that, get'er done before the weather breaks as the heat buildup in there might prove nasty work conditions.
I gotta tell you that tho' it sucks, in this case removing the drywall is the easy way to really address the issue. Sometimes straightforward go forth and conquer is the best strategy but it's your call.
But keep on poking around, sometimes livable compromises can be stumbled upon.
Cheers and best to you.
Parolee # 53804
Edited 4/11/2007 10:37 pm ET by rez
Thanks. I know it's going to be difficult. Even trying to slide a channel up there would be next to impossible with all of those nails from the sheating. I'll keep poking around.
I feel your pain. About a year and a half ago, I purchased a cape code outside of Philly, and soon after noticed the same issue that you face. I have a cedar roof, and trying to push one of those foam panels between the insulation and shingles was fruitless; the nails chewed it up before I even got started. Since then, I've also been contemplating various possible solutions (other than the last resort of ripping out the drywall). One idea that looks like it could POSSIBLY have promise is on page 100 of the May '07 issue of FH. It's called "Clip-Vent," and I'm thinking that the design MIGHT allow the insertion of the panels without the "nail-snagging" issue. Again, I haven't tried it yet. But since you're in the same boat, I thought I'd throw it out. Also, as I think someone else mentioned, I've toyed with the idea of pushing some inch-and-a-half PVC pipe between the isulation and the shingles too. Though that wouldn't be perfect, it seems like it will at least provide some marginal airflow.
Yeah, and it would be somewhat better if you could find perfed pipe.
So convenient a thing it is to be a reasonable Creature, since it enables one to find or make a Reason for everything one has a mind to do. --Benjamin Franklin
Probably not much help here, but here's a sort of chute I used before adding more blown cells to our low-slope attic. It consists of two long 1x2s (approx 7 feet -- had to trim from 8 feet to be able to move them in tight attic) and a shorter piece, plus a 2x3 foot corregated plastic political sign and another small piece of signboard, all assembled with staples. The short piece of 1x2 is installed flat, about six inches from the eave end of the unit. It isn't attached to the other 1x2s directly but is simply held in place by the staples through the signboard. (A jig is invaluable for assembly.)The spacing between the 1x2s is determined by your rafter spacing, with allowances for however inaccurate your builder was in spacing the rafters. The length of the 1x2s depends on clearances in the attic -- longer makes installation in a low pitch easier, but at some point they become too long to move around. The appropriate size of the sign depends on the spacing of the rafters and how long a chute you need to hold back anticipated insulation.The unit is installed sign-side-down, with the "tail" (seen on the left) extending down into the soffit area slightly. After the tail is in position the other end of the unit is lifted upward until it's flush with the bottoms of the rafters, and the ends of the 1x2s are tacked to the rafters with screws.
So convenient a thing it is to be a reasonable Creature, since it enables one to find or make a Reason for everything one has a mind to do. --Benjamin Franklin
My guess is that unless you are replacing the existing insulation with a higher performance insulation with provisions for an air channel, removing the insulation will give you no noticeable improvement in the summer and much larger heating bills in the winter. The compression ideas that others have mentioned may help some.
I doubt that there is an economically feasible way to significantly improve the insulation system as a retrofit unless you are planning to totally gut the upstairs interior or install a second vented roof system over the present one.
Trying to use the same system to heat and cool a multistory house is always difficult. As I see it, you can increase the supply and return capacity to the second floor (probably difficult as it would require tearing out walls or building enclosures around ducts going through the first floor) or add additional a/c capacity to the second floor such as a window a/c unit. If the second floor return is at the floor level, it may help to raise it to the ceiling level so that it pulls out the hottest air, not the coolest air. If there are multiple rooms that get closed off, a single return is not adequate.
Yeah, I'd suggest trying to work something in above the insulation. Even a piece of 1x4 inserted flat and then twisted up on end would produce a significant air channel. Better would be several pieces of 2-3" plastic conduit. And probably several other options.
I'd think about adding (or enlarging) a couple of gable vents. If you can dump the heated air that accumulates above the flat part of the ceiling, you'll be way ahead.
There are gable vents in my roof too at booth ends of the roof. As I mentioned too, there are soffit vents too but only on one side of the house (the front). My house is a simple rectangle (Cape Cod) with a gable roof whose long axis runs parrallel with the front street.
The second floor stays very warm in the winter but hot as blazes in the summer and that's with the AC on. As much as 15 degrees warmer than the downstairs. With the downstairs set at 75 degrees.
As some have said here already. 1x4 turned on edge will help with venting the area. A rig so to speak. Aside from that there will be variations of the same idea. None of which will make a big differance in cooling in the summer. Installing a gable fan in one of your gable vents to pull air faster from the area's may help some ,it will create faster draw in through your ridge vents and out the fan. This would most likely create greater release from the area's between the bays but not greatly.
Most everything here is just a small band aid. I think it comes down to getting you proper or sufficent airflow for logevity of your roof/sheathing system. However once this is accoplished addressing the heat build up in the living area is something
I think you will be addressing even after accoplishing your first goal.
Do you have good soffit vents? is there insulation stopping flow there to?
I have gable vents at both ends of the gable roof and and soffit vents on only one side of the house (the front) oddly. The front of the house has an eave to allow for them whereas the rear of the house has nearly nothing in terms of an eave hence no soffit vents back there. It's as if they built the house wrong (I purchased iit this way 3 years ago, it was built around 1983).
I'm trying to find out too how I could possibly install some kind of small soffit vents on the side that currently doesn't have them but with only a 3" or less eave there I haven't found a solution yet.
you could try vented edging. There was a post here a while back about a week or two with a link. it would help you out. You would need to cut the fascia down an inch then install it under the shingles. Another option would be to vent the side walls but that would not look too smooth. Here you go!
http://www.airvent.com/professional/products/intake-ventedDE.shtml
Edited 4/12/2007 11:03 pm ET by AllTrade
I had a client with a about a 4" soffit, there was just enough room fom me to reach down from the attic side and drill a series of 1" holes through the soffit board. Covered the holes on the outside with perforated aluminum soffit grate. There was no ridge vent either, so we installed a gable fan with a thermostatically operated switch. I think we set it to about 95 degrees. When the attic temp reaches 95, the fan kicks on and sucks out the hot air in short order. The client claims the solution keeps her her 2nd floor temperatures at a reasonable level that allow her window AC units to keep up. Prior to installing the fan, the 2nd floor temps on hot summer days were intolerable. Using a gable vent fan is not a perfect solution, but it works great in this situation, and it may be worth considering for your fix as well. Gable vent fans are readily available anywhere, this particular unit came from HD.
pull the rest of that insulation out of there to create a free air flow channel up to the ridge vents
The real question is really, will that air flow actually cool the roof structure at all--which is improbablt give that you can feel the studs now.
Ok, how to "fix" too hot upstairs? Well, probably what you need is a zoned t-stat to get more cooler air upstairs "first" (you can then let gravity carry it downstairs).
Likely, you need some coravent channels (and octupus-limber types) to go into the rafte bays. Follow that up with some blown-in cellulose for the best insulation compromise (since what you may really have needed was to not have interior finishes directly fastened to exterior surfaces, a thermal break of some kind, in other words).
the ideal solution would be to remove the drywall on the slope and fur down those 2x6's and make them at least 2x10. then you have enough room for insulation and ventilation. or you could just use a garden rake to remove old insulation.