*
Sorry if I’m being redundant here, but I posted a similar message a few weeks ago, and it seems to have disappeared. I’m building an indoor, japanese style soaking tub…like a mini-hottub, without the jets. The plan is as follows: Build the basic shape with treated plywood; a layer of reinforced concrete over that; a layer of Bostik Ultra-Set waterproofing; and a finish layer of colored concrete, thinset or??? I’d like to avoid having to use ceramic tile, as the tub will have some rounded corners and coves which would be a pain (given my limited skills) to install. I could use some advice on any aspect of this project: The structure, the waterproofing, the heating and other equipment, sealing penetrations, the drain (if one is even necessary), and the finish coat.
Discussion Forum
Discussion Forum
Up Next
Video Shorts
Featured Story
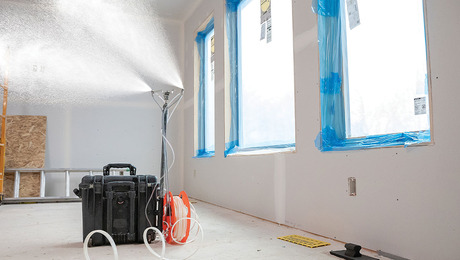
Simple air-sealing measures and spray-applied sealant lower energy bills and increase comfort without the need to tear the house apart.
Highlights
"I have learned so much thanks to the searchable articles on the FHB website. I can confidently say that I expect to be a life-long subscriber." - M.K.
Fine Homebuilding Magazine
- Home Group
- Antique Trader
- Arts & Crafts Homes
- Bank Note Reporter
- Cabin Life
- Cuisine at Home
- Fine Gardening
- Fine Woodworking
- Green Building Advisor
- Garden Gate
- Horticulture
- Keep Craft Alive
- Log Home Living
- Military Trader/Vehicles
- Numismatic News
- Numismaster
- Old Cars Weekly
- Old House Journal
- Period Homes
- Popular Woodworking
- Script
- ShopNotes
- Sports Collectors Digest
- Threads
- Timber Home Living
- Traditional Building
- Woodsmith
- World Coin News
- Writer's Digest







Replies
*
Yeah, Tom, I remember you. My suggestions mainly concern waterproofing and sealing. These would include:
1) Install 15# felt lapped correctly over all wood members.
2)Ixnay the Ultra-Set and substitute a vinly membrane wrapped to the outside of the tub.
3)Use butyl rubber for seal at all membrane penetrations.
4)Some may laugh, but a 50/50 mix of pastic and common in the mud somehow is less permeable. Or, use standard mud mix and use good cement sealer. Make sure it will stand up under fulltime submersion.
5) Definitely, install a drain.
6)What is going to support all this? I have done two of these. The first one was supported on grade (hole cut in first story floor over crawlspace); the second a team of carpenters earned their keep by beefing up floor joists. Check your local code.
7)You could paint using epoxy. Or, stucco pigment thrown into finish coat?
*
John, Thanx for the response. I do have a couple questions regarding your suggestions. I'm pretty much a novice with concrete, so am proceeding very slowly and try to avoid fatal errors. Since this is my own house, I have that luxury.
1)What is the "pastic and common" you referred to in mixing the mud? Is this a typo or some product I've never heard of?
2)If I do use a concrete sealer, do you know of any brands that will stand up to constant submersion in heated, chlorinated water?
3)Is there some type of drain that will be totally leakproof? I'm figuring on using a standard shower-type "weep" drain, and installing a valve in the crawl space for when I need to drain it a couple time a year or so.
4)Is there some type of epoxy paint made for this purpose? I have literature on one brand of epoxy pool paint, but they only make the standard blues of backyard swimming pools. I need a bone or tan.
5)Is the butyl rubber you refer to a solid tape like I've used to seal windows, or the standard butyl caulk of hardware store variety?
The weight is transfered directly to the footings in the crawl space via two new beams and posts.
Thanks in advance.
*
Rich here, er, I mean "John".
1)I'm assuming you'll being mixing your own mud for this project. When doing so, use a mixture of plastic cement and common cement. Use this for the finish coat only.
2)I don't usually work around chlorine so I cannot advise on a sealer for this. Try swimming pool contractor.
3)The drain is only as leakproof as you make it. I use a two part flange type drain in all wet areas. Never a problem. Get them at plumbing wholesale house.
4)Go to marine supply house for paint. Ask lots of questions re: various epoxy products they have. They'll be sure to have bone or tan.
5)It is caulk, in a cartridge, applied with a gun. Don't know about standard hardwarestore variety. That sounds scary. Don't cheap out here.
6)Framing support sounds good.
*
Sorry Rich.....er, John. I was confused. Both have an "h", so it's east to see how I went wrong.
*Concrete weighs 150 pounds per cubic foot and water weighs 62.4 pounds per cubic foot. Calculate the volumn and then the weight of your hot tub, and you will see why it should go on the ground. Remember, concrete always cracks and it is always permeable (both with liquid and vapor). Go look at your neighborhood pools. Use plaster for the water proof barrier (properly done, the plaster will last 15 to 20 years). do not rely on felt or any other water resistant barrier on the outside of the concrete shell. they may work for a little while, but they will eventually leak. Are you using the plywood or the concrete for the structural shell. If you are using the concete, you must have some type of reinforcing material to help hold it together. If you rely on the wood, then becarefull of long-term water leaks that rot the wood and weaken it.
*
Hi Tom,
You mentioned not wanting to use tile due to the "round corners" in your soaking tub. Have you considered using mosaics?(they come on a sheet, usually 12X12) They "wrap" quite nicely. If you do decide to tackle the mosics, I have found that if I mix my thinset quite stiff, I am able to hang the mosaic sheets starting at the top instead of the bottom, it seems to go A LOT faster and is in general, easier to control as far as any "slipping" might go.
Good Luck,
Donna
*Tom: I'm also planning a soaking tub for my bathroom (about 22x38 oval, for two). Having built several fixed and several portable hot tubs and several stitch-and-glue kayaks, I'm constructing mine a little differently to save time, money, and leaks. One sheet of 4mm marine plwood for the sides, joined with epoxy and a 4-inch spline of plywood. Floor of the same material, joined with a fillet of thickened epoxy and reinforced with fiberglass. My 16-foot kayak of the same construction handles 4-foot seas and landing on rocky beach. A stationary hot tub is much less taxing. System Three Resins is good, easy, has good instructions. 206-782-7976 in Seattle. There are lots of good books on stitch-and-glue boat building. Look it up and see what you think. Having built four boats that way, I'm familiar and comfortable with materails and figure it will take about 15 hours time to construct. Want a drain? Just epoxy it in place. Want a fill pipe or fitting for a water heater element on the side? Just drill a hole and epoxy a pipe fitting in place. That was the nicest thing about fiberglass or epoxied hot tubs and vessels that I've built - how easy those connections are. -David
*
David,
Thanks for the tip. This was actually one of my first thoughts, but because of some cracks that have developed in my boat, using epoxy and filleted corners, I have shied away from the idea. It's not too late to go back, though. I'm still at the plywood box stage. (Granted, a boat takes substantially more of a beating than a tub!) What type of finish over the epoxy would you recommend. Could I tile over it using thinset? There's always paint, but that seems to be a high maintenance finish. Any other ideas?
Tom Laing
*
Sorry if I'm being redundant here, but I posted a similar message a few weeks ago, and it seems to have disappeared. I'm building an indoor, japanese style soaking tub...like a mini-hottub, without the jets. The plan is as follows: Build the basic shape with treated plywood; a layer of reinforced concrete over that; a layer of Bostik Ultra-Set waterproofing; and a finish layer of colored concrete, thinset or??? I'd like to avoid having to use ceramic tile, as the tub will have some rounded corners and coves which would be a pain (given my limited skills) to install. I could use some advice on any aspect of this project: The structure, the waterproofing, the heating and other equipment, sealing penetrations, the drain (if one is even necessary), and the finish coat.