Can someone clue me in as to why I get this gap at the ceiling after coping crown molding? I miter the crown and cope the profile.
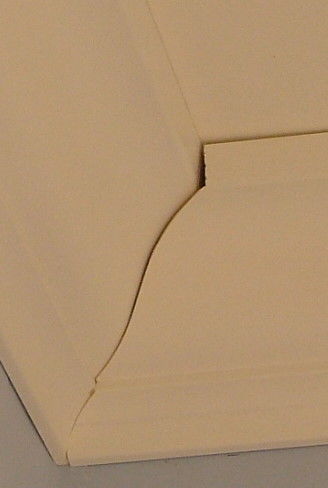
Can someone clue me in as to why I get this gap at the ceiling after coping crown molding? I miter the crown and cope the profile.

Look high and low to find and plug air leaks that cost you money and comfort.


"I have learned so much thanks to the searchable articles on the FHB website. I can confidently say that I expect to be a life-long subscriber." - M.K.
Dig into cutting-edge approaches and decades of proven solutions with total access to our experts and tradespeople.
Start Free Trial NowGet instant access to the latest developments in green building, research, and reports from the field.
Start Free Trial Now


Replies
no relief back cut...
crown piece on the left, the top is kicked back to the wall slightly..
Life is not a journey to the grave with the intention of arriving safely in a pretty and well preserved body, but rather to skid in broadside, thoroughly used up, totally worn out, and loudly proclaiming
WOW!!! What a Ride!
Forget the primal scream, just ROAR!!!
The coping job itself looks very good, but I think when you cut the inside miter, the molding wasn't sitting at exactly the right spring angle.
How are you cutting? Upside-down-and-backwards (you need to use a crown stop) or "on-the-flat" (check you miter saw for accuracy).
cutting upside down & backwards with the back of the molding flat and tight against the miter box jig.
Either your angle is off when you cut or the molding doesn't match.
First, check your angle when you cut it and when you put it on the wall. These angles must be perfect and match the crown's angle.
Second, I've bought cheap molding from HD where two sticks from the same pile didn't have the exact same profile. You could be trying to match profiles that weren't intended to go together.
not sure if you had access to the previous post...i am not using a compund miter saw, but rathr, cutting upside down & backwards with the back of the molding flat and tight against the miter box jig....so i'm not sure what you mean by, "First, check your angle when you cut it and when you put it on the wall."
You may be cutting it perfect, but then not putting it up straight. The angle that it sits (upside down and backwards) on your mitre saw has to be the same angle that you put it up on the wall.
Obviously from your picture, something isn't lining up right. There's three options, (1) the original cut isn't perfect, (2) the pieces don't match, or (3) it's being hung out of alignment.
It sounds like you have number one figured out, two is not very common, and I'm guessing it's number 3. Is there a 90 degree angle in the corner? That would throw off the alignment as well.
I reread my post and I think I'm being confusing. So I drew a picture.
The angle in the picture is normally 39 degrees for your standard crown. If it's less then 39, then the top of the crown will open up, like in your photograph. You could also say the the crown is too far down the wall and it needs to be moved up.
And of course, if it's more than 39, the bottom will be open. This would be the case if the crown were too high and it needed to be moved down.
The normal spring angle for crown molding is 38°.
You need to draw a line on your miter saw fence to align the wall edge and draw a line on the wall the same distance from the ceiling.
View Image
Riversong HouseWright
Design * * Build * * Renovate * * ConsultSolar & Super-Insulated Healthy Homes
Edited 2/27/2008 12:47 pm ET by Riversong
110, 120, whatever it takes.
----NEWSFLASH----
Wall corners are never perfect. Put a block of wood on the bottom of both pieces and drive them up till the cope is tight.
Fasten your crown from the middle of the wall moving toward the end and then you can tap the corners up or down for a perfect fit- then nail em in.No Tag
reading thru this thread wondering how long it would betill someone got it. Even with perfect 90 walls, which I've heard of, but rarely seen everyone seems to forget about the ceiling. Dry wall guys pack the mud in herwe to throw off the best framing angles. I see the marks on the wall and hitting right on the marks in this case means squat. With crown as my old boss used to say " If it looks right , it is right." Sledgehammer hit it right
These guys are too busy figuring in the coriolis effect base on the phase of the moon in relation to the longitudinal differential from the equator based on the relative humidity time differential from greenwhich mean.
Makes me wonder who has actually installed crown in the same dimension I exist in.
Wall corners are never perfect. Put a block of wood on the bottom of both pieces and drive them up till the cope is tight.
But if you don't understand why the gap is on the top, or the bottom or even the middle, how do you know which way to give it a smack?
I'm very good at smacking it the right way because all of the different holes make sense to me.
(if that doesn't get me in the BT Quotes thread, nothing ever will)
If you smack the left piece up, as Doug and others have suggested...as the bottom of that piece moves up the top should roll out closing the gap.If that does not work, slip two playing cards in above the left piece at the ceiling, then stuff a shim inbetween the playing cards (think shoehorn that protects the crown and ceiling). Cut off and caulk in the shim (that gap is easier to hide than a goofy coped joint).
If the gap is at the top smack it up. If it's at the bottom you cut it too short... In the middle you need to pick up the most up to date help wanted section of the newspaper.
This ain't rocket science.
Apparently it is... ya gotta smack both pieces up. I'm betting he hasn't back cut the cope far enough. Winterlude, Winterlude, my little daisy,
Winterlude by the telephone wire,
Winterlude, it's makin' me lazy,
Come on, sit by the logs in the fire.
The moonlight reflects from the window
Where the snowflakes, they cover the sand.
Come out tonight, ev'rything will be tight,
Winterlude, this dude thinks you're grand.
JMadson,
Nobody could improve on your explanation.
I would try driving the moulding on the left side upward with a hammer and a block until it fit before trying to remove anything.
Ron
your deductions make alot of sence...i think #3 may be the problem as well....thanks
Where the straight part meets the start of the S curve, you often end up with a sharp corner on the back. You have to cut that corner back or it will hit and keep the joint open. Your cut doesn't look accurate, whether the first molding has tipped in on the top or the miter for the cope was off. It helps to make a mark from the ceiling down so every piece on the same plane. It only takes a tiny difference to knock the miter out of whack. Using a backer table on the miter saw, with a stop, helps keep all pieces registered the same, when cutting. It also indicates exactly where the blade will cut.
When I install crown, I leave the piece a little long. You can only leave it 1/2"-3/4" long. You can get the coped end and a fair part of the molding in place, against the wall and ceiling. You have to leave the long end sticking out. This will allow you to check the fit of the cope and make any necessary alterations. Even when everything is cut perfectly, a cope can be slightly off in fit. To get the correct length, make a mark on the molding and the wall where the extra long piece fits. You can then measure from the far corner to that mark and transfer that amount to the molding. Much better than trying to bend a tape in the corner and guess
Beat it to fit / Paint it to match
Did you install blocking and snap a line on the wall ? You can determine/cut accurate angles and make perfect copes and scribes, but if the molding isn't installed in a straight line, the geometry changes and things won't match perfectly. As you can see, even tiny discrepancies stand out.
i did use blocking and i also made intermittent lines where the proper crown should lie....but i think in this 80 year old house the "tweak factor" threw my lines right out the window....however i think your assertion about the geometry is right on the money...thanks
Edited 2/27/2008 11:11 am ET by steve801
When you nail that piece on the right(the uncoped piece) leave the last 4 or 6 feet un-nailed. then when you have your coped piece up there you have the ability to adjust the loose piece to fit.
For now though all you have to do is smack that crown(the one on the left) up a bit and you should be good to go.
Doug
Using a block of wood is the way to go, but I would add that I rip 2x material to the angle of the back of the crown placing this behind the crown to have backing to nail to in the corners and along walls that joists are parallel too. I rip the 2x's with a gap to allow adjustments but tight enough to have nails hold. A 1/4" less should meet both requirements. Before placing the finished crown in place set a scrap piece of crown in place as it will be when installed. This will give you a good indication if you have taken enough material out.
All walls and ceilings are different, and you can snap as many lines and measure perfectly up, down and sideways 'till next Tuesday's breakfast and it still won't be 100% (or it might) and there will always be that little opening at the top of the joint (or maybe there won't).
My little 5 cent answer lies in always making a coped mating piece before you install any crown. Make it around 12" long, and cope both ends and do a careful job. Now stick it in your tool belt.
Nail your long wall pieces in the middle so it stays up then go right to the end that you are working on, (I like to work left to right). Get out your test piece and put the two together 'till they mate perfectly, then while still holding the installed piece, put the test piece back in your belt, grab your gun that's been hooked on your belt and start shootin'. Always check with your tape that you are in the ballpark of the correct spring angle. Eyeball the rest of the run to a straight line and then open fire.
After you get the hang of it, you will be pretty near 100% almost 100% of the time and will have to endure hours of compliments from your boss and the HO.
Good luck & have fun.
The cope piece looks fine. The first piece you put up is too low.This changes the spring angle.Take off the coped piece,pull the first piece off. Now take a short length of crown and hold it in place against the wall.Make sure the back hits the ceiling and wall as perfect as possible,the wall and ceiling may not be 90°. Lightly mark the bottom of the scrap crown, repeat at each corner and a couple of places inbetween.
Nail the first piece back up leaving the last 3 feet at each end unnailed. Fit the coped piece in, and put 1 or 2 nails in to hold it. The joint will be perfect if the cope is good and the moldings were from the same run of millwork.Leaving the nails out of the last three feet gives you the chance to finagle the butt end if needed.
mike