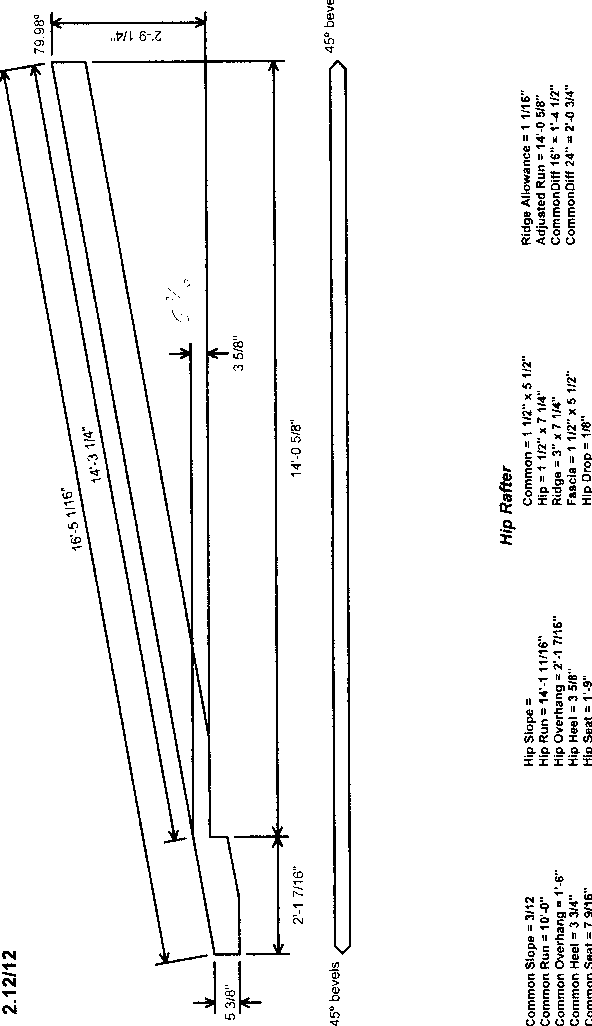
On the attached drawing it appears that the birdsmouth’s depth exceeds 1/4 of the rafter. What should I do? It is a 3/12 pitch and a 2X8 hip rafter. It is because it is such a low pitch with a flat ceiling. Any ideas on a solution are welcome. Thanks
Edited 4/8/2005 9:48 pm ET by BHACKFORD


Replies
Turn the drawing 90...easier to read
I just looked at your picture again and notyiced that it says that your seatcut on the common is 7-9/16". Why is it that big and what size rafter are you using and are the walls 2x4 or 2x6?If the seatcut is 7-9/16" it's wrong, unless your wall is a 2x8 and even though you shouldn't cut 7-9/16" for the seatcut and that's one reason why your hip seatcut is 1'9" and your taking so much out of both common and hip rafters.Joe Carola
The walls are 2X6 but this is the hip and must be that length to cover the corner of a 2x6 wall, right? Should I shorten it? Easyrafter will not let me I tried but the diagonal seat of the hip does not change???
"The walls are 2X6 but this is the hip and must be that length to cover the corner of a 2x6 wall, right? Should I shorten it? Easyrafter will not let me I tried but the diagonal seat of the hip does not change???"The hip length is good and can't be changed. Every hip HEEL/HAP cut is all determined by the common rafter HEEL/HAP cut,you never go by the seatcut. The problem that you have is that Easy Rafters gave you the wrong seatcut 7-9/16". you should cut the seatcut a 5-1/2" or 3-1/2" and you will get your HEE/HAP cut measurements that I posted and also give you the hip HEEL/HAP cut.When cutting a hip you never go by the seatcut it's always the common HEEL/HAP cut. If you used a 2x12 or a 1-3/4" x 14" lvl for the hip the HEEL/HAP cut stays the same less your drop which is 1/8" which is correct for the 3/12 but using a bigger hip will give you a bigger seatcut because your always lining up the HEEL/HAP cut on the hip from the top and down less the drop to plane in the top of the rafters at the building with the common HEEL/HAP cut.Joe Carola
"Should I shorten it? Easyrafter will not let me I tried but the diagonal seat of the hip does not change???"I have to laugh at Easy Rafters not letting you. That's too funny. Tell easy rafters to shove it and see what it says. All joking aside, you cut the rafters the way you want and the right way. That program keeps giving the wrong seatcuts.Have you cut the commons yet?Use Joey Rafters measurements that I gave above and if they're wrong tell me to shove it.....;-)Joe Carola
Thanks for the info. Could you define HEEL/HAP cut? Heel is vertical and Hap is horizaniatial cut of the birdsmouth? Thanks again for all your help.
"Could you define HEEL/HAP cut? Heel is vertical and Hap is horizaniatial cut of the birdsmouth? Thanks again for all your help."HAP means (Height Above Plate) which is the vertical measurement on the outside of the building line after you cuit your level seatcut and is the same thing that you have on your drawing as Common HEEL and Hip HEEL. Some people here call it Heelstand some call it Heel and I call it HAP so I write it as HEEL/HAP meaning the same thing so if anyone reads it will know what I'm referring to. I've aslo seen that the HEEL cut is what's left over from the seatcut and down. I'll post a drawing."Also these number do not change as the run changes only as the pitch changes, right?"Yes, the run doesn't change anything when laying out the birdsmouth, just the picthwall thickness and seatcut and the width of the rafter 2x6, 2x8 or 2x10. Those will change the HEEL cut.Joe Carola
Joe, the Heel is the Hap, in me neck of the woods.
Your picture shows the heel and hap as something different and around here, I would say that is an incorrect drawing.
Also around here, our birdmouths are a product of several factors, which are usually out of our control. 90% of the time, our conventional framing is connected in some way to trusses and we don't have the luxury of adjusting our heels. Instead, they are a calculated height dictated by the span (usually the foundation governs) and the plane of the prefabbed trusses.
I have never measured or talked about the length of the level cut, nor meaured or thought about the distance that your picture shows as the "heel".
This just shows us how different regional practices are.
blueJust because you can, doesn't mean you should!
Warning! Be cautious when taking any framing advice from me. There are some in here who think I'm a hackmeister...they might be right! Of course, they might be wrong too!
HEEL definition
I know this is a 9 year old thread but since it still comes up in search engines I think this would be best explained a bit further.
Much of my experience we used in PNW Long point to Short Point or Short Point to Short Point etc to explain a measurement to be cut on a known angle. This way one call out lengths to someone else to cut rather than get all mixed up on heels toes and luckily they didn't call the seat cut an ankle cut. It doesn't mean we don't make mistakes it just means we understand more than likely the description of what is needed without throwing heel and toe in. I would assume part of this is how I learned framing. When I began there was no speed squares but squangles existed which we used in conjunction with tri squares and framing squares. A nice feature of a squangle is it gives you a 4" seatcut to fit over 1/2" plywood just by setting the squangle to the desired angle of inclination/ slope / pitch etc. This was quite handy in the days of 2x4 exterior walls with half inch plywood.
I know what hes saying but mixing the two words Heel and Height and naming them HAP together is not helping define where Heel came from.
Common Rafter Dimensions, Adjustments and Heel Height (H.A.P.)
http://www.oocities.org/web_sketches/hip_valley_dimensioning/common_rafter_hap.html
I would define Heel this way. The Heel Line is actually the entire horizontal level line or part that matches the top of the top plate. This line is what seat cut horizontal line matches. The Heel really being the part we want to sit on the top of the wall.
Where as Height Above Plate or HAP an acronym that came long after I began framing and means the distance form the outside of the top of the top plate to the top of the rafter on a plumbline or above the apex of the seat cut. Yes we were always aware of height above plate for both rafter strength and planing into trusses. Also heel bearing point on the inside of the top plate when possible.
The issue is 1) heels should not extend into the interior and 2) the HAP should not be less than 2/3rds of the height of that plumb line. There are some that say the seat cut below the top plate on the plumb cut should be only 1/4 rather than up to 1/3rd.
Obviously dropping a hip to plane in has effect on its HAP and where its heel begins. I am not really trying to get into that here just trying to explain to people that the heel is not the HAP. The HAP is at the outside of the wall perpendicular to the Heel but they are not the same thing though many drawings explain it that way.
The attatched image though upsdie down shows this. Its from a simple pole barn building link here. What the heel really means is the long side of the rafter square. At least in this instance. Plumb Cut and Heel Cut.
http://www.pole-barn.info/building-rafters.html
The upper video makes me laugh as he is goes into the variety of names for a seat cut and the 2/3rds method and full bearing.
The lower video is even funnier calling the short side of the farming square tongue and the long side the body. Perhaps it is called that in the instructions. IDK.
In addition this problems in residential construction book link below shows the heel and its location to the inside for good bearing vs a heel sticking too far in. Funny how it doesn't discuss HAP at all and the 2/3rds or 25% rule I hearing from some. Being 1/4 vs 1/3 rd out of the plumb cut for the seat maximum to preserve the rafter strength. Some place there are people arguing to use clips only and no seat cut. I would like to see them build roof with 24' 2x12 or 3x12 and set them on clips. Special simpson variable connectors. I think at that point they might understand the usefulness of a seat cut.
Page 38 Roof Framing diagram. Also they show some other things like tapperin ceiling joists too much. But oddly do not seem to go into HAP measurements from looking at it. I think this was created for building inspection.
http://books.google.com/books?id=iwSasc7rowcC&pg=PA38&lpg=PA38&dq=heel+or+toe+bearing+with+rafter&source=bl&ots=QXpuP2csh6&sig=aBxUyKfe4mv2pWTq5bQon4cZvj8&hl=en&ei=L8gnTIqtL9CHnQfkk9m8Bg&sa=X&oi=book_result&ct=result&resnum=1&ved=0CBIQ6AEwAA#v=onepage&q=heel%20or%20toe%20bearing%20with%20rafter&f=false
Unfortunately the forum cut the image down so you cannot see the word Heel on it to the left. But if you click on it it will show.
You all put the Heels on her and have a HAP good time.
I just looked at your picture again and it says 2x6 commons.If your using 2x4 walls the HEEL/HAP cut would be 4-13/16" with a seatcut at 3-1/2" for the common.Your 2x8 hip, the HEEL/HAP cut would be 4-11/16" with a seatcut at 1'4-9/16".If your using 2x6 walls and you cut the seatcut at 5-1/2" your HEEL/HAP cut would be 4-5/16" for the 2x6 common.Your 2x8 hip, the HEEL/HAP cut would be 4-3/16" and your seatcut would be 1'7-7/16".That picture looks like you got it from the program "Easy Rafters". Anyone who posts numbers from them usually gives the wrong HEEL/HAP cut height. I don't know why Easy Rafters does that.If you room were cathedral and you had x 2x4 wall or 2x6 wall and Easy Rafters tells you the seatcut 7-9/16" you have a problem.Joe Carola
"If your using 2x6 walls and you cut the seatcut at 5-1/2" your HEEL/HAP cut would be 4-5/16" for the 2x6 common." What is the HAP cut? Also these number do not change as the run changes only as the pitch changes, right?Thanks
HAP = height above plate, or the amount of material left above the plate measured in a verticle direction if that helps.
Q: does the level cut of the birdsmouh really need to cover the entire top of the wall plate?Sorry to butt in here...
Matt
PS: To help with terminology, etc, check out Joe Fusco's web site. for example:
http://www.josephfusco.org/Articles/Roof_Cutting/raftercutting.htm#What%20is%20the%20birdsmouth and scroll down to "What is meant by the Birdsmouth?" read the next 2 or 3 descriptions.
He is a master carpenter who used to hang out here a lot. Not sure why he left but there were some very heated discussions. Maybe he got tired of arguing with people who thought they could offer their advice by reasoning their way through things but had no actual expierence... which works sometimes...
Edited 4/9/2005 8:57 am ET by DIRISHINME
Q: does the level cut of the birdsmouh really need to cover the entire top of the wall plate?Sorry to butt in here...
No it doesn't. There is a minimum bearing according to the code (which may vary) and there is a maximum you can cut out of rafter stock.
On most roofs, I am for a 3" seatcut which almost guarantees I won't overcut the hip unless I'm required to use some really deep lvl for the hip.
I don't know why that first drawing was so big but here's another shot. I draw these in paint and never had to shrink them before.Here we go.Worked because the first one was in BMP not JPGEJoe Carola
Edited 4/9/2005 9:18 am ET by Framer
Thanks now I understand HAP among many other things. I am really not this slow but I was hoping you could further explain...."1'7-7/16" in the following context....Your 2x8 hip, the HEEL/HAP cut would be 4-3/16" and your seatcut would be 1'7-7/16". So the seat cut needs to be 1'7-7/16 long? Plywood gussets will be needed, right?Thanks for all your help
"So the seat cut needs to be 1'7-7/16 long?"
I'm with Blue on this point: Why are you even discussing "length" of seat cut? Regional terms may vary, but your plumb-cut is basically the amount of rafter below the plate, and H.A.P. is the amount of rafter above the plate. Once your H.A.P. is determined, that alone will determine the seat-cut on your hip. The only other thing you need is the run, to layout the hip rafter. If you want to know what the length of the seat-cut is, it will be proportional to the depth of your plumb-cut. i.e. on a 2:12 roof the equation for the hip bird's mouth will be 2/16.97(or 17) = plumb-cut depth/length of seat-cut. Basic math will get you the rest.Or better yet, just lay your framing square across the rafter at 2:17, and mark your plumb line. Then lay it again at 2:17 across the point of your plumb-cut, and measure the level line at that point.
View ImageView Image
Edited 4/9/2005 6:11 pm ET by Huck
"When cutting a hip you never go by the seatcut it's always the common HEEL/HAP cut. If you used a 2x12 or a 1-3/4" x 14" lvl for the hip the HEEL/HAP cut stays the same less your drop which is 1/8" which is correct for the 3/12 but using a bigger hip will give you a bigger seatcut because your always lining up the HEEL/HAP cut on the hip from the top and down less the drop to plane in the top of the rafters at the building with the common HEEL/HAP cut."That's what I said to you in one of my posts and you said, "So the seat cut needs to be 1'7-7/16 long? Plywood gussets will be needed, right?"The seatcut will all depend on what you make the common seatcut and HAP cut, so if you make the common seatcut at 5-1/2" for the 2x6 wall then you'll have a 4-5/16" HAP cut for the common and you will make your HAP cut for the hip 4-3/16" which will give you a 1'7-7/16" seatcut for your hip.It's all up to you and what you cut your common seatcut at that will determine your HAP cuts for the common and hip which will determine your seatcuts. Again I never go by a seatcut for a hip I just layout the plumbcut and mark down the HAP cut and scribe the seatcut and whatever it is it is.Now if you cut the seatcut at 3-1/2" for the common your 2x8 HAP cut for the hip would be 4-11/16" with a seatcut at 1'4-9/16".Look it's a low pitch roof and everyone knows when cutting a hip the seatcut is always bigger and is sticking into the room when you have ceiling joists because the hip is always a lower pitch and your always using a hip at least one size bigger then the common so these types of hips are cut every day. If you want to put a gusset you can. If you have heavy snow load from where your from double up the hip as I said in my first post. You should ask the Architect what he thinks.These hips are cut and installed all the time. I personally think the gusset is useless. I would just double the hip and be done with it. This is going by my past experience and following Architects advice so ask your Architect what he thinks.Joe Carola
Edited 4/9/2005 7:29 pm ET by Framer
Thanks. I got it now. The print out threw me off completely. Once you stated it four times I said to myself "of course" on the 4th time. Thanks for the great advice.
"These hips are cut and installed all the time. I personally think the gusset is useless. I would just double the hip and be done with it."
OK Joe, I'm never too old to learn something. Please explain why you view a plywood gusset in this application as "worthless". I'm confused by your assessment. The value of plywood gussets for strengthening or reinforcing a stress point is pretty well accepted in the industry. Timber.org.au says of plywood "Panel shear - approximately double that of solid timber due to its cross laminated structure, making it suitable for use in gussets for portal frames, webs of fabricated beams and thin plywood bracing panels...The high shear strength of plywood makes it suitable for bracing panels or as webs in manufactured beams" In this case the loads on the hip create a stress-line that runs basically parallel with the grain, the weakest point in a wood member.
While doubling the hip adds strength, it does not address the problem of grain. Plywood, on the other hand, is made from layers whose grain is alternated, offering strength in multiple directions. Two pieces of 3/4" plywood offers the same width as doubling the hip, at the stress point, with the added benefit of cross-grain strength, and at a savings of materials/labor in comparison to doubling the hip.I'm not an engineer, so I'd like to see where my assessment is in error. You're saying that the rafter in the drawing on the right will fail at the same time as the rafter in the drawing on the left? What do you know that I don't? View Image
Edited 4/9/2005 9:12 pm ET by Huck
Huck,I'm not an Engineer either. In a little over 20 years of framing I've cut a plenty of hips this way and never once seen or heard of a plywood gusset like your saying for a hip. I've doubled up hips plenty of times. The houses that I framed with these hips are still standing.You said, "I'm not an engineer, so I'd like to see where my assessment is in error. You're saying that the rafter in the drawing on the right will fail at the same time as the rafter in the drawing on the left? What do you know that I don't?"My assessment is that you don't need the gussets and both your pictures wont fail becasue so far all of the hips that I've cut like that haven't failed yet. You'll never convince me that they will fail.Joe Carola
OK, gotcha. Thanks for the explanation. I've cut a lot like that too, but not many with as severe a plumb cut as the original post. I've never known one to fail either, but I've been accused of "over-building" my projects, so you may have something there.
Huck,I don't disagree that I think it's weaking the hip becasue you can't overcut a common seatcut like that but with 2x hips they have worked and still stand and if I was him in that situation I would cut the common birdsmouth at 3-1/2" which would shorten is hip seatcut and raise the HAP cut and use a microlam because I think thery're stronger and they're made out of plywood and glue.One thing off topic is that I never saw your two drawings and I didn't know what you were talking about until I remembered that I can't see your drawings when I'm using Mozilla but I used Microsoft Office and your drawings came up. I don't know what the problem is with Mozilla. Any Ideas?Joe Carola
Joe - I don't know about the Mozilla problem. I'm a Mozilla user also. I used Mozilla when I posted it. I can see other's pics, and my own, just fine with Mozilla. Some websites, like GaryGulman.com, don't work with Mozilla, but I've never had that problem here.I agree: making the seat-cut shallower is the best option. Some guys have half the roof up before they get to the hips and realize there is a problem with their seat-cut depth, and then its too late to change it, so I just gave him a suggestion if he had to go with that particular deep seat-cut parameter.Perhaps there is not as much load on a hip rafter as it first appears. Especially if the hip jacks are placed directly opposing, as should be the case. I recently converted an attic to a play-room, and had to remove a lot of roof bracing. I compensated with load-bearing walls, and a beam at mid-span. I temporary-braced everything first before cutting the braces out, and I noticed no "give" whatsoever (heavy tile roof) when I cut the hip braces, but a tiny amount (enough to bind the sawzall blade) when I cut the mid-span bracing.With opposing jacks, the hip acts much as a ridge board. And I know that with truss roofs, the ridge is nothing more than 2x4 blocking at the peak, yet is sructurally adequate.
I am using Mozilla also, and can see the images fine. Great exchange by the way. I just did a couple of hip roofs and enjoyed the discussion. The original poster might want to refer to Haun's book as well.
UNLESS YOUR GOING TO RUN THAT PLY OUT INTO THE EAVES ,WHATS THE POINT
KEEP IT SIMPLE.THERE IS PROBABLY BETTER CAUSES TO WORK ON .
BEND ONE, DROP ONE, DRIVE ONE.
The point is to reinforce the point of stress...which isn't at the eave. Its a simple solution, I've used plywood gussets just like that when I had to scarf/splice a hip due to length on a large roof. Quick and easy and remarkably strong.
when u spliced your hips in the past,you ran your gussets beyond the joint.
I see what you're getting at, but I think you missed my point. I don't think the narrowest part of rafter above the seatcut (at the outside edge of the wall) is the vulnerable point. I think the unsupported portion of the seat-cut is, on the inside of the wall. The gusset is glued and screwed to prevent the wood from separating along the grain at this point (not to reinforce the narrow portion that supports the overhang, which would necessitate running the gusset out to the eave, as you pointed out). Joe says my solution is redundant (overkill), which would about fit with what I'm known for, so he's probably right!
Edited 4/13/2005 9:49 am ET by Huck
I don't think I've ever gussetted one. When the level cut gets so long that it looks weak to me, I simply install a header. The header is usually nothing more than a single 2x6 that spans from wall to wall and snugs up to the hip. If I'm feeling like Supercarpenter, I make a second seat cut to receive the new header. In most cases, since it's all overkill anyways, I simply add a wedgeand nail it.
Occasionally I raise the level cut and insert a flat 2x 10 or 2x 12 or microlam. Every situation is different and I use my "seat of the pants" engineering.
One thing I won't do is double the entire hip unless specifically called for on the plans.
blueJust because you can, doesn't mean you should!
Warning! Be cautious when taking any framing advice from me. There are some in here who think I'm a hackmeister...they might be right! Of course, they might be wrong too!
Joe:
Do you see a pattern here at BT? Matt
What's the pattern here?Joe Carola
Nail it in. There's nothing you can do about it. This always happens and it's been dicussed before with me and Architects and they always say it's okay. You can't change the HEEL/HAP cut on the hip. If your not comfortable with it then double it up.
Your drawing shows a Height-Above-Plate of 3&5/8". When you have severely cut the hip for your seatcut, the danger is in eventual splitting. The load of the roof is pushing down, but there is no support under a large portion of the horzontal seatcut. You should probably try to get some reinforcement on that hip, i.e. plywood gussets (glued and screwed) and a metal strap. I would also try to get a brace under it wherever possible.
View Image
View Image