FHB Logo Facebook LinkedIn Email Pinterest Twitter X Instagram Tiktok YouTube Plus Icon Close Icon Navigation Search Icon Navigation Search Icon Arrow Down Icon Video Guide Icon Article Guide Icon Modal Close Icon Guide Search Icon Skip to content
Subscribe
Log In
  • How-To
  • Design
  • Tools & Materials
  • Restoration
  • Videos
  • Blogs
  • Forum
  • Magazine
  • Members
  • FHB House
  • Podcast
Log In

Discussion Forum

Discussion Forum

How do I move this light switch

johnjingles | Posted in General Discussion on January 1, 2009 04:40am

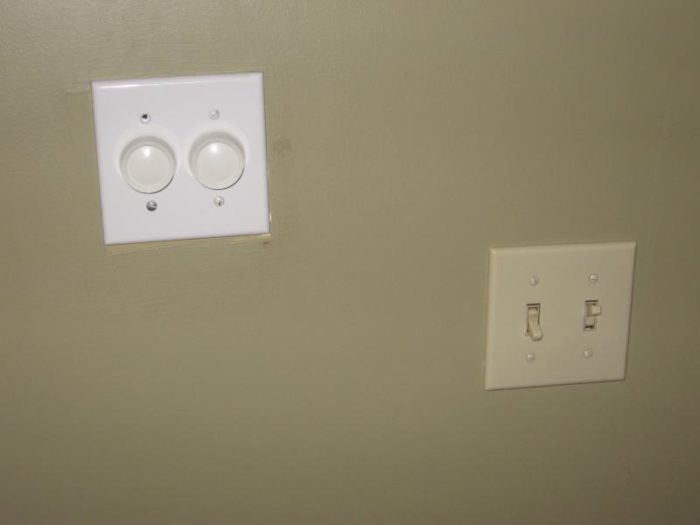
Folks, I have to move the light switch on the right – to right below the light switch on the left. The right box is nailed to the stud on its right and the left is nailed to the stud on its left. No stud between the two boxes. The switches on the right are a regular switch and 3 way. A new wall is going right where the box on the right is – that is why I have to move it. Surely someone has done this before. Can someone help me and let me know the step by step process – cause I am sure if I start in I will get half way and not realize something and then I will have holes everywhere and I have to leave for CA for the week and I will get killed if I leave this wall a mess. This is the first time posting a picture so I hope that works. Thanks for any help.

Reply
  • X
  • facebook
  • linkedin
  • pinterest
  • email
  • add to favorites Log in or Sign up to save your favorite articles

Replies

  1. MSA1 | Jan 01, 2009 05:31pm | #1

    You left out alot of info including your skillset. It helps to know where the wires come from. If they all come from the top (or bottom) it makes things easier. Do you have access either above or below the switch ie attic & basement? If so, its cake. You can put an accessible junction box above and or below then put the box wherever you want.

    I would minimize wall damage by abandoning the old box and installing a cut-in box in the new location.

    I really need a few of my questions answered before I can add more.


    Family.....They're always there when they need you.

  2. DanH | Jan 01, 2009 05:37pm | #2

    The picture should ideally to be scaled down in visual size and megabytes, but it's otherwise OK.

    It's unclear what precisely you're planning -- do you mean that a new wall will tee into the existing wall where the switch is?

    The difficulty of moving the switch depends a lot on how the wires are routed, and how far you want to move the switch. If the wires are coming from above, and you only want to move the switch a few inches, you can simply open up the wall, disconnect the box from the stud, swing it to the left, and attach it to a scabbed-in piece of 2x4. As it swings left it will need to go higher, but since the other switch is higher this gives you an opportunity to put them on the same level.

    But if some wires are from above and some from below, or if you want to move the switch to the other side of the left one (or just below), you'll probably need more slack in the wires than you have. Since you can't legally "bury" a splice in a wall, you'd probably have to install one or more junction boxes in the wall (high and low, as needed) with blank covers (or, if you're lucky, place the boxes in an unfinished attic or basement).

    The mark of the immature man is that he wants to die nobly for a cause, while the mark of a mature man is that he wants to live humbly for one. --Wilhelm Stekel
    1. brownbagg | Jan 01, 2009 05:45pm | #3

      they make a box that clamps to the drywall, no stud is needed, its a platic blue box

      1. JTC1 | Jan 01, 2009 05:58pm | #5

        .....clamps to the drywall.....

        Called an "old work box", available as plastic or metal.

        Happy New Year!

        JimNever underestimate the value of a sharp pencil or good light.

  3. jayzog | Jan 01, 2009 05:46pm | #4

    open up the wall from stud to stud from about 2' above to about 2' below the switches, that gives you plenty of room to work, a small sheetrock patch is as much work a bigger one.

    Pull the nails holding the box, pull staples on the wires, with any luck you will have enough slack to just slide it overto the other side. Screww through the side of the box to the stud.

    If your wires are not long enough then you may have to get creative to make legal junctions.

    1. habilis | Jan 01, 2009 06:50pm | #6

      jayzog gives the easiest answer covering most of the problems you might encounter. The switch you want to move has at least two wires going to it; one for each switch. That would be German style(or something like that), where the power is going to the light and devise & never mind...More likely there is a third wire supplying power to both switches. Code calls for wires to be stapled to studs close to box. Where do they come from & where do they go? If you can't visualize these possibilities and make a determination from inspection, call someone who can. Respect electricity, it's a great tool, but so is a chain saw.

  4. habilis | Jan 01, 2009 06:55pm | #7

    Btw, how are you fastening the new wall to the existing?

  5. GregGibson | Jan 01, 2009 07:06pm | #8

    . . . and, for goodness sake, put the new box at the same elevation as the old one. That arrangement would drive me nuts !

    Greg

    1. User avater
      bstcrpntr | Jan 01, 2009 07:21pm | #9

      Put Everything at the same height, I agree with the others.

      Resized picture.

      View Image

      October 17th, 2009

      Jeremy and Lisa

      Was there ever any doubt?

      Edited 1/1/2009 11:21 am by bstcrpntr

  6. User avater
    bstcrpntr | Jan 01, 2009 07:27pm | #10

    What if you cut one good sized hole that goes around both boxes?

    You could put in a 4gang switch box.  By raising the switches on the right it may give you enough wire to simply move things from one side of stup to the other.

    Shut off the power. Label all wires in each box. Remove all wires from both boxes. Install 4gang box. Pull wires into new box. Cut drywall to fit. Install switches and dimmers.  Finish around box when you finish new wall.

    Take pictures of switches hanging out with labels on the wires before disconnecting. Gives you something to look at when you get confused.


    October 17th, 2009

    Jeremy and Lisa

    Was there ever any doubt?

  7. renosteinke | Jan 01, 2009 07:32pm | #11

    Looks like there's already been some amateurs at work on that wall.

    You won't know what you need to do until you open up a pretty good size section of the wall. You need to know not just the stud arrangement, but what wiring method was used.

    There's no such thing as just moving one switch ... you're going to have to move the entire box, containing both switches.

    Once you have the wall open, you'll see just what has to be done. Ultimately, since you have a total of four switches, you'll probably want to use a single "four gang" box to hold all four switches. If you do, be sure to support the box across it's entire length, and not rely just upon the mounting flange at one end.

    Since the switches might be on different circuits, take care to keep your wires sorted out. Don't just try to put all the white wires under the same wire nut.

    1. johnjingles | Jan 01, 2009 07:55pm | #12

      Folks, thanks for responding.Looks like I have to take out more wall than I thought - but that is fine.In the long run having more room to work will make it easier. I can handle the patching - that is not a big deal.I will go for the gang box idea. The wires enter the box from the top and I don't have attic access to the wires.What is actually going on this new wall is a 36" french door. I am adding this door to close off a great room. This great room is up a set of 5 stairs. The door will be at the top of the stairs opening into the room. Those switches are at the top of the stairs.For the new wall I was going to toggle bolt a 2x4 stud to the wall - and then start building off (tee off) that. OR what should I do to start the new wall?Thanks again everyone.PS - before I do anything I have to figure out how to resize the photos for posting. Good god - endless stuff to do!!!

      1. MrBill | Jan 01, 2009 08:07pm | #13

        "PS - before I do anything I have to figure out how to resize the photos for posting. Good god - endless stuff to do!!!"

        JJ,

         Every computer I have ever had came with some sort of easy to use photo software. I use the Microsoft "picture it" software that came with my Dell. Just open the picture and there should be an option somewhere to resize it.  Bill Koustenis

        Advanced Automotive Machine

        Waldorf Md

      2. User avater
        BillHartmann | Jan 01, 2009 08:46pm | #14

        "For the new wall I was going to toggle bolt a 2x4 stud to the wall - and then start building off (tee off) that."If you where just building a new wall then you could get buy with gluing the stud to the wall and the top plate to the ceiling if it ran parallel and between joist.But you are going to have a door and my guess is near that end. And since you are opening up the wall anyway put in a stud in the wall or run some blocking between stud so that you have something solid to support the door..
        William the Geezer, the sequel to Billy the Kid - Shoe

      3. JAlden | Jan 01, 2009 08:48pm | #15

        OR what should I do to start the new wall?

        I'd open that stud bay up from floor to ceiling. Attach your new wall to the stud on the right or nail in some blocking between the studs.

  8. User avater
    Dam_inspector | Jan 01, 2009 08:49pm | #16

    Tear out a big hole in the drywall where the switches are, then post a pic of it. You'll get more answers than you can use after that.

    1. johnjingles | Jan 01, 2009 09:16pm | #17

      Man it is worse than anticipated. I shut the power off to both those boxes - they are on 2 different circuits. I opened up the box on the right - the one I want moved. The switch on the left in that box controls a fan in the great room and the switch on the right is a 3 way switch to recessed lights in an adjacent room. But there are 3 cables into the box and all 3 cables are tied together - I could not even explain how they are tied together if I tried. So I can't go further with until I get an electrician in here.I am adventurous but I have limits.I have to rethink the plan.Thanks everyone.

      1. DanH | Jan 01, 2009 09:48pm | #18

        If all the wires are coming in from the top consider simply moving the box as I described earlier. Pry it loose from the stud, scab in a new piece of 2x4 to support the box, and attach to that. You'll need to open up enough of the wall to pull the staples on the cables going up a couple of feet at least, but you should probably open up the wall anyway to install blocking to support the new wall.
        The mark of the immature man is that he wants to die nobly for a cause, while the mark of a mature man is that he wants to live humbly for one. --Wilhelm Stekel

  9. User avater
    BillHartmann | Jan 02, 2009 01:11am | #19

    Please don't post pictures like that inline.

    It is way to big. Both screen size and byte size.

    It will lockup peoples computers that are one dailup.

    And screen size it is too big to tell what is happening. (Except it does show some back DW and paining jobs.

    .
    William the Geezer, the sequel to Billy the Kid - Shoe
  10. DanH | Jan 02, 2009 01:13am | #20

    Please, please, PLEASE!! Never do that again!! You imbedded a nearly 1MB image in your post. At best it takes forever to load on a dial-up connection. At worst it crashes the browser and maybe the computer. Scale it down if you're going to imbed it.

    The mark of the immature man is that he wants to die nobly for a cause, while the mark of a mature man is that he wants to live humbly for one. --Wilhelm Stekel
    1. Henley | Jan 02, 2009 05:45am | #21

      Sorry guy's! Sincerely.
      I just did the copy and paste. I had no idea it would
      cause a problem. I am a comic genius thou, right? PS
      Deleting post right now.

  11. MisterT | Jan 03, 2009 05:00pm | #22

    Call a qualified electrician????????????????????????????????????????????????

    .
    .
    "After the laws of Physics, everything else is opinion"

    -Neil deGrasse Tyson
    .
    .
    .
    If Pasta and Antipasta meet is it the end of the Universe???
    .
    .
    .
    according to statistical analysis, "for some time now, bears apparently have been going to the bathroom in the woods."

Log in or create an account to post a comment.

Sign up Log in

Become a member and get full access to FineHomebuilding.com

Video Shorts

Categories

  • Business
  • Code Questions
  • Construction Techniques
  • Energy, Heating & Insulation
  • General Discussion
  • Help/Work Wanted
  • Photo Gallery
  • Reader Classified
  • Tools for Home Building

Discussion Forum

Recent Posts and Replies

  • |
  • |
  • |
  • |
  • |
  • |
View More Create Post

Up Next

Video Shorts

Featured Story

FHB Summit 2025 — Design, Build, Business

Join some of the most experienced and recognized building professionals for two days of presentations, panel discussions, networking, and more.

Featured Video

SawStop's Portable Tablesaw is Bigger and Better Than Before

The 10-in. Jobsite Saw PRO has a wider table, a new dust-control port, and a more versatile fence, along with the same reliable safety mechanism included in all SawStop tablesaws.

Related Stories

  • Podcast Episode 688: Obstructed Ridge Vent, Buying Fixer-Uppers, and Flashing Ledgers
  • FHB Podcast Segment: Finding the Right Fixer-Upper
  • Keeping It Cottage-Sized
  • Townhouse Transformation

Highlights

Fine Homebuilding All Access
Fine Homebuilding Podcast
Tool Tech
Plus, get an extra 20% off with code GIFT20

"I have learned so much thanks to the searchable articles on the FHB website. I can confidently say that I expect to be a life-long subscriber." - M.K.

Get home building tips, offers, and expert advice in your inbox

Signing you up...

This site is protected by reCAPTCHA and the Google Privacy Policy and Terms of Service apply.
See all newsletters
See all newsletters

Fine Homebuilding Magazine

  • Issue 332 - July 2025
    • Custom Built-ins With Job-Site Tools
    • Fight House Fires Through Design
    • Making the Move to Multifamily
  • Issue 331 - June 2025
    • A More Resilient Roof
    • Tool Test: You Need a Drywall Sander
    • Ducted vs. Ductless Heat Pumps
  • Issue 330 - April/May 2025
    • Deck Details for Durability
    • FAQs on HPWHs
    • 10 Tips for a Long-Lasting Paint Job
  • Issue 329 - Feb/Mar 2025
    • Smart Foundation for a Small Addition
    • A Kominka Comes West
    • Making Small Kitchens Work
  • Issue 328 - Dec/Jan 2024
    • How a Pro Replaces Columns
    • Passive House 3.0
    • Tool Test: Compact Line Lasers

Fine Home Building

Newsletter Sign-up

  • Fine Homebuilding

    Home building tips, offers, and expert advice in your inbox.

  • Green Building Advisor

    Building science and energy efficiency advice, plus special offers, in your inbox.

  • Old House Journal

    Repair, renovation, and restoration tips, plus special offers, in your inbox.

Signing you up...

This site is protected by reCAPTCHA and the Google Privacy Policy and Terms of Service apply.
See all newsletters

Follow

  • Fine Homebuilding

    Dig into cutting-edge approaches and decades of proven solutions with total access to our experts and tradespeople.

    Start Free Trial Now
    • Facebook
    • Instagram
    • X
    • LinkedIn
  • GBA Prime

    Get instant access to the latest developments in green building, research, and reports from the field.

    Start Free Trial Now
    • Facebook
    • YouTube
  • Old House Journal

    Learn how to restore, repair, update, and decorate your home.

    Subscribe Now
    • Facebook
    • Instagram
    • X

Membership & Magazine

  • Online Archive
  • Start Free Trial
  • Magazine Subscription
  • Magazine Renewal
  • Gift a Subscription
  • Customer Support
  • Privacy Preferences
  • About
  • Contact
  • Advertise
  • Careers
  • Terms of Use
  • Site Map
  • Do not sell or share my information
  • Privacy Policy
  • Accessibility
  • California Privacy Rights

© 2025 Active Interest Media. All rights reserved.

Fine Homebuilding receives a commission for items purchased through links on this site, including Amazon Associates and other affiliate advertising programs.

  • Home Group
  • Antique Trader
  • Arts & Crafts Homes
  • Bank Note Reporter
  • Cabin Life
  • Cuisine at Home
  • Fine Gardening
  • Fine Woodworking
  • Green Building Advisor
  • Garden Gate
  • Horticulture
  • Keep Craft Alive
  • Log Home Living
  • Military Trader/Vehicles
  • Numismatic News
  • Numismaster
  • Old Cars Weekly
  • Old House Journal
  • Period Homes
  • Popular Woodworking
  • Script
  • ShopNotes
  • Sports Collectors Digest
  • Threads
  • Timber Home Living
  • Traditional Building
  • Woodsmith
  • World Coin News
  • Writer's Digest
Active Interest Media logo
X
X
This is a dialog window which overlays the main content of the page. The modal window is a 'site map' of the most critical areas of the site. Pressing the Escape (ESC) button will close the modal and bring you back to where you were on the page.

Main Menu

  • How-To
  • Design
  • Tools & Materials
  • Video
  • Blogs
  • Forum
  • Project Guides
  • Reader Projects
  • Magazine
  • Members
  • FHB House

Podcasts

  • FHB Podcast
  • ProTalk

Webinars

  • Upcoming and On-Demand

Podcasts

  • FHB Podcast
  • ProTalk

Webinars

  • Upcoming and On-Demand

Popular Topics

  • Kitchens
  • Business
  • Bedrooms
  • Roofs
  • Architecture and Design
  • Green Building
  • Decks
  • Framing
  • Safety
  • Remodeling
  • Bathrooms
  • Windows
  • Tilework
  • Ceilings
  • HVAC

Magazine

  • Current Issue
  • Past Issues
  • Magazine Index
  • Subscribe
  • Online Archive
  • Author Guidelines

All Access

  • Member Home
  • Start Free Trial
  • Gift Membership

Online Learning

  • Courses
  • Project Guides
  • Reader Projects
  • Podcast

More

  • FHB Ambassadors
  • FHB House
  • Customer Support

Account

  • Log In
  • Join

Newsletter

Get home building tips, offers, and expert advice in your inbox

Signing you up...

This site is protected by reCAPTCHA and the Google Privacy Policy and Terms of Service apply.
See all newsletters
See all newsletters

Follow

  • X
  • YouTube
  • instagram
  • facebook
  • pinterest
  • Tiktok

Join All Access

Become a member and get instant access to thousands of videos, how-tos, tool reviews, and design features.

Start Your Free Trial

Subscribe

FHB Magazine

Start your subscription today and save up to 70%

Subscribe

Enjoy unlimited access to Fine Homebuilding. Join Now

Already a member? Log in

We hope you’ve enjoyed your free articles. To keep reading, become a member today.

Get complete site access to expert advice, how-to videos, Code Check, and more, plus the print magazine.

Start your FREE trial

Already a member? Log in

Privacy Policy Update

We use cookies, pixels, script and other tracking technologies to analyze and improve our service, to improve and personalize content, and for advertising to you. We also share information about your use of our site with third-party social media, advertising and analytics partners. You can view our Privacy Policy here and our Terms of Use here.

Cookies

Analytics

These cookies help us track site metrics to improve our sites and provide a better user experience.

Advertising/Social Media

These cookies are used to serve advertisements aligned with your interests.

Essential

These cookies are required to provide basic functions like page navigation and access to secure areas of the website.

Delete My Data

Delete all cookies and associated data