FHB Logo Facebook LinkedIn Email Pinterest Twitter X Instagram Tiktok YouTube Plus Icon Close Icon Navigation Search Icon Navigation Search Icon Arrow Down Icon Video Guide Icon Article Guide Icon Modal Close Icon Guide Search Icon Skip to content
Subscribe
Log In
  • How-To
  • Design
  • Tools & Materials
  • Restoration
  • Videos
  • Blogs
  • Forum
  • Magazine
  • Members
  • FHB House
  • Podcast
Log In

Discussion Forum

Discussion Forum

How do I repair cracked plaster?

pizza | Posted in General Discussion on April 21, 2006 12:09pm

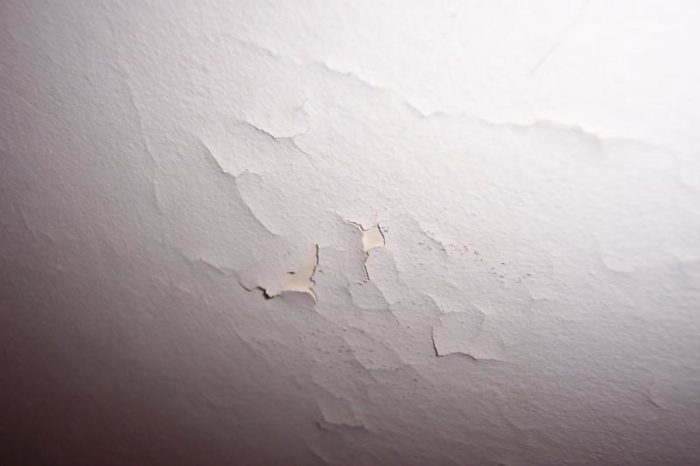
Hi. How do I repair the cracking plaster walls shown in the attached photo? What causes this? These walls started doing this about 10-15 years ago. The plaster is original and the house is a row home in Philadelphia and is about 75 years old. Thanks in advance for any help!

Reply
  • X
  • facebook
  • linkedin
  • pinterest
  • email
  • add to favorites Log in or Sign up to save your favorite articles

Replies

  1. WNYguy | Apr 21, 2006 12:57am | #1

    Looks to me like the original finish plaster is what's showing through where  the surface has cracked.  The top (cracking) layer may be some sort of textured paint or spackle mix.  Is this an outside wall?  A masonry wall?  The top surface may be less permeable to moisture than the plaster, and infiltrating moisture is "pushing" off the top layer.

    You can try scraping off the loose stuff, then use joint compound or plaster to skim coat everything smooth.  Then paint with an acrylic paint that would allow moisture to pass through.   If there's excessive moisture, however, you may need to solve that problem first (leaking gutter, compromised brick or mortar, etc.).

    Allen

    1. pizza | Apr 21, 2006 03:57am | #12

      Thanks Allen,

      This wall is an interior wall between two rowhouses meaning it's a shared "firewall" -I think they sometimes call it. I believe that under that plaster coat are bricks. It's on the second floor - the roof is above that wall. The roof was re-done 4 years ago.

      I also should say that this wall just happens to face the door to the bathroom about 5-6 feet away. Could the steam and humidity be causing that-like when the door is opened after a shower or bath? That bathroom doesn't get much venting during the summer since the skylight remains closed during that part of the year. BUT I must also say that this peeling phenomenon is also occuring in a few other areas of the house but to a very very lesser degree in those areas.

      Thanks everyone.

  2. User avater
    IMERC | Apr 21, 2006 12:59am | #2

    looks to me to more of a peeling action than a cracking..

    scrape.. put on a sealer / binder and refloat the walls or texyure...

    Life is not a journey to the grave with the intention of arriving safely in a pretty and well preserved body, but rather to skid in broadside, thoroughly used up, totally worn out, and loudly proclaiming

    WOW!!! What a Ride!

    Forget the primal scream, just ROAR!!!

  3. DanH | Apr 21, 2006 01:06am | #3

    Looks to me like peeling paint or "skim coat". From what little I can see the plaster underneath looks sound.

    This can be due to moisture coming through from the other side (check for water leakage into the wall/ceiling), or can be due to poor adhesion, incompatible paints, etc.

    Sometimes the problem is a coat of "milk paint" under all the other stuff. "Milk paint" is like Teflon -- nothing sticks to it for very long.

    Or it could just be that too many coats of paint have been applied over the past 75 years, and the walls simply can't hold any more.

    If Tyranny and Oppression come to this land, it will be in the guise of fighting a foreign enemy. --James Madison
    1. TomC | Apr 21, 2006 03:45am | #8

      Sometimes the problem is a coat of "milk paint" under all the other stuff. "Milk paint" is like Teflon -- nothing sticks to it for very long.

      I know what you mean but that's not milk paint, I think it's called white wash or something like that. It's the only kind of water-based paint available before latex, kind of a chalky suspension in a weak binder and after it dried the surface became chalky.

      What he's showing is multiple layers of modern formula paint on top of the original chalky paint.

      1. DanH | Apr 21, 2006 03:55am | #10

        All accounts I've heard said it was milk (casein) paint.
        If Tyranny and Oppression come to this land, it will be in the guise of fighting a foreign enemy. --James Madison

  4. DanH | Apr 21, 2006 01:10am | #4

    The worst areas will need to be scraped and skim-coated, probably. Areas with only minor cracking may be able to be fixed by using a sort of wallpaper (I forget the specific term) that goes on horizontally and is designed to be painted or papered over.

    If Tyranny and Oppression come to this land, it will be in the guise of fighting a foreign enemy. --James Madison
  5. philarenewal | Apr 21, 2006 01:23am | #5

    Yo! Pizza, I'm also in Philly. (south philly).

    You sure your place is only 75 yrs old?  That's an infant.

    In addition to the good ideas you already got, what is also common was for the plaster walls to get coated with a plain (no pattern or real color) wallpaper, which over the years was then painted with a gazzillion layers of paint.

    You can get it off with plain water, but the tough part is getting water to the paper and old paste through the paint.

    Try getting a bit of water down between the plaster and whatever you have there.  If it starts to bubble and peel spontaneously after a few minutes, you got pasted on paper.  Continue the process (and get yourself a quality wide blade razor scraper) and you can get it all off without hurting the plaster.


    "Let's get crack-a-lackin"  --- Adam Carolla

    1. pizza | Apr 21, 2006 04:03am | #14

      Yo philarenewal!! Thanks for the advice. ya-no-whad-I-mean?

      1. philarenewal | Apr 21, 2006 05:41am | #20

        Yo philarenewal!! Thanks for the advice. ya-no-whad-I-mean?

        fugetaboudid.  ;-)

        And best of luck with it!

        PS: that wall is lookin' fugaazy right now.  ;-) 

        "Let's get crack-a-lackin"  --- Adam Carolla

  6. peteduffy | Apr 21, 2006 01:56am | #6

    I agree with Dan.  That is peeling paint you see in the picture.  It's not the finish coat of plaster-it's too thin for that.

    Scrape off anything that comes off.  Lightly sand.  Feather in with joint compound to remove the paint lip.

    Prime and paint.


    Pete Duffy, Handyman

    1. pizza | Apr 21, 2006 03:44am | #7

      Thanks for all of the suggestions. But let me give you a bit more history on these walls because I doubt that that is layers of paint coming off. You see, when my parents bought that house in 1954, there was wallpaper on the walls. In the 60's, I remember helping my parents take all of it off throughout the house. I specifically remember the chore of wetting and scraping all of it off completely- paste residue and all. Then we painted over the newly exposed walls. Since that time we must've painted those walls maybe three times - tops. That doesn't look like 3 layers of paint-unless these walls were painted long long ago before the paper was even put on. What do you all think?

      Also, what do I skim coat it with? Any suggestions on a good binder /sealer brand prior to finishing it?

      Thanks.

      1. DanH | Apr 21, 2006 03:53am | #9

        Well, we can't tell very well from that picture (good picture, just limited ability to actually touch the thing), but it looks like the surface behind the peeling stuff is white and smooth. If the plaster itself were peeling it would probaly separate between layers, and you'd probably have a brownish coat showing through.What you may have, though, is moisture behind there, with oil paint over it. The moisture, over time, would "disassemble" the very topmost 1/8" or so of plaster, allowing the paint and a very thin layer of plaster to peel, and leaving a slightly rough (sort of "orange peel") surface.But it's also possible that there was indeed more paint on the wall, under the wallpaper, or even more layers of wallpaper.Finally, is it possible that, during all that scraping in the 60s, some areas of the wall were damaged enough that they had to be skim-coated?

        If Tyranny and Oppression come to this land, it will be in the guise of fighting a foreign enemy. --James Madison

      2. User avater
        IMERC | Apr 21, 2006 03:55am | #11

        you got a layer or 6 of WP glue under there that is letting go...Life is not a journey to the grave with the intention of arriving safely in a pretty and well preserved body, but rather to skid in broadside, thoroughly used up, totally worn out, and loudly proclaiming<!----><!----><!---->

        WOW!!! What a Ride!<!----><!---->

        Forget the primal scream, just ROAR!!!

  7. DanH | Apr 21, 2006 04:01am | #13

    Peel off a few chips and look at the back of them. How thick is the chalky layer (if there is one at all)?

    Check the surface underneath. Is it pretty smooth (like finished plaster) or is it maybe the texture of orange peel (or something else you can describe)?

    Where is the peeling occurring, and where it is worst? Is it mainly ceilings, mainly exterior walls, mainly interior walls, etc?

    If Tyranny and Oppression come to this land, it will be in the guise of fighting a foreign enemy. --James Madison
    1. pizza | Apr 21, 2006 04:07am | #15

      I'll do that Dan and let you know what I find as soon as I get back over there. Thanks!

    2. pizza | Apr 21, 2006 04:12am | #16

      If I skim coat it after scraping off all the loose stuff, is it easy to do it with plaster? I have experience with joint compound but no plastering experience.

      To answer somebody's question earlier, I don't recall my Dad repairing any bad sections up there after removing the wallpaper. But then again my memory sometimes goes on the fritz- if ya know what I mean.

      1. DanH | Apr 21, 2006 04:14am | #17

        He probably did it in the dead of night so you wouldn't hear the cussing.
        If Tyranny and Oppression come to this land, it will be in the guise of fighting a foreign enemy. --James Madison

        1. pizza | Apr 21, 2006 04:31am | #18

          LOL :)

      2. DonCanDo | Apr 21, 2006 04:33am | #19

        If I skim coat it after scraping off all the loose stuff, is it easy to do it with plaster? I have experience with joint compound but no plastering experience.

        There's no reason you can't skim coat with joint compound.  Granted, it's not as hard as plaster, but unless you plan on playing handball against this wall, you'll never know the difference.  I do prefer setting compounds for this type of repair since they don't shrink (fewer coats needed) and cure harder than regular joint compound. 

        You could also increase the hardness of compound (either regular or setting) by adding plaster to it, but you'll have to experiment a bit to know how much gives you the desired results.  I did that once and it came out great, but it was more of an experiment than an actual need.  Since then, I just use compound.

        It's very important to prime the repair areas BEFORE applying compound.  Some plaster is so slick that any compound and/or plaster will not adhere properly.

        -Don 

        1. pizza | Jun 13, 2006 07:48pm | #21

          What do I prime it with before repairing it/ applying the compound?

          1. DonCanDo | Jun 13, 2006 08:29pm | #22

            Some regulars here have said that it's best to prime it with an oil-based primer, especially if it's new plaster.

            I've only ever used a good quality all-purpose latex primer and I've never had a problem.

            -Don

Log in or create an account to post a comment.

Sign up Log in

Become a member and get full access to FineHomebuilding.com

Video Shorts

Categories

  • Business
  • Code Questions
  • Construction Techniques
  • Energy, Heating & Insulation
  • General Discussion
  • Help/Work Wanted
  • Photo Gallery
  • Reader Classified
  • Tools for Home Building

Discussion Forum

Recent Posts and Replies

  • |
  • |
  • |
  • |
  • |
  • |
View More Create Post

Up Next

Video Shorts

Featured Story

FHB Podcast Segment: Efficient HVAC for a New Build

Self-installing an HVAC system requires a lot of thought and planning.

Featured Video

How to Install Cable Rail Around Wood-Post Corners

Use these tips to keep cables tight and straight for a professional-looking deck-railing job.

Related Stories

  • Podcast Episode 686: Brick Steps, Ground-Source Heat Pumps, and Greenhouses in Nova Scotia
  • FHB Podcast Segment: Efficient HVAC for a New Build
  • Affordable Scans, Accurate Plans
  • FHB Summit 2025 — Design, Build, Business

Highlights

Fine Homebuilding All Access
Fine Homebuilding Podcast
Tool Tech
Plus, get an extra 20% off with code GIFT20

"I have learned so much thanks to the searchable articles on the FHB website. I can confidently say that I expect to be a life-long subscriber." - M.K.

Get home building tips, offers, and expert advice in your inbox

Signing you up...

This site is protected by reCAPTCHA and the Google Privacy Policy and Terms of Service apply.
See all newsletters
See all newsletters

Fine Homebuilding Magazine

  • Issue 331 - June 2025
    • A More Resilient Roof
    • Tool Test: You Need a Drywall Sander
    • Ducted vs. Ductless Heat Pumps
  • Issue 330 - April/May 2025
    • Deck Details for Durability
    • FAQs on HPWHs
    • 10 Tips for a Long-Lasting Paint Job
  • Issue 329 - Feb/Mar 2025
    • Smart Foundation for a Small Addition
    • A Kominka Comes West
    • Making Small Kitchens Work
  • Issue 328 - Dec/Jan 2024
    • How a Pro Replaces Columns
    • Passive House 3.0
    • Tool Test: Compact Line Lasers
  • Issue 327 - November 2024
    • Repairing Damaged Walls and Ceilings
    • Plumbing Protection
    • Talking Shop

Fine Home Building

Newsletter Sign-up

  • Fine Homebuilding

    Home building tips, offers, and expert advice in your inbox.

  • Green Building Advisor

    Building science and energy efficiency advice, plus special offers, in your inbox.

  • Old House Journal

    Repair, renovation, and restoration tips, plus special offers, in your inbox.

Signing you up...

This site is protected by reCAPTCHA and the Google Privacy Policy and Terms of Service apply.
See all newsletters

Follow

  • Fine Homebuilding

    Dig into cutting-edge approaches and decades of proven solutions with total access to our experts and tradespeople.

    Start Free Trial Now
    • Facebook
    • Instagram
    • X
    • LinkedIn
  • GBA Prime

    Get instant access to the latest developments in green building, research, and reports from the field.

    Start Free Trial Now
    • Facebook
    • YouTube
  • Old House Journal

    Learn how to restore, repair, update, and decorate your home.

    Subscribe Now
    • Facebook
    • Instagram
    • X

Membership & Magazine

  • Online Archive
  • Start Free Trial
  • Magazine Subscription
  • Magazine Renewal
  • Gift a Subscription
  • Customer Support
  • Privacy Preferences
  • About
  • Contact
  • Advertise
  • Careers
  • Terms of Use
  • Site Map
  • Do not sell or share my information
  • Privacy Policy
  • Accessibility
  • California Privacy Rights

© 2025 Active Interest Media. All rights reserved.

Fine Homebuilding receives a commission for items purchased through links on this site, including Amazon Associates and other affiliate advertising programs.

  • Home Group
  • Antique Trader
  • Arts & Crafts Homes
  • Bank Note Reporter
  • Cabin Life
  • Cuisine at Home
  • Fine Gardening
  • Fine Woodworking
  • Green Building Advisor
  • Garden Gate
  • Horticulture
  • Keep Craft Alive
  • Log Home Living
  • Military Trader/Vehicles
  • Numismatic News
  • Numismaster
  • Old Cars Weekly
  • Old House Journal
  • Period Homes
  • Popular Woodworking
  • Script
  • ShopNotes
  • Sports Collectors Digest
  • Threads
  • Timber Home Living
  • Traditional Building
  • Woodsmith
  • World Coin News
  • Writer's Digest
Active Interest Media logo
X
X
This is a dialog window which overlays the main content of the page. The modal window is a 'site map' of the most critical areas of the site. Pressing the Escape (ESC) button will close the modal and bring you back to where you were on the page.

Main Menu

  • How-To
  • Design
  • Tools & Materials
  • Video
  • Blogs
  • Forum
  • Project Guides
  • Reader Projects
  • Magazine
  • Members
  • FHB House

Podcasts

  • FHB Podcast
  • ProTalk

Webinars

  • Upcoming and On-Demand

Podcasts

  • FHB Podcast
  • ProTalk

Webinars

  • Upcoming and On-Demand

Popular Topics

  • Kitchens
  • Business
  • Bedrooms
  • Roofs
  • Architecture and Design
  • Green Building
  • Decks
  • Framing
  • Safety
  • Remodeling
  • Bathrooms
  • Windows
  • Tilework
  • Ceilings
  • HVAC

Magazine

  • Current Issue
  • Past Issues
  • Magazine Index
  • Subscribe
  • Online Archive
  • Author Guidelines

All Access

  • Member Home
  • Start Free Trial
  • Gift Membership

Online Learning

  • Courses
  • Project Guides
  • Reader Projects
  • Podcast

More

  • FHB Ambassadors
  • FHB House
  • Customer Support

Account

  • Log In
  • Join

Newsletter

Get home building tips, offers, and expert advice in your inbox

Signing you up...

This site is protected by reCAPTCHA and the Google Privacy Policy and Terms of Service apply.
See all newsletters
See all newsletters

Follow

  • X
  • YouTube
  • instagram
  • facebook
  • pinterest
  • Tiktok

Join All Access

Become a member and get instant access to thousands of videos, how-tos, tool reviews, and design features.

Start Your Free Trial

Subscribe

FHB Magazine

Start your subscription today and save up to 70%

Subscribe

Enjoy unlimited access to Fine Homebuilding. Join Now

Already a member? Log in

We hope you’ve enjoyed your free articles. To keep reading, become a member today.

Get complete site access to expert advice, how-to videos, Code Check, and more, plus the print magazine.

Start your FREE trial

Already a member? Log in

Privacy Policy Update

We use cookies, pixels, script and other tracking technologies to analyze and improve our service, to improve and personalize content, and for advertising to you. We also share information about your use of our site with third-party social media, advertising and analytics partners. You can view our Privacy Policy here and our Terms of Use here.

Cookies

Analytics

These cookies help us track site metrics to improve our sites and provide a better user experience.

Advertising/Social Media

These cookies are used to serve advertisements aligned with your interests.

Essential

These cookies are required to provide basic functions like page navigation and access to secure areas of the website.

Delete My Data

Delete all cookies and associated data