How do I splice deck beam at middle post
Hi.
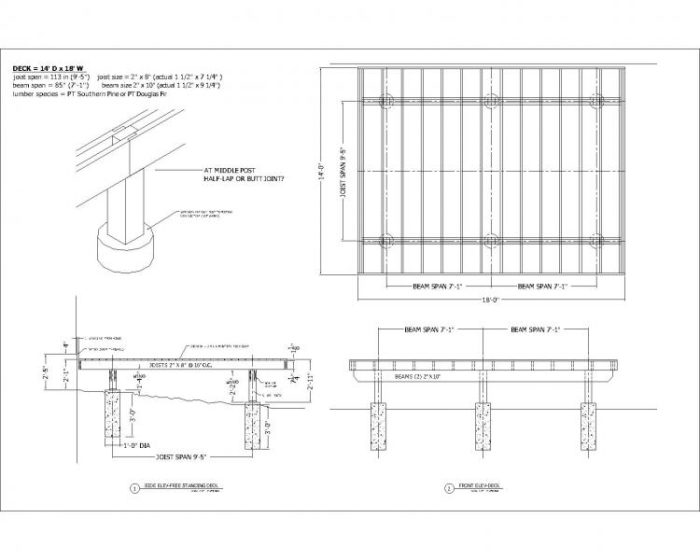
I’m designing a new free-standing 14 ft deep x 18 ft wide deck to replace my old poorly constructed deck from the previous house owner. This new deck will have pressure treated yellow pine 2 x 8 joists and 2 x 10 beams on 6 x 6 posts resting on 12 inch dia footings (36 inches deep by code in my area 40 miles west of Philadelphia). There are 6 footings. The beam span is 7 ft 1 inch and the joist span is 9 ft 5 inches. The joist spacing is 16 inches on center and I will be using Western red cedar for the decking and railings.
This deck is not high, it’s top is only 25 inches from grade at the patio door and then the grade slopes away from the house until the top of the deck is about 37 inches above grade. The decking is parallel to the 18 ft width so my joists are running perpendicular to the house. I will be placing one of those grates I saw in FHB mag in place of one of the deck boards before the door to help with reducing tracking mud in to the house.
My question is, since I can’t get 18 ft long beams, how do I splice the beams at that middle post? Is a butt joint there OK or is a half-lap type joint better. SEE THE ATTACHED DRAWING. I show the half lap in the isometric view in the upper right of the drawing.
Also, my local Home Depot, supplies their pressure treated lumber in the yellow pine variety. Is Yellow Pine the same as Southern Pine? I ask this because the span tables show that southern pine is stronger in bending than the Doug fir-Larch-Hem Fir group.
SEE MY ATTACHED DRAWING (pdf or jpg)
Thanks to all in advance.


Replies
You can get 18-footers -- you just have to find a place that will supply them. Different yards have different sources.
Pizza
Here in NW OH, Yellow Pine is used for treatment-and is Southern Yellow Pine.
The half lap joint is a waste of time and opens up the interior of your treated wood-little or no treatment that deep. You should treat all cuts and / or wrap-cover-protect with a product like Vycor-a peel and stick membrane that seals around nails/screws/and bolts (also gums up your bit for the bolt holes).
It looks like you are notching the 6x6 to sit the beam members ON it, leaving the meat in the middle to bolt to. Seal those cuts and maybe cover the top with some of that Vycor so water doesn't seep in there and fester.
Best of luck.
deck
I am not sure about this but you should refer to town inspector to see if your design for the mid beam would be a true beam. Someone in this site may correct me. Your present beam is 2 single pieces close together, but not nailed together. I am not sure if this would act as one beam. Also, why notch the 6x6? Post to post connector would be simpler. Hope it helps.
Your present beam is 2 single pieces close together, but not nailed together. I am not sure if this would act as one beam.
Except for the possibility of rolling (or buckling, if made exceptionally thin), it makes no difference. Beam strength is directly proportioinal to width.
I was thinking that if one 2x10 warps, joists could lose contact with one of the beam then he's supported on one beam. I see lot of this configuration for pergolas but not for decks. But then, I was never taught this kind of beam, except maybe blocks sandwiched between?
Deck Beams and notched posts
I put the two beams in that notch because I read, and I believe it was in a Fine Homebuilding magazine article, that separating the two beams like that provides better drying out and air circulation rather than just putting them together.
Also resting them in a notch like that allows the forces to be transmitted down thru the 6 x 6 post rather than relying on thru bolts if just attaching the beams to the sides of the posts.
Plus if I attached the beams simply to the sides of the posts (without notching) wouldn't that mean the transfer of forces goes thru a smaller bearing area , meaning the bolts , hence a higher stress concentration gets presented to the post? You'd be relying on the shear strength of the bolts which is much higher than, I assume, the axial strength of the posts.
My neighbors deck beams are notched into their posts but in his case the beams are not separated but together and touching each other.
My other alternative would be to not notch the posts and just cut them short such that the two beams run across their tops and are held in place with one of those simpson connectors that goes on top of the post and holds the beams.
The FPS's "Wood Decks:
The FPS's "Wood Decks: Materials, Construction and Finishing" manual is fairly clear on this, a multiple-ply beam must be nail-laminated to use their span tables. Their nailing pattern is 3 at the end and staggered top and bottom 6" OC with fasteners long enough to fully penetrate two members.
Think about it: In your design, the inner 2x10 is carrying 4'-8-1/2" of tributary or, at a 40/10 load, 230 lb/lft. The outer 2x10 is carrying 2'-3-1/2" of tributary, 115 lb/ft. Theoretically, the inner member will deflect some amount and then the load will begin to transfer to the outer member and the system will stabilize with both members carrying half the total load(theoretically, a bumblebee can't fly....). Practically, the members probably won't have identical structural characteristics, so one will end up carrying more load. If the difference is minor there's no problem, but suppose that the inner member has a hidden check in the center? The check expands and now all the load falls on the outer member, you're carrying 7' of tributary on a single 2x10 and that ain't gonna work. That's a worst-case scenario, but you get the idea. The median approach is that your beam sags a little more than it should and it's a little bouncier than it should be.
I've made a lot of money fixing decks built like this. :) I love them! Just so you know, the fix involves jacking the beam members and laminating both sides with identical or a size larger material. An alternative is to jack the beams and rip a bunch of blocks for fillers, hoping the beams aren't permanently deformed(but they usually sag right back to where they were), nail it all together and pray it holds for the year's warranty. I prefer not to do that, it doesn't go with my business model. Although I will if the customer insists, I'll insist they sign a waiver,and charge them again when I come back to do it right.
Just out of curiousity, why do you want to cantilever the joists anyway? It's more labor, more material(an additional two members for rim joists, concrete for the footers and the extra 6x6 for the posts). Why not bolt to the house and eliminate the inner beam along with it's postsand footers(unless you're attaching to a cantilever?)? A 2x8 is bouncy at anything over 8', I'll run 2x10s up to 12' or so and then go to 2x12s. Just my $.02 worth.
Personally, if I were being paid to build this deck, I'd through-bolt/LedgerLock/wedge anchor(depending on where and to what I was attaching) a single ledger to the house, run a double 2x12 band with 2x12 joists and set 3 postsat the ends and the center of the outer beam. I'll bet I'd finish up with a much stouter deck at equivalent or less cost than what you've designed. If I were attaching to a cantilever, I'd drop 3" from the subfloor, rip the rim joist and run the deck joists to the wall plate, adding a ledger if I had to notch them. Block between the joists with PT, flash it all properly and you're done.
But I've only built a thousand or so decks in the 8 years I've been in business, YMMV..... Or some suit in a magazine office will spend a couple of days on his computer proving I'm full of BS, he's more than welcome to my customer list.
HTH,
Bill
why do you want to cantilever the joists anyway
With properly spaced supports a cantilever setup has less deflection and less bounce than the equivalent structure with end supports, using the same beams.
Dan, you're absolutely correct
as a general rule and the key is what you said: "With properly spaced supports..." I'd go so far as to add "and appropriately sized joists". But in this design you do add additional costs compared to bolting a ledger to the structure. In this case, pizza hasn't given us any indication that he has no means of supporting the deck at the house so the posts/beams are superflous, since 2x8 joists 16OC spanning 9-1/2' WILL bounce immediately and sag over time, I don't care what the span tables say. Been there, done that, got a box full of T-shirts and don't need any more. I'm talking about cost/benefit ratios and I just don't see any benefit in this situation. He'd end up with a much stouter deck at an equivalent cost, where's the advantage in a cantilever design for him?
As a general rule I avoid cantilevers until spans get extreme. In most situations(at least in my area), decks get bolted to the band or the foundation walls. Cantilevering a beam adds additional load on that beam(the total of the cantilever and 1/2 the span to the house) for no rela benefit. Take, for example, a pretty-much standard 2' cantilever: you reduce the house-to-beam tributary by 1', but you add an additional 2' of load to the outer beam. So the net result is that the weakest member picks up all the additional load from the the cantilever but only reduces its clear-span load by half that amount. Unless esthetics are a primary concern, I personally prefer to avoid that. Granted, if you cantilevered the other end you'd equalize that but you'll add an equal number of posts and footings, additional beam and rim members, and associated hardware and labor costs. I'm coming back to the cost/benefit thing again.
I'm just saying don't do it unless you need to. In this particular instance I don't see a need. I'm a big fan of the KISS principle, if you don't absolutely need something don't use it. If it ain't there it can't break.
But that's just me, YMMV and all that.
Best,
Bill
Some people don't like the added risk of rot and other damage to their house by bolting a ledger to the rim joist. Maybe that's the reason he drew it that way, but I'd lose the cantilever too. And go to larger joists, and use a laminated beam. No notches for the post either. Maybe use Simpson products (or not) for attaching the beam to the post. And use a layer of moisture barrier over the beams to keep water out, which was a concern.
Additionally, some inspectors don't like to see the deck bearing on the house. Ledger connections too often fail catastrophically, while beam-on-post construction rarely does.
Which cantilever are you refering to? There's a cantilver on all four sides. I'm assuming you mean the one next to the house and at the opposite side away form the house - they're both equal. If I "lose the cantilever" as you suggest and stil build a free-standing deck would that mean that my footings would be smack up against the foundation?
I'm not an architect, maybe my terminology is wrong. I am referring to having the 2 beams acting as a support for the deck rather than being a part of the deck itself. I would simply move the beams to the sides of the deck perpendicular to the joists and on the same plane, so they are "built into" the deck. So all I'm saying is move the piers out to the side. I see no particular problem having the footings next to the house, but I'm not seeing the whole picture. Cantilever that end of you have to.
There are two main support beams on piers. The two planks in each I would nail tightly together and sit on top of posts instead of the notched 6x6. I'd probably attach them with metal connectors myself but there is the option of 2x4 scabs. I would add a third beam in the center which would reduce the joist span to 7'. The joists would hang from joist hangers between the beams. All framing lumber would be 2x10.
Also you only need one plank on the outside where two are drawn. So you will have a stronger deck with virtually no added material except the additional three posts and piers.
One thing not drawn but extremely important is bracing. Your deck would fall over as drawn, but I'm assuming you just didn't draw the bracing. At any rate, include it.
Now remember that lumber is variable and shrinks with drying and try to deal with that as well as possible. You can't just assume anything, always measure and check squareness. If there is any crown to the lumber, put that up. If it's badly crowned and you are committed to using it snap a line and saw it straight.
Also I recommend using something like Termin-8 to seal cuts. It helps prevent rot on exposed cuts.
And use a palm nailer to make things easier.
I've got to hand it to you Bill
"But I've only built a thousand or so decks in the 8 years I've been in business"
Deck building every day for 8 yrs would make me climb the walls. You have any pictures-there's always a call for design requests here and your expertise would be a good asset. And since you seem to like house attachment, can you post any flashing details that you've found to work well. We've all seen ledger/house failures when proper installation wasn't even attempted.
thanks.
Decks are a minor part of the business,
I'm a framing contractor. Ran 4-5 crews from '02-'06, dropped to three in '07, 2 in '08 and have been down to one since about this time last year. Yeah, I'd be crazy(ier?) if all we did was frame decks.
I'm really bad about photographing our work but I did put up an album on PhotoBucket, you can browse it here: http://s107.photobucket.com/albums/m293/billg71/Work/ It's pretty representative, everything from small remodels to big cliff-hanging vacation homes. There's a couple of pictures of a timber-frame job by New River Timberworks in there, we installed the SIPs on that and did the rest of the framing, and there's one timber truss shot that was built by the shop in Boone, NC, that we installed and built the rest of the porch. Other than that, everything you see is our framing.
For flashing, I like to run an 18" rip of 30# felt or some 16" galvanized behind the band. With the HD, we'll put a little bend at the bottom to shed over the siding below. With the felt we'll tuck a piece of 1-5/8 metal drip behind the felt, again to make sure anything that should get behind the band sheds off and doesn't continue down the wall.
Top flashing has changed through the years because of the PT situation. I used to have a z-flash bent up out of Galvalume, capping the ledger and turning down 1/2". We drop our deck framing 4" below the subfloor, so the upper leg would be 3-1/2" tall. At door openings we'd add a 3-1/2x3-1/2 angle to cap the deck flashing and make sure nothing from the threshold weeps got behind the flashing. The 1/2" leg of the Z went between the joists and the ledger, if the fit was tight you just set the skilsaw to 1/2" depth and ran it along the wall, cutting a small groove at every joist. At corners we'll double-lap the flashing and add a bit of PL-400 for sealing.
Had to stop using the Galvalume when ACQ came out so we started using 4" HD roof edge and hammering the gutter flat against the wall. Not nearly as elegant, I really liked turning down the flashing over the band. I'm still not sure about this newest PT, I'm a little leery of going back to the aluminum flashing so for now we're sticking with the roof edge.
Gotta run and get payroll together, such as it is.....
Best,
Bill
Thanks for the advice Bill. I'll readjust my joist and beam sizes. I thought I was diligently following the 2009 IRC tables when I designed this deck. So you're saying that it still is undersized and that the deck will be bouncy.
I want to build a free-standing deck not attached to the house because I do not want to add additional holes into my house through the rough stucco exterior. Before I build this deck I am replacing the patio slider door that leads out onto it because the double pane seal has failed causing fogging and mold growth between the glass and also the floor at the threshold has severe water damage on the interior of the house - I can put my fist thru the rot. SO once I replace the floor and the door I'm moving on to the deck.
The stucco exterior is also bulging right at the level of the floor for about a distance of 3 feet from the door's right bottom corner so I'm preparing to investigate that and fix it too.
Also, the previous inadequately built 18' x 12' deck , was half attached to the house with nails at a so called ledger right below the threshold of the door and the other half (the other 9 feet) of the deck was a free-standing deck believe it or not (spaced about 1/2 inch way from the exterior wall. Needless to say it was in sad shape. Also the deck was just 3/4 of an inch below the door threshold inviting years of water and snow to come on in. And as far as I can see there was no sill pan flashing of any kind.
I also read, if you are going to build a ledger attached deck, that code now requires decks to be fastened directly to the rim joist of the house and the stucco cannot be sandwiched between the deck ledger and the rim joist-the stucco must be removed. With the bulging stucco and the water damage I feel that it would be much cleaner to build a free-standing deck that is not in any way attached to the house. My stucco has a very rough texture and is not very flat. Plus it's been my experience that no matter how good they say the sealants, flashings, flex wraps etc are they all eventually fail so caulking any holes I've made thru the house will just eventually cause rot and invite more insects inside.
By the way, can someone tell me how a homeowner can get his hands on that Tyvek flexwrap that I intend on using for pan flashing? I just went to my local building supply and it costs 214 dollars for a roll of it! Holy moley! All I need is an 8 foot length of it. I can''t stand when I research extensively the proper way to do stuff and they recommend this or that only to find out I can't get it. Would you recommend the Sure Sill product? It is a ready made pan sill that you put down before the door is installed I believe it is made of pvc.
It seems that this flex wrap is the way to go because it will create a seal at the corner when it fans out and stretches and sticks - unlike the other ways of cutting and notching that corner on the outside which seems like it would be vulnerable to water infiltration. At least that's what the BUilding Science Joe Listurbek has to say.
Also any advice on how to properly repair the stucco? I need to remove the rotted half ledger board below the door, re-stucco over the resulting hole and then fix the bulge on the right. I'm afraid that if I don't do it right the stucco will crack where the new and the old meet. Any advice?
So if my new deck is free-standing and is 18' by 14' (the 18' side runs parallel to the house) what distances should my six piers be spaced at in your professional opinion - Anyone? I want a solid non-bouncy deck. If I can't go by the book according the span tables then who do I trust? My joist span of 113 inches is inadequate for 2 x 8 southern yellow pine?
Thanks
Codes are MINIMUM requirements...
that will ensure something doesn't collapse or break under normal use. But there's a big difference in what's adequate and what people expect to feel when they walk across a floor or a deck. The L/360 deflection the IRC uses for floor joists is, IMHO, woefully inadequate. I like to use a minimum of L/480 for my floors but I'll install what the builder has budgeted, as long as it meets code I'm covered liability-wise. Also, are you using the wet-service span tables for your spans? I use the wet-service tables from the Southern Pine Council or the FPS Wood Decks:... handbook as a starting point and beef up a little based on experience and the situation. Both those tables show 2x8's will span 12'-5 with a 40/10 load or or 10'6 at 60/10 but that's at the (to-be-avoided IMHO) L/360 deflection, I limit my 2x8's to 8' spans.
I see your reasoning, if I was having water problems with the so-called stucco I'd probably go with a freestanding deck, too. You need to add some sway bracing , just some 45-degree kickers off the posts in both directions.
Since you're doing this for yourself, you've got to have the three inner posts/footings anyway and labor cost isn't a critical factor, you could use the cantilever design you've drawn and just sub 2x12's for the beams(laminate them and attach with a bracket) and 2x10's for joists. It might come out a little cheaper than clear-spanning 14' with 2x12's and would be even stiffer. Esthetically, it'd probably be a little easier on the eye with the posts not so "in-your-face". And it would be a stout SOB, you could throw a block party on it and it wouldn't notice.
When I do a dropped beam, I'll cover the top with some flashing wide enough to hang over a half-inch on the sides and turn that down a little, just to make sure it sheds water. You also need to block between at least a few of the joists to eliminate the possibility of rotation. I like to run a full row of blocking because treated pine is notorious for cupping and twisting if it isn't restrained.
There are a number of window-sealing butyl products available, we generally reserve the Flex Wrap for radius-top windows since it's a LOT more expensive than the regular stuff. And anything with the Tyvek name on it is going to cost more automatically. You can make a regular butyl window tape go around a corner with some pulling and stretching and maybe a 2x4 block and a hammer, it'll stretch just not as easily as the FlexWrap.
The SureSill product looks interesting, I've contacted them for a local dealer. Thanks for the tip, it looks like it'd be great for some of the extreme-exposure houses we frame. It might be a bit of overkill for most installations but for doors opening onto those decks with the 90-mile view it would be a great application.
You might want to remove the old deck before you replace the door, if your water issues are as bad as you describe you'll probably have to replace some sheathing under that bulge below the floorline and maybe some more band as well. Lots easier to do this with no deck in the way and the plasterer won't throw in a big PITA charge when he comes to replace the stucco. That's my recommendation for the stucco repair, hire somebody.
I have to thank you for posting your queston, I've learned a lot from the other replies and from researching my own. Seems us old dogs can get a little set in our ways but we can learn new tricks if we're led to the water under the bridge.... :)
Good luck with your deck!
Bill
P.S. addad a photo of a 2x10 I got bitched out over by the builder. The guys framed the deck on Friday and he called me Monday AM complaining, his customer had visited the site Sunday afternoon and it looked like this. It was straight when it was put in.
Nothing a little blocking wont fix!
Yeah, that PT lumber sure gets squirrely sometimes.
Thanks Bill. I'm going to re-design this deck to be less bouncy as you suspect it will be. Didn't know that those tables were minimum.
I did partially remove the deck in preparation for replacing that old patio door. This weekend I found even more rot in the floor AND in the rim/band joist. We cut it out and replaced the rotted part with a PT joist. I had to replace the sub floor for about 2 feet into the house and 114 inches across the door threshold. I've re-sheathed and am ready for the delivery of the new slider .
I'm going to try a get pics up of the rot and the replacement of the floor and rim joist. I just hope I flash everything correctly. I got that butyl flashing and am reading up on how to properly do all of that flashing in preparation for the eventual stucco after the door is in.
Thanks to all for the advice. Stay tuned for the pictures.