Hello everyone, I’m sure this will seem very simple to most of you but as I’m relatively new to the biz I’d appreciate some feedback on a small project.
I am finishing a gas fireplace surround and would like to create a more built-in look by flanking some niches above and on either side of the fireplace. I have two 16″x32″ rough openings to work with.
I realize I will need to screw in a basic box for each of the niches however I’d like to maximize this small space. If I use 3/4″ plywood for the box and line it with 1/2″ drywall, mud and corner bead I will loose approx. 2 1/2″ of width and height leaving me with a considerably smaller finished opening.
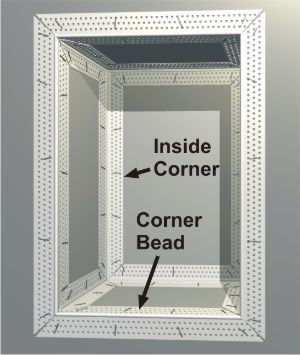
Is 3/4″ plywood a little overkill for such small niches? I was thinking of using MDF originally and just creating built-in shelves but got some great ideas from the folks at Trim-Tex (see pics below). I really like the bullnose corner bead and drywall finish as it creates a more architectural look.
I guess my basic goal is to maximize space but using drywall will mean I require 2 layers (ply and drywall) Any thoughts? I got the pics from www.trim-tex.com – hope they don’t mind!
Mike


Replies
In this surround the wall is built out, over the fireplace? Take a pc of ply for the back and screw it to two blocks that will fit between studs to either side. Slip that in the opening and fasten the blocks to the stud. Sheetrock the back with glue, the sides and bottom. Apply the bead, mud up.
Remodeling Contractor just outside the Glass City.
Quittin' Time
Thanks for the tips.
To answer your question, the fireplace sits 15" away from an exterior concrete pony wall in the 3rd level of a 4 level split. The fireplace is in the middle of an 8' wide by 8' high new surround that I have framed out and finished with dw. I have left a large open drywall area above the fireplace and in between the niches for artwork.
Would you use staples to attach the corner bead as in the photos? Also, would you use inside corners or just dw tape?
Mike
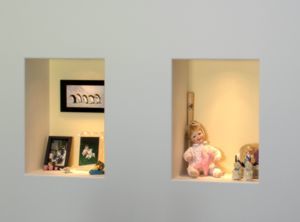
First time poster here, look out...Here's a few shots of an arched niche I did with just drywall, a "floor" of MDF, and studs. If you're never going to put anything heavy or anything with a point load, like an upside down lead-filled crystal pyramid ;-) then you'll be fine.I used flexible drywall for the upper part of the niche, but still had to kerf the back several times to make this radius. I used flexible corner bead around the arched part of the opening and it worked very well after a few cuts in the outer edged to make it bend rather than kink around the radius.I layered the bottom of the opening in MDF rather than drywall for better dent resistance and allowed the front edge of the MDF to wrap around the opening slightly, then placed some moulding under that edge to give it a more finished look.The switch for the light is recessed at the back left of the MDF, barely visible in one of the finished pistures, and is out of view unless you walk up to the niche, stand on your toes, and look in the back.I think the staples are fine, and I just used tape for everything but the outer radius.BTW, this was one of my very first projects requiring framing, and I have learned MUCH since then, so don't look at that part too closely.
Hi TW, I couldn't believe your post as this is exactly what my dilemma is. Thanks for your post - pictures speak a thousand words.
I agree that there will not be any significant point loads in this small space but you have a good point about the dw being dented and/or damaged if it is used for the base of the niche. I believe this space could be used for books perhaps.
I'm also thinking that with this small space, maybe I should be switching to low voltage puck lights instead of the 3" halogen can lights.
My one big question though: did you tape and mud the dw sides to the MDF base? I was leary of the MDF swelling but it looks like you were successful.
Thanks again, great pics.
Mike
Jeez, what in the world am I doing up this late???I dw'd the sides, then two coats mud, then laid in the MDF piece over the studs below it. Then came the final coat of mud, then I caulked the gap between the dw and the MDF, then painted the dw sides in beige and the MDF in gloss white to match the other trim. So, to answer your question, no, I didn't tape to the MDF, just used caulk to fill the small gap and painted over that. I would be a little leary of the swelling, too, now that you mention it, but it never occured to me back then in my rookie days.My can light gets warm, but not so much as to worry me, and I'm the worrying type sometimes. We usually only have it on for guests, anyway.Hope that helps, feel free to ask some more if ya like...
Thumb, welcome to breaktime. When you post pictures, for the benefit of those of us on dialup, keep the size smaller. Around 100 or lower kb's.....but I made the mistake b/4=-the small "b"s
thanks.Remodeling Contractor just outside the Glass City.
Quittin' Time
You could use staples, I have. You need to make sure the staples are in all the way, the bump on the bead isn't that pronounced and you don't want to run into the staples. I've taken to using Trimtex spray adhesive for alot of plastic trims (tho not necessary here). Works well. Spray both the plastic and the sheetrock. There's a directional fan spray on the can, not very messy at all.
I also use original Durabond for all trims. It's a setting dry "you have to mix" compound. Dries super hard so don't leave more than you want on the wall. For a small niche, you might want to use it just on the surface, regular setting mud in the alcove.
We used to see those in alot of houses, the fancy doorbells were in there, with the long pipes. Also saw them as sort of Virgin Mary alcoves, not unlike the buried bathtub in the front yard.Remodeling Contractor just outside the Glass City.
Quittin' Time
Could you use MDO for the back, attached to the studs with blocks, then drywall the sides and caulk the seams?--MDO would take paint nicely and wouldn't be as thick as a layer of MDF or plywood with drywall over it.
Thanks for all the feedback, and especially the photos. As I am trying to stay fairly contemporary, I really wanted a clean look without any casing (no offence Piffin). I came up with a simple compromise: build the boxes out of 1/2" plywood instead of 3/4" and use 3/8" d.w. instead of 1/2".
For a 16" rough opening, this made enough of a difference that I am quite happy with the finished product. I just need to put on the corner bead, mud, prime and paint.
Just out of curiosity, what on earth would anyone use 3/8" d.w. for??? You look at this stuff and it dents. I can't imagine putting that on a wall, but seemed to work well for this small project.
Mike
Mainly 3/8" is either used as a second layer, over 1/2" or 5/8", or it's used instead of skim coating where and old wall is botched up, or in remodeling we've used it a lot where the second layer of drywall was glued without nails or screws to a first layer that was nailed. The second layer loosens after many years and so you either screw it back up, or like in a bathroom ceiling where you are putting in new lights and such, it is easier to remove the old second layer and replace it. Aren't you glad you asked?
Does it need to be sheetrockED?
I have build five or six similar to these in photo. You can do it without the pedimented cap and just picture frame casing to match what is in your house.
Also, Fypon has some foam prebuilt ones, and I believe outwater does too. It seems like I haver also seen a plastic ( PVC?) box advertised that staples in before hanging the rock on the main wall.
Welcome to the
Taunton University of Knowledge FHB Campus at Breaktime.
where ...
Excellence is its own reward!
I've done them a couple of different ways. I bought some from Outwater Plastics - worked out really well as I had to put several niches in every other bay in a wall - the fancy trim was important to that cutomer.
I did a small shrine niche using a medicin cabinet.
I did a couple of plain drywall niches by bonding 3/8" drywall to 1/4" ply for the sides and just the drywall bonded to the back of the opposite wall for the niche's back - all surfaces made whole with Polyfix - results okay
Given a choice, the Outwater products is heads above making your own.
Phill Giles
The Unionville Woodwright
Unionville, Ontario
Why are you using DW in the first place?
When facing this feature I make a 3/4 MDF box with glue and screws and slide the box into the wall , nail off the sides to the studs and have a brace in the back to nail to or a cleat the rest the box on.
If you are so motivated pre-prime the MDF then build it --save you a whole lotta taping time, pre-primed is about as easy as it is going to get , and you have the option of trimming out the face or taping it in,
Maybe I am missing something but taping all those corners for a wall niche seems to be a heffty price to pay.
Mike
Adam Savage---Mythbusters
Hi Mike, I enjoy working with MDF as it is very versatile however I wanted to avoid having to trim out the front of the boxes that are on the fireplace wall so I opted for DW. Not that I dislike casing however this provides a more contemporary 'clean' look.
Maybe I misunderstaood you but were you suggesting using MDF for the box and taping/mudding that to the dw front?
Mike
Yes, you can do it either way case or tape. I have done both in niche and windows ( usually basement egrees or hopper)Pre-prime, build, install, tape ( I prefer metal corner cause it has a smaller profile ) and paint, oh yeah don't forget Enjoy,Mike" I reject your reality and substitute my own"
Adam Savage---Mythbusters
Hi Mike, this is the first time I've ever heard of anyone taping/mudding to MDF. Is it just me or has anyone else done this? No swelling? (I guess the priming takes care of it). I think this could be it's own FHB article.....
Thanks for your feedback Mike!
M.
Edited 4/1/2005 5:55 pm ET by MG911
MG,
Never thought I would come up with a new one--don't recall if I saw it somewhere or if i came up with it on my own.I have done it both ways-primed and raw and have not had any problems, I have a sheet of primed stuff on hand and use it when I am doing niches-as a favor to my painter who primed it for me so he wouldn't have a million corners in 2 square feet.The one thing you do have to use is tape on corners because the MDF is so hard that a stapler will leave them proud and you can't nail the stuff with a DW nail.Give it a try and you may be surprised at the results. Mike" I reject your reality and substitute my own"
Adam Savage---Mythbusters