How to build exterior walls directly on stem walls without a floor
I’m seeking some advice/guidance on how best to build exterior walls without the ability to build it on a floor or ‘stand it up.’ The property is tight and there’s no surface to build a wall (in, say a backyard), and move it onto the stem wall.
I’m mostly working alone with the help of friends for days that require extra sets of hands.
More context: I’m renovating an old house and adding to it. The hold house had no crawl or foundation (rotten/eaten wood on bricks), and so I’ve removed the old floor system, excavated a bunch of dirt, poured new foundation under the old house walls, and made way for a new slab to be poured under the old house. The new (heated) slab will become the finished floor surface.
Because I’m also adding to the footprint of the house, I’ve been advised to wait to pour the interior slab until it all can be under roof and in one continuous pour. In order to do that means that the addition will need to be framed without a solid floor surface—building straight up off of the stem walls.
I would welcome any advice on how best to accomplish this. I’m curious about what techniques I might use to make sure it’s level and straight. I haven’t found much out there on the internet about framing in this type of situation—or maybe I’m not searching for the right thing.
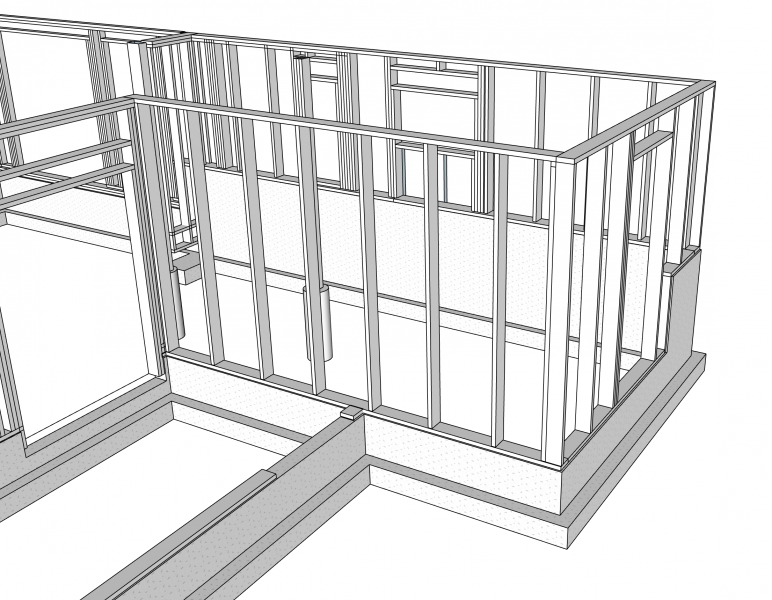
Included a drawing of the 1st floor framing atop the stem walls of the addition.


Replies
Issue 114 of FHB or an old Audells.
Thank you so much for this reference. Really helpful.
https://www.finehomebuilding.com/1998/03/01/the-process-of-balloon-framing
I think you're making this harder than it needs to be. There is nothing wrong with pouring the slabs at different times, it's a typical construction technique used every day. Pour you footers and floor and build your walls the conventional way.
Ok. The builder who advised me to pour the slab under roof said it would help ensure that we can control for temperature and weather so that we can achieve the concrete finish we're going for. We won't be covering the slab with anything, but will be doing a 'partial exposed' finish appearance - as shown in picture.
Do you think a cold joint with this type of exposed concrete floor presents any cosmetic challenges?
Would be much easier to have a slab first, so your input is making me rethink this. Thank you!
Greetings
sitting in a remote corner of New Mexico and cannot get good enough service to see florida's link.....but,
Plate the stem wall, make up a corner and plumb and toenail it held by braces. Go down the layout and install a stud cut level with your corner. Brace that, fill in and toenail the remaining studs/openings and continue. With the corner and one stud placed you can string line the top to measure remaining studs. Plumb that wall, brace it and plate it. Continue around the perimeter. Dbl the top plate as you can"
with good bracing and accurate measurements, you need no helpers.
Thanks calvin. One question... after i go down the layout and install a second stud and brace it (same length & level with corner brace), should i put the first top plate on and fill in remaining studs under it? (i know the top plate would be bowing down a bit after first being installed) Or, rather am I bracing each of the studs then installing a top plate? Seems like a heck of a lot of bracing, if I were to do each stud. If I instaled a top plate that was a pretty good straight piece of lumber, then could I think I could just plumb the middle section of the wall with fewer braces because the studs would be connected together with the top plate. Does that sound right?
Thanks so much for your thoughts on this. I will be starting this work on April 3rd 2018. Here's a picture of the wall I'll be starting on:
Scuze please
On this iPad with Safari, your picture is so big that every other post in this thread is my-noot!
so, could you edit the pic smaller? This forum software sucks.
i string line after plumbing and bracing the two studs at each end of the wall. I measure length of each stud in between (to the line), write the list and cut. I then lay what plate length I can on top and then fit the studs according to layout, toenailing the bottom and nailing the top through the plate.
If there's spelling errors I apologize, the type on this iPad look like pepper. Not even coarse ground.