Hello,
I’ve attached a picture of the exterior of our house. This area is on our back patio, and you can see that the paint is peeling and it seems to be getting moldy. This area faces west but the patio has retaining walls on three sides. We haven’t had rain in 2 or 3 months. What is the best way to fix this damage and to prevent it from recurring?
Many thanks.
Jocelyn
Edited to delete huge jpg. See below.
Edited 9/18/2005 5:38 pm ET by jocelyng


Replies
Here.
View Image
Edited 9/18/2005 5:24 pm ET by bbqjason
Edited 9/18/2005 5:25 pm ET by bbqjason
Thanks for doing that. I'll make sure that DH sends me a smaller file next time!
Jocelyn
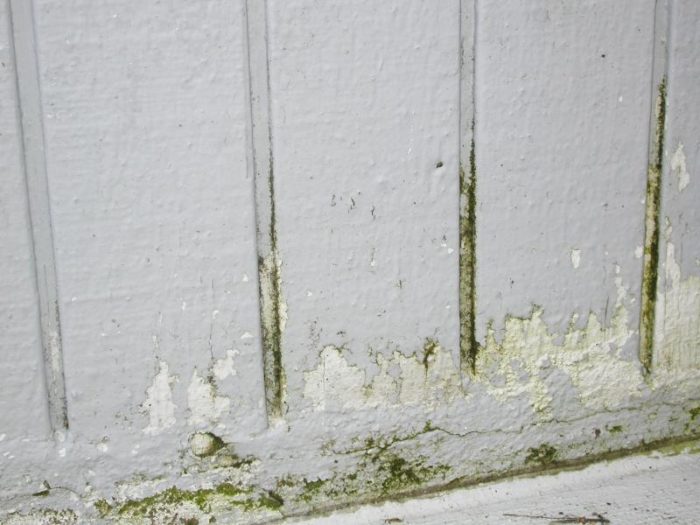
Is that T-111 siding and a concrete patio?
What condition is the siding in? Rotted? Solid?
I don't know what T-111 siding is. Yes, it is a concrete patio. Most of the siding is in good shape, but it doesn't appear to be rotting. There is that mold or moss in the recesses.
Thanks.
Jocelyn
Edited 9/18/2005 7:58 pm ET by jocelyng
I'm not sure, but it looks like the siding is making direct contact with the concrete. I don't know if that's bad, but it's possible the bottom edge of the siding is not properly sealed. You're getting moisture infiltration somewhere, it's possible that it could be coming from the inside, but it's most likely from outside. Does water collect there after it rains? Does the area recieve any direct sunlight?
Figure out why you have a moisture problem and solve it. Make sure the siding is still sound, and if you have to remove any material check the framing behind the wall for rot. I would clean the area...scrape all peeling paint, remove all caulking in the problem area, clean and scrub with TSP, or a bleach solution like Jomax. Feather in the edges with sandpaper. Prime with two or more coats of quality oil base primer, seal all joints (caulk) with a quality sealant like PL polyurethane masonry sealant. Finish with a quality exterior latex paint.
That's something, but maybe not what you need. Some of the more educated around here may be able to help you better.
OK, it is a little hard to see exactly what this is. Probably originally the T-1-11 which is a 5/8" thick plywood formed to look like a reverse board and batten siding. It was often used as both sheathing and siding in one, but sometimes as an accent like you seem to have, in conjunction with other sidings on the same house. When used as a combio, it was nbecause the builder was looking for the cheapest way to go, hence the reputation it has, but if used properly, it can last for a generation. The most common problem is delamination of the plies ( layers) that make up the panels.The failing showing in your case is most likely, in my never so humble opinion, to be due to the fact that no wood ( other than specially treated stuff) should ever be used in direct contact with concrete.
Even if it never gets rained on, it will attract and wick condensation and ground water and waste away. THE FIX
Here is what I would consider - keep in mind that I am not there and cannot see everything - See the attached drawing - I would make a straight horizontal cut with my skil saw high enough up - say 6 - 8 " to get rid of the rotted and delaminated siding, setting the depth of blade so it only cuts the siding and not any underlying sheathing or studding.Then I would fit a prebent metal drip cap up under the T 1-11 and fill the space below with a cedar 5/4 x 8 or whatever size is needed. I would prepaint that piece of cedar on all surfaces before nialing it in, lifting it tight to the bottom of the siding and leavinga space under it to keep it from having direct conmtact with the crete. Before placing all of that, I would inspect what shows once the ripped strip is removed, and use a strip of tarpaper or Vycor to protect the bottom of the all before patching things back together
Welcome to the Taunton University of Knowledge FHB Campus at Breaktime. where ... Excellence is its own reward!
I'd love to take a look if you can downsize this jpg to about 1/20th as large and then repost it. That would take a half hour for me to download it is so big
Welcome to the
Taunton University of Knowledge FHB Campus at Breaktime.
where ...
Excellence is its own reward!
See above. Let me know what you think.
Jocelyn
From the picture it looks like the siding is T-111, which is only a cheap, temporary material. Once decay begins the material crumbles and is, unfortunately, unrepairable. The only remedy is to reside with something that can handle the weather.
There are many good materials. One that can maintain that style is fibercement in sheet form. James Hardie is one manufacturer that make it in 4 x 8 sheets in the T-111 pattern. They also make all sorts of other styles, including shingles, clapboards, and others. Vinyl is another durable, and lower cost material. Stucco may be appropriate to your architectural style, though is has less resistance to earthquakes than the others. The Hardie material, if used in sheet form, can add considerable strength to a structure.
Hardie's website is http://www.jameshardie.com
I'm not sure what you mean by "temporary." The house was built in 1989, and this is the only part of the house that has this. There is some concrete foundation that is in between the bottom of the siding and the patio. Water might collect there, I'm not actually sure. We hardly go out on the patio in the rainy season. Assuming that it isn't T-111, what can I do to repair this? If we did re-side the house, would it be hard to match with the existing? Re-siding the entire house is out of the question.
Jocelyn
Jocelyng
If it is T-111 siding and that's the only place on the house that has any damage you can just replace the bad area and paint to match, provided that that area is rotted.
If the sidings been on since "89" and that area is all thats bad I dont think your in that much trouble. I'd probably just repair/replace and re-paint.
I don't think T-111 is anymore temporary then vinyl siding, JMO.
Doug
its looks like the masonite material used around here. and yes , it would be replace and repaint. I think I would go back with concrete board
By temporary I mean that the material is cheap and unsuitable for outdoor applications. It is marketed for outdoor use, but really is junk. If you replaced it with a similar material you'd only get another 10 years out of it.
If your budget is limited could you perhaps replace only the one wall with a different material?
There very well could be water damage deeper into the structure, so at the very least you should not try to repaint what is there.
Sorry for sounding so pessimistic, but the photo shows the story.
If I replace the one area in a different material, it would be hard to match, right? I fear a snowball thing where we end up replacing all of the siding, which would be a huge expense (big house).
Jocelyn
Just replace existing w? same but this time before installingback and end prime with an oil base primer (two times).Then use a good polyurethane caulk at the bottom edge.And use the real wood t-1-11. Not the masonite or chip board.
Since we didn't build the house, how do I find out what we currently have? Should I just call a general contractor to have him come out and see what he thinks it is (and hopefully will know where to get more)?
Thanks.
Jocelyn
Your siding product is hidden under what appears to be a thick coat of paint but the horizontal surface striations that are visible and the width of the grooves leads me to believe you have T1-11 with the grooves 8" on center. The material would be 5/8" thick and be panels 4' wide by 8' tall and maybe fir or cedar.
The bottom of the panel appears to be resting on a slab or footing and is slightly recessed with an extreme amount of caulk?? along the edge placed to shed water over the edge of the slab. The discoloration appears to be algae.
The panal can be stabbed with a sharp instrument (screwdriver) to detemine if it is rotten.
Repair would be to cut the bottom off the panel, about a foot, apply z-flashing to the cut after a thorough prime and paint of the edge, add a replacement piece primed and painted all around and place over a length of flashing that would overhang the slab edge and go up behind the new piece. Leave a gap between the bottom of the new piece and the flashing over the slab.
Also, the house wrap or felt would overlap the lower slab flashing before you replaced the siding.
Oy vey.
Jocelyn
How 'bout that! three different cormners of the country and we come up with pretty much the same solution
Welcome to the Taunton University of Knowledge FHB Campus at Breaktime. where ... Excellence is its own reward!
how do I find out what we currently have?You can take a srewdriver and probe in the most rottenpart and possibly tell from that.Also what Ralph Wicklund said but the only thing I woulddo different is replace the whole pcs. instead of patching.
>>By temporary I mean that the material is cheap and unsuitable for outdoor applications. It is marketed for outdoor use, but really is junk. If you replaced it with a similar material you'd only get another 10 years out of it.It looks cheesy, but if handled and detailed correctly, it can last.The application shown has something mudded along the bottom.That is not proper detailing.
View Image
Sojourners: Christians for Justice and Peace
At one time we did all rot repair on federally owned properties in several western states. Your situation is pretty common. One relatively quick, decent way to fix the problem would be to saturate the lower portions of the siding with a two part epoxy, such as West System. We have also used a two part system from a company in Seattle, I believe their website is rotdoctor.com
The solvents used to carry the epoxy into the wood are very unpleasant smelling, but evaporate quickly, outdoors it isn't much of an issue. If you apply enough to achieve saturation, it won't rot any more, and as long as there is some wood fiber there to act as a "form" to hold some epoxy, it will end up being stronger than the original material. We've used plastic to build forms around beams on older, historic homes in the northwest. Many of these beams extended beyond eaves, and the with continued wetting, the rot traveling inward, well into the living areas. Some of these beams were as large as 14"x14". As long as there is enough wood, even rotted wood, to hold the epoxy mixture in, or you can create a temporary form for holding it in, the end results are great. Once it has cured for a couple of days it can be easily sanded, once it is fully cured it usually takes much more agressive action to remove material.
On our new craftsman style home that have knee braces, we saturate the members with epoxy prior to painting and installation, and they will never rot. Some of the modern wooden boat builders that utilize epoxy construction have their boats considered as composite construction by the majority of insurance companies. Using epoxy to repair your area, and to keep it from happening again, may be something to consider. T111 isn't the best siding material, but if you have a localized problem with moisture, it shouldn't be a big deal. It looks like your siding was cut too close to the slab, or perhaps the slab was put in later. A little splashing or water build up will cause rot in short order.