FHB Logo Facebook LinkedIn Email Pinterest Twitter X Instagram Tiktok YouTube Plus Icon Close Icon Navigation Search Icon Navigation Search Icon Arrow Down Icon Video Guide Icon Article Guide Icon Modal Close Icon Guide Search Icon Skip to content
Subscribe
Log In
  • How-To
  • Design
  • Tools & Materials
  • Restoration
  • Videos
  • Blogs
  • Forum
  • Magazine
  • Members
  • FHB House
  • Podcast
Log In

Discussion Forum

Discussion Forum

How to flash dormers when replacing a roof without replacing the siding

flyian | Posted in General Discussion on January 29, 2016 04:48am

I recently had my roof replaced.  I’ve had a running arguement with the contractor about how to properly flash where second story dormers intersect first story roofs.  The photo of my roof below shows many such intersections:

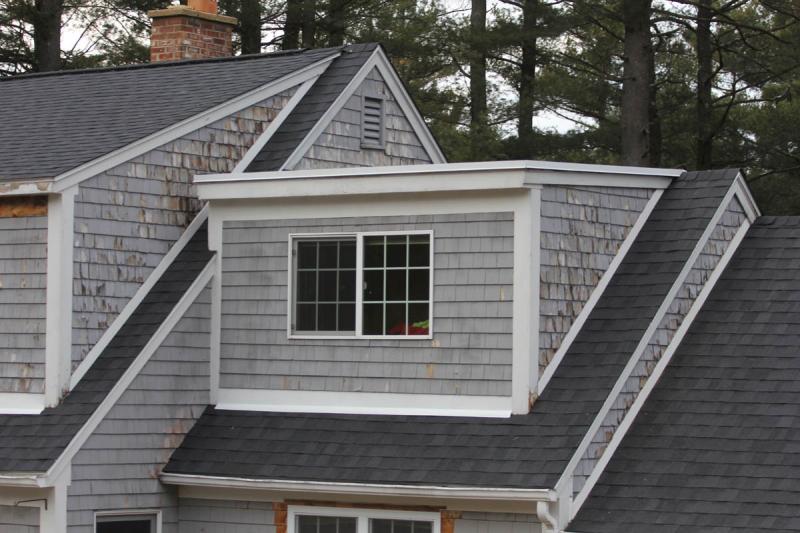
You’ll note that where the second story walls meet the roof at their base approximately 3″ of siding has been removed to allow new flashing to be installed.  PVC trim is then installed over the flashing.  This was to avoid residing the second story of the house as part of the roofing project.

The question or concern I had was how to make the joint where the bottom of the siding on the dormers meets the top of the PVC trim weather tight.  On his initial visit the contractor described how this was to be done, which I have diagramed below. (It has been pointed out to me that what I refer to as “drip edge” is more correctly called “drip cap”)  

Since that first conversation, and after the job was completed, the contractor has insisted drip cap was never part of the contract.  They claim to have never even mentioned drip cap in our initial conversation.

So how is the intersection of the siding and the PVC trim supposed to be made weather tight, I asked?

I was told that the siding, being thicker than the PVC trim, provides an overhang making the seam weather tight. 

The contractor was nice enough to caulk all the intersections until such time as I can replace the siding and install drip cap.  They have also offered to do that work for me for an additional fee.

The question remains, how should the intersection of siding and PVC trim be made weather tight?  I don’t buy the overhang concept, and don’t think caulk is much of a long term solution.

Help!

Thanks in advance…

Ian

Reply
  • X
  • facebook
  • linkedin
  • pinterest
  • email
  • add to favorites Log in or Sign up to save your favorite articles

Replies

  1. TommH | Jan 29, 2016 06:32pm | #1

    Flashing

    Your diagram shows exactly how it should be done if you are going to use a piece of trim (water table), as shown. The key is the flashing. Without it, water will inevitably work its way in towards the wall. The caulking probably makes matters worse because water still gets into the small space between each shingle and the caulking will trap it there. The best approach would have been to simply remove the first 2 rows of wall shingles, install appropriate flashing between the wall and roof, and then replace the shingles (leaving a healthy gap between the bottom of the shingles and the new roof shingles.)  Removing and then replacing the sidewall shingles is a PIA and maybe your carpenter thought his approach was easier. But, once he had the area prepped to install the trim, it should have been no problem to push the flashing into place before installing the trim board.(Is that how it was originally, i.e. no trim piece between the roof and wall shingles?) 

    1. flyian | Jan 31, 2016 10:24am | #4

      Thank you very much for the comprehensive response.  

      You're right, I think the contractor thought removing 3" of siding to install the new flashing then cover it with trim was easier, especially when I previosuly had trim in that same location but over the siding.  (That it would seem was a really poor way to do things!)

      The contractor said the shingles were very brittle.  He also said the siding fasteners made it impossible to push the drip cap up behind the siding.

      I am coming to the conclusion that the best solution will be to remove the trim and the siding, then reinstall new siding.  This time without the trim.  The areas are relatively small, so I'm hoping it won't be too big a project.  I hope to address it this summer.

      That will lead to the question of how to I prepare the experior wall for the new siding?  I assume its just plywood sheathing, and that I will want to put some sort of abarrier over it before applying the new siding.  What type of barrier?  Will the space between the barrier and the siding need to be vented?  How do I vent a wall that begins at a wall/roof intersection?  So much research to do!

      Thanks for your input!

      Ian

      1. TommH | Jan 31, 2016 12:09pm | #7

        First, he does have a point about the fasteners making it hard (not impossible) to push the flashing into place. It can be done, but difficult (cut slots in flashing to let it slide past the fasteners, cut fasteners using sawzall blade slipped behind shingles, etc.). Best is to remove 2, or better,3, rows of shingles, get rid of trim board altogether, as you suggest. Then you don't neede this extra flashing; just the step flashing at the roof/wall intersection.  Make sure you place a piece of soft flashing (tar paper or peel and stick, I have used both) over the metal flashing at the roof/wall intersection (which I assume is properly installed step flashing) and under the existing wall tar paper, tyvek, typar, etc. Try to find article in FHB #202,p. 106 by Mike Guertin which deals with flashing issues for this type of wall/roof intersection.

        1. TommH | Jan 31, 2016 02:09pm | #9

          Mike Guertin Article

          Looks like Calvin found it for you!

          1. calvin | Jan 31, 2016 02:21pm | #10

            Dormer kick out flash .....

            is similar but different from sidewall flashing to direct water into the gutter.

            but the idea is the same-keep water from getting behind siding/trim/etc.

            most deteriorating vertical corners are caused by water/moisture getting in and not drying out.  Usually not an immediate and overwhelming leak, but more of a slow wetting and rotting.  Hardly anyone paints open grain that is stuffed down on a shingle before install.  

            But evidently time is money and few want to pay more and hope the guys know the real correct way.  If it looks good from the road, all seems well.

            best of luck

  2. mark122 | Jan 29, 2016 09:36pm | #2

    I second the previous comment. The diagram shows the proper way to do it. 

    What is his roof warranty?

    How did he flash the bottom left side of the roof (base of full dormer in the picture)?

    the over hang tale sounds like a load of crap.

    1. flyian | Jan 31, 2016 10:35am | #6

      Thanks for your response.

      He did not reflash the bottom left side of the roof as far as I can tell. The shingles at the wall/roof intersection are undisturbed.  He missed another spot, too.  I have brought this up with the contractor but have yet to receive a response.

      Yes, the roof has a warranty (which I have yet to see despite repeated requests for it) which they point out ends at the flashing. They take no responsibility for the integrity of the seam where the trim meets the siding.

      I agree, the overhang explanation is crap.  This explanation was from retrired contractor with decades of expereince.  He's the one who told me about the drip cap originally but  now claims to have never said anything about it.  

      Thanks for your help!

      Ian

  3. calvin | Jan 29, 2016 09:48pm | #3

    Ian

    while you're in the neighborhood, make sure there's some kick out flashing at the bottom corners of the dormers.  This is an area not often detailed poorly.  Long term slow leak, big time problem later.

    .

    1. flyian | Jan 31, 2016 10:34am | #5

      I want to make sure I understand your question.  Are your refering to where the 1x4" vertical pine trim on the corners of the dormers meets the first story, roof at the bottom of each piece of trim?

      If so, I've wondered about that too.  It would seem to me that the flashing should be continous behind both the siding and the trim.  Is that correct?

      Thanks...

      Ian

      1. calvin | Jan 31, 2016 02:02pm | #8

        Ian

        at the bottom of the dormer at the corner, there should be a pc of flashing that kicks out water to go around the corner trim.

        there should be a diagram here:

        http://forums.finehomebuilding.com/user/80/edit

        Plenty of reading at least.

        and this from Mike Guertin

        https://www.finehomebuilding.com/how-to/video/flashing-roof-eave-to-wall-intersections-with-kickout-diverter.aspx

Log in or create an account to post a comment.

Sign up Log in

Become a member and get full access to FineHomebuilding.com

Video Shorts

Categories

  • Business
  • Code Questions
  • Construction Techniques
  • Energy, Heating & Insulation
  • General Discussion
  • Help/Work Wanted
  • Photo Gallery
  • Reader Classified
  • Tools for Home Building

Discussion Forum

Recent Posts and Replies

  • |
  • |
  • |
  • |
  • |
  • |
View More Create Post

Up Next

Video Shorts

Featured Story

Scaled to Suit the Site

This thoughtfully designed home preserves the character of its neighborhood while maximizing space for a growing family through careful attention to scale, rooflines, and material choices.

Featured Video

SawStop's Portable Tablesaw is Bigger and Better Than Before

The 10-in. Jobsite Saw PRO has a wider table, a new dust-control port, and a more versatile fence, along with the same reliable safety mechanism included in all SawStop tablesaws.

Related Stories

  • Podcast Episode 684: Masonry Heaters, Whole-House Ventilation, and Porch Flooring
  • FHB Podcast Segment: Repairing an Old Home While Maintaining Its Integrity
  • Tools and Gear for the Moms Who Get it Done
  • An Easier Method for Mitered Head Casings

Highlights

Fine Homebuilding All Access
Fine Homebuilding Podcast
Tool Tech
Plus, get an extra 20% off with code GIFT20

"I have learned so much thanks to the searchable articles on the FHB website. I can confidently say that I expect to be a life-long subscriber." - M.K.

Get home building tips, offers, and expert advice in your inbox

Signing you up...

This site is protected by reCAPTCHA and the Google Privacy Policy and Terms of Service apply.
See all newsletters
See all newsletters

Fine Homebuilding Magazine

  • Issue 331 - June 2025
    • A More Resilient Roof
    • Tool Test: You Need a Drywall Sander
    • Ducted vs. Ductless Heat Pumps
  • Issue 330 - April/May 2025
    • Deck Details for Durability
    • FAQs on HPWHs
    • 10 Tips for a Long-Lasting Paint Job
  • Issue 329 - Feb/Mar 2025
    • Smart Foundation for a Small Addition
    • A Kominka Comes West
    • Making Small Kitchens Work
  • Issue 328 - Dec/Jan 2024
    • How a Pro Replaces Columns
    • Passive House 3.0
    • Tool Test: Compact Line Lasers
  • Issue 327 - November 2024
    • Repairing Damaged Walls and Ceilings
    • Plumbing Protection
    • Talking Shop

Fine Home Building

Newsletter Sign-up

  • Fine Homebuilding

    Home building tips, offers, and expert advice in your inbox.

  • Green Building Advisor

    Building science and energy efficiency advice, plus special offers, in your inbox.

  • Old House Journal

    Repair, renovation, and restoration tips, plus special offers, in your inbox.

Signing you up...

This site is protected by reCAPTCHA and the Google Privacy Policy and Terms of Service apply.
See all newsletters

Follow

  • Fine Homebuilding

    Dig into cutting-edge approaches and decades of proven solutions with total access to our experts and tradespeople.

    Start Free Trial Now
    • Facebook
    • Instagram
    • X
    • LinkedIn
  • GBA Prime

    Get instant access to the latest developments in green building, research, and reports from the field.

    Start Free Trial Now
    • Facebook
    • YouTube
  • Old House Journal

    Learn how to restore, repair, update, and decorate your home.

    Subscribe Now
    • Facebook
    • Instagram
    • X

Membership & Magazine

  • Online Archive
  • Start Free Trial
  • Magazine Subscription
  • Magazine Renewal
  • Gift a Subscription
  • Customer Support
  • Privacy Preferences
  • About
  • Contact
  • Advertise
  • Careers
  • Terms of Use
  • Site Map
  • Do not sell or share my information
  • Privacy Policy
  • Accessibility
  • California Privacy Rights

© 2025 Active Interest Media. All rights reserved.

Fine Homebuilding receives a commission for items purchased through links on this site, including Amazon Associates and other affiliate advertising programs.

  • Home Group
  • Antique Trader
  • Arts & Crafts Homes
  • Bank Note Reporter
  • Cabin Life
  • Cuisine at Home
  • Fine Gardening
  • Fine Woodworking
  • Green Building Advisor
  • Garden Gate
  • Horticulture
  • Keep Craft Alive
  • Log Home Living
  • Military Trader/Vehicles
  • Numismatic News
  • Numismaster
  • Old Cars Weekly
  • Old House Journal
  • Period Homes
  • Popular Woodworking
  • Script
  • ShopNotes
  • Sports Collectors Digest
  • Threads
  • Timber Home Living
  • Traditional Building
  • Woodsmith
  • World Coin News
  • Writer's Digest
Active Interest Media logo
X
X
This is a dialog window which overlays the main content of the page. The modal window is a 'site map' of the most critical areas of the site. Pressing the Escape (ESC) button will close the modal and bring you back to where you were on the page.

Main Menu

  • How-To
  • Design
  • Tools & Materials
  • Video
  • Blogs
  • Forum
  • Project Guides
  • Reader Projects
  • Magazine
  • Members
  • FHB House

Podcasts

  • FHB Podcast
  • ProTalk

Webinars

  • Upcoming and On-Demand

Podcasts

  • FHB Podcast
  • ProTalk

Webinars

  • Upcoming and On-Demand

Popular Topics

  • Kitchens
  • Business
  • Bedrooms
  • Roofs
  • Architecture and Design
  • Green Building
  • Decks
  • Framing
  • Safety
  • Remodeling
  • Bathrooms
  • Windows
  • Tilework
  • Ceilings
  • HVAC

Magazine

  • Current Issue
  • Past Issues
  • Magazine Index
  • Subscribe
  • Online Archive
  • Author Guidelines

All Access

  • Member Home
  • Start Free Trial
  • Gift Membership

Online Learning

  • Courses
  • Project Guides
  • Reader Projects
  • Podcast

More

  • FHB Ambassadors
  • FHB House
  • Customer Support

Account

  • Log In
  • Join

Newsletter

Get home building tips, offers, and expert advice in your inbox

Signing you up...

This site is protected by reCAPTCHA and the Google Privacy Policy and Terms of Service apply.
See all newsletters
See all newsletters

Follow

  • X
  • YouTube
  • instagram
  • facebook
  • pinterest
  • Tiktok

Join All Access

Become a member and get instant access to thousands of videos, how-tos, tool reviews, and design features.

Start Your Free Trial

Subscribe

FHB Magazine

Start your subscription today and save up to 70%

Subscribe

Enjoy unlimited access to Fine Homebuilding. Join Now

Already a member? Log in

We hope you’ve enjoyed your free articles. To keep reading, become a member today.

Get complete site access to expert advice, how-to videos, Code Check, and more, plus the print magazine.

Start your FREE trial

Already a member? Log in

Privacy Policy Update

We use cookies, pixels, script and other tracking technologies to analyze and improve our service, to improve and personalize content, and for advertising to you. We also share information about your use of our site with third-party social media, advertising and analytics partners. You can view our Privacy Policy here and our Terms of Use here.

Cookies

Analytics

These cookies help us track site metrics to improve our sites and provide a better user experience.

Advertising/Social Media

These cookies are used to serve advertisements aligned with your interests.

Essential

These cookies are required to provide basic functions like page navigation and access to secure areas of the website.

Delete My Data

Delete all cookies and associated data