Hey everyone.I recently bought a home that is roughly 100 yrs old,and after a few weeks of
Discussion Forum
Discussion Forum
Up Next
Video Shorts
Featured Story
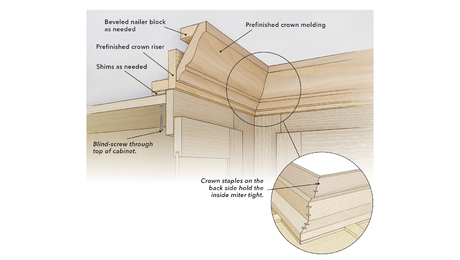
Use these assembly techniques when installing crown risers and molding to minimize visible gaps and nail holes.
Featured Video


Highlights


"I have learned so much thanks to the searchable articles on the FHB website. I can confidently say that I expect to be a life-long subscriber." - M.K.
Fine Homebuilding Magazine


Fine Home Building
Follow
-
Fine Homebuilding
Dig into cutting-edge approaches and decades of proven solutions with total access to our experts and tradespeople.
Start Free Trial Now -
GBA Prime
Get instant access to the latest developments in green building, research, and reports from the field.
Start Free Trial Now
- Home Group
- Antique Trader
- Arts & Crafts Homes
- Bank Note Reporter
- Cabin Life
- Cuisine at Home
- Fine Gardening
- Fine Woodworking
- Green Building Advisor
- Garden Gate
- Horticulture
- Keep Craft Alive
- Log Home Living
- Military Trader/Vehicles
- Numismatic News
- Numismaster
- Old Cars Weekly
- Old House Journal
- Period Homes
- Popular Woodworking
- Script
- ShopNotes
- Sports Collectors Digest
- Threads
- Timber Home Living
- Traditional Building
- Woodsmith
- World Coin News
- Writer's Digest

Replies
I've never done it with 3/8", but normally in a situation like this I'll simply rip a sheet of plywood (of appropriate thickness) down to strips, then fur the wall out with them, 16"oc. Goes pretty quick, and also makes hanging the sheetrock much easier, at least for me.
Edited 9/6/2005 10:43 pm ET by JeffSmallwood
I've never done it with 3/8", but normally in a situation like this I'll simply rip a sheet of plywood (of appropriate thickness) down to strips, then fur the wall out with them, 16"oc. Goes pretty quick, and also makes hanging the sheetrock much easier, at least for me.
I had a similiar scenario recently and did the same thing. Worked fine
-----------------------------------------------------------------------------
WWPD
If you think that is a hell of a lotta work, you own the wrong house. Furring wallsout is a half day job for each room is all. Easiest is to use lathe straight over the studs.
But you want to insulate first too, and check to see if the studding is plumb and if off, is it worth plumbing ( shimming to be plumb) at the same time you furr
Another i have done with this situation is this - Houses that old are also getting weak knees, meaning that the joints sometimes are no longer tight, nails are rusting out, etc, so they shak a bit when you slam a door and they no longer have the shear strength they once haad to resist wind loads, earth tremblors, etc. So I have relined the entire wall with 7/16" OSB for a shim, and then hung 3/8" or 1/2" ( as needed) sheetrock over it. That OSB under the SR does two things. One is that it resists racking in the wall while shimming out over the studs. The other is that it provides a good solid nailing surface for hanging art. No need to find the stud
Welcome to the
Taunton University of Knowledge FHB Campus at Breaktime.
where ...
Excellence is its own reward!
" Houses that old are also getting weak knees.....So I have relined the entire wall with 7/16" OSB for a shim, and then hung 3/8" or 1/2" ( as needed) sheetrock over it. That OSB under the SR does two things. One is that it resists racking in the wall while shimming out over the studs. The other is that it provides a good solid nailing surface for hanging art. No need to find the stud"
Great tip.
Have you used comealongs, etc. to try and take the worst of the rack or out-of-plumbness out before applying the 7/16" OSB?http://costofwar.com/
I have a whole collection of special plates, eyebolts, steel cable, chains, comealongs, eight to fifty ton jacks...I have taken a large house that was five inches lower on one side than the other and returned it to wioth an inch and a half. I have taken a 3" sag out of a 28 x 28 cieling by inserting a flush beam and transferring the load UP via steel to an inserted underslung beam.I have taken a house that had spread its footing apart( opposite of the norm - where the top plates bow out from rafters pushing with inadequate Rafter ties) by three inches, lifted enough to cable-yank it back together and set it down again. Once you get it back, you have to have a way to hold it somehow. Interior sheathing like this is just one trick
Welcome to the Taunton University of Knowledge FHB Campus at Breaktime. where ... Excellence is its own reward!
Cool. Stuff like that is magic to my ears. Doing the impossible.
One day soon, I hope to take a small one on... I've a customer who needs help with a 20'x22' 1.5 storey, 90 years old. It's sills and floor beams are on the original posts (crawlspace), and they've deteriorated....
We're looking at raising it, excavating, place on concrete/wood foundation = basement suite with windows and grade level entry at back. We hope to meet the City's bldg. insp. next week and find out if bylaws allow this. If it's a go-ahead, this would be my first one.
Nicest thing is that this is a great customer. Done work there each year the last 5 years.http://costofwar.com/
What about adding a backband of trim. Maybe 1/4 or 3/8" thick x 1" wide with a roundover edge.
"When asked if you can do something, tell'em "Why certainly I can", then get busy and find a way to do it." T. Roosevelt
I've gotta agree that shimming the walls shouldn't seem like all that much work if you've already committed to a gut rehab. Are you using a nail gun? If not, renting one for just this job would be worth it. Using the old lath will work, but unless you are extremely cost-sensitive the proposal to basically sheath the wall with OSB is a good one. It adds another layer (admittedly not a great one) of both thermal and sound insulation, in addition to strengthening the wall. Also, not only will it make haging art easy, it'll make hanging drywall easy, no more popped screw heads from missing the stud.
The OSB idea is a great one as long as you aren't the poor electrician that has to deal with cutting it and working behind it. I can hear it already - "F(((*&^$#n Breaktimers."
Thanks for the responses guys.So i guess the concensus is that furring out is the way to go rather than somehow trimming the frames.I thought about just covering the walls with some type of 3/8" sheet goods,whether OSB or 3/8" sheetrock,but I figured since i have a ton of woodlath,I might as well put it to good use rather than pay to have it taken away.That was also a good point about strenghtening the frame of the house and adding some lateral strength,I hadden't thought of that.Thanks again everyone. -jim
Just like doing the power rough-in before SR, we do the same when using the osb, but have to make it clear to sparky that the stand off is so thick
Welcome to the Taunton University of Knowledge FHB Campus at Breaktime. where ... Excellence is its own reward!
You could use some 1/4 ply wood and cut strips 1 1/2 inches wide, tack em on and sheet rock........that'd leave your doors 1/8 out, but you could deal with that.
I think the osb sounds like a good idea just for the strength, if you can afford the extra cost. Guess it wouldn't take much if its a small room?
That isn't ugly! Its custom!
Piffen, I do understand the stand off concept. That's the easy part.
I was thinking more of what happens when sparky decides that he needs to drill for an extra wire or add an outlet, for example. Then the osb is in the way, can't get to the studs. Could that be considered "payback" for all the times they screw up everyone else?
Don
screw-ups and changes always cost anyways. Better not to have any. Actually insertting an old workbox is easier than putting it into lathe and plaster or SR alone because theere is something solid to fasten to.You wanna hear a sparky scream? Use foam spraye dion place and then do a change order
Welcome to the Taunton University of Knowledge FHB Campus at Breaktime. where ... Excellence is its own reward!
I've done this more times than I can count. Like Piffin, I just fir out the walls with the appropriate thickness shims. I generally rip some CDX or PTS ply for shims. I set up my circ.saw with a rip guide, and make sure I cut enough for the job.
I don't have to worry about all those little nails in the lath, at 8' long, it goes up quick, and if you have some waves in the walls (if?), you can just get a couple different thickness plywoods. 30 # tar paper also works well for shimming, when you need just a little more .
Don't obsess about making your walls perfectly flat. 1/8" -3/16" is plenty good enough
Not in kitchen it isn't...
Welcome to the Taunton University of Knowledge FHB Campus at Breaktime. where ... Excellence is its own reward!
can't you just use longer drywall screws when your hanging the cabinets?I like the whole sheets of OSB idea, never thought of that.
Not the length of screw that matters, it's how you use it.A kitchen wall should be as near perfect as possible, plumb too. Saves a lot of work shimming and aligning the cabinets, but also in making the countertop look good. any "L" section of countertop needs two square walls to butt. An hour of shim work in the rough frame stage can save ten hours of cussing when it comes to installing the cabs and counters.My granite guy loves to install in one of my kitchens. He says nobody else in three counties lets him have a good wall and level base units to seat to.
Welcome to the Taunton University of Knowledge FHB Campus at Breaktime. where ... Excellence is its own reward!
Now for lesson Two in the fine art of kitchen hanging.
Learn it well, or I will have to hang you, too!;)have you ever come across the term Piffin Screws here at BT?Ya see, a SR screw is not a structural screw. It can and often will break at the shoulder when used in hardwood for hanging cabinets. I get piffed off when I take cabs down demoing for a remodel and discover that the original installer used SR screws and a third of them are broken, leaving luck to keep heavy dish laden units on the wall and not breaking somebody's bones.I know some guys call any phillips head screw a drywalll screw, which they are not, but please make sure that you use a screw rated for structural loads to hang your cabs. The metal in SR screws is too brittle, the shank too thin for the job.That's my hobby horse. haven't had a chance to rant about it for a while. Thanks for the opportunity!;)
Welcome to the Taunton University of Knowledge FHB Campus at Breaktime. where ... Excellence is its own reward!
PiffinThe drywall screw was a joke, I use them for temp jigs and drywall ONLY. I've seen jobs where people use them to toe"nail" studs when they didn't have enough room to conveniently swing a hammer...they were probably snapped when the siding was done, or at least the first time the wind hit 20 mph. I live in a windy, damp beach town in Mass and apparently, alotta guys think that the black coating makes them rust-proof and as such, excellent for exterior work as well. <G>P.S I have been reading and enjoying your knowledgeable and tongue-in-cheek posts for years, hence the original post, I know you love screws.
I didn't recognize ya!
Welcome to the Taunton University of Knowledge FHB Campus at Breaktime. where ... Excellence is its own reward!
ya got me there
Instead of wasting time and money with furring strips, you should do some trim bump outs. For some great ideas, see FHB#172. You really only need to make up about a 1/4 to 3/8 after sheet rock and mud. Not only will it save you time and money, it will really add that extra kick to the room.
Ocean State Builders, Inc.
Wilmington, NC
Fine Custom Framing and Exterior Trim
Could you describe that? Is it backbanding?
Welcome to the Taunton University of Knowledge FHB Campus at Breaktime. where ... Excellence is its own reward!
For a 100 year old house I like the osb idea.